
Popular categories
Looking for a yarn?


|
|||||||
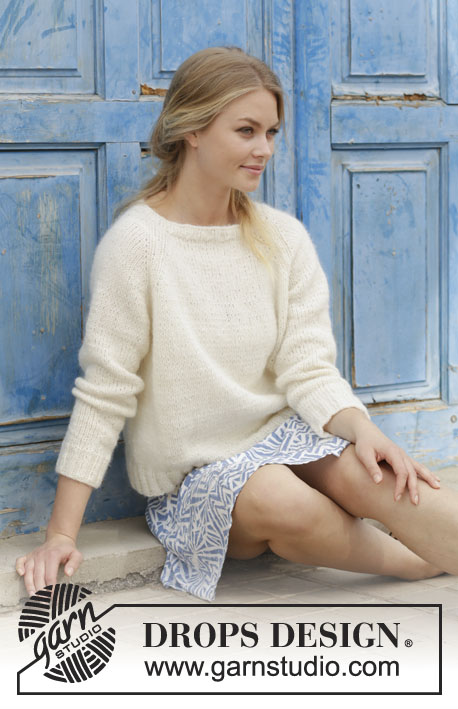
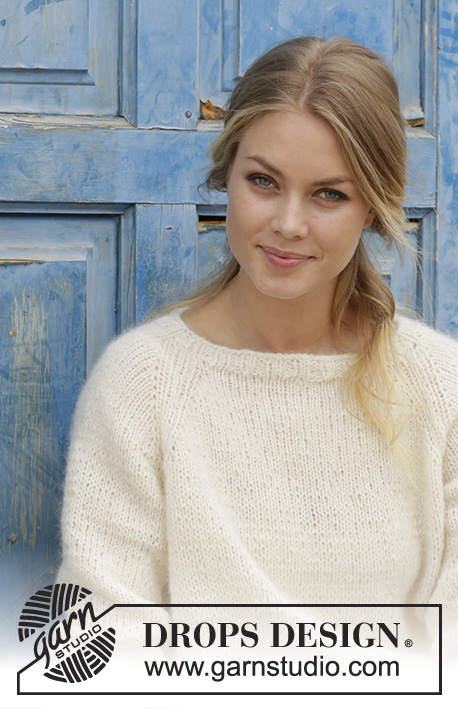
Carly Pullover |
|||||||
 |
 |
||||||
Knitted sweater with raglan, worked top down. Sizes S - XXXL. The piece is worked in DROPS Air.
DROPS 186-30 |
|||||||
|
INFORMATION FOR THE PATTERN: PATTERN: See diagram A.1. The diagram shows all the rows in the pattern seen from the right side. RAGLAN: Increase to raglan on each side of A.1 (= 8 stitches increased per round). Increase by making 1 yarn over, on the next round work the yarn over twisted to avoid a hole. INCREASE TIP (evenly spaced): To work out how to increase evenly, count the total number of stitches on the round (e.g. 168 stitches) and divide by the number of increases to be made (e.g. 24) = 7. In this example, increase by making 1 yarn over after every 7th stitch. On the next round, work the yarn overs twisted to avoid holes. DECREASE TIP (for sleeves): Decrease 1 stitch on each side of the marker thread as follows: Work until there are 3 stitches left before the marker thread, slip 1 stitch as if to knit, knit 1, pass the slipped stitch over the knitted stitch, knit 2 stitches (the marker thread sits in the middle of these 2 stitches) knit the next 2 stitches together. ---------------------------------------------------------- The piece is worked in the round with circular needle from mid back, top down. The sleeves are worked with short circular needle/double pointed needles. SWEATER: Cast on 80-84-88-96-96-104 stitches with circular needle size 4.5 mm / US 7 and Air. Knit 1 round, then work rib (= knit 2 / purl 2) for 2 cm / ¾". The beginning of the round = mid back. Change to circular needle SIZE 5.5 mm/US 9 and work the next round as follows: Knit 15-16-17-18-18-20 stitches - AT THE SAME TIME as you increase 2-1-2-2-2-3 stitches evenly over these stitches, knit 10-10-10-12-12-12 stitches, knit 30-32-34-36-36-40 stitches – AT THE SAME TIME as you increase 4-2-4-4-4-6 stitches evenly over these stitches, knit 10-10-10-12-12-12 stitches, knit 15-16-17-18-18-20 stitches – AT THE SAME TIME as you increase 2-1-2-2-2-3 stitches evenly over these stitches = 88-88-96-104-104-116 stitches. REMEMBER THE GAUGE! The next round is worked as follows: Knit 14-14-16-17-17-20 stitches (=half back piece), A.1 (= 6 stitches), knit 4-4-4-6-6-6 stitches (= sleeve), A.1, knit 28-28-32-34-34-40 stitches (= front piece), A.1, knit 4-4-4-6-6-6 stitches (= sleeve), A.1, knit 14-14-16-17-17-20 stitches (= half back piece). Continue this pattern at the same time as you increase 1 stitch on each side of A.1 to RAGLAN – see description above. Increase every 2nd round a total of 20-23-23-26-28-30 times. After all the increases there are 248-272-280-312-328-356 stitches on the needle. Continue with pattern and stockinette stitch (without increasing) until the piece measures 23-26-27-29-31-33 cm / 9"-10¼"-10½"-11½"-12¼"-13" from the cast-on edge mid front. Work the next round as follows: Work 39-42-43-48-52-57 stitches (= half back piece), place the next 46-52-54-60-60-64 stitches on 1 thread (= sleeve), cast on 6-6-10-8-10-10 new stitches on the needle (= under the sleeve), knit 78-84-86-96-104-114 stitches (= front piece), place the next 46-52-54-60-60-64 stitches on 1 thread (= sleeve), cast on 6-6-10-8-10-10 new stitches on the needle (= under the sleeve), and work the remaining 39-42-43-48-52-57 stitches (= half back piece). BODY: = 168-180-192-208-228-248 stitches. Insert a marker. THE PIECE IS NOW MEASURED FROM HERE. Continue in the round with stockinette stitch until the piece measures 25-24-25-24-24-24 cm / 9¾"-9½"-9¾"-9½"-9½"-9½". Knit 1 round where you increase 24-28-28-32-36-36 stitches evenly on round – read INCREASE TIP = 192-208-220-240-264-284 stitches. Change to circular needle size 4.5 mm / US 7 and work rib (= knit 2 / purl 2) for 5 cm / 2". Bind off with knit over knit and purl over purl - to avoid the bind-off edge being tight you can bind off with needle SIZE 5.5 mm/US 9 / US 9. The piece measures approx. 54-56-58-60-62-64 cm / 21¼"-22"-22¾"-23⅝"-24⅜"-25¼" from the shoulder down. SLEEVE: The piece is worked in the round with short circular needle/double pointed needles. Place the 46-52-54-60-60-64 stitches from the thread on the one side of the piece on circular needle/double pointed needles size 5.5 mm/US 9 and in addition cast on 6-6-10-8-10-10 new stitches mid under sleeve = 52-58-64-68-70-74 stitches. Insert 1 marker thread in the middle of the new stitches. THE PIECE IS NOW MEASURED FROM HERE. Work stockinette stitch in the round. When the piece measures 2 cm / ¾" decrease 2 stitches mid under sleeve – read DECREASE TIP. Decrease every 4-3-2-2-1½-1½ cm / 1½"-1"-¾"-¾"-½"-½"" a total of 9-11-14-15-15-16 times = 34-36-36-38-40-42 stitches. When the piece measures 36-34-33-31-30-29 cm / 14¼"-13½"-13"-12¼"-11¾"-11½" knit 1 round where you increase 6-4-8-6-8-6 stitches evenly on round = 40-40-44-44-48-48 stitches. Change to double pointed needles size 4.5 mm / US 7 and work rib (= knit 2 / purl 2). Continue with rib for 5 cm / 2", then bind off with knit over knit and purl over purl. The sleeve measures approx. 42-40-39-37-36-35 cm / 16½"-15¾"-15¼"14½"14¼"-13¾". Work the other sleeve in the same way. ASSEMBLY: Sew the openings under the sleeves. |
|||||||
Diagram explanations |
|||||||
|
|||||||

|
|||||||
|
Have you made this or any other of our designs? Tag your pictures in social media with #dropsdesign so we can see them! Do you need help with this pattern?You'll find tutorial videos, a Comments/Questions area and more by visiting the pattern on garnstudio.com. © 1982-2024 DROPS Design A/S. We reserve all rights. This document, including all its sub-sections, has copyrights. Read more about what you can do with our patterns at the bottom of each pattern on our site. |
|||||||


With over 40 years in knitting and crochet design, DROPS Design offers one of the most extensive collections of free patterns on the internet - translated to 17 languages. As of today we count 304 catalogs and 11422 patterns - 11417 of which are translated into English (US/in).
We work hard to bring you the best knitting and crochet have to offer, inspiration and advice as well as great quality yarns at incredible prices! Would you like to use our patterns for other than personal use? You can read what you are allowed to do in the Copyright text at the bottom of all our patterns. Happy crafting!
Comments / Questions (130)
Bonjour, Pourriez-vous fournir les explications de vos modèles avec des aiguilles droites ? Je ne comprends rien avec les aiguilles en rond. C'est décourageant ! Merci :)
31.03.2022 - 20:33DROPS Design answered:
Bonjour Anouchka, cette leçon explique comment on peut adapter un modèle pour des aiguilles droites; il peut être parfois plus simple de tricoter en rond, comme dans les explications, cette leçon et cette vidéo montrent par exemple comment tricoter un pull de haut en bas. Bon tricot!
01.04.2022 - 07:52Hallo! Na om hulp te hebben gevraagd van een vriendin weet ik inmiddels al hoe ik verder moet en zie ik dat ik het patroon helemaal verkeerd begrepen heb. Ik kan mijn eerdere vraag alleen niet verwijderen, dus doe ik het even zo!
16.03.2022 - 13:25DROPS Design answered:
Dag Iris,
Oh, mooi dat je verder kon en bedankt voor de terugkoppeling! Veel breiplezier. Je eerdere vraag had ik zojuist beantwoord, misschien dat iemand anders er nog wat aan heeft...
18.03.2022 - 08:53Hallo! Ik heb een vraag over het verdeeld meerderen aan het begin van de trui. Ik heb 96 steken op de naald staan (maat L) en moet nu afwisselend 8 en 23 keer meerderen tot ik 280 steken heb. Maar 96+186=282, dus ik kom niet op 280 uit. Ik kom ook niet uit de som om uit te rekenen waar ik de 23 steken verdeeld moet meerderen. Ik gebruik het voorbeeld om dit uit te rekenen en heb nu na de eerste ronde met 8 meerderingen 104 steken op de naald. 104/23 =4,52. Hoe kan ik nu verder? Dank alvast! :)
15.03.2022 - 15:15DROPS Design answered:
Dag Iris,
Het gaat goed tot en met dat je 104 steken hebt. Daarna meerder je niet verdeeld, maar meerder je voor de raglan, dus steeds aan elke kant van A.1 door een omslag te maken. Dit doe je (afhankelijk van je maat) 26 of 28 keer om de naald. Dus de ene naald wel meerderen aan beide kanten van A.1 en de andere naald niet meerderen.
18.03.2022 - 08:35Hei! Jeg har kommet til delen hvor arbeidet deles inn i bol og ermer (strikker str S). Skal A1 være med på forstykket og bakstykket, eller vil delingen skje midt i A1? Får ikke helt maskeantallet til å stemme dersom mønsteret skal være med inn i forstykket/bakstykket...
16.01.2022 - 16:05DROPS Design answered:
Hei Line. De fleste maskene av A.1 skal inn på forstykket og bakstykket, men noen få på ermene. Strikk 34 masker + 5 masker av A.1 (=halve bakstykket), sett siste maske av A.1 + 44 masker (1.erme) + første maske av neste A.1 på 1 tråd, legg opp 6 nye masker. Strikk de 5 neste maskene av A.1 + 68 masker + 5 masker av neste A.1 (= forstykket). Sett siste maske av A.1 + 44 masker (2.erm) + 1.maske av neste A.1 på 1 tråd. Legg opp 6 nye masker. Strikk 5 masker av A.1 + de resterende 34 masker (halve bakstykket). mvh DROPS Design
18.01.2022 - 11:07In the beginning should I cast stiches in to circular needle 4,5 size 40 or 80? It's not mentioned in the guide in english or in Finnish.
15.01.2022 - 08:07DROPS Design answered:
Dear Anni, you could use either one of them. Here, we start with 40 and continue with 80 later on, but you could always use the circular needles of 80 cm if you use the Magic Loop technique. Happy knitting!
16.01.2022 - 21:26I’m presently knitting the sleeves. My question is on the finished sleeve lengths. S to XXXL states 42-40-39-37-36-35cm. That makes no sense to me. It seems the smallest size has the longest sleeve. What am I missing?
06.01.2022 - 17:12DROPS Design answered:
Hi Nancy, The sleeve length measurements are shorter in the larger sizes due to wider shoulders and longer yoke in these sizes. Happy knitting!
07.01.2022 - 07:03Bonjour, j'ai un tour poitrine de 100 cm. Quelle taille dois-je choisir pour un résultat un peu ample comme sur la photo mais pas trop ? Merci et bravo pour la grande diversité de modèles que vous proposez !
08.12.2021 - 22:07DROPS Design answered:
Bonjour Stéphanie, mesurez un pull similaire que vous avez et dont vous aimez la forme et comparez ces mesures à celles du schéma, ce sera ainsi plus simple de trouver la taille qui vous convient. Retrouvez plus d'infos < a href="https://www.garnstudio.com/lesson.php?id=24&cid=8">ici. Bon tricot!
09.12.2021 - 07:33Hallo, in der Anleitung steht: "Im Muster glatt rechts (ohne Zunahmen) weiterarbeiten, bis die Arbeit eine Länge von 23-26-27-29-31-33 cm ab dem Anschlagrand hat..." Heisst das, dass ab hier nur rechte Maschen ohne das Muster A1 gestrickt werden? Vielen Dank schon einmal im Voraus für Ihre Hilfe!
07.10.2021 - 11:37Bonjour Dans mes favoris, ce modèle, comme d'autres, n'apparait plus en photo. C'est pareil quand je cherche des modèles, il n'y a plus de photo. Pouvez vous me dire d'où vient ce problème? J'aime beaucoup vos modèles ! Merci beaucoup. Je vous remercie, j'
27.09.2021 - 15:15DROPS Design answered:
Bonjour Françoise, nous avons eu quelques soucis d'affichage des images ce week-end, mais tout est rentré dans l'ordre; essayez de rafraîchir votre page et/ou supprimez vos cookies, ça pourra vous aider. Bon tricot!
27.09.2021 - 16:59Hej Drops. Fin bluse🧶 Er det ikke muligt at lave modeller, med ikke så stor omkreds. Hvis man strikker i small og er et lille menneske forsvinder man i blusen😊
02.06.2021 - 12:41