
Popular categories
Looking for a yarn?


|
|||||||
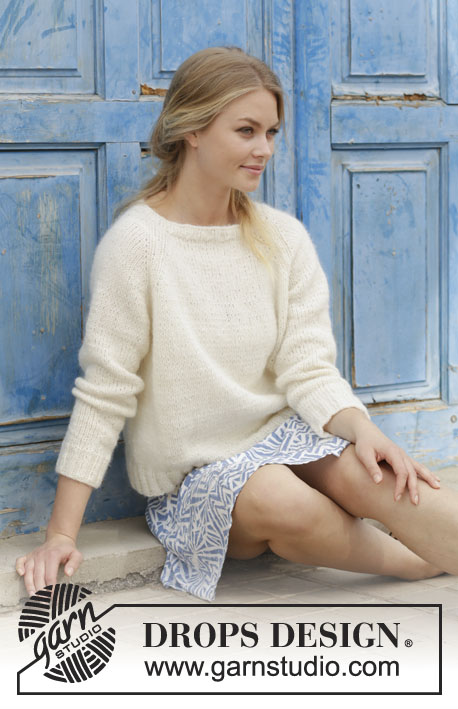
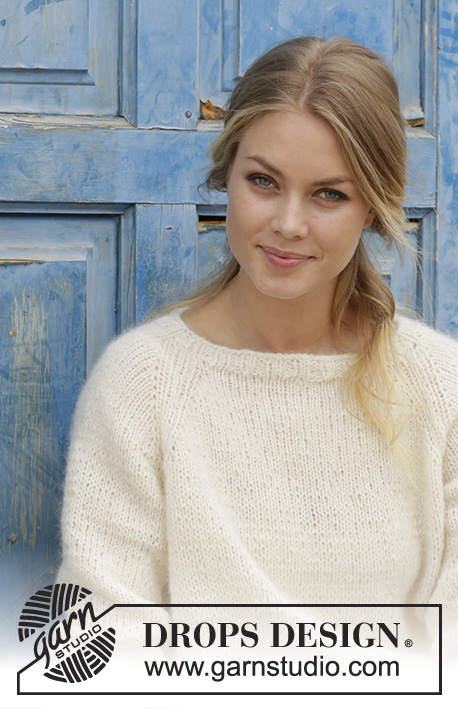
Carly Pullover |
|||||||
 |
 |
||||||
Knitted jumper with raglan, worked top down. Sizes S - XXXL. The piece is worked in DROPS Air.
DROPS 186-30 |
|||||||
|
INFORMATION FOR THE PATTERN: PATTERN: See diagram A.1. The diagram shows all the rows in the pattern seen from the right side. RAGLAN: Increase to raglan on each side of A.1 (= 8 stitches increased per round). Increase by making 1 yarn over, on the next round work the yarn over twisted to avoid a hole. INCREASE TIP (evenly spaced): To work out how to increase evenly, count the total number of stitches on the round (e.g. 168 stitches) and divide by the number of increases to be made (e.g. 24) = 7. In this example, increase by making 1 yarn over after every 7th stitch. On the next round, work the yarn overs twisted to avoid holes. DECREASE TIP (for sleeves): Decrease 1 stitch on each side of the marker thread as follows: Work until there are 3 stitches left before the marker thread, slip 1 stitch as if to knit, knit 1, pass the slipped stitch over the knitted stitch, knit 2 stitches (the marker thread sits in the middle of these 2 stitches) knit the next 2 stitches together. ---------------------------------------------------------- The piece is worked in the round with circular needle from mid back, top down. The sleeves are worked with short circular needle/double pointed needles. JUMPER: Cast on 80-84-88-96-96-104 stitches with circular needle size 4.5 mm and Air. Knit 1 round, then work rib (= knit 2 / purl 2) for 2 cm. The beginning of the round = mid back. Change to circular needle size 5.5 mm and work the next round as follows: Knit 15-16-17-18-18-20 stitches - AT THE SAME TIME as you increase 2-1-2-2-2-3 stitches evenly over these stitches, knit 10-10-10-12-12-12 stitches, knit 30-32-34-36-36-40 stitches – AT THE SAME TIME as you increase 4-2-4-4-4-6 stitches evenly over these stitches, knit 10-10-10-12-12-12 stitches, knit 15-16-17-18-18-20 stitches – AT THE SAME TIME as you increase 2-1-2-2-2-3 stitches evenly over these stitches = 88-88-96-104-104-116 stitches. REMEMBER THE KNITTING TENSION! The next round is worked as follows: Knit 14-14-16-17-17-20 stitches (=half back piece), A.1 (= 6 stitches), knit 4-4-4-6-6-6 stitches (= sleeve), A.1, knit 28-28-32-34-34-40 stitches (= front piece), A.1, knit 4-4-4-6-6-6 stitches (= sleeve), A.1, knit 14-14-16-17-17-20 stitches (= half back piece). Continue this pattern at the same time as you increase 1 stitch on each side of A.1 to RAGLAN – see description above. Increase every 2nd round a total of 20-23-23-26-28-30 times. After all the increases there are 248-272-280-312-328-356 stitches on the needle. Continue with pattern and stocking stitch (without increasing) until the piece measures 23-26-27-29-31-33 cm from the cast-on edge mid front. Work the next round as follows: Work 39-42-43-48-52-57 stitches (= half back piece), place the next 46-52-54-60-60-64 stitches on 1 thread (= sleeve), cast on 6-6-10-8-10-10 new stitches on the needle (= under the sleeve), knit 78-84-86-96-104-114 stitches (= front piece), place the next 46-52-54-60-60-64 stitches on 1 thread (= sleeve), cast on 6-6-10-8-10-10 new stitches on the needle (= under the sleeve), and work the remaining 39-42-43-48-52-57 stitches (= half back piece). BODY: = 168-180-192-208-228-248 stitches. Insert a marker. THE PIECE IS NOW MEASURED FROM HERE. Continue in the round with stocking stitch until the piece measures 25-24-25-24-24-24 cm. Knit 1 round where you increase 24-28-28-32-36-36 stitches evenly on round – read INCREASE TIP = 192-208-220-240-264-284 stitches. Change to circular needle size 4.5 mm and work rib (= knit 2 / purl 2) for 5 cm. Cast off with knit over knit and purl over purl - to avoid the cast-off edge being tight you can cast off with needle size 5.5 mm. The piece measures approx. 54-56-58-60-62-64 cm from the shoulder down. SLEEVE: The piece is worked in the round with short circular needle/double pointed needles. Place the 46-52-54-60-60-64 stitches from the thread on the one side of the piece on circular needle/double pointed needles size 5.5 mm and in addition cast on 6-6-10-8-10-10 new stitches mid under sleeve = 52-58-64-68-70-74 stitches. Insert 1 marker thread in the middle of the new stitches. THE PIECE IS NOW MEASURED FROM HERE. Work stocking stitch in the round. When the piece measures 2 cm decrease 2 stitches mid under sleeve – read DECREASE TIP. Decrease every 4-3-2-2-1½-1½ cm a total of 9-11-14-15-15-16 times = 34-36-36-38-40-42 stitches. When the piece measures 36-34-33-31-30-29 cm knit 1 round where you increase 6-4-8-6-8-6 stitches evenly on round = 40-40-44-44-48-48 stitches. Change to double pointed needles size 4.5 mm and work rib (= knit 2 / purl 2). Continue with rib for 5 cm, then cast off with knit over knit and purl over purl. The sleeve measures approx. 42-40-39-37-36-35 cm. Work the other sleeve in the same way. ASSEMBLY: Sew the openings under the sleeves. |
|||||||
Diagram explanations |
|||||||
|
|||||||

|
|||||||
|
Have you made this or any other of our designs? Tag your pictures in social media with #dropsdesign so we can see them! Do you need help with this pattern?You'll find tutorial videos, a Comments/Questions area and more by visiting the pattern on garnstudio.com. © 1982-2024 DROPS Design A/S. We reserve all rights. This document, including all its sub-sections, has copyrights. Read more about what you can do with our patterns at the bottom of each pattern on our site. |
|||||||


With over 40 years in knitting and crochet design, DROPS Design offers one of the most extensive collections of free patterns on the internet - translated to 17 languages. As of today we count 304 catalogues and 11422 patterns - 11422 of which are translated into English (UK/cm).
We work hard to bring you the best knitting and crochet have to offer, inspiration and advice as well as great quality yarns at incredible prices! Would you like to use our patterns for other than personal use? You can read what you are allowed to do in the Copyright text at the bottom of all our patterns. Happy crafting!
Comments / Questions (130)
Danke für die Anleitung, muß sagen das ich schon immer viel gestrickt habe.es war sehr hilfreich für mich.Weiter so die Anregungen sehr gut.Bleiben Sie gesund.
18.11.2020 - 10:36Hej Jeg er nået til delen som hedder "RYG- OG FORSTYKKE:“ og jeg er i tvivl om at jeg blot skal stikke glat strik igennem A1 mønsteret eller og A1 mønsteret skulle havet været taget med over på en tråd sammen med ærmerne?
06.10.2020 - 15:39Bonjour, je viens de finir le sweater Carly avec la laine Drops Air. Je l'ai tricoté en taille L. A la fin, je l'ai lavé et mis à sécher à plat (blocage, mais je n'ai rien tiré). Et finalement, il s'est détendu d'au moins 15%, il est plus large et plus long que le diagramme. Comment aurais-je dû faire pour avoir un ouvrage aux dimensions du diagramme? Choisir une taille M? J'ai un autre projet avec une laine Drops Sky, est-ce que ça sera pareil? D'avance merci
30.09.2020 - 20:55DROPS Design answered:
Bonjour Mme Grin, vous trouverez ici des conseils pour l'entretien de vos fils et laines à tricoter DROPS - votre magasin aura fort probablement d'autres astuces pour vous, n'hésitez pas à le contacter, même par mail ou téléphone, on saura vous conseiller. Bon tricot!
01.10.2020 - 10:09Hej, Når der står at arb skal måle 27 cm (str L) fra opslåningskant, er det så målt fra hvor rib halskant starter? Eller lige efter rib? Lidt tidligere i afsnittet står der omgangenes begyndelse efter rib - midt bagpå. Er forvirret hvor jeg skal måle fra. Kh. Katrine
01.07.2020 - 21:26DROPS Design answered:
Hej Katrine, ja da måler du fra der hvor du slog maskerne op. (Hver omgang starter midt bagpå) . God fornøjelse!
02.07.2020 - 11:50Hei, jeg har nå strikket bolen i glattstrikk i 24 cm og skal i følge oppskriften bare strikke 5 cm til før felling.. Genseren blir jo veldig kort? Jeg vil helst ikke ha en magetopp heller. Jeg strikker str M, vil det være nok garn til å strikke 5-6 cm til før ribbekanten? Jeg har 300g Air. Takker for svar!
21.06.2020 - 18:05DROPS Design answered:
Hei Line. Det har vi dessverre ikke oversikt over. Ser på lignende modeller og noen av dem har en garnmengde på 350 gr, så 300 gr kan bli akkurat litt lite. Men om du nå f.eks strikker ermene ferdig først, så strikker du så genseren så lang du har garn til. God Fornøyelse!
22.06.2020 - 13:55Can you help me with the first row after yoke where increases start?I'm making XL size but can't figure out how to begin.
21.05.2020 - 09:35DROPS Design answered:
Dear Deni, before increasing for raglan you will first increase evenly on some sts: with larger needle work as follows: knit 18 sts inc 2 sts (= there are now 20 sts), knit 12 sts, knit 36 sts inc 4 sts (= there are now 40 sts), knit 12 sts, knit 18 sts inc 2 sts (there are now 20 sts) = there are now: 20+12+40+12+20= 104 sts on needle. Now work A.1 increasing for raglan as explained under RAGLAN. Happy knitting!
22.05.2020 - 09:42Jeg kan ikke få opskriften til at passe, jeg er nået til der hvor man skal sætte ærmerne på snor. Jeg har fået 24 masker for meget. Opskriften må være forkert? Det ville være en kæmpe hjælp, hvis det fremgik om raglanmønstret A1 skal tælle med på ærmesiden? Hvordan kan man redde opskriften? Jeg har trevlet op, og kommer til det samme mærkelige antal masker igen... HJÆLP!!!
13.05.2020 - 12:54Hej. Jeg har lige strikket denne opskrift i str. M og fulgt opskrift og antal masker hele vejen, men den er ALT for bred!!! Måler 65 cm i bredden og jeg Har 14 masker på pind 5,5 på 10 cm i strikkefasthed , så forstår ikke hvorfor og er nødt til at pille det hele op igen. Øv øv. Hvad går der galt???
07.05.2020 - 07:26DROPS Design answered:
Hej Anne, for at få målene i opskriften, så er du nødt til at følge strikkefastheden ifølge opskriften, som er 16 masker på 10 cm i bredden. (har du færre masker (14) så vil den blive for bred og har du flere, vil den blive for smal) Øv men du er nødt til at starte forfra hvis du vil have den mindre. :)
08.05.2020 - 09:49Hi. Im doing the Carly pullover. On the first row of the pattern for the raglan, it says knit 14,then 4,then 28 then 4 then 14. It says continue at the same time increasing on each side of raglan every 2 round. I understand that but my problem is. This works out 64 stitches above? I have 88 on my needles, am i just carried on knitting the pattern? But the arms are not even? I followed the pattern correctly and had 88 as i was supposed to have. So im 24 over and not sure?
17.04.2020 - 00:07DROPS Design answered:
Dear Joanne, you should have 88 stitches on this round: Knit 14 (=half back piece), A.1 (= 6 stitches), knit 4 (= sleeve), A.1 (= 6 stitches), knit 28 (= front piece), A.1 (= 6 stitches), knit 4 (= sleeve), A.1 (= 6 stitches), knit 14 (= half back piece) = 14+6+4+6+28+6+4+6+14= 88 sts. Round starts on mid on back piece, there are 28 stitches for front and back piece, 4 ssts on each sleeve and 6 sts for each of the 4 raglan line. Hope this helps. Happy knitting!
17.04.2020 - 09:00Har strikket ferdig bolen. (Str xxl) det står du skal øke 36 masker før vrangbord nede. Det må jo være feil. Du vil jo få et»skjørt» da. Jeg økte ingenting, og den ble fortsatt for vid.
13.04.2020 - 08:25