
Popular categories
Looking for a yarn?


|
|||||||
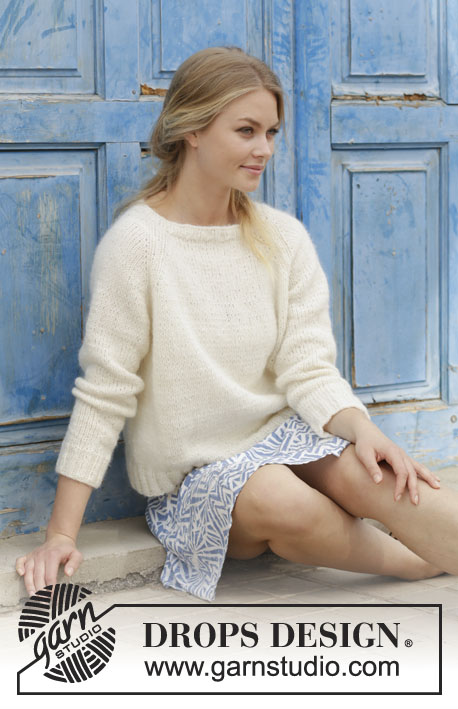
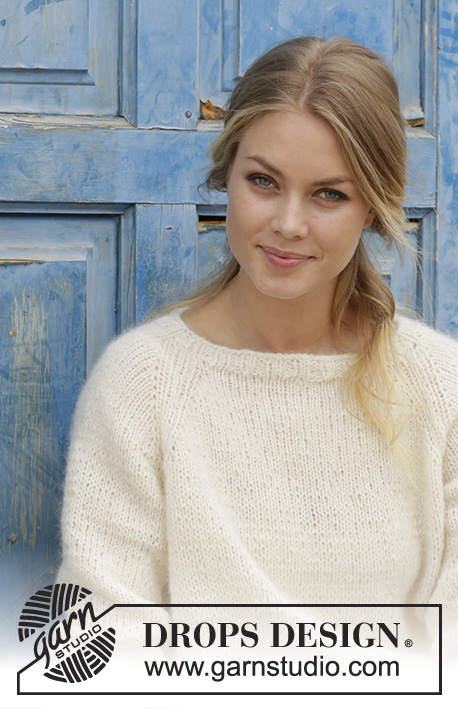
Carly Pullover |
|||||||
 |
 |
||||||
Knitted jumper with raglan, worked top down. Sizes S - XXXL. The piece is worked in DROPS Air.
DROPS 186-30 |
|||||||
|
INFORMATION FOR THE PATTERN: PATTERN: See diagram A.1. The diagram shows all the rows in the pattern seen from the right side. RAGLAN: Increase to raglan on each side of A.1 (= 8 stitches increased per round). Increase by making 1 yarn over, on the next round work the yarn over twisted to avoid a hole. INCREASE TIP (evenly spaced): To work out how to increase evenly, count the total number of stitches on the round (e.g. 168 stitches) and divide by the number of increases to be made (e.g. 24) = 7. In this example, increase by making 1 yarn over after every 7th stitch. On the next round, work the yarn overs twisted to avoid holes. DECREASE TIP (for sleeves): Decrease 1 stitch on each side of the marker thread as follows: Work until there are 3 stitches left before the marker thread, slip 1 stitch as if to knit, knit 1, pass the slipped stitch over the knitted stitch, knit 2 stitches (the marker thread sits in the middle of these 2 stitches) knit the next 2 stitches together. ---------------------------------------------------------- The piece is worked in the round with circular needle from mid back, top down. The sleeves are worked with short circular needle/double pointed needles. JUMPER: Cast on 80-84-88-96-96-104 stitches with circular needle size 4.5 mm and Air. Knit 1 round, then work rib (= knit 2 / purl 2) for 2 cm. The beginning of the round = mid back. Change to circular needle size 5.5 mm and work the next round as follows: Knit 15-16-17-18-18-20 stitches - AT THE SAME TIME as you increase 2-1-2-2-2-3 stitches evenly over these stitches, knit 10-10-10-12-12-12 stitches, knit 30-32-34-36-36-40 stitches – AT THE SAME TIME as you increase 4-2-4-4-4-6 stitches evenly over these stitches, knit 10-10-10-12-12-12 stitches, knit 15-16-17-18-18-20 stitches – AT THE SAME TIME as you increase 2-1-2-2-2-3 stitches evenly over these stitches = 88-88-96-104-104-116 stitches. REMEMBER THE KNITTING TENSION! The next round is worked as follows: Knit 14-14-16-17-17-20 stitches (=half back piece), A.1 (= 6 stitches), knit 4-4-4-6-6-6 stitches (= sleeve), A.1, knit 28-28-32-34-34-40 stitches (= front piece), A.1, knit 4-4-4-6-6-6 stitches (= sleeve), A.1, knit 14-14-16-17-17-20 stitches (= half back piece). Continue this pattern at the same time as you increase 1 stitch on each side of A.1 to RAGLAN – see description above. Increase every 2nd round a total of 20-23-23-26-28-30 times. After all the increases there are 248-272-280-312-328-356 stitches on the needle. Continue with pattern and stocking stitch (without increasing) until the piece measures 23-26-27-29-31-33 cm from the cast-on edge mid front. Work the next round as follows: Work 39-42-43-48-52-57 stitches (= half back piece), place the next 46-52-54-60-60-64 stitches on 1 thread (= sleeve), cast on 6-6-10-8-10-10 new stitches on the needle (= under the sleeve), knit 78-84-86-96-104-114 stitches (= front piece), place the next 46-52-54-60-60-64 stitches on 1 thread (= sleeve), cast on 6-6-10-8-10-10 new stitches on the needle (= under the sleeve), and work the remaining 39-42-43-48-52-57 stitches (= half back piece). BODY: = 168-180-192-208-228-248 stitches. Insert a marker. THE PIECE IS NOW MEASURED FROM HERE. Continue in the round with stocking stitch until the piece measures 25-24-25-24-24-24 cm. Knit 1 round where you increase 24-28-28-32-36-36 stitches evenly on round – read INCREASE TIP = 192-208-220-240-264-284 stitches. Change to circular needle size 4.5 mm and work rib (= knit 2 / purl 2) for 5 cm. Cast off with knit over knit and purl over purl - to avoid the cast-off edge being tight you can cast off with needle size 5.5 mm. The piece measures approx. 54-56-58-60-62-64 cm from the shoulder down. SLEEVE: The piece is worked in the round with short circular needle/double pointed needles. Place the 46-52-54-60-60-64 stitches from the thread on the one side of the piece on circular needle/double pointed needles size 5.5 mm and in addition cast on 6-6-10-8-10-10 new stitches mid under sleeve = 52-58-64-68-70-74 stitches. Insert 1 marker thread in the middle of the new stitches. THE PIECE IS NOW MEASURED FROM HERE. Work stocking stitch in the round. When the piece measures 2 cm decrease 2 stitches mid under sleeve – read DECREASE TIP. Decrease every 4-3-2-2-1½-1½ cm a total of 9-11-14-15-15-16 times = 34-36-36-38-40-42 stitches. When the piece measures 36-34-33-31-30-29 cm knit 1 round where you increase 6-4-8-6-8-6 stitches evenly on round = 40-40-44-44-48-48 stitches. Change to double pointed needles size 4.5 mm and work rib (= knit 2 / purl 2). Continue with rib for 5 cm, then cast off with knit over knit and purl over purl. The sleeve measures approx. 42-40-39-37-36-35 cm. Work the other sleeve in the same way. ASSEMBLY: Sew the openings under the sleeves. |
|||||||
Diagram explanations |
|||||||
|
|||||||

|
|||||||
|
Have you made this or any other of our designs? Tag your pictures in social media with #dropsdesign so we can see them! Do you need help with this pattern?You'll find tutorial videos, a Comments/Questions area and more by visiting the pattern on garnstudio.com. © 1982-2024 DROPS Design A/S. We reserve all rights. This document, including all its sub-sections, has copyrights. Read more about what you can do with our patterns at the bottom of each pattern on our site. |
|||||||


With over 40 years in knitting and crochet design, DROPS Design offers one of the most extensive collections of free patterns on the internet - translated to 17 languages. As of today we count 304 catalogues and 11422 patterns - 11422 of which are translated into English (UK/cm).
We work hard to bring you the best knitting and crochet have to offer, inspiration and advice as well as great quality yarns at incredible prices! Would you like to use our patterns for other than personal use? You can read what you are allowed to do in the Copyright text at the bottom of all our patterns. Happy crafting!
Comments / Questions (130)
Waarom worden er steken gemeerderd in het lijf vóór de tailleboord? Vr groet Bor
10.04.2024 - 10:23DROPS Design answered:
Dag Bor,
Dit wordt gedaan om te voorkomen dat de boord het werk samentrekt.
10.04.2024 - 21:07Bonjour, Merci pour vos informations précédentes Je m'interroge toutefois sur les mesures indiquées sur le graphique du patron.J'y vois 56 pour la partie dos et devant Je mesure en pouces ou en cm et cette mesure m'apparait démesurée pour une taille moyenne .A quoi ce chiffre fait ill référence? Je n'en suis pourtant pas à mon premier modele chez vous qui n'a jamais posé problème Merci encore
05.03.2024 - 21:23DROPS Design answered:
Bonjour Véronique, les mesures des schémas sont toujours en cm et mesurées ainsi: vous avez 180 mailles en taille M pour le bas du pull, après la division de l'empiècement, soit 90 m pour le dos et pour le devant, sur la base de 16 mailles = 10 cm, ces 90 mailles vont mesurer environ 56 cm. Bon tricot!
06.03.2024 - 08:34Pourriez vous réexpliquer le calcul des augmenatations à intervalles dans ce patron Carly Pullover Au début du pull. Comment en arrive t-on à 88 mailles avec toutes ces augmentations en partant de 84 mailles du début?Taille Medium
03.03.2024 - 03:31DROPS Design answered:
Bonjour Véronique, vous allez tricoter ainsi: 16 mailles en augmentant 1 m = 17, puis vous tricotez 10 mailles, puis les 32 m suivantes en augmentant 2 mailles = 34 m, puis vous tricotez 10 mailles et tricotez les 16 dernières mailles en augmentant 1 m = 17 m, vous avez ainsi augmenté 2 mailles pour le devant et 2 mailles pour le dos (1 par demi-dos), vous avez maintenant 88 mailles. Bon tricot!
04.03.2024 - 08:54Bonjour, Je souhaiterai faire ce modèle avec la qualité Drops Air ; pour la taille M vous conseillez de prendre 300 g soit 5 pelotes, si j'ai bien compris. Par contre, sur la pelote, il est conseillé d'en acheter 8 soit 300 g pour un 38/40. Merci pour votre réponse. Cdlt
31.01.2024 - 19:23DROPS Design answered:
Bonjour Martine, la quantité requise dépend, en plus de la taille, de la forme du modèle, du point utilisé, de la tension, etc... Pour ce pull en taille M il faut effectivement 300 g DROPS Air soit 6 pelotes de 50 g. Bon tricot!
01.02.2024 - 08:21Bonjour j ai un doute pour mesurer les 27 cm je fais la taille L je mesure droit sur le devant ??et non le raglan. Merci par avance pour votre réponse isabelle
03.08.2023 - 16:49DROPS Design answered:
Bonjour Mme Vaillant, posez votre ouvrage le plus à plat possible et mesurez à partir du rang de montage, au milieu du devant. Bon tricot!
07.08.2023 - 09:17Hey, jeg lurer på om det er mulig å strikke denne oppskriften med en tråd drops air OG en tråd drops kid-silk for å få genseren litt mer fyldig? Bør jeg foreta meg noen endringer i forhold til oppskriften eller er det bare å følge den slik som den er?
25.07.2023 - 11:01DROPS Design answered:
Hei Maren, Når du bruker et garn til, i tillegg til Drops Air, må du enten går ned i pinnestørrelse eller antall masker, ellers blir genseren for stor. Det blir litt prøving og feiling, men å strikke en prøvelapp og justere etter det er måten å gjøre dette på. Lykke til og god fornøyelse!
26.07.2023 - 06:53Der står 2 gange, at man skal “slå op under ærme”: 1. gang, når man skal dele op til ærmer og fortsætte til “bare” at strikke ryg og forstk. og så IGEN under stykket, under “ÆRMER” Hvis, man gør det 1. gang, bliver blusen jo større!!?? (Omkredsen) Så, HVORNÅR mener I/hvad skal gøres??
24.01.2023 - 15:45DROPS Design answered:
Hei Lena. Du legger opp masker til erme 2 steder når du strikker bolen, så når du skal strikke ermene legger du også opp masker, "over" de maskene du la opp på bolen. Du får da et hull under ermene der du har lagt opp nye masker. Dette hullet sys sammen senere. Ta en titt på videoen: Bluse strikket oppefra og ned og se på tidspunktene: 07:46, 08:50 (legger opp masker under ermene) og tidspunkt 11:18 (legges opp masker under ermet på ermet). Kanskje du bedre vil forstå hvordan det strikkes. mvh DROPS Design
30.01.2023 - 10:28Bonjour pour le modèle 186-30 on fait une augmentation avant et après A1 au tour suivant ses 2 mailles augmentées on les tricote comment?Le A1 est décalé .pourquoi faire un jeté pour augmenter et pas une augmentation droite ou gauche?merci pour votre réponse
25.10.2022 - 21:52DROPS Design answered:
Bonjour Mme Choquel, vous pouvez augmenter avec une autre technique que le jeté si vous le préférez, ce n'est pas un problème du tout; juste une question de choix de technique; mais les augmentations du raglan doivent se faire automatiquement avant et après chaque A.1, autrement dit, vous tricotez jusqu'à la 1ère maille endroit de A.1, vous augmentez pour le raglan, tricotez les 6 mailles de A.1 et vous augmentez pour le raglan; A.1 doit ainsi continuer en ligne droite, c'est la ligne du raglan. Bon tricot!
26.10.2022 - 07:59🇩🇰 Hej, hvis jeg ønsker, at strikkedenne ( Carly Pullover) i str. xl. i Jeres “Wish” - Hvilke p.-str. skal jeg så bruge? Og, hvor meget garn skal jeg så bruge? Jeg KAN IKKE REGNE 👀; Ej, heller Jeres, måske så fiiiine regne-dén-ud-stykker🤷♀️: dét siger mig INTET😪🤦♀️\r\nMvh. Lena B.
21.09.2022 - 18:08DROPS Design answered:
Hej Lena, Denne bluse er strikker i DROP Air som tilhører garngruppe C, hvis du strikker den i Wish (gruppe E) vil den blive meget kompakt. Vil du strikke lignende model i Wish prøv en af disse: Bluse - raglan - oppefra - 9-11masker
22.09.2022 - 14:59Hi! I would love to do this pattern with Drops Wish + Kid silk but is it going to be very different in size then?
17.07.2022 - 19:48DROPS Design answered:
Hi Aliisa, If you use Drops Wish + Kid Silk, the garment will be quite a lot thicker and you will need fewer stitches and rows. You need to work a swatch and adjust your stitch number and row number accordingly. Happy crafting!
18.07.2022 - 06:57