
Popular categories
Looking for a yarn?


|
||||||||||||||||||||||
The Pearl |
||||||||||||||||||||||
 |
 |
|||||||||||||||||||||
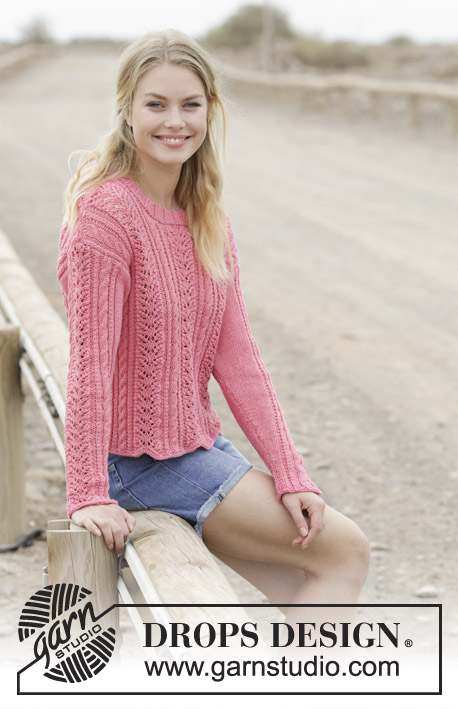
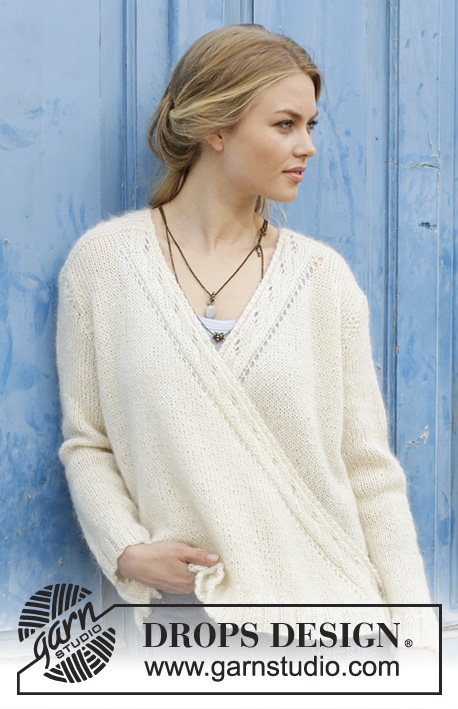
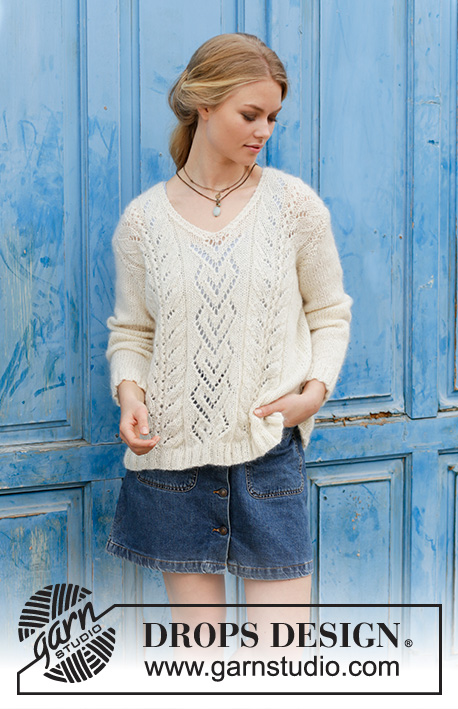
Knitted jumper with lace pattern and V-neck. Sizes S - XXXL. The piece is worked in DROPS Alpaca and DROPS Kid-Silk.
DROPS 186-31 |
||||||||||||||||||||||
|
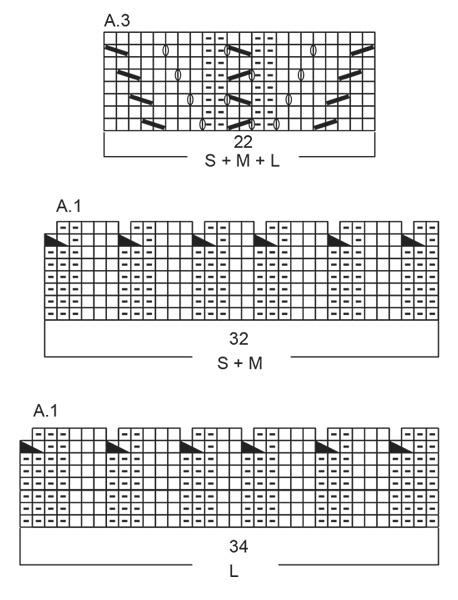
INFORMATION FOR THE PATTERN: RIDGE/GARTER STITCH (worked back and forth): 1 ridge = Knit 2 rows. PATTERN: See diagrams A.1 to A.5. Choose diagram for your size (applies to A.1, A.3 and A.5) The diagrams show all the rows in the pattern seen from the right side. DECREASE TIP-1 (evenly spaced): To work out how to decrease evenly, count the total number of stitches on the needle (e.g. 104 stitches) minus the stitches you are not decreasing over (e.g. 2 edge stitches in garter stitch) and divide the remaining number of stitches by the number of decreases to be made (e.g. 13) = 7.8. In this example, knit approx. every 7th and 8th stitch together. DECREASE TIP-2: All decreases are made from the right side! Decrease as follows before the 1 edge stitch in garter stitch: work until there are 3 stitches left on the row, knit 2 together, 1 edge stitch in garter stitch. Decrease as follows after the 1 edge stitch in garter stitch: Slip 1 stitch as if to knit, knit 1, pass the slipped stitch over the knitted stitch. INCREASE TIP: All increases are made from the right side! Increase 1 stitch by making 1 yarn over. On the next row, purl the yarn over twisted to avoid a hole. ---------------------------------------------------------- JUMPER: The piece is worked back and forth with circular needle, bottom up. You work lace pattern on the front piece. The back piece is worked in stocking stitch. The sleeves are worked in stocking stitch, back and forth with circular needle, bottom up. BACK PIECE: Cast on 104-114-124-134-144-159 stitches with circular needle size 4 mm and 1 strand Alpaca + 1 strand Kid-Silk (= 2 strands). Work rib from the right side as follows: 1 edge stitch in garter stitch, purl 2, (knit 3 / purl 2) until there is 1 stitch left, 1 edge stitch in garter stitch. Continue like this until the rib measures 4 cm. Change to circular needle size 5 mm. Knit 1 row from the right side where you decrease 13-15-17-21-21-24 stitches evenly on row (but not over the edge stitches in garter stitch) – read DECREASE TIP-1 (evenly spaced) = 91-99-107-113-123-135 stitches. Continue with stocking stitch and 1 edge stitch in garter stitch in each side. REMEMBER THE KNITTING TENSION! When the piece measures 5 cm decrease 1 stitch in each side – read DECREASE TIP-2. Decrease like this approx. every 16-17-12-18-20-13 cm a total of 3-3-4-3-3-4 times = 85-93-99-107-117-127 stitches. When the piece measures 40-43-45-45-48-47 cm cast off for the armhole in each side every 2nd row as follows: Cast off 4 stitches 1 time, 2 stitches 0-2-2-3-5-7 times and 1 stitch 1-1-2-2-3-2 times = 75-75-79-83-83-87 stitches. Continue with stocking stitch and 1 edge stitch in garter stitch in each side. When the piece measures 53-57-60-61-65-65 cm work garter stitch over the middle 25-25-25-25-25-27 stitches on the row. When you have worked 2 ridges over these stitches, cast off the middle 19-19-19-19-19-21 stitches for the neck and each shoulder is finished separately. There are now 28-28-30-32-32-33 stitches on each shoulder. Continue with stocking stitch, 3 stitches in garter stitch towards the neck and 1 edge stitch in garter stitch towards the armhole. When the piece measures 56-60-63-64-68-68 cm cast off. Make sure that the cast-off edge is not tight. Work the other shoulder in the same way. FRONT PIECE: Cast on 105-115-129-133-143-157 stitches with circular needle size 4 mm and 1 strand Alpaca + 1 strand Kid-Silk (= 2 strands). Work rib from the right side as follows: 1 edge stitch in garter stitch, (knit 3, purl 2) over the next 5-10-15-15-20-25 stitches, knit 3, A.1 (choose diagram for your size = 32-32-34-36-36-38 stitches), A.2 (= 23 stitches), A.1 (choose diagram for your size = 32-32-34-36-36-38 stitches), (knit 3 / purl 2) over the next 5-10-15-15-20-25 stitches, knit 3, 1 edge stitch in garter stitch. Continue like this back and forth until the diagrams have been completed in height. There are now 91-101-115-119-129-143 stitches on the needle. Change to circular needle size 5 mm. Now work pattern from the right side as follows: 1 edge stitch in garter stitch, knit the first 8-13-18-18-23-28 stitches at the same time as you decrease 0-1-4-3-3-4 stitches evenly over these stitches (= 8-12-14-15-20-24 stitches in stocking stitch inside the 1 edge stitch in garter stitch in the side), purl 2-2-3-2-2-3 stitches, A.3 (choose diagram for your size = 22-22-22-26-26-26 stitches), purl 2-2-3-2-2-3 stitches, A.4 (= 21 stitches), purl 2-2-3-2-2-3 stitches, A.3 (choose diagram for your size = 22-22-22-26-26-26 stitches), purl 2-2-3-2-2-3 stitches, knit the next 8-13-18-18-23-28 stitches at the same time as you decrease 0-1-4-3-3-4 stitches over these stitches (= 8-12-14-15-20-24 stitches in stocking stitch inside the 1 edge stitch in garter stitch in the side), 1 edge stitch in garter stitch = 91-99-107-113-123-135 stitches. Continue back and forth like this, AT THE SAME TIME when the piece measures 5 cm decrease 1 stitch in each side – remember DECREASE TIP-2. Decrease like this approx. every 16-17-12-18-20-13 cm a total of 3-3-4-3-3-4 times = 85-93-99-107-117-127 stitches. Continue the pattern and decrease for the V-neck as described below, AT THE SAME TIME when the piece measures 40-43-45-45-48-47 cm cast off for the armholes in each side in the same way as for the back piece. Work as follows: When A.4 has been worked a total of 4-5-5-5-6-6 times in height, work as follows for the different sizes: Sizes S, L and XL: Continue with pattern as before over all stitches until you have worked the first 8 rows in A.4. Then work A.5 (choose diagram for your size = 21 stitches) over A.4 (the remaining stitches on the row are worked in pattern as before). On the last row in A.5 increase 1 stitch in the middle stitch in the diagram. Continue from ALL SIZES. Sizes M, XXL and XXXL: Continue with pattern as before over all stitches, but work A.5 (choose diagram for your size = 21 stitches) over A.4. On the last row of A.5 increase 1 stitch in the middle stitch in the diagram. Continue from ALL SIZES. ALL SIZES: When the whole of A.5 has been worked, place the first half of the stitches from the needle (seen from the wrong side) on a thread for right front piece. The remaining stitches = left front piece. LEFT FRONT PIECE: Work back and forth from the right side - NOTE: Casting off for the armhole continues as for back piece. Work pattern as before as far as A.5, knit until there are 5 stitches left before the division for the neck, knit 2 stitches together (= 1 stitch decreased) and work 3 stitches in garter stitch (= towards the neck). Work back from the wrong side. Continue like this back and forth and decrease for neck on each row from the right side a total of 9-9-9-9-9-10 times. When all the decreases for neck and armhole are finished there are 29-29-31-33-33-34 stitches on the shoulder. Continue until the armhole measures approx. 16-17-18-19-20-21 cm (the piece measures a total of 56-60-63-64-68-68 cm from the shoulder down), AT THE SAME TIME on the last row decrease 1 stitch by knitting 2 stitches together = 28-28-30-32-32-33 stitches. Cast off. Make sure that the cast-off edge is not tight. RIGHT FRONT PIECE: Place the stitches from the thread back onto the circular needle and work back and forth from the right side - NOTE: Casting off for armhole continues as for back piece and left front piece. Work 3 stitches in garter stitch (from the neck), slip 1 stitch as if to knit, knit 1, pass the slipped stitch over (= 1 stitch decreased), work as far as A.3, and continue the pattern as before to end of row. Continue like this back and forth and decrease to neck on each row from the right side a total of 9-9-9-9-9-10 times. When all decreases to neck and armhole are finished there are 29-29-31-33-33-34 stitches on the shoulder. Continue working until the armhole measures 16-17-18-19-20-21 cm (the piece measures a total of 56-60-63-64-68-68 cm from the shoulder down), AT THE SAME TIME on the last row decrease 1 stitch by knitting 2 stitches together = 28-28-30-32-32-33 stitches. Cast off. Make sure that the cast-off edge is not tight. SLEEVE: Cast on 45-50-50-55-55-60 stitches with circular needle size 4 mm. Work rib from the right side as follows: 1 edge stitch in garter stitch, (knit 3 /purl 2) until there are 4 stitches left, knit 3, 1 edge stitch in garter stitch. When the rib measures 4 cm change to circular needle size 5 mm. Knit 1 row where you decrease 7-11-8-13-10-14 stitches evenly on row = 38-39-42-42-45-46 stitches. Continue with stocking stitch and 1 edge stitch in garter stitch in each side, AT THE SAME TIME when the piece measures 9-9-11-11-7-4 cm increase 1 stitch in each side – read INCREASE TIP. Increase like this approx. every 6-5-4-3-3-3 cm a total of 6-7-8-10-11-12 times = 50-53-58-62-67-70 stitches. Continue with stocking stitch and 1 edge stitch in garter stitch in each side. When the sleeve measures 43-43-43-42-41-40 cm cast off for the sleeve cap at the beginning of each row in each side as follows: Cast off 4 stitches 1 time, 2 stitches 2-2-3-3-3-3 times, 1 stitch 3-4-2-3-5-6 times, 2 stitches 2-2-3-3-3-3 times and 4 stitches 1 time = 12-13-14-16-17-18 stitches. Cast off the remaining stitches. The sleeve measures approx. 51-52-52-52-53-53 cm. Work the other sleeve in the same way. ASSEMBLY: Sew the shoulder seams inside the cast-off edges. Sew sleeves to body. Sew the seam under the sleeve and continue down the side seam. Sew inside the 1 edge stitch in garter stitch in each side. |
||||||||||||||||||||||
Diagram explanations |
||||||||||||||||||||||
|
||||||||||||||||||||||
|
||||||||||||||||||||||

|
||||||||||||||||||||||

|
||||||||||||||||||||||

|
||||||||||||||||||||||
|
Have you made this or any other of our designs? Tag your pictures in social media with #dropsdesign so we can see them! Do you need help with this pattern?You'll find tutorial videos, a Comments/Questions area and more by visiting the pattern on garnstudio.com. © 1982-2024 DROPS Design A/S. We reserve all rights. This document, including all its sub-sections, has copyrights. Read more about what you can do with our patterns at the bottom of each pattern on our site. |
||||||||||||||||||||||


With over 40 years in knitting and crochet design, DROPS Design offers one of the most extensive collections of free patterns on the internet - translated to 17 languages. As of today we count 304 catalogues and 11422 patterns - 11422 of which are translated into English (UK/cm).
We work hard to bring you the best knitting and crochet have to offer, inspiration and advice as well as great quality yarns at incredible prices! Would you like to use our patterns for other than personal use? You can read what you are allowed to do in the Copyright text at the bottom of all our patterns. Happy crafting!
Comments / Questions (15)
Hallo liebes team ich habe nicht verstanten in welcher höhe bei größe XL beginnd der V-Ausschnit vielen dank
18.01.2022 - 18:02DROPS Design answered:
Liebe Frau Kassalia, wenn A.4 insgesamt 5 Mal in der Höhe gestrickt wurde, stricken Sie A.5 über die A.4, bei der letzten Reihe nehmen Sie 1 Masche zu. Nach der letzten Reihe teilen Sie die Arbeit für die 2 Hälfte/Halsausschnitt, siehe unter ALLE GRÖSSEN. Viel Spaß beim stricken!
19.01.2022 - 08:30Bonjour! Pour le devant du pull, dois-je tricoter les 8 mailles avant et après les diagrammes, comme elles se présentent sur chaque rang (c'est-à-dire la maille endroit sur l'endroit deviendra maille envers sur l'envers) ou dois-je contrarier ces mailles selon l'endroit ou l'envers du rang? Merci pour votre réponse!
08.09.2020 - 17:59DROPS Design answered:
Bonjour Catherine, si vous parlez des 8 mailles (en taille S) entre la maille lisière et A.1, elles se tricotent en côtes, autrement dit, sur l'envers, tricotez les comme elles se présentent. (de même en fin de rang après A.1 et avant la maille lisière). Bon tricot!
09.09.2020 - 09:04Bonjour, Je ne comprends pas les légendes pour le diagramme. Pourriez-vous me les expliquer ?
13.09.2019 - 18:48DROPS Design answered:
Bonjour Latricoteuse24, vous retrouverez la signification de chaque symbole sous la légende, les diagrammes montrent tous les rangs (= sur l'endroit et sur l'envers), quand vous croisez un des symboles, référez-vous à la légende, par ex 1 case blanche se tricote en jersey endroit (= à l'end sur l'end, à l'env sur l'env) et un tiret en jersey envers (= à l 'env sur l'end, à l'end sur l'env) et ainsi de suite. Plus d'infos ici dans la FAQ. Bon tricot!
16.09.2019 - 13:07The chart legend Has a triangle over two stitch is Purl two together. The chart though has the triangle slanting in the opposite direction? Is this still Purl two together, as the previous rows show Purl stictches, or because it’s a reversed symboled, is it knit two together? Thank you
26.05.2019 - 15:48DROPS Design answered:
Dear Inc1961, this symbol should be read as P2 tog, diagram/symbol will be edited to match. Thanks for your feedback. Happy knitting!
27.05.2019 - 11:19Jeg strikker minste størrelse, og lurer på de to maskene som strikkes vrang mellom hver rapport, altså 1 kantmaske, 8 m rett, 2 MASKER VRANG, A.3, 2 MASKER VRANG, A.4, 2 MASKER VRANG osv. Skal disse maskene strikkes vrang fra vrangsiden også? Eller strikkes de som en vrangbord, og altså rett fra vrangsiden?
24.11.2018 - 20:17DROPS Design answered:
Hei Elin. De strikkes vrang fra retten og rett fra vrangen slik at de forblir vrang (sett fra rettsiden) hele veien opp. God fornøyelse
26.11.2018 - 11:30Fabiane Brettas wrote:
Olá. Fiz a receita seguindo as explicações para o tamanho M, porém as mangas não encaixam nas cavas. Existe alguma correção para esse tamanho?
24.06.2018 - 00:36DROPS Design answered:
Olá, Não existe qualquer correção para este modelo. Verificou bem se a sua amostra era igual à indicada? Usou o fio DROPS? Pois se usou um outro fio, a tensão do trabalho pode ser muito diferente!
25.06.2018 - 16:34Simone wrote:
Sorry, another question, is the whole jersey knitted in two strands and can I substitute with one strand in double knit yarn instead. Thank you,
18.06.2018 - 09:46DROPS Design answered:
Dear Simone, this pattern is worked entirely with 2 strands yarn group A (= Alpaca and Kid-Silk) and can be worked with a yarn group C - read more about alternatives here. Happy knitting!
18.06.2018 - 10:06Simone wrote:
Can I knit the front and back sections in the round?
17.06.2018 - 19:36DROPS Design answered:
Dear Simone, you can work body in the round until armhole if you like to, but remember designer choice might have some reasons so that piece worked in the round may not look as pattern shown. Happy knitting!
18.06.2018 - 09:02Er denne veldig vid i størrelsen? I henhold til målene på tegningen er omkretsen 98 cm rundt brystet i str. S. Det virker veldig stort. Kan man justere pinnestr. og dermed strikkefastheten, og sånn få et litt smalere plagg, eller vil dette påvirke dimensjonene ellers?
14.06.2018 - 19:39DROPS Design answered:
Hei Elin. Ja, denne modellen er litt løs. Ettersom strikkefastheten går på både lengde og bredde vil alle dimensjonenene i plagget bli påvirket at du endrer på dette. Det er selvføleglig ikke noe i veien for at du endrer på det så lenge du er klar over at det påvirker lengde, bredde og eventuelt garnmengde. God fornøyelse
19.06.2018 - 08:00Oksana wrote:
In the description for front piece is says: ... Now work pattern from the right side as follows: 1 edge stitch in garter stitch, knit the first 8-13-18-18-23-28 stitches at the same time as you decrease 0-1-4-3-3-4 stitches evenly over these stitches.... and then - Continue back and forth like this ... Question: in this row description you suggest to continue with there is decrease of the stiches. Should it be repeated every other row till the end of the work?
14.04.2018 - 10:01DROPS Design answered:
Dear Oksana, after the row with dec you continue with 8-12-14-15-20-24 sts in stocking st after the edge st at the beg of row and before the edge st at the end of row, you will then dec when piece measures 5 cm (as for back piece). Happy knitting!
16.04.2018 - 08:52