
Popular categories
Looking for a yarn?


|
||||||||||||||||||||||||||||
Belle Époque |
||||||||||||||||||||||||||||
 |
 |
|||||||||||||||||||||||||||
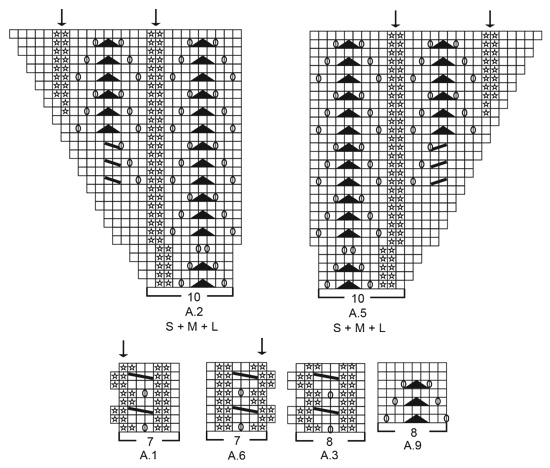
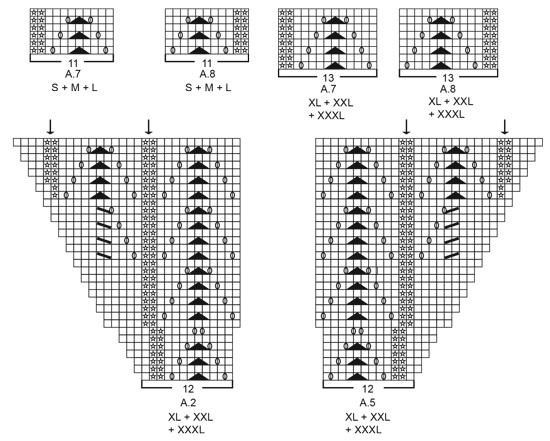
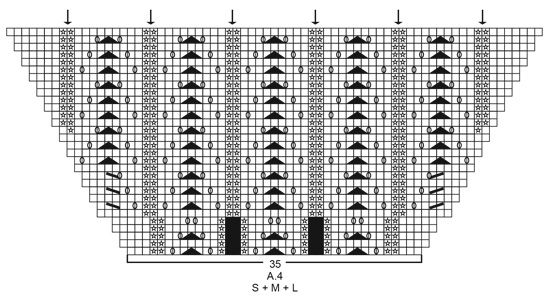
Fitted jacket with lace pattern, raglan and ¾ sleeves, knitted top down. Size: S - XXXL Piece is knitted in DROPS Paris.
DROPS 186-7 |
||||||||||||||||||||||||||||
|
INFORMATION FOR PATTERN: GARTER STITCH (back and forth): 1 ridge = knit 2 rows. GARTER STITCH (worked in the round): 1 ridge = 2 rounds. Knit 1 round and purl 1 round. INCREASE TIP-1: To calculate how to increase evenly, use the total number of stitches on row (e.g. 98 stitches), minus bands (e.g. 10 stitches) and divide the remaining stitches by number of increases to be done (e.g. 17) = 5.2. In this example increase by making 1 yarn over after approx. every 5th stitch (do not increase over bands). On next row work yarn overs twisted to avoid holes. PATTERN: See diagrams A.1 to A.9. Choose diagram for your size (applies to A.2, A.4, A.5, A.7 and A.8). Diagrams show all rows in pattern seen from the right side. RAGLAN: All increases are done from the right side. Increase for raglan on each side of A.3 in every transition between body and sleeves (= 8 stitches increased on every increase row). Increase 1 stitch by making 1 yarn over, on next row (wrong side) purl yarns over to make holes. Work the increased stitches in stockinette stitch on sleeves and according to diagram on front and back piece. DECREASE TIP (applies to sides on body and mid under sleeves): All decreases are done from the right side! Begin 4 stitches before marker and knit 2 together, knit 4 (marker is between these 4 stitches), slip 1 stitch knitwise, knit 1, pass slipped stitch over stitch worked (= 2 stitches decreased). INCREASE TIP-2 (applies to purl sections on body): All increases are done from the right side. Increase 1 stitch in every purl section by making 1 yarn over before all 2 purl stitches. On next row (wrong side) knit yarn over twisted to avoid hole. On next increase make 1 yarn over after every 3 purl stitches. Continue increase by alternately increasing at beginning and end of purl section. INCREASE TIP-3 (applies to sides of body): All increases are done from the right side. Begin 3 stitches before marker thread, make 1 yarn over, knit 6 (marker thread is in the middle of these 6 stitches), make 1 yarn over (= 2 stitches increased). On next row (wrong side) purl yarn overs twisted to avoid holes. INCREASE TIP-4 (applies to sections in stockinette stitch over A.7/A.8 on body): All increases are done from the right side. When A.7/A.8 has been done, work in stockinette stitch over the 9-9-9-11-11-11 stitches with lace pattern. Increase over these 9-9-9-11-11-11 stitches as follows: Work 1 stitch in stockinette stitch, make 1 yarn over, work in stockinette stitch until 1 stitch in stockinette stitch remains, make 1 yarn over, work 1 stitch in stockinette stitch. On next row (wrong side) purl yarn overs twisted to avoid holes. BUTTONHOLES: Decrease for buttonholes on right band (when garment is worn). 1 buttonhole = work from right side until 3 stitches remain on needle, make 1 yarn over, knit 2 together and finish by knitting 1. On next row (wrong side) knit the yarn over to make a hole. Decrease for first buttonhole on first row from right side after edge in garter stitch in neck. Then decrease the next 6-6-6-7-7-7 buttonholes, approx. 7-7-7½-7-7½-7½ cm / 2¾"-2¾"-2⅞"-2¾"-2⅞"-2⅞" between each. ---------------------------------------------------------- JACKET: Work back and forth on circular needle from mid front, work top down. Work sleeves in the round on double pointed needles/a short circular needle, top down. NECK EDGE: Cast on 98-102-106-110-114-118 stitches (including 5 band stitches in each side towards mid front) on circular needle size 4 mm / US 6 with Paris. Work 2 ridges in GARTER STITCH - see explanation above. Knit 1 row from right side while increasing 17-13-9-15-11-7 stitches evenly - read INCREASE TIP-1 and remember BUTTONHOLES on right band - see explanation above = 115-115-115-125-125-125 stitches. Purl 1 row from wrong side inside 5 band stitches in garter stitch in each side towards mid front. Switch to circular needle size 5 mm / US 8 and work yoke as explained below. YOKE: Work first row as follows from right side: Work 5 band stitches in garter stitch, A.1 (= 7 stitches), A.2 (= 10-10-10-12-12-12 stitches), make 1 yarn over, work A.3 (= 8 stitches), make 1 yarn over, work 2 stitches in stockinette stitch (= sleeve cap), make 1 yarn over, work A.3, make 1 yarn over, work A.4 (= 35-35-35-41-41-41 stitches), make 1 yarn over, work A.3, make 1 yarn over, work 2 stitches in stockinette stitch (= sleeve cap), make 1 yarn over, work A.3, make 1 yarn over, work A.5 (= 10-10-10-12-12-12 stitches), work A.6 (= 7 stitches) and finish with 5 band stitches in garter stitch towards mid front = 129-129-129-139-139-139 stitches (including yarn overs in A.1/A.3/A.6). Continue pattern like this. AT THE SAME TIME on every row from right side increase for RAGLAN - see explanation above, until increase has been done 14-18-20-21-24-26 times on each side of A.3 (including increases on first row from right side after neck edge). REMEMBER THE GAUGE! NOTE! When A.2/A.4/A.5 has been worked, continue pattern the same way, but work the next increased stitches on each side of A.3 in stockinette stitch. In size S the increases for raglan is done when 3 rows remain in A.2/A.4/A.5, continue pattern without increase as explained below. After last increase for raglan there are 237-269-285-303-327-343 stitches on needle if it is on a row with 7/8/7 stitches in A.1/A.3/A.6 or 243-275-291-309-333-349 stitches if it is on a row with 8/9/8 stitches in A.1/A.3/A.6. Continue pattern as before without increases for raglan until piece measures 17-19-21-23-25-27 cm / 6¾"-7½"-8¼"-9"-9¾"-10½" from cast-on edge mid front, but finish so that last row is a row with 7/8/7 stitches in A.1/A.3/A.6. Work next row as follows from right side: Continue with band, pattern and in stockinette stitch as before over the first 37-41-43-47-51-55 stitches (= front piece), slip the next 49-57-61-62-66-66 stitches on 1 stitch holder for sleeve, cast on 6-6-8-8-10-12 new stitches on needle (= in the side under sleeve), continue in stockinette stitch and pattern as before over the next 65-73-77-85-93-101 stitches (= back piece), slip the next 49-57-61-62-66-66 stitches on 1 stitch holder for sleeve, cast on 6-6-8-8-10-12 new stitches on needle (= in the side under sleeve) and continue in stockinette stitch, pattern and band over the remaining 37-41-43-47-51-55 stitches (= front piece). Finish body and sleeves separately. NOW MEASURE PIECE FROM HERE! BODY: = 153-169-181-197-217-237 stitches (including yarn overs in A.1/A.6). Insert 1 marker thread in the middle of the 6-6-8-8-10-12 stitches cast on under sleeve in each side and move the marker threads upwards when working. Begin from wrong side and work 1 row with garter stitch over garter stitch, purl over purl, knit over knit. Work next row as follows from right side: 5 band stitches in garter stitch, continue A.1 (= 7 or 8 stitches), work A.7 over the next 22-22-22-26-26-26 stitches (= 2 repetitions of 11-11-11-13-13-13 stitches, continue on correct row in diagram where pattern was finished at division), work in stockinette stitch over the next 13-21-27-26-36-46 stitches, A.8 over the next 55-55-55-65-65-65 stitches (= 5 repetitions of 11-11-11-13-13-13 stitches, continue on correct diagram), purl 2, 13-21-27-26-36-46 stitches in stockinette stitch, A.8 over the next 22-22-22-26-26-26 stitches (= 2 repetitions of 11-11-11-13-13-13 stitches, continue on correct row in diagram), continue A.6 (= 7 or 8 stitches) and finish with 5 band stitches in garter stitch towards mid front. Continue the pattern like this – READ THE REST OF BODY BEFORE CONTINUING! DECREASE IN THE SIDES: When piece measures 1 cm / ⅜" from division, decrease 1 stitch on each side of both marker threads - read DECREASE TIP (= 4 stitches decreased). Decrease like this every other row (i.e. every row from right side) 5 times in total in each side = 131-147-159-175-195-215 stitches (without yarn overs in A.1/A.6). INCREASE IN PURL SECTIONS: When piece measures 6 cm / 2⅜" from division, increase 1 stitch in every purl section marked with arrow in diagram (i.e. increase in all purl sections except the one purl section closest mid front in each side = 12 stitches increased) – read INCREASE TIP-2. Increase like this every 5 cm / 2" 6 times in total in every purl section (there are now 8 stitches in each of these purl sections). INCREASE IN THE SIDES: AT THE SAME TIME when piece measures 7 cm / 2¾" from division, increase 1 stitch on each side of both marker threads - read INCREASE TIP-3 (= 4 stitches increased). Increase like this every 6 cm / 2⅜" 3 times in total in each side. INCREASE IN STOCKINETTE STITCH SECTIONS: AT THE SAME TIME when piece measures approx. 15 cm / 6" from division, finish A.7 and A.8 after one whole repetition vertically. Then work knit over knit and purl over purl over these stitches. On next row from right side increase 2 stitches in each stockinette stitch section over A.7/A.8 - read INCREASE TIP-4 (= 18 stitches increased). Repeat this increase after 2 cm / ¾" (= 18 stitches increased). When all increases are done there are 251-267-279-295-315-335 stitches on row (without yarn overs in A.1/A.6). Continue with garter stitch over garter stitch, knit over knit and purl over purl until piece measures approx. 59-61-63-65-67-69 cm / 23¼"-24"-24¾"-25½"-26⅜"-27⅛" from shoulder and down, but adjust so that next row is worked from right side. Switch to circular needle size 4.5 mm / US 7. Work 2 ridges back and forth over all stitches. Switch back to circular needle size 5 mm / US 8 and cast loosely off by knitting from right side. Jacket measures approx. 60-62-64-66-68-70 cm / 23⅝"-24⅜"-25¼"-26"-26¾"-27½" from shoulder and down. SLEEVE: Slip the 49-57-61-62-66-66 stitches from stitch holder in one side of piece on double pointed needles or a short circular needle size 5 mm / US 8 and pick in addition up 1 stitch in each of the 6-6-8-8-10-12 new stitches cast on under sleeve = 55-63-69-70-76-78 stitches. Insert 1 marker thread in the middle of the 6-6-8-8-10-12 stitches under sleeve and begin round here. Work in stockinette stitch in the round. When piece measures 2-2-2-2-3-3 cm / ¾"-¾"-¾"-¾"-1"-1" from division, decrease 2 stitches mid under sleeve - read DECREASE TIP. Decrease like this every 3½-2½-2-1½-1-1 cm / 1¼"-⅞"-¾"-½"-⅜"-⅜" 7-10-12-12-14-14 times in total = 41-43-45-46-48-50 stitches. Continue until sleeve measures 26-25-24-21-20-19 cm / 10¼"-9¾"-9½"-8¼"-8"-7½" (shorter measurements in the larger sizes because of longer yoke). Knit 1 round while adjusting number of stitches to 40-40-40-48-48-48. Work A.9 in the round (= 5-5-5-6-6-6 repetitions of 8 stitches). When A.9 has been worked, switch to double pointed needles size 4 mm / US 6. Work 2 ridges in the round. Switch back to double pointed needles size 5 mm / US 8 and bind off by knitting. Sleeve measures approx. 30-29-28-25-24-23 cm / 11¾"-11½"-11"-9¾"-9½"-9" from division. Work the other sleeve the same way. ASSEMBLY: Sew the buttons on to the left band. |
||||||||||||||||||||||||||||
Diagram explanations |
||||||||||||||||||||||||||||
|
||||||||||||||||||||||||||||
|
||||||||||||||||||||||||||||
|
||||||||||||||||||||||||||||
|
||||||||||||||||||||||||||||

|
||||||||||||||||||||||||||||

|
||||||||||||||||||||||||||||
|
Have you made this or any other of our designs? Tag your pictures in social media with #dropsdesign so we can see them! Do you need help with this pattern?You'll find tutorial videos, a Comments/Questions area and more by visiting the pattern on garnstudio.com. © 1982-2024 DROPS Design A/S. We reserve all rights. This document, including all its sub-sections, has copyrights. Read more about what you can do with our patterns at the bottom of each pattern on our site. |
||||||||||||||||||||||||||||


With over 40 years in knitting and crochet design, DROPS Design offers one of the most extensive collections of free patterns on the internet - translated to 17 languages. As of today we count 304 catalogs and 11422 patterns - 11417 of which are translated into English (US/in).
We work hard to bring you the best knitting and crochet have to offer, inspiration and advice as well as great quality yarns at incredible prices! Would you like to use our patterns for other than personal use? You can read what you are allowed to do in the Copyright text at the bottom of all our patterns. Happy crafting!
Comments / Questions (61)
Bonjours, pourriez-vous m'expliquer comment tricoter le diagramme A1 avec le decalage je ne comprend pas. Merci
20.12.2020 - 15:58DROPS Design answered:
Bonjour Mme Rousseau, il n'y a pas de décalage dans A.1, en revanche quand on fait 1 jeté au 1er rang, on augmente 1 m = on va donc avoir 1 maille en plus que l'on diminuera au 3ème rang. Cette vidéo montre comment tricoter ce type de petites torsades ajourées. Bon tricot!
21.12.2020 - 08:11Bonjour, pourriez vous svp m'expliquer pourquoi apres avoir tricoté en taille M le 1er rang soit 102 mailles + l'augmentation demandée de 13 mailles soit 115 mailles,plus les 8 jetes de l'empiecement je trouve 123 mailles au lieu des 129 indiquees sur le modele. Avec mes remerciements pour votre reponse.
20.12.2020 - 15:37DROPS Design answered:
Bonjour Gisele, c'est parce que vous n'avez pas compte les jetés du 1er rang de A.1/A.3/A.6 (6 mailles supplementaires). 123+6=129. Bon tricot!
20.12.2020 - 23:21Bonjours, pourriez vous m'indiquer l'adresse du tuto car j'ai plusieurs problemes notamment sur le diagramme les symboles noirs que faire des mailles existantes. Merci
18.12.2020 - 20:31DROPS Design answered:
Bonjour Mme Delamare, les cases noires des diagrammes (= avant-dernier symbole de la légende) ne sont pas des mailles à ce stade là des diagrammes car elles n'ont pas encore été augmentées (=jetés sans diminutions faites au dernier rang des cases noires). Passez simplement ces cases comme si elles n'existaient pas, vous aurez donc 2 mailles envers côte à côte (comme au début et à la fin de A.4). Boin tricot!
21.12.2020 - 07:03Can you send me this pattern? My printer will not print from my phone
30.11.2020 - 01:54DROPS Design answered:
Dear Carol, you can print this pattern with the help of "print" button and/or choose a virtual printer to save it as a .PDF; you are also welcome to ask your DROPS store for a printed pattern. Happy knitting!
30.11.2020 - 10:19My question is on sizing. My daughter has a 36” bust , 32” waist, and 40” hips . Which size would I knit for her, a small or medium. Thank you
15.11.2020 - 00:42DROPS Design answered:
Dear Mrs Midge, measure a similar garment she has and like the shape and compare these measurements to those in the chart ( = in cm) - this is the best way to find out the matching size. Read more about sizing and convert into inches here. Happy knitting!
16.11.2020 - 08:50Buongiorno, vorrei fare questo modello iniziando dal passo. Posso sapere per favore quante sono le maglie a maglia rasata e quanti quelle a rovescio vicino al bordo di fine lavoro per voi e quante dovrebbero essere prima di iniziare i diagrammi ? taglia M . grazie
31.08.2020 - 14:02DROPS Design answered:
Buongiorno Renata, questo modello è stato progettato per essere lavorato dall'alto in basso. Per un aiuto così personalizzato può rivolgersi al suo rivenditore DROPS di fiducia. Buon lavoro!
01.09.2020 - 09:17I am working the body section, size medium., using diagrams A.1, A.6, A.7 and A.8, per the paragraph labeled BODY. In the section INCREASE IN PURL SECTIONS, it indicates to increase 1 stitch in every purl section marked by the arrow. The arrow appears in only diagrams A.1 and A.6. Are these the only places where an increase is made? How are the 12 stitches counted? Within a row? Vertically? The comment about “all purl sections except....” seems to contradict the diagram arrows.
31.08.2020 - 01:38DROPS Design answered:
Dear Elaine, you increase 1 stitch in every Purl section on the needle except in the first P-section and in the Last P-section, ie in A.1 and A.6 increase only in the P-section with the arrow. Happy knitting!
31.08.2020 - 10:13Let me ask the question another way. I am knitting the pattern for size medium. On row 1, RS, right side, there are yarn overs before and after each A.3. On row 2, WS, wrong side, do I also include these same yarn overs before and after each A.3?
20.08.2020 - 20:24DROPS Design answered:
Dear Elaine, the yarn overs described on row 1 under yoke worked on each side of A.3 are for the raglan, these yarn overs are worked only on every right side rows, ie from WS these yarn overs won't be worked. Hope I properly answered your question now, let us know if it is still not the case. Happy knitting!
21.08.2020 - 07:55I am working the pattern for side medium. For the yoke, the number of stitches after the first row is 129. How many stitches should there be after row 2 and row 3? Are the yarn overs around the sleeve cap made on each row?
19.08.2020 - 19:42DROPS Design answered:
Dear Elaine, you will increase for the raglan on every row from RS, this means you increase 8 sts on every row from RS - the number of stitches will then vary depending on the row worked in A.3 - A.1 and A.6 (if you are working a row with yarn over and K3 between purl sts (= as on row 1 and 2 for ex.) or if you decreased (as on row 3 and 4 for ex) - you will then increase 2 sts in A.5, A.2 and A.4 on row 5 - see diagram. You should have 269 or 275 sts after all increases are done and depending on which row you worked. Happy knitting!
20.08.2020 - 10:01Strikker denne i str M og har lagt opp 102 masker, deretter økt 13 masker = 115 masker. Deretter 5 stolpemasker, A1 (7 masker), A2 (10 masker), 1 kast, A3 (8 masker), 1 kast, 2 masker glattstrikk, 1 kast, A3, 1 kast, A4 (35 masker) 1 kast, A3, 1 kast, 2 m glattstrikk, 1 kast, A3, 1 kast, A5 og A6, 5 stolpemasker. Her er det 8 kast og masketallet skulle bli 123, men i oppskriften står 129. Hva er rett? Hvor mange masker skal det være etter 18 raglanøkninger i str M?
11.07.2020 - 00:04DROPS Design answered:
Hej Hege, således tæller du: 5 +7+10, 1 kast +8, 1 kast+ 2, 1 kast, +8, 1 kast, 35, lag 1 kast, 8, lag 1 kast, 2, lag 1 kast, 8, lag 1 kast 10+ 7+5 (+ 6 kast i A.1/A.3/A.6) = 129 masker
28.07.2020 - 13:47