DROPS Paris
DROPS Paris
100% Cotton
from 1.10 £ /50g
Get the yarn to make this pattern from 17.60£.

The yarn cost is calculated from the pattern’s smallest size and the yarn’s cheapest product type. Looking for an even better price? You might find it on the DROPS Deals!

DROPS SS24

Magic Mountain

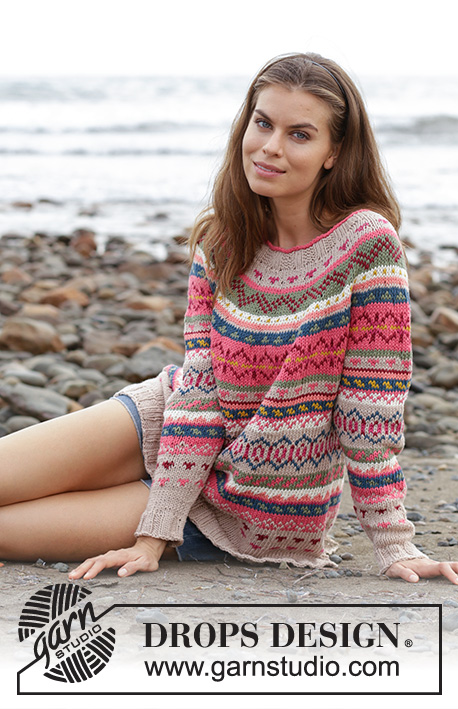
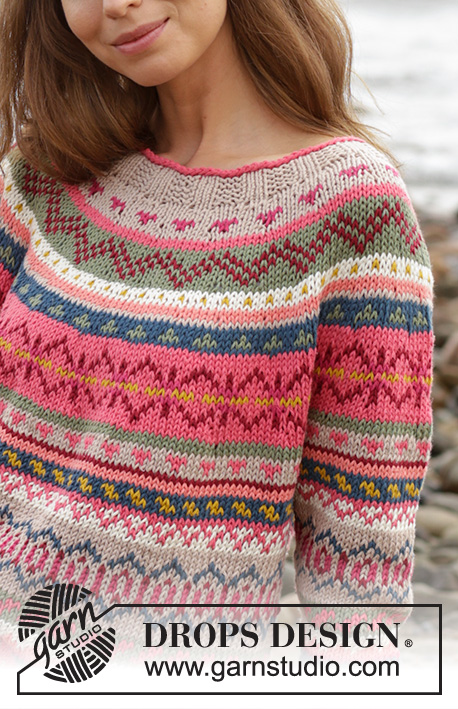
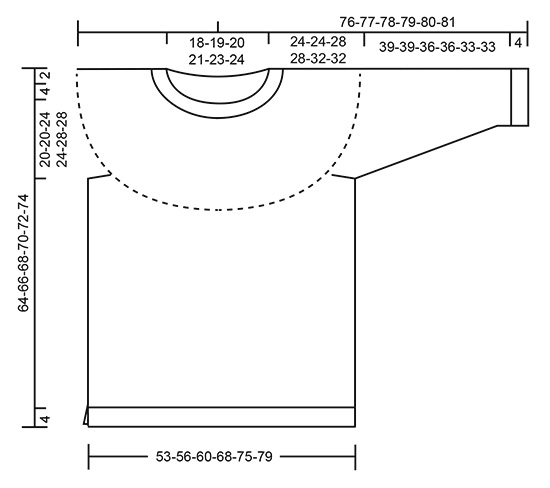
Knitted jumper with round yoke and multi-coloured Norwegian pattern, worked top down. Sizes S - XXXL. The piece is worked in DROPS Paris.

DROPS 187-8
DROPS Design: Pattern no w-695
Yarn group C or A + A
-----------------------------------------------------------
Sizes: S - M - L - XL - XXL - XXXL
Materials:
DROPS PARIS from Garnstudio (belongs to yarn group C)
250-250-300-350-350-400 g colour 26, dark beige
150-150-150-200-200-200 g colour 38, raspberry
100-100-100-100-100-150 g colour 48, petrol
50-100-100-100-100-100 g colour 25, moss green
50-100-100-100-100-100 g colour 17, off white
50-100-100-100-100-100 g colour 37, rusty red
50-50-50-50-50-50 g colour 01, apricot
50-50-50-50-50-50 g colour 07, heather
50-50-50-50-50-50 g colour 41, mustard

The piece can also be knitted with yarn from:
"Alternative yarn (Yarn group C)" – see link below.

DROPS DOUBLE POINTED NEEDLES AND CIRCULAR NEEDLE (40 + 80 cm) SIZE 5.5 MM – or the size needed to get 16 stitches and 20 rows stocking stitch on 10 cm in width and 10 cm in height.

DROPS DOUBLE POINTED NEEDLES AND CIRCULAR NEEDLE (40 and 80 cm) SIZE 4.5 MM for rib – or the size needed to get 18 stitches and 23 rows stocking stitch on 10 cm in width and 10 cm in height.

---------------------------------------------------------

-------------------------------------------------------

Alternative Yarn – See how to change yarns here
Yarn Groups A to F – Use the same pattern and change the yarn here
Yarn usage using an alternative yarn – Use our yarn converter here

-------------------------------------------------------

DROPS Paris
DROPS Paris
100% Cotton
from 1.10 £ /50g
Get the yarn to make this pattern from 17.60£.

The yarn cost is calculated from the pattern’s smallest size and the yarn’s cheapest product type. Looking for an even better price? You might find it on the DROPS Deals!

Pattern instructions

NOTE: This pattern is written in British English. All measurements in charts are in cm. For conversion from cm to inches - click here. There are different terms for crocheting in British and American English. If this pattern includes crochet, click for "crochet terms" here. For this pattern in American English, please click here.
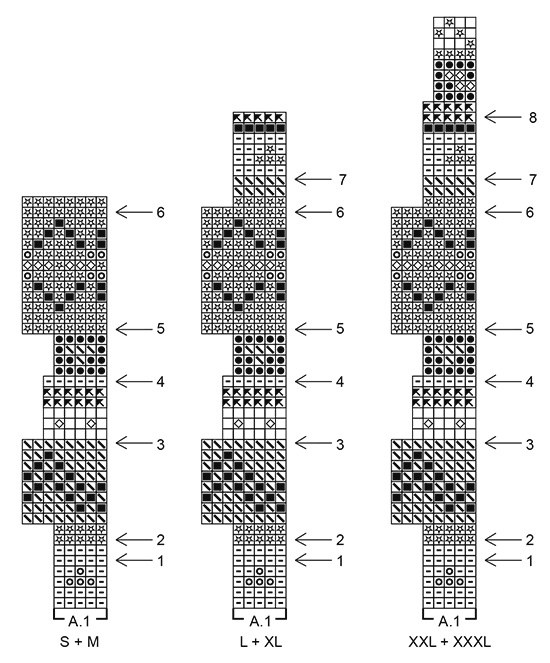
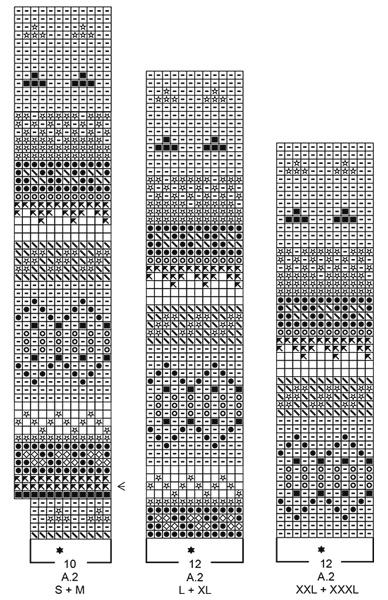
INFORMATION FOR THE PATTERN:

RIDGE/GARTER STITCH (worked in the round):
1 ridge = 2 rounds. Knit 1 round and purl 1 round.

RIDGE/GARTER STITCH (worked back and forth):
1 ridge = Knit 2 rows

DECREASE/INCREASE TIP (evenly spaced):
To work out how to decrease/increase evenly, count the total number of stitches on the needle (e.g. 90 stitches) and divide by the number of decreases/increases to be made (e.g. 6) = 15.
In this example, decrease by knitting together every 14th and 15th stitch. When increasing make 1 yarn over after every 15th stitch. On the next round/row work the yarn overs twisted to avoid holes.

PATTERN:
See diagrams A.1 and A.2. Choose diagram for your size. The whole pattern is worked in stocking stitch.

KNITTING TIP:
To avoid the knitting tension becoming tighter when working pattern, it is important that the strands at the back of the piece are not tight. You can use a size larger needle when working pattern if this is a problem.

DECREASE TIP (for mid under sleeve):
Start 2 stitches before the marker thread, knit 2 together, slip 1 stitch as if to knit, knit 1, pass the slipped stitch over the knitted stitch (= 2 stitches decreased).
----------------------------------------------------------

JUMPER:
The yoke and body are worked in the round with circular needle, top down to where the rib begins, then the front and back pieces are worked separately back and forth. The sleeves are worked in the round with short circular needle/double pointed needles, top down.

NECKLINE:
Cast on 90-96-96-102-102-108 stitches with short circular needle size 4.5 mm and raspberry. Knit 1 round. Change to dark beige and work the next round as follows: * Knit 3, 3 stitches in GARTER STITCH – see description above *, work from *-* to end of round. Continue the rib like this until the neck measures 4 cm. Knit 1 round where you decrease 6-10-6-8-4-6 stitches evenly on round – read DECREASE/INCREASE TIP = 84-86-90-94-98-102 stitches.
Change to circular needle size 5.5 mm. Knit 1 round where you increase 31-29-30-31-32-33 stitches evenly on round = 115-115-120-125-130-135 stitches. Then work the yoke as described below.

YOKE:
Work A.1 in the round (= 23-23-24-25-26-27 repeats of 5 stitches). Continue the pattern as shown in the diagram. Read KNITTING TIP and REMEMBER THE KNITTING TENSION!
AT THE SAME TIME on each round marked with an arrow in the diagram increase as described below:
Arrow-1: Increase 15-19-20-22-23-25 stitches evenly on round = 130-134-140-147-153-160 stitches.
Arrow-2: Increase 14-18-20-21-23-24 stitches evenly on round = 144-152-160-168-176-184 stitches (you now have room for 18-19-20-21-22-23 repeats of 8 stitches).
Arrow-3: Increase 30-34-38-42-40-44 stitches evenly on round = 174-186-198-210-216-228 stitches.
Arrow-4: Increase 26-29-32-35-34-32 stitches evenly on round = 200-215-230-245-250-260 stitches (you now have room for 40-43-46-49-50-52 repeats of 5 stitches).
Arrow-5: Increase 24-25-26-27-30-28 stitches evenly on round = 224-240-256-272-280-288 stitches (you now have room for 28-30-32-34-35-36 repeats of 8 stitches).
Arrow-6: Increase 18-20-12-20-24-24 stitches evenly on round = 242-260-268-292-304-312 stitches. The increases are finished in sizes S and M.
L + XL + XXL + XXXL:
Arrow-7: Increase 12-18-21-18 stitches evenly on round = 280-310-325-330 stitches. Increases are finished in sizes L and XL.
XXL + XXXL:
Arrow-8: Increase 19-18 stitches evenly on round = 344-348 stitches. Increases are finished in sizes XXL and XXXL.

ALL SIZES:
= 242-260-280-310-344-348 stitches.
Finish working A.1. The piece measures approx. 24-24-28-28-32-32 cm from the cast-on edge. The next round is worked as follows (with moss green in sizes S and M, apricot in sizes L and XL and with off white in sizes XXL and XXXL): Place the first 42-46-52-55-60-60 stitches on 1 thread for sleeve, cast on 6-6-8-8-8-12 new stitches on the needle (= in side under sleeve), knit 79-84-88-100-112-114 stitches (= front piece), place the next 42-46-52-55-60-60 stitches on 1 thread for sleeve, cast on 6-6-8-8-8-12 new stitches on needle (= in side under sleeve) and knit the remaining 79-84-88-100-112-114 stitches (= back piece). Cut the strands. Body and sleeves are finished separately. THE PIECE IS NOW MEASURED FROM HERE!

BODY:
= 170-180-192-216-240-252 stitches. Insert 1 marker thread in the one side of the piece, in the middle of the 6-6-8-8-8-12 stitches cast on under sleeve. Start the round here and work A.2 in the round (= 17-18-16-18-20-21 repeats of 10-10-12-12-12-12 stitches). On the round marked with arrow-7 in A.2 decrease 2 stitches evenly on round (applies only to size S) = 168-180-192-216-240-252 stitches.
When A.2 has been completed, the piece measures approx. 33-33-29-29-25-25 cm from the division.
Continue with stocking stitch and dark beige. When the piece measures 34-36-34-36-34-36 cm from the division (or to desired length, there is 4 cm left to finished length) divide the piece for a split in each side. Keep the first 84-90-96-108-120-126 stitches on the needle and place the remaining 84-90-96-108-120-126 on 1 thread or extra needle.
Knit 1 row from the right side - AT THE SAME TIME increase 15-21-21-21-21-27 stitches evenly on this row (do not increase over the outermost 3 stitches in each side) = 99-111-117-129-141-153 stitches. Change to circular needle size 4.5 mm and work rib as follows from the wrong side: 3 edge stitches in GARTER STITCH – see description above, * purl 3, knit 3 *, work from *-* until there are 6 stitches left on the row, purl 3 and finish with 3 edge stitches in garter stitch. Continue the rib like this for 4 cm. Cast off with garter stitch over garter stitch, knit over knit and purl over purl, but to avoid the cast-off edge being tight, make 1 yarn over after every 6th stitch at the same time as you cast off (yarn overs cast off as normal stitches). Work in the same way over the stitches on the thread/extra needle. The jumper measures approx. 64-66-68-70-72-74 cm from the shoulder down.

SLEEVE:
Place the 42-46-52-55-60-60 stitches from the thread on the one side of the piece on short circular needle size 5.5 mm and, in addition, knit up 1 stitch in each of the 6-6-8-8-8-12 stitches cast on under the sleeve = 48-52-60-63-68-72 stitches.
Work the first round in A.2 and decrease at the same time 1-1-1-0-1-1 stitch on this round = 47-51-59-63-67-71 stitches. Insert 1 marker thread at the beginning of the round (= mid under sleeve) and 1 marker thread in the middle of the round (= mid top of sleeve). Work A.2 in the round, but start the round as described below:
In sizes M, L and XXXL work A.2 from and including stitch 2 in the diagram.
In size S work A.2 from and including stitch 3 in the diagram.
In size XXL work A.2 from and including stitch 4 in the diagram.
In size XL work A.2 from and including stitch 6 in the diagram.
When starting on these different stitches, all sizes will then match the marker thread on top of sleeve with the stitch marked with a black star in the diagram, but because of different numbers of stitches in A.2 in sizes S and M the start of the round will need to be recounted when the number of stitches in the repeat has changed to 12 stitches in these sizes.
AT THE SAME TIME when the piece measures 3-3-3-2-2-2 cm from the division, decrease 2 stitches mid under the sleeve – read DECREASE TIP. Decrease like this every 5½-5-3-3-2½-2 cm a total of 7-8-11-12-13-15 times = 33-35-37-39-41-41 stitches.
When A.2 has been completed finish working the sleeve with dark beige. When the piece measures 39-39-36-36-33-33 cm from the division, knit 1 round where you increase 9-7-5-9-7-7 stitches evenly on round = 42-42-42-48-48-48 stitches. Change to double pointed needles size 4.5 mm and work rib in the round (= knit 3 / purl 3). When the rib measures 4 cm cast off with knit over knit and purl over purl, but to avoid the cast-off edge being tight, make 1 yarn over after every 6th stitch at the same time as you cast off (yarn overs cast off as normal stitches). The sleeve measures approx. 43-43-40-40-37-37 cm from the division. Work the other sleeve in the same way.

Diagram

symbols = off white
symbols = dark beige
symbols = heather
symbols = raspberry
symbols = rusty red
symbols = moss green
symbols = mustard
symbols = apricot
symbols = petrol
symbols = increase round
symbols = star marks the middle stitch on sleeve
diagram
diagram
diagram

Each of our patterns has specific tutorial videos to help you.

Do you have a question? See a list of frequently asked questions (FAQ)

Knitting tension is what determines the final measurements of your work, and is usually measured per 10 x 10 cm. It is provided like so: number of stitches in width x number of rows in height - eg: 19 stitches x 26 rows = 10 x 10 cm.

The knitting tension is very individual; some people knit/crochet loosely while others work tightly. You adjust the knitting tension with the needle size, which is why the suggested needle size is only meant as a guide! You need to adjust this (up or down) to ensure that YOUR knitting tension matches the knitting tension provided in the pattern. If you work with a different knitting tension than provided you will have a different yarn consumption, and your work will have different measurements than what the pattern suggests.

The knitting tension also determines which yarns can replace each other. As long as you achieve the same knitting tension you can replace one yarn with another.

See DROPS lesson: How to measure your tension/gauge

See DROPS video: How to make a gauge tension swatch

The required amount of yarn is provided in grams, eg: 450 g. To calculate how many balls you’ll need you first need to know how many grams are in 1 ball (25g, 50g or 100g). This information is available if you click on the individual yarn quality on our pages. Divide the amount required with the amount of each ball. For example, if each ball is 50g (the most common amount), the calculation will be as follows: 450 / 50 = 9 balls.

The important thing when changing from one yarn to another is that the knitting/crochet tension remains the same. This is so that the measurements of the finished piece will be the same as on the sketch provided. It is easier to achieve the same knitting tension using yarns from the same yarn group. It is also possible to work with multiple strands of a thinner yarn to achieve the knitting tension of a thicker one. Please try our yarn converter. We recommend you to always work a test swatch.

Please NOTE: when changing yarn the garment might have a different look and feel to the garment in the photo, due to individual properties and qualities of each yarn.

See DROPS lesson: Can I use a different yarn than the one mentioned in the pattern?

All our yarns are categorised into yarn groups (from A to F) according to thickness and knitting tension – group A contains the thinnest yarns and group F the thickest. This makes it easier for you to find alternative yarns to our patterns, should you wish to switch yarn. All yarns within the same group have a similar knitting tension and can easily replace each other. However, different yarn qualities have different structures and properties which will give the finished work a unique look and feel.

Click here for an overview of the yarns in each yarn group

At the top of all our patterns you’ll find a link to our yarn calculator, which is a helpful tool should you wish to use a different yarn than suggested. By filling in the yarn quality you wish to replace, the amount (in your size) and number of strands, the calculator will present good alternative yarns with the same knitting tension. Additionally it will tell you how much you’ll require in the new qualities and whether you’ll need to work with multiple strands. Most skeins are 50g (some are 25g or 100g).

If the pattern is worked with multiple colours, every colour will have to be calculated separately. Similarly, if the pattern is worked with several strands of different yarns (for example 1 strand Alpaca and 1 strand Kid-Silk) you will have to find alternatives for each, individually.

Click here to see our yarn calculator

Since different yarns have different qualities and textures we have chosen to keep the original yarn in our patterns. However, you can easily find options among our available qualities by using our yarn calculator, or simply pick a yarn from the same yarn group.

It is possible that some retailers still have discontinued yarns in stock, or that someone has a few skeins at home that they would like to find patterns for.

The yarn calculator will provide both alternative yarn as well as required amount in the new quality.

If you think it's hard to decide what size to make, it can be a good idea to measure a garment you own already and like the size of. Then you can pick the size by comparing those measures with the ones available in the pattern's size chart.

You'll find the size chart at the bottom of the pattern.

See DROPS lesson: How to read size chart

The needle size provided in the pattern serves only as a guide, the important thing is to follow the knitting tension. And since knitting tension is very individual, you will have to adjust the needle size to ensure that YOUR tension is the same as in the pattern – maybe you’ll have to adjust 1, or even 2 needle sizes, up or down to achieve the correct tension. For this, we recommend that you work test swatches.

Should you work with a different knitting tension than the one provided, the measurements of the finished garment might deviate from the measurement sketch.

See DROPS lesson: How to measure your tension/gauge

See DROPS video: How to make a tension/gauge swatch

Working a garment top-down provides more flexibility and room for personal adjustment. For example it is easier to try the garment on while working, as well as making adjustments to length of yoke and shoulder caps.

The instructions are carefully explaining every step, in the correct order. Diagrams are adjusted to the knitting direction and are worked as usual.

The diagram depicts all rows/rounds, and every stitch seen from the right side. It is read from bottom to top, from right to left. 1 square = 1 stitch.

When working back and forth, every other row is worked from the right side and every other row is worked from the wrong side. When working from the wrong side, the diagram will have to be worked reversed: from left to right, knit stitches are purled, purl stitches are knit etc.

When working in the round every round is worked from the right side and the diagram are worked from right to left on all rounds.

See DROPS lesson: How to read knitting diagrams

The diagram depicts all rows/rounds, and every stitch seen from the right side. It is worked from bottom to top, from right to left.

When working back and forth every other row is worked from the right side: from right to left and every other row is worked from the wrong side: from left to right.

When working in the round, every row in the diagram are worked from the right side, from right to left.

When working a circular diagram you start in the middle and work your way outwards, counter clockwise, row by row.

The rows usually start with a given number of chain stitches (equivalent to the height of the following stitch), this will either be depicted in the diagram or explained in the pattern.

See DROPS lesson: How to read crochet diagrams

Instructions for working several diagrams after each other on the same row/round, will often be written like so: “work A.1, A.2, A.3 a total of 0-0-2-3-4 times". This means you work A.1 once, then A.2 is worked once, and A.3 is repeated (in width) the number of times provided for your size – in this case like so: S = 0 times, M = 0 times, L=2 times, XL= 3 times and XXL = 4 times.

The diagrams are worked as usual: begin with the first row in A.1, then work the first row in A.2 etc.

See DROPS lesson: How to read knitting diagrams

See DROPS lesson: How to read crochet diagrams

The total width of the garment (from wrist-to-wrist) will be larger in the larger sizes, despite the actual sleeves being shorter. The larger sizes have longer sleeve caps and wider shoulders, so there will be a good fit in all sizes.

The measurement sketch/schematic drawing provides information regarding the full length of the garment. If it’s a jumper or a jacket the length is measured from the highest point on the shoulder closest to the neckline, and straight down to the bottom of the garment. It is NOT measured from the tip of shoulder. Similarly, the length of yoke is measured from the highest point on the shoulder and down to where yoke is split into body and sleeves.

On a jacket measures are never taken along bands, unless specifically stated. Always measure inside band stitches when measuring the length.

See DROPS lesson: How to read a schematic drawing

Diagrams are often repeated on the round or in height. 1 repeat is the diagram the way it appears in the pattern. If it says to work 5 repeats of A.1 in the round, then you work A.1 a total of 5 times after/next to each other in the round. If it says to work 2 repeats of A.1 vertically/in height you work the entire diagram once, then begin again at the start and work the entire diagram one more time.

Chain stitches are slightly narrower than other stitches and to avoid working the cast-on edge too tight, we simply chain more stitches to begin with. The stitch count will be adjusted on the following row to fit the pattern and measurement sketch.

The rib edge is more elastic and will contract slightly compared to, for example, stocking stitch. By increasing before the rib edge, you avoid a visible difference in width between the rib edge and the rest of the body.

It’s very easy to cast off too tightly, and by making yarn overs while casting off (and simultaneously casting these off) you avoid a too tight cast off edge.

See DROPS video: How to bind off with yarn overs (yo)

To achieve an even increase (or decrease) you can increase on, for example: every 3rd and 4th row alternately, like so: work 2 rows and increase on the 3rd row, work 3 rows and increase on the 4th. Repeat this until the increase is complete.

See DROPS lesson: Increase or decrease 1 st on every 3rd and 4th row alternately

Should you prefer to work in the round instead of back and forth, you may of course adjust the pattern. You’ll need to add steeks mid-front (usually 5 stitches), and follow the instructions. When you would normally turn and work from the wrong side, simply work across the steek and continue in the round. At the end you’ll cut the piece open, pick up stitches to work bands, and cover the cut edges.

See DROPS video: How to knit steeks and cut open

Should you prefer to work back and forth instead of in the round, you may of course adjust the pattern so you work the pieces separately and then assemble them at the end. Divide the stitches for the body in 2, add 1 edge stitch in each side (for sewing) and work the front and back pieces separately.

See DROPS lesson: Can I adapt a pattern for circular needles into straight needles?

Pattern repeats can vary slightly in the different sizes, in order to get the correct proportions. If you’re not working the exact same size as the garment in the photo, yours might deviate slightly. This has been carefully developed and adjusted so that the complete impression of the garment is the same in all sizes.

Make sure to follow instructions and diagrams for your size!

If you have found a pattern you like which is available in women’s size it’s not very difficult to convert it to men’s size. The biggest difference will be the length of sleeves and body. Start working on the women size that you think would fit across the chest. The additional length will be worked right before you cast off for the armhole/sleeve cap. If the pattern is worked top-down you can add the length right after the armhole or before the first decrease on sleeve.

Regarding additional yarn amount, this will depend on how much length you add, but it is better with a skein too many than too few.

All yarns will have excess fibres (from production) that might come off as lint or shedding. Brushed yarns (ie hairier yarns) have more of these loose, excess fibres, causing more shedding.

Shedding also depends on what is worn under or over the garment, and whether this pulls at the yarn fibres. It’s therefore not possible to guarantee that there will be no shedding

Below are some tips on how to get the best result when working with hairier yarns:

1. When the garment is finished (before you wash it) shake it vigorously so the looser hairs come off. NOTE: do NOT use a lint roller, brush or any method that pulls at the yarn.

2. Place the garment in a plastic bag and put it in your freezer - the temperature will cause the fibres to become less attached to each other, and excess fibres will come off easier.

3. Leave in the freezer for a few hours before taking it out and shaking it again.

4. Wash the garment according to the instructions on the yarn label.

Pilling is a natural process that happens to even the most exclusive of fibers. It's a natural sign of wear and tear that is hard to avoid, and that is most visible in high friction areas of your garment like a sweater's arms and cuffs.

You can make your garment look as new by removing the pilling, using a fabric comb or a pill/lint remover.

Still can't find the answer you need? Then scroll down and leave your question so one of our experts can try to help you. This will be done normally within 5 to 10 working days.
In the meantime, you can read the questions and answers that others have left to this pattern or join the DROPS Workshop on Facebook to get help from fellow knitters/crocheters!

You might also like...

Post a comment to pattern DROPS 187-8

We would love to hear what you have to say about this pattern!

If you want to leave a question, please make sure you select the correct category in the form below, to speed up the answering process. Required fields are marked *.

Comments / Questions (71)

country flag Helen wrote:

I made the small size and the body was too big but the sleeves were really, really tight from the armpit down with a baggy cuff. I had to rework the sleeves using another pattern and undoing all the Nordic pattern.

28.03.2024 - 14:32

country flag Jean Homer wrote:

I found this pattern easy to follow but the tension 16 stitches to 10cm on 5.5 mm needles doesnt tally with the ball band which is 17 sts to 10 cms on 5 mm needles. That 1 stitch difference makes a huge difference to the final garment if not addressed but using larger needles just makes the knitting loose and sloppy .

30.01.2024 - 17:37

country flag Diana wrote:

Beste mensen, Is het de bedoeling om het proeflapje voor de naalden 5,5 te breien met een meerkleurig inbreipatroon of gewoon unikleur tricotsteek? Vriendelijke groet, Diana

16.02.2023 - 15:33

DROPS Design answered:

Dag Diana,

Je kunt het proeflapje gewoon in tricotsteek breien, tenzij je van jezelf wet dat je altijd strakker of juist losser breit wanner er zo'n patroon in zit. In dat geval is het beter om ook het proeflapje in tricotsteek te breien.

18.02.2023 - 10:24

country flag Monika Siebe wrote:

Hallo, laut Beschreibung habe ich 325 Maschen (für größe L)auf der Nadel, wenn ich mit den Zunahmen der Passe in A1 fertig bin. danach kommt in der Beschreibung: "alle Größen: = 280 Maschen für Größe L. wann oder wo wurden denn die 45 Maschen abgenommen????

02.01.2023 - 16:06

DROPS Design answered:

Liebe Frau Siebe, nach dem 6. Pfeil haben Sie 268 Maschen in L, dann nehmen Sie 12 Maschen zu = 268+12=280 Maschen (in diesem Teil ist L die 1. Größe). Viel Spaß beim stricken!

02.01.2023 - 16:34

country flag Kathy wrote:

Hi Guys. Love the jumper chosen for neckline. The first pattern I’ve tried of yours. I’m trying to knit the large just a fraction too big really but … Casting 96 sts to knit in the round. Knitted down past the petrol colour. Neck looks too tight. Tried it on and it’s a polar neck. Not at all like the neckline in the photo. I must be doing something wrong as can’t see anyone with this problem. Can you help me please? Thank you. 🧶

04.12.2021 - 16:09

DROPS Design answered:

Dear Kathy, you need to check your gauge; if it is too tight you can use a larger needle to cast on and work at the beginning. Happy knitting!

05.12.2021 - 17:09

country flag GRASSET Edith wrote:

Je souhaiterai faire ce modèle en ALPAGA brushed alpaca silk de même groupe. Cette qualité est en pelote de 25 g. Il me semble que cela fait beaucoup de pelotes et donc très cher. N'y a t'il pas une erreur? Merci

15.09.2021 - 10:40

DROPS Design answered:

Bonjour Mme Grasset, utilisez notre convertisseur pour calculer la quantité exacte requise en DROPS Brushed Alpaca Silk pour chaque couleur (ex pour 250 g Paris, il vous faut 75 g Brushed Alpaca Silk, soit 3 pelotes). Rappelez-vous juste bien que le résultat sera différent de celui de la photo si vous utilisez cette alternative. Votre magasin saura vous conseiller si besoin. Bon tricot!

15.09.2021 - 15:47

country flag Jolanda Bles wrote:

Hoi ik wil graag deze trui breien maar wil graag geen roze kleuren maar wil die blauwe kleuren zou dat ook kunnen. Groetjes Jolanda

26.04.2021 - 22:02

DROPS Design answered:

Dag Jolanda,

Jazeker kan dat. Je bent natuurlijk vrij om te kiezen welke kleuren je gebruikt.

29.04.2021 - 14:54

country flag Jolanda Bles wrote:

Hoi ik wil graag deze trui breien maar wil graag geen roze kleuren maar die blauwe kleuren kan dat ook. Stuur maar door naar

26.04.2021 - 21:55

country flag Hannelore wrote:

Ich hatte mich auf einen hellen Norweger Pullover gefreut, gerade Recht fürs Frühjahr. Es wurden die originalen Farben bestellt lt ihrerseits Anleitung. Es wird ein dunkler Pullover und hat nichts mit ihrer Abbildung zu tun. Bei der Anleitung wäre die Reihe 9 apricot. Im Originalbild ist ihr Pullover hier grün rot. Die Grundfarbe ist ein dunkelbeige statt der schönen hellen Farbe auf dem Foto. Furchtbar. Umsonst Geld ausgeben.

11.04.2021 - 15:39

country flag Rosemarie wrote:

Ich komme mit dem Muster der Ärmel nicht klar. Bei Größe M habe ich zu Beginn 51 Maschen auf der Nadel. Wenn ich ab der 2. Masche mit dem Muster beginne bin ich am Ende der Reihe nicht mehr im Muster. Die letzte Musterfolge bleibt unvollständig

11.04.2021 - 12:38

DROPS Design answered:

Liebe Rosemarie, beginnen Sie mit der leztzen 9 Maschen in A.1, dann wiederholen Sie A.1 4 Mal, dann strickens Sie die 2 ersten M in A.1 = 9+40+2=51Maschen. Viel Spaß beim stricken!

12.04.2021 - 09:43