DROPS Alpaca
DROPS Alpaca
100% Alpaca
from 4.85 $ /50g
DROPS Kid-Silk
DROPS Kid-Silk
75% Mohair, 25% Silk
from 6.75 $ /25g
Get the yarn to make this pattern from 39.65$.

The yarn cost is calculated from the pattern’s smallest size and the yarn’s cheapest product type. Looking for an even better price? You might find it on the DROPS Deals!

DROPS SS24

Esmeralda

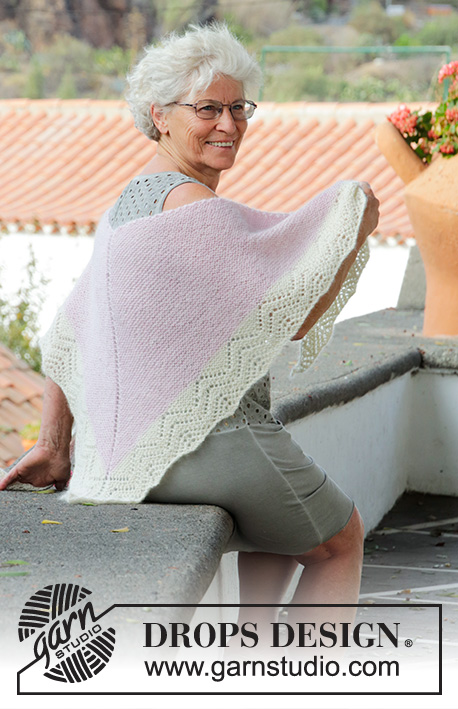
Knitted shawl in garter stitch with lace pattern. Piece is knitted top down in DROPS Alpaca and Kid-Silk.

DROPS 188-29
DROPS design: Pattern z-822
Yarn group A + A or C
----------------------------------------------------------
Measurements: approx. 60 cm / 23½" measured in the middle, and approx. 192 cm / 75½" measured along the top.
Materials:
DROPS ALPACA from Garnstudio (belongs to yarn group A)
100 g color 3112, powder pink
100 g color 0100, off white
And use:
DROPS KID-SILK from Garnstudio (belongs to yarn group A)
75 g color 01, off white

Piece can also be knitted with yarn from:
"Alternative yarn (yarn group A)" - see link below.

DROPS CIRCULAR NEEDLE (80 cm / 32") SIZE 5 mm/US 8 – or size needed to get 17 stitches and 33 rows in garter stitch with 1 strand Alpaca and 1 strand Kid-Silk (= 2 strands) = width 10 cm / 4" and 10 cm / 4" vertically.

-------------------------------------------------------

Alternative Yarn – See how to change yarns here
Yarn Groups A to F – Use the same pattern and change the yarn here
Yarn usage using an alternative yarn – Use our yarn converter here

-------------------------------------------------------

DROPS Alpaca
DROPS Alpaca
100% Alpaca
from 4.85 $ /50g
DROPS Kid-Silk
DROPS Kid-Silk
75% Mohair, 25% Silk
from 6.75 $ /25g
Get the yarn to make this pattern from 39.65$.

The yarn cost is calculated from the pattern’s smallest size and the yarn’s cheapest product type. Looking for an even better price? You might find it on the DROPS Deals!

Pattern instructions

NOTE: This pattern is written in American English. All measurements in charts are in cm. For conversion from inches to cm - click here. There are different terms for crocheting in American and British English. If this pattern includes crochet, click for "crochet terms" here. For this pattern in British English, please click here.
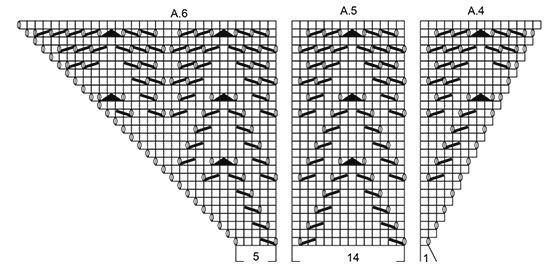
INFORMATION FOR PATTERN:

GARTER STITCH (back and forth):
1 ridge = knit 2 rows.

PATTERN:
See diagrams A.1 to A.6.
Diagrams show all rows in pattern seen from the right side.

BIND-OFF TIP:
To avoid at tight edge at the bottom of shawl bind off with a larger sized needle. NOTE! If the edge still is tight make yarn overs and cast them off as stitches evenly along the bind off.
----------------------------------------------------------

SHAWL:
Worked back and forth on circular needle to make room for all the stitches. Work top down.

Cast on 5 stitches with 1 strand powder pink Alpaca and 1 strand off white Kid-Silk. Work 1 edge stitch in GARTER STITCH - see explanation above, 1 yarn over, knit 1, 1 yarn over, knit 1 (= middle stitch), 1 yarn over, knit 1, 1 yarn over, 1 edge stitch in garter stitch = 9 stitches. Insert a marker in the middle stitch, this should follow up along the piece and marks middle stitch. Work middle stitch in stockinette stitch.
ROW 1 (= wrong side): Work 1 edge stitch in garter stitch, 1 yarn over, knit until middle stitch, purl middle stitch, knit until 1 stitch remains, 1 yarn over and 1 edge stitch in garter stitch = 2 stitches increased and there are now 11 stitches on needle.

ROW 2 (= right side): Work 1 edge stitch in garter stitch, 1 yarn over, knit until stitch marker, 1 yarn over, knit 1 (= middle stitch), 1 yarn over, knit until 1 stitch remains, 1 yarn over and 1 edge stitch in garter stitch = 4 stitches increased.

ROW 3 (= wrong side): Work 1 edge stitch in garter stitch, 1 yarn over, knit until middle stitch, purl middle stitch, knit until 1 stitch remains, 1 yarn over and 1 edge stitch in garter stitch = 2 stitches increased.

Repeat rows 2-3 until there are 317 stitches on needle (= rows are repeated 51 times). REMEMBER THE GAUGE!

Cut the yarn in powder pink and switch to 1 strand off white, continue in Alpaca off white and Kid-Silk off white.

Repeat rows 2-3 1 more time, there are 323 stitches on needle.

Now work according to diagrams A.1-A.6 from right side:
Work 1 edge stitch in garter stitch, A.1 over 5 stitches, repeat A.2 over the next 154 stitches (= 11 times in total), A.3 over 1 stitch, 1 stitch in stockinette stitch (= middle stitch), work A.4 over 1 stitch, repeat A.5 over the next 154 stitches (= 11 times in total), A.6 over 5 stitches and work 1 edge stitch in garter stitch.
Work diagrams 1 time vertically = 407 stitches on needle. READ BIND-OFF TIP - see explanation above. Loosely bind off on next row from right side. Fasten off.

Diagram

All measurements in charts are in cm.

symbols = knit from right side, knit from wrong side
symbols = between 2 stitches make 1 yarn over. Knit yarn over on next row, it should make a hole.
symbols = knit 2 together
symbols = slip 1 stitch knitwise, knit 1 and pass slipped stitch over stitch worked
symbols = slip 1 stitch knitwise, knit 2 together and pass slipped stitch over stitches worked together
diagram
diagram
Do you have a question? See a list of frequently asked questions (FAQ)

Knitting tension is what determines the final measurements of your work, and is usually measured per 10 x 10 cm. It is provided like so: number of stitches in width x number of rows in height - eg: 19 stitches x 26 rows = 10 x 10 cm.

The knitting tension is very individual; some people knit/crochet loosely while others work tightly. You adjust the knitting tension with the needle size, which is why the suggested needle size only serve as a guide! You need to adjust this (up or down) to ensure that YOUR knitting tension matches the knitting tension provided in the pattern. If you work with a different knitting tension than provided you will have a different yarn consumption, and your work will have different measurements than what the pattern suggests.

The knitting tension also determines which yarns can replace each other. As long as you achieve the same knitting tension you can replace one yarn with another.

See DROPS lesson: How to measure your tension/gauge

See DROPS video: How to make a gauge tension swatch

The required amount of yarn is provided in grams, eg: 450 g. To calculate how many balls you’ll need you first need to know how many grams are in 1 ball (25g, 50g or 100g). This information is available if you click on the individual yarn quality on our pages. Divide the amount required with the amount of each ball. For example, if each ball is 50g (the most common amount), the calculation will be as follows: 450 / 50 = 9 balls.

The important thing when changing from one yarn to another is that the knitting/crochet tension remains the same. This is so that the measurements of the finished piece will be the same as on the sketch provided. It is easier to achieve the same knitting tension using yarns from the same yarn group. It is also possible to work with multiple strands of a thinner yarn to achieve the knitting tension of a thicker one. Please try our yarn converter. We recommend you to always work a test swatch.

Please NOTE: when changing yarn the garment might have a different look and feel to the garment in the photo, due to individual properties and qualities of each yarn.

See DROPS lesson: Can I use a different yarn than the one mentioned in the pattern?

All our yarns are categorised into yarn groups (from A to F) according to thickness and knitting tension – group A contains the thinnest yarns and group F the thickest. This makes it easier for you to find alternative yarns to our patterns, should you wish to switch yarn. All yarns within the same group have a similar knitting tension and can easily replace each other. However, different yarn qualities have different structures and properties which will give the finished work a unique look and feel.

Click here for an overview of the yarns in each yarn group

At the top of all our patterns you’ll find a link to our yarn converter, which is a helpful tool should you wish to use a different yarn than suggested. By filling in the yarn quality you wish to replace, the amount (in your size) and number of strands, the converter will present good alternative yarns with the same knitting tension. Additionally it will tell you how much you’ll require in the new qualities and whether you’ll need to work with multiple strands. Most skeins are 50g (some are 25g or 100g).

If the pattern is worked with multiple colours, every colour will have to be converted separately. Similarly, if the pattern is worked with several strands of different yarns (for example 1 strand Alpaca and 1 strand Kid-Silk) you will have to find alternatives for each, individually.

Click here to see our yarn converter

Since different yarns have different qualities and textures we have chosen to keep the original yarn in our patterns. However, you can easily find options among our available qualities by using our yarn converter, or simply pick a yarn from the same yarn group.

It is possible that some retailers still have discontinued yarns in stock, or that someone has a few skeins at home that they would like to find patterns for.

The yarn converter will provide both alternative yarn as well as required amount in the new quality.

If you think it's hard to decide what size to make, it can be a good idea to measure a garment you own already and like the size of. Then you can pick the size by comparing those measures with the ones available in the pattern's size chart.

You'll find the size chart at the bottom of the pattern.

See DROPS lesson: How to read size chart

The needle size provided in the pattern serves only as a guide, the important thing is to follow the knitting tension. And since knitting tension is very individual, you will have to adjust the needle size to ensure that YOUR tension is the same as in the pattern – maybe you’ll have to adjust 1, or even 2 needle sizes, up or down to achieve the correct tension. For this, we recommend that you work test swatches.

Should you work with a different knitting tension than the one provided, the measurements of the finished garment might deviate from the measurement sketch.

See DROPS lesson: How to measure your tension/gauge

See DROPS video: How to make a gauge tension swatch

Working a garment top-down provides more flexibility and room for personal adjustment. For example it is easier to try the garment on while working, as well as making adjustments to length of yoke and shoulder caps.

The instructions are carefully explaining every step, in the correct order. Diagrams are adjusted to the knitting direction and are worked as usual.

The diagram depicts all rows/rounds, and every stitch seen from the right side. It is read from bottom to top, from right to left. 1 square = 1 stitch.

When working back and forth, every other row is worked from the right side and every other row is worked from the wrong side. When working from the wrong side, the diagram will have to be worked reversed: from left to right, knit stitches are purled, purl stitches are knit etc.

When working in the round every round is worked from the right side and the diagram are worked from right to left on all rounds.

See DROPS lesson: How to read knitting diagrams

The diagram depicts all rows/rounds, and every stitch seen from the right side. It is worked from bottom to top, from right to left.

When working back and forth every other row is worked from the right side: from right to left and every other row is worked from the wrong side: from left to right.

When working in the round, every row in the diagram are worked from the right side, from right to left.

When working a circular diagram you start in the middle and work your way outwards, counter clockwise, row by row.

The rows usually start with a given number of chain stitches (equivalent to the height of the following stitch), this will either be depicted in the diagram or explained in the pattern.

See DROPS lesson: How to read crochet diagrams

Instructions for working several diagrams after each other on the same row/round, will often be written like so: “work A.1, A.2, A.3 a total of 0-0-2-3-4 times". This means you work A.1 once, then A.2 is worked once, and A.3 is repeated (in width) the number of times provided for your size – in this case like so: S = 0 times, M = 0 times, L=2 times, XL= 3 times and XXL = 4 times.

The diagrams are worked as usual: begin with the first row in A.1, then work the first row in A.2 etc.

See DROPS lesson: How to read knitting diagrams

See DROPS lesson: How to read crochet diagrams

The total width of the garment (from wrist-to-wrist) will be larger in the larger sizes, despite the actual sleeves being shorter. The larger sizes have longer sleeve caps and wider shoulders, so there will be a good fit in all sizes.

The measurement sketch/schematic drawing provides information regarding the full length of the garment. If it’s a jumper or a jacket the length is measured from the highest point on the shoulder (usually closest to the neckline), and straight down to the bottom of the garment. It is NOT measured from the tip of shoulder. Similarly, the length of yoke is measured from the highest point on the shoulder and down to where yoke is split into body and sleeves.

See DROPS lesson: How to read a schematic drawing

Diagrams are often repeated on the round or in height. 1 repeat is the diagram the way it appears in the pattern. If it says to work 5 repeats of A.1 in the round, then you work A.1 a total of 5 times after/next to each other in the round. If it says to work 2 repeats of A.1 vertically/in height you work the entire diagram once, then begin again at the start and work the entire diagram one more time.

Chain stitches are slightly narrower than other stitches and to avoid working the cast-on edge too tight, we simply chain more stitches to begin with. The stitch count will be adjusted on the following row to fit the pattern and measurement sketch.

The rib edge is more elastic and will contract slightly compared to, for example, stocking stitch. By increasing before the rib edge, you avoid a visible difference in width between the rib edge and the rest of the body.

It’s very easy to cast off too tightly, and by making yarn overs while casting off (and simultaneously casting these off) you avoid a too tight cast off edge.

See DROPS video: How to bind off with yarn overs (yo)

To achieve an even increase (or decrease) you can increase on, for example: every 3rd and 4th row alternately, like so: work 2 rows and increase on the 3rd row, work 3 rows and increase on the 4th. Repeat this until the increase is complete.

See DROPS lesson: Increase or decrease 1 st on every 3rd and 4th row alternately

Should you prefer to work in the round instead of back and forth, you may of course adjust the pattern. You’ll need to add steeks mid-front (usually 5 stitches), and follow the instructions. When you would normally turn and work from the wrong side, simply work across the steek and continue in the round. At the end you’ll cut the piece open, pick up stitches to work bands, and cover the cut edges.

See DROPS video: How to knit steeks and cut open

Should you prefer to work back and forth instead of in the round, you may of course adjust the pattern so you work the pieces separately and then assemble them at the end. Divide the stitches for the body in 2, add 1 edge stitch in each side (for sewing) and work the front and back pieces separately.

See DROPS lesson: Can I adapt a pattern for circular needles into straight needles?

Pattern repeats can vary slightly in the different sizes, in order to get the correct proportions. If you’re not working the exact same size as the garment in the photo, yours might deviate slightly. This has been carefully developed and adjusted so that the complete impression of the garment is the same in all sizes.

Make sure to follow instructions and diagrams for your size!

If you have found a pattern you like which is available in women’s size it’s not very difficult to convert it to men’s size. The biggest difference will be the length of sleeves and body. Start working on the women size that you think would fit across the chest. The additional length will be worked right before you cast off for the armhole/sleeve cap. If the pattern is worked top-down you can add the length right after the armhole or before the first decrease on sleeve.

Regarding additional yarn amount, this will depend on how much length you add, but it is better with a skein too many than too few.

All yarns will have excess fibres (from production) that might come off as lint or shedding. Brushed yarns (ie hairier yarns) have more of these loose, excess fibres, causing more shedding.

Shedding also depends on what is worn under or over the garment, and whether this pulls at the yarn fibres. It’s therefore not possible to guarantee that there will be no shedding

Below are some tips on how to get the best result when working with hairier yarns:

1. When the garment is finished (before you wash it) shake it vigorously so the looser hairs come off. NOTE: do NOT use a lint roller, brush or any method that pulls at the yarn.

2. Place the garment in a plastic bag and put it in your freezer - the temperature will cause the fibres to become less attached to each other, and excess fibres will come off easier.

3. Leave in the freezer for a few hours before taking it out and shaking it again.

4. Wash the garment according to the instructions on the yarn label.

Pilling is a natural process that happens to even the most exclusive of fibers. It's a natural sign of wear and tear that is hard to avoid, and that is most visible in high friction areas of your garment like a sweater's arms and cuffs.

You can make your garment look as new by removing the pilling, using a fabric comb or a pill/lint remover.

Still can't find the answer you need? Then scroll down and leave your question so one of our experts can try to help you. This will be done normally within 5 to 10 working days.
In the meantime, you can read the questions and answers that others have left to this pattern or join the DROPS Workshop on Facebook to get help from fellow knitters/crocheters!

You might also like...

Post a comment to pattern DROPS 188-29

We would love to hear what you have to say about this pattern!

If you want to leave a question, please make sure you select the correct category in the form below, to speed up the answering process. Required fields are marked *.

Comments / Questions (19)

country flag Ludmila wrote:

I see that the YO's in the midden are knitted so that there is a whole. How are the YO knitted on the end edges of the shawl? Twisted?

25.11.2022 - 12:24

country flag Mrs Bohannon wrote:

I’m just about to start the lace part and need to read the chart. Do I need to reverse the pattern for the second line of the chart or do I read it as it is written , please? Thank you

04.07.2022 - 17:08

DROPS Design answered:

Dear Mrs Bohannon, when working back and forth you read: from right to left (right side) and from left to right (wrong side). From the right side, you start with A.1 and end in A.6, while from the wrong side you start with A.6 and end in A.1. Since you are also working in garter stitch all white square symbol stitches are knitted, regardless of the side you are working on. Happy knitting!

04.07.2022 - 18:50

country flag Wenche wrote:

Hei - når det er 323 m på pinnen, skal det da fortsettes å strikke A1 - A6 for å få den lyse kanten rundt- blir ikke den kanten i feil ende av sjalet da eller?

25.08.2020 - 11:50

DROPS Design answered:

Hej Wenche, det er bare at følge opskriften, så får du kanten som på billedet :)

27.08.2020 - 14:46

country flag ROSALIND KNIGHT wrote:

I do't understand pattern from beginning: Garter St(K 2 rows)then 1 yo, k1, 1yo, k1,( = middle st) 1 yo, k1, 1yo, 1 edge st in garter st. ??? Is this one row , two rows.? what is the edge stitch? How do You begin?

16.08.2020 - 19:37

DROPS Design answered:

Dear Mrs Knight, when you have to work 1 stitch in garter stitch (= edge stitches) this means you will knit this stitch from RS as well as from WS, At the very beginning of the shawl, you knit the stitches both from RS and from WS. Cast on 5 sts and increase 4 sts as explained = 9 sts. Then work the rows 1 to 3 and repeat rows 2 and 3. Happy knitting!

17.08.2020 - 08:56

country flag Frid Borgjorde wrote:

Hei ! Jeg lurer på, hvor jeg skal plukke opp maskene på sjalet etter de 323 m, for å få det penest mulig. Er det helt ytterst i kantmasken rille eller innen for kastet? Takk for svar !

25.02.2020 - 21:06

country flag Giuseppina Baseggio wrote:

Come posso fare uno scialle ai ferri senza il ferro circolare .....perche non lo so usare......

11.11.2019 - 22:44

country flag Tatiana Johansen wrote:

1 kantmaske rille ?????

30.10.2019 - 11:24

DROPS Design answered:

Hej Tatiana, ja stemmer, ret på hver pind :)

31.10.2019 - 09:48

country flag Coralie wrote:

J'ai compris mon erreur, j'ai débuté la lecture des diagrammes par le bas gauche alors qu'ils se lisent à partir du bas droit. Je vais recommencer cette partie du châle 😉 Merci pour votre réponse

28.02.2019 - 06:13

country flag Coralie wrote:

Bonjour. J'ai atteint le début des diagrammes. Est-ce qu'il faut faire les 2 jetés côte à côte entre les diagrammes A1 et A2 sur la 1ere ligne ? Où est-ce que le jeté du début de A2 est à faire uniquement entre 2 diagrammes de A2 ? J'espère que ma question est assez claire. Merci d'avance

23.02.2019 - 20:25

DROPS Design answered:

Bonjour Coralie, le 1er rang de A.1 se tricote ainsi: 1 jeté, 3 m end, 2 m ens à l'end, 1 jeté (= 5 mailles), le 1er rang de A.2 commence par 1 m end, 1 jeté etc.. ainsi les 2 jetés ne sont pas côte à côte mais bien séparés par 1 maille. Après A.1, répétez les 14 mailles de A.2 (11 fois sur 154 m). Bon tricot!

25.02.2019 - 08:41

country flag Susana wrote:

No me sale que al final se llegue a los 407 puntos en la aguja, solo consigo 379; es decir, que me faltarían 7 pasadas. Cuando se empieza el borde, tienes 323 puntos en la aguja y se deben tejer 28 pasadas, en las que se aumentan 4 puntos en las 14 pasadas del derecho; en total 56 puntos más. Así, 323 + 56 = 379. ¿Podrían ayudarme a ver dónde me equivoco?. Gracias.

28.11.2018 - 12:28

DROPS Design answered:

Hola Susana. Por el lado derecho se trabajan 4 aumentos en la fila (un total de 56 puntos), por el lado revés se trabajan 2 aumentos en la fila ( un total de 28 puntos) , es decir un total de 84 puntos aumentados. 323 + 84 = 407 puntos

04.12.2018 - 12:12