
Popular categories
Looking for a yarn?


|
|
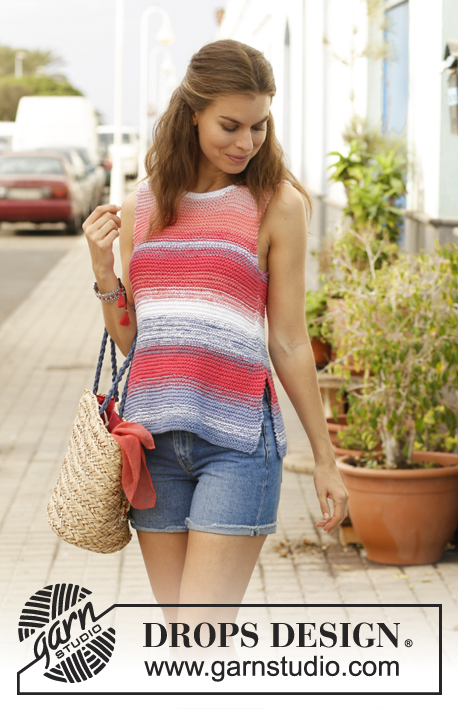
Malibu Top |
|
 |
 |
Knitted top with garter stitch and stripes. Sizes S - XXXL. The piece is worked in 2 strands DROPS Safran.
DROPS 187-10 |
|
|
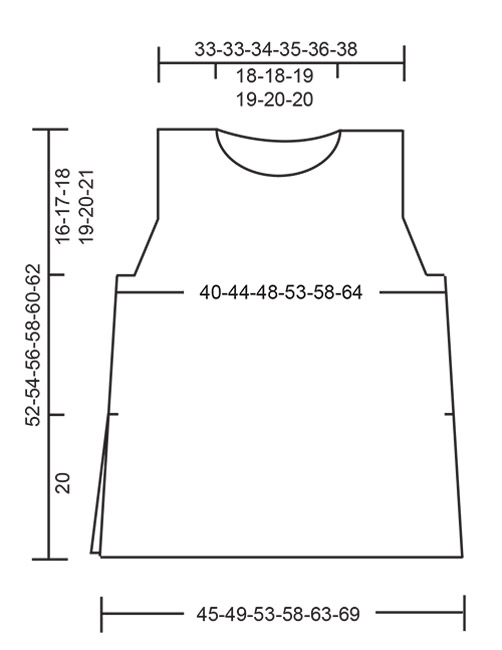
INFORMATION FOR THE PATTERN: RIDGE/GARTER STITCH (worked back and forth): 1 ridge = Knit 2 rows. STRIPES: Work stripes in garter stitch with 2 strands Safran as follows: denim blue + denim blue: 3-3-4-4-4-4 ridges denim blue + white: 4-4-4-4-4-4 ridges denim blue + light blue purple: 5-5-5-6-6-6 ridges light blue purple + raspberry: 3-4-4-4-5-5 ridges raspberry + raspberry: 6-6-6-7-7-7 ridges raspberry + denim blue: 3-4-4-4-4-5 ridges denim blue + white: 7-7-8-8-8-9 ridges white + white: 4-4-4-4-4-4 ridges white + peach: 3-3-3-3-3-3 ridges peach + raspberry: 4-5-5-5-5-6 ridges raspberry + raspberry: 5-5-5-5-5-5 ridges raspberry + light blue purple: 3-3-4-4-5-5 ridges light blue purple + white: 2-2-2-2-3-3 ridges raspberry + peach: 3-3-3-4-4-4 ridges peach + peach: 6-6-6-6-6-6 ridges peach + light pink: 3-3-3-3-3-3 ridges light pink + light pink: 6-6-6-6-6-6 ridges light pink + white: 3-3-3-3-3-3 ridges white + white: 5-5-5-5-5-5 ridges– or to finished length. DECREASE TIP: Decrease on the inside of the 3 edge stitches in garter stitch. All decreases are worked from the right side! Decrease as follows after the 3 edge stitches: Slip 1 stitch as if to knit, knit 1, pass the slipped stitch over the knitted stitch (= 1 stitch decreased). Decrease as follows before the 3 edge stitches: Start 2 stitches before the 3 edge stitches and knit 2 together (= 1 stitch decreased). ---------------------------------------------------------- TOP: The piece is worked back and forth in 2 parts which are sewn together to finish. BACK PIECE: The whole of the back piece is worked back and forth with GARTER STITCH and STRIPES - see description above. Cast on 72-78-84-92-100-110 stitches with circular needle size 5.5 mm and 2 strands Safran (denim blue + denim blue). Work garter stitch and stripes as described above. When the piece measures 8 cm, decrease 1 stitch in each side – read DECREASE TIP. Decrease in this way every 8-8-8-8-9-9 cm a total of 4 times in each side = 64-70-76-84-92-102 stitches. REMEMBER THE KNITTING TENSION! When the piece measures 36-37-38-39-40-41 cm, cast off 3-3-4-5-5-6 stitches at the beginning of the next 2 rows for armholes = 58-64-68-74-82-90 stitches. Then decrease 1 stitch for the armhole in each side every 2nd row (i.e. every row from the right side) a total of 3-6-7-9-12-15 times in each side – read DECREASE TIP = 52-52-54-56-58-60 stitches. AT THE SAME TIME when the piece measures 38-40-42-42-44-46 cm, divide for the split mid back (this is done after 1 knitted row from the right side). Place half the stitches on 1 thread and finish each side separately. Continue with stripes and garter stitch and continue to decrease for armhole in the side if necessary, on each row from the right side until all the decreases have been completed. When the piece measures 50-52-54-56-58-60 cm, cast off 13-13-14-14-15-15 stitches for the neck at the beginning of the row from mid back. Continue working as before and cast off 1 stitch for the neck at the beginning of the next row from mid back = 12-12-12-13-13-14 stitches left on shoulder. Continue working with 2 strands white until piece measures 52-54-56-58-60-62 cm. Cast off with knit from the right side. Work the other side in the same way. FRONT PIECE: Cast on as for back piece and follow the instructions for back piece until the piece measures 46-48-50-51-53-55 cm. Decreases for armholes have now been completed and there are 52-52-54-56-58-60 stitches on the needle. Place the middle 14-14-16-16-16-16 stitches on a thread for neck and finish each shoulder separately. Continue with garter stitch and stripes and continue to cast off for neck every 2nd row (i.e. every row from the right side) as follows: Cast off 2 stitches 2-2-2-2-2-2 times and then 1 stitch 3-3-3-3-4-4 times = 12-12-12-13-13-14 stitches left on shoulder. Continue working until piece measures 52-54-56-58-60-62 cm. Cast off with knit from the right side. Work the other shoulder in the same way. ASSEMBLY: Sew side seams from the armholes down – sew in the outermost loop of the outermost stitch so the seam is flat, but stop when you still have 20 cm left at the bottom of each side (= split). Sew shoulder seams inside the cast-off edge. NECK EDGE: Start from the right side mid back and knit up approx. 68 to 84 stitches (including stitches from the thread in front) with circular needle size 5 mm and 2 strands white. Knit 1 row from the wrong side, knit 1 row from the right side and knit 1 row from the wrong side. Then cast off with knit from the right side. Divide the lace ribbon into 2 equal lengths and sew a length to each side of the split at the back, at top of neck. Tie a bow mid back. |
|
|
|
|
Have you made this or any other of our designs? Tag your pictures in social media with #dropsdesign so we can see them! Do you need help with this pattern?You'll find tutorial videos, a Comments/Questions area and more by visiting the pattern on garnstudio.com. © 1982-2024 DROPS Design A/S. We reserve all rights. This document, including all its sub-sections, has copyrights. Read more about what you can do with our patterns at the bottom of each pattern on our site. |
|


With over 40 years in knitting and crochet design, DROPS Design offers one of the most extensive collections of free patterns on the internet - translated to 17 languages. As of today we count 304 catalogues and 11422 patterns - 11422 of which are translated into English (UK/cm).
We work hard to bring you the best knitting and crochet have to offer, inspiration and advice as well as great quality yarns at incredible prices! Would you like to use our patterns for other than personal use? You can read what you are allowed to do in the Copyright text at the bottom of all our patterns. Happy crafting!
Comments / Questions (34)
Bonjour, Mon problème: Quand l'ouvrage mesure 36-37-38-39-40-41 cm, rabattre 3-3-4-5-5-6 mailles au début des 2 rangs suivants pour les emmanchures = 58-64-68-74-82-90 mailles. Est-ce que je dois diminuer 2x à droite de l'ouvrage sur l'endroit? Ou est-ce que je dois diminuer une 1x à droite (endroit)et 1x à gauche (envers) pour faire les emmanchures?
05.07.2021 - 11:46DROPS Design answered:
Bonjour Mme Voirol, vous allez rabattre 1 fois 3-3-4-5-5-6 mailles en début de rang sur l'endroit + 1 fois 3-3-4-5-5-6 mailles en début de rang sur l'envers (= 3-3-4-5-5-6 mailles au début des deux rangs suivants), autrement dit 1 x à droite et 1 x à gauche. Bon tricot!
05.07.2021 - 12:08Hejsa😀 Hvor meget garn skal jeg bruge, hvis jeg skal lave den ensfarvet i M ?
10.04.2021 - 09:49DROPS Design answered:
Hej Asha, så skal du bruge ca ca 450 gr, men husk - hellere et nøgle for meget end et for lidt, man kan altid lave en scrunchie :)
12.04.2021 - 14:43Vil gerne gerne lave denne top men i tre farver maksimalt, kan i hjælpe med hvor meget jeg i så fald skal bruge af garn?😊
31.03.2021 - 12:56DROPS Design answered:
Hej Pia, nej det kan vi desværre ikke, det kommer helt an på hvor store felter du vil strikke af hver farve og i hvilken kombination og størrelse....
06.04.2021 - 13:47Hola! Tengo dos preguntas. En el delantero, me toca pasar los puntos al gancho auxiliar para el cuello y finalizar los hombros. Los puntos se pasan al gancho por el lado del derecho? Y cuando dice "Continuar con el punto musgo y las rayas y seguir cerrando para el cuello cada 2a fila...", comienzo a cerrar los puntos desde el centro del delantero? Gracias!!
08.05.2020 - 22:46DROPS Design answered:
Hola Claudia. Los puntos en espera pasan al gancho auxiliar por el lado derecho. Las disminuciones para el escote se hacen desde el escote por el lado derecho o por el lado revés (depende del delantero que estemos trabajando, el derecho o el izquierdo).
20.11.2020 - 15:53Hola. Me toca dividir la labor para empezar la abertura de la espalda. Cómo sigo? Tejo 1 fila de derecho y luego paso la mitad de los puntos al gancho auxiliar (es decir, cuando empiece a tejer uno de los lados me tocará iniciar del revés)? O primero paso los puntos al gancho auxiliar y luego empiezo a tejer (empezaría cada lado de derecho)? Gracias por la aclaración.
10.04.2020 - 11:00DROPS Design answered:
Hola Claudia. Si, es correcto. Después de completar 1 fila de derecho pasar la mitad de los puntos a un gancho auxiliar y comenzar a trabajar el resto de la espalda comenzando por el lado revés.
14.04.2020 - 21:02Hola! Me podrían decir qué conviene más, si cortar el hilo cuando se hace un cambio de color o llevar el hilo inactivo todo el largo del borde? Mi duda es porque son muchos colores y las franjas varían de pequeñas a grandes. Gracias!
22.03.2020 - 22:11DROPS Design answered:
Hola Claudia. Este vídeo te podría ayudar:
22.03.2020 - 23:18Hola! Quería saber si en el montaje de puntos de este modelo ya están incluidos los puntos de orillo. Gracias!
20.03.2020 - 16:16DROPS Design answered:
Hola Claudia. Los puntos de orillo están incluidos en el número total de puntos.
22.03.2020 - 23:37Hola! Quisiera saber si en el montaje de puntos de este modelo ya están incluidos los puntos de orillo. Gracias!
20.03.2020 - 15:47I would like to make this top with one colour of safran yarn. Could you tell me how many skeins will I need?
18.02.2019 - 14:27DROPS Design answered:
Dear Pola, we are unfortunately not able to adjust every pattern to every single request. For any further individual assistance please contact your DROPS store - even per mail or telephone. Happy knitting!
18.02.2019 - 16:01Wenn ich es mit einem Faden Safran in L stricken möchte, wie viel Maschen muss ich dann aufnehmen? Kann ich das irgendwie umrechnen? Danke
08.08.2018 - 12:34DROPS Design answered:
Liebe Anette, dieses Top wird mit 2 Fäden Safran gestrickt, dh die Maschenprobe wird nicht die gleiche sein wie mit nur 1 Faden und die Anleitung sollen Sie dann ganz anpassen, je nach Ihrer eigenen Maschenprobe. Am besten stricken Sie mit 2 Fäden Safran - wie in der anleitung oder mit nur 1 Faden Garngruppe C - siehe unseren Garnumrechner. Viel Spaß beim stricken!
08.08.2018 - 13:22