DROPS Merino Extra Fine
100% Wool
from 3.50 £ /50g
Get the yarn to make this pattern from 31.50£.

The yarn cost is calculated from the pattern’s smallest size and the yarn’s cheapest product type. Looking for an even better price? You might find it on the DROPS Deals!

DROPS SS24

Golden Heart

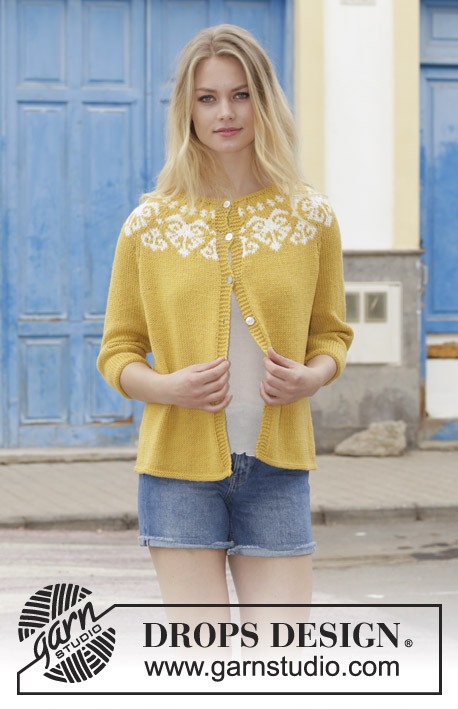
Knitted jumper with round yoke, multi-coloured Norwegian pattern and ¾-length sleeves, worked top down. Sizes S - XXXL. The piece is worked in DROPS Merino Extra Fine.

DROPS 187-12
DROPS Design: Pattern no me-131
Yarn group B
-----------------------------------------------------------
Sizes: S - M - L - XL - XXL - XXXL
Materials:
DROPS MERINO EXTRA FINE from Garnstudio (belongs to yarn group B)
400-400-450-500-550-600 g colour 30, mustard
50-50-50-50-50-50 g colour 01, off white

The piece can also be knitted with yarn from:
"Alternative yarn (Yarn group B)" – see link below.

DROPS DOUBLE POINTED NEEDLES AND CIRCULAR NEEDLE (40 + 60 or 80 cm) SIZE 4 MM – or the size needed to get 21 stitches and 28 rows of stocking stitch on 10 cm in width and 10 cm in height.

DROPS DOUBLE POINTED NEEDLES AND CIRCULAR NEEDLE (40 + 60 or 80 cm) SIZE 3 MM – for garter stitch edges.
----------------------------------------------------------

-------------------------------------------------------

Alternative Yarn – See how to change yarns here
Yarn Groups A to F – Use the same pattern and change the yarn here
Yarn usage using an alternative yarn – Use our yarn converter here

-------------------------------------------------------

DROPS Merino Extra Fine
100% Wool
from 3.50 £ /50g
Get the yarn to make this pattern from 31.50£.

The yarn cost is calculated from the pattern’s smallest size and the yarn’s cheapest product type. Looking for an even better price? You might find it on the DROPS Deals!

Pattern instructions

NOTE: This pattern is written in British English. All measurements in charts are in cm. For conversion from cm to inches - click here. There are different terms for crocheting in British and American English. If this pattern includes crochet, click for "crochet terms" here. For this pattern in American English, please click here.
INFORMATION FOR THE PATTERN:

RIDGE/GARTER STITCH (worked in the round with double pointed needles):
1 ridge = Knit 1 round and purl 1 round .

INCREASE TIP (for yoke):
To work out how to increase evenly, count the total number of stitches on the needle (e.g. 100 stitches) and divide by the number of increases to be made (e.g. 12) = 8.3.
In this example, increase after approx. every 8th stitch by making 1 yarn over; on the next round knit the yarn overs twisted to avoid holes.

PATTERN:
See diagrams A.1 to A.3. Choose diagram for your size (applies to A.1 and A.2).
The whole pattern is worked in stocking stitch.

RAGLAN:
Increase 1 stitch on each side of the 4 marker threads in each transition between body and sleeves as follows: Start 1 stitch before the marker thread, make 1 yarn over, knit 2 (the marker thread sits in the middle of these 2 stitches), make 1 yarn over (= 2 stitches increased). On the next round knit the yarn overs to leave holes.

DECREASE TIP (for mid under sleeve):
Start 3 stitches before the marker thread, knit 2 together, knit 2 (the marker thread sits in the middle of these 2 stitches), slip 1 stitch as if to knit, knit 1 and pass the slipped stitch over the knitted stitch (= 2 stitches decreased).
----------------------------------------------------------

JUMPER:
The yoke and body are worked in the round with circular needle, top down. The sleeves are worked in the round with short circular needle top down; change to double pointed needles when necessary.

NECK:
Cast on 100-104-110-116-120-126 stitches with short circular needle size 3 mm and mustard. Work 2 RIDGES in the round – see description above. Knit 1 round where you increase 12-22-16-24-20-28 stitches evenly on round – read INCREASE TIP = 112-126-126-140-140-154 stitches. Change to circular needle size 4 mm and knit 1 round. Then work yoke as described below. REMEMBER THE KNITTING TENSION!

YOKE:
Work A.1 in the round (= 8-9-9-10-10-11 repeats of 14 stitches). Continue the pattern like this and increase as shown in the diagram. AT THE SAME TIME on the last round of A.1 increase 8-9-9-10-10-11 stitches evenly on round. When A.1 has been completed there are 152-171-171-190-190-209 stitches on the needle.
Continue by working A.2 in the round (= 8-9-9-10-10-11 repeats of 19 stitches). Continue the pattern like this and increase as shown in the diagram. When A.2 has been completed there are 208-234-234-260-260-286 stitches on the needle and the piece measures approx. 12-12-12-14-14-14 cm from the cast on edge mid front. Continue with mustard to finished length.
Knit 1 round where you increase 8-6-2-4-4-6 stitches evenly on round = 216-240-236-264-264-292 stitches. Knit 1 round.
Now insert 4 marker threads in the piece without working the stitches: The first marker thread is inserted after the first 34-37-37-42-44-50 stitches (= ½ back piece), 2nd marker thread is inserted after the next 40-46-44-48-44-46 stitches (= sleeve), 3rd marker thread is inserted after the next 68-74-74-84-88-100 stitches (= front piece) and the 4th marker thread is inserted after the next 40-46-44-48-44-46 stitches (= sleeve). There are now 34-37-37-42-44-50 stitches after the last marker thread for the other half back piece.
Work stocking stitch in the round. AT THE SAME TIME on the first round increase to RAGLAN – see description above (= 8 stitches increased). Continue to increase to raglan every 2nd round until you have increased a total of 11-12-16-16-19-19 times on each side of the 4 marker threads = 304-336-364-392-416-444 stitches on needle.
Continue working as before without further increases to raglan; but to avoid stopping the row of holes along each raglan line work A.3 in each transition between body and sleeves (the marker threads sit in the middle of A.3).
When the piece measures 23-25-27-29-31-33 cm work the next round as follows:
Work as before over the first 45-49-53-58-63-69 stitches (= ½ back piece), place the next 62-70-76-80-82-84 stitches on 1 thread for sleeve, cast on 6-6-8-8-10-12 new stitches on the needle (= in side under sleeve), knit 90-98-106-116-126-138 stitches (= front piece), place the next 62-70-76-80-82-84 stitches on 1 thread for sleeve, cast on 6-6-8-8-10-12 new stitches on needle (= in side under sleeve) and work as before over the remaining 45-49-53-58-63-69 stitches (= half back piece). Body and sleeves are finished separately. THE PIECE IS NOW MEASURED FROM HERE!

BODY:
= 192-208-228-248-272-300 stitches. Continue in the round with stocking stitch. When the piece measures 32 cm from the separation change to circular needle size 3 mm. Work 2 ridges in the round. Change back to circular needle size 4 mm and cast off with knit. The jumper measures approx. 56-58-60-62-64-66 cm from the shoulder down.

SLEEVE:
Place stitches from the thread in the one side of the piece on short circular needle size 4 mm and in addition knit up 1 stitch in each of the 6-6-8-8-10-12 stitches cast on under the sleeve = 68-76-84-88-92-96 stitches. Insert 1 marker thread in the middle of the 6-6-8-8-10-12 stitches. Work stocking stitch in the round with mustard. When the piece measures 2 cm from the separation decrease 2 stitches mid under sleeve – read DECREASE TIP. Decrease like this a total of 9-12-15-15-16-17 times in Size S: Every 8th round, in Size M: Every 5th round, in Size L: Every 4th round, in Size XL: Alternately every 3rd and 4th round, in Size XXL: Every 3rd round and in Size XXXL: Alternately every 2nd and 3rd round = 50-52-54-58-60-62 stitches. Continue working until the sleeve measures 26-24-23-21-19-18 cm from the separation. Change to double pointed needles size 3 mm and work 2 ridges in the round. Change back to double pointed needles size 4 mm and cast off with knit. Work the other sleeve in the same way.

Diagram

symbols = mustard
symbols = off white
symbols = between 2 stitches make 1 yarn over with mustard, on the next round work the yarn over twisted to avoid a hole
symbols = increase row
symbols = knit 2 together
symbols = slip 1 stitch as if to knit, knit 1, pass the slipped stitch over the knit stitch
symbols = between 2 stitches make 1 yarn over with mustard, on next round knit yarn over to make a hole
diagram
diagram
diagram

Each of our patterns has specific tutorial videos to help you.

Do you have a question? See a list of frequently asked questions (FAQ)

Knitting tension is what determines the final measurements of your work, and is usually measured per 10 x 10 cm. It is provided like so: number of stitches in width x number of rows in height - eg: 19 stitches x 26 rows = 10 x 10 cm.

The knitting tension is very individual; some people knit/crochet loosely while others work tightly. You adjust the knitting tension with the needle size, which is why the suggested needle size is only meant as a guide! You need to adjust this (up or down) to ensure that YOUR knitting tension matches the knitting tension provided in the pattern. If you work with a different knitting tension than provided you will have a different yarn consumption, and your work will have different measurements than what the pattern suggests.

The knitting tension also determines which yarns can replace each other. As long as you achieve the same knitting tension you can replace one yarn with another.

See DROPS lesson: How to measure your tension/gauge

See DROPS video: How to make a gauge tension swatch

The required amount of yarn is provided in grams, eg: 450 g. To calculate how many balls you’ll need you first need to know how many grams are in 1 ball (25g, 50g or 100g). This information is available if you click on the individual yarn quality on our pages. Divide the amount required with the amount of each ball. For example, if each ball is 50g (the most common amount), the calculation will be as follows: 450 / 50 = 9 balls.

The important thing when changing from one yarn to another is that the knitting/crochet tension remains the same. This is so that the measurements of the finished piece will be the same as on the sketch provided. It is easier to achieve the same knitting tension using yarns from the same yarn group. It is also possible to work with multiple strands of a thinner yarn to achieve the knitting tension of a thicker one. Please try our yarn converter. We recommend you to always work a test swatch.

Please NOTE: when changing yarn the garment might have a different look and feel to the garment in the photo, due to individual properties and qualities of each yarn.

See DROPS lesson: Can I use a different yarn than the one mentioned in the pattern?

All our yarns are categorised into yarn groups (from A to F) according to thickness and knitting tension – group A contains the thinnest yarns and group F the thickest. This makes it easier for you to find alternative yarns to our patterns, should you wish to switch yarn. All yarns within the same group have a similar knitting tension and can easily replace each other. However, different yarn qualities have different structures and properties which will give the finished work a unique look and feel.

Click here for an overview of the yarns in each yarn group

At the top of all our patterns you’ll find a link to our yarn calculator, which is a helpful tool should you wish to use a different yarn than suggested. By filling in the yarn quality you wish to replace, the amount (in your size) and number of strands, the calculator will present good alternative yarns with the same knitting tension. Additionally it will tell you how much you’ll require in the new qualities and whether you’ll need to work with multiple strands. Most skeins are 50g (some are 25g or 100g).

If the pattern is worked with multiple colours, every colour will have to be calculated separately. Similarly, if the pattern is worked with several strands of different yarns (for example 1 strand Alpaca and 1 strand Kid-Silk) you will have to find alternatives for each, individually.

Click here to see our yarn calculator

Since different yarns have different qualities and textures we have chosen to keep the original yarn in our patterns. However, you can easily find options among our available qualities by using our yarn calculator, or simply pick a yarn from the same yarn group.

It is possible that some retailers still have discontinued yarns in stock, or that someone has a few skeins at home that they would like to find patterns for.

The yarn calculator will provide both alternative yarn as well as required amount in the new quality.

If you think it's hard to decide what size to make, it can be a good idea to measure a garment you own already and like the size of. Then you can pick the size by comparing those measures with the ones available in the pattern's size chart.

You'll find the size chart at the bottom of the pattern.

See DROPS lesson: How to read size chart

The needle size provided in the pattern serves only as a guide, the important thing is to follow the knitting tension. And since knitting tension is very individual, you will have to adjust the needle size to ensure that YOUR tension is the same as in the pattern – maybe you’ll have to adjust 1, or even 2 needle sizes, up or down to achieve the correct tension. For this, we recommend that you work test swatches.

Should you work with a different knitting tension than the one provided, the measurements of the finished garment might deviate from the measurement sketch.

See DROPS lesson: How to measure your tension/gauge

See DROPS video: How to make a tension/gauge swatch

Working a garment top-down provides more flexibility and room for personal adjustment. For example it is easier to try the garment on while working, as well as making adjustments to length of yoke and shoulder caps.

The instructions are carefully explaining every step, in the correct order. Diagrams are adjusted to the knitting direction and are worked as usual.

The diagram depicts all rows/rounds, and every stitch seen from the right side. It is read from bottom to top, from right to left. 1 square = 1 stitch.

When working back and forth, every other row is worked from the right side and every other row is worked from the wrong side. When working from the wrong side, the diagram will have to be worked reversed: from left to right, knit stitches are purled, purl stitches are knit etc.

When working in the round every round is worked from the right side and the diagram are worked from right to left on all rounds.

See DROPS lesson: How to read knitting diagrams

The diagram depicts all rows/rounds, and every stitch seen from the right side. It is worked from bottom to top, from right to left.

When working back and forth every other row is worked from the right side: from right to left and every other row is worked from the wrong side: from left to right.

When working in the round, every row in the diagram are worked from the right side, from right to left.

When working a circular diagram you start in the middle and work your way outwards, counter clockwise, row by row.

The rows usually start with a given number of chain stitches (equivalent to the height of the following stitch), this will either be depicted in the diagram or explained in the pattern.

See DROPS lesson: How to read crochet diagrams

Instructions for working several diagrams after each other on the same row/round, will often be written like so: “work A.1, A.2, A.3 a total of 0-0-2-3-4 times". This means you work A.1 once, then A.2 is worked once, and A.3 is repeated (in width) the number of times provided for your size – in this case like so: S = 0 times, M = 0 times, L=2 times, XL= 3 times and XXL = 4 times.

The diagrams are worked as usual: begin with the first row in A.1, then work the first row in A.2 etc.

See DROPS lesson: How to read knitting diagrams

See DROPS lesson: How to read crochet diagrams

The total width of the garment (from wrist-to-wrist) will be larger in the larger sizes, despite the actual sleeves being shorter. The larger sizes have longer sleeve caps and wider shoulders, so there will be a good fit in all sizes.

The measurement sketch/schematic drawing provides information regarding the full length of the garment. If it’s a jumper or a jacket the length is measured from the highest point on the shoulder closest to the neckline, and straight down to the bottom of the garment. It is NOT measured from the tip of shoulder. Similarly, the length of yoke is measured from the highest point on the shoulder and down to where yoke is split into body and sleeves.

On a jacket measures are never taken along bands, unless specifically stated. Always measure inside band stitches when measuring the length.

See DROPS lesson: How to read a schematic drawing

Diagrams are often repeated on the round or in height. 1 repeat is the diagram the way it appears in the pattern. If it says to work 5 repeats of A.1 in the round, then you work A.1 a total of 5 times after/next to each other in the round. If it says to work 2 repeats of A.1 vertically/in height you work the entire diagram once, then begin again at the start and work the entire diagram one more time.

Chain stitches are slightly narrower than other stitches and to avoid working the cast-on edge too tight, we simply chain more stitches to begin with. The stitch count will be adjusted on the following row to fit the pattern and measurement sketch.

The rib edge is more elastic and will contract slightly compared to, for example, stocking stitch. By increasing before the rib edge, you avoid a visible difference in width between the rib edge and the rest of the body.

It’s very easy to cast off too tightly, and by making yarn overs while casting off (and simultaneously casting these off) you avoid a too tight cast off edge.

See DROPS video: How to bind off with yarn overs (yo)

To achieve an even increase (or decrease) you can increase on, for example: every 3rd and 4th row alternately, like so: work 2 rows and increase on the 3rd row, work 3 rows and increase on the 4th. Repeat this until the increase is complete.

See DROPS lesson: Increase or decrease 1 st on every 3rd and 4th row alternately

Should you prefer to work in the round instead of back and forth, you may of course adjust the pattern. You’ll need to add steeks mid-front (usually 5 stitches), and follow the instructions. When you would normally turn and work from the wrong side, simply work across the steek and continue in the round. At the end you’ll cut the piece open, pick up stitches to work bands, and cover the cut edges.

See DROPS video: How to knit steeks and cut open

Should you prefer to work back and forth instead of in the round, you may of course adjust the pattern so you work the pieces separately and then assemble them at the end. Divide the stitches for the body in 2, add 1 edge stitch in each side (for sewing) and work the front and back pieces separately.

See DROPS lesson: Can I adapt a pattern for circular needles into straight needles?

Pattern repeats can vary slightly in the different sizes, in order to get the correct proportions. If you’re not working the exact same size as the garment in the photo, yours might deviate slightly. This has been carefully developed and adjusted so that the complete impression of the garment is the same in all sizes.

Make sure to follow instructions and diagrams for your size!

If you have found a pattern you like which is available in women’s size it’s not very difficult to convert it to men’s size. The biggest difference will be the length of sleeves and body. Start working on the women size that you think would fit across the chest. The additional length will be worked right before you cast off for the armhole/sleeve cap. If the pattern is worked top-down you can add the length right after the armhole or before the first decrease on sleeve.

Regarding additional yarn amount, this will depend on how much length you add, but it is better with a skein too many than too few.

All yarns will have excess fibres (from production) that might come off as lint or shedding. Brushed yarns (ie hairier yarns) have more of these loose, excess fibres, causing more shedding.

Shedding also depends on what is worn under or over the garment, and whether this pulls at the yarn fibres. It’s therefore not possible to guarantee that there will be no shedding

Below are some tips on how to get the best result when working with hairier yarns:

1. When the garment is finished (before you wash it) shake it vigorously so the looser hairs come off. NOTE: do NOT use a lint roller, brush or any method that pulls at the yarn.

2. Place the garment in a plastic bag and put it in your freezer - the temperature will cause the fibres to become less attached to each other, and excess fibres will come off easier.

3. Leave in the freezer for a few hours before taking it out and shaking it again.

4. Wash the garment according to the instructions on the yarn label.

Pilling is a natural process that happens to even the most exclusive of fibers. It's a natural sign of wear and tear that is hard to avoid, and that is most visible in high friction areas of your garment like a sweater's arms and cuffs.

You can make your garment look as new by removing the pilling, using a fabric comb or a pill/lint remover.

Still can't find the answer you need? Then scroll down and leave your question so one of our experts can try to help you. This will be done normally within 5 to 10 working days.
In the meantime, you can read the questions and answers that others have left to this pattern or join the DROPS Workshop on Facebook to get help from fellow knitters/crocheters!

You might also like...

Türkiser Herzschlag

Sabine, Germany

Golden Heart

Ira Rott, Canada

Golden Heart by Drops

SimoneetGinette, France

Golden Heart

strikkebilla, Norway

Post a comment to pattern DROPS 187-12

We would love to hear what you have to say about this pattern!

If you want to leave a question, please make sure you select the correct category in the form below, to speed up the answering process. Required fields are marked *.

Comments / Questions (27)

country flag Assa wrote:

Liebes Drops-Team, ich habe den Pulli in L gestrickt, bin nun bei 364 Maschen angelangt. Jetzt steht dort A3 stricken. Ab einer Länge von 27 cm dann Maschen stilllegen. Ab wo sind die 27cm denn gemessen? Ich komme ab Rand( Strickanfang) auf ca 38 cm. Und wie lange muss man A3 stricken, nur die 4 Reihen? Ich freue mich aud Eure Antwort, LG Assa

31.10.2019 - 10:26

DROPS Design answered:

Liebe Assa, stimmt Ihre Maschenprobe in der Höhe? Nach Hals stricken Sie: A.1 = 10 Reihe + A.2 = 24 Reihe + 32 Reihe mit Raglanzunahmen = 66 Reihen = ca 24 cm. Viel Spaß beim stricken!

04.11.2019 - 14:06

country flag Zebra wrote:

I'm having the same problem as Marije Wolde before me, in that this section has me confused. "When A.2 has been completed there are 208-234-234-260-260-286 stitches on the needle and the piece measures approx. 12-12-12-14-14-14 cm from the cast on edge mid front. [b]Continue with mustard to finished length.[/b]." Does this mean to get to 12 or 14 cm depending on size?

16.06.2019 - 01:16

DROPS Design answered:

Dear Zebra, yes 12 or 14 cm depends on size you are knitting (S - M - L - XL - XXL - XXXL): for size S you should have 208 sts and piece should measure 12 cm, for size M and L you should have 234 sts and piece should measure 12 cm, for size XL you should have 260 sts and piece should measure 14 cm, etc. After that you work only with mustard yarn. Happy knitting!

16.06.2019 - 12:52

country flag Marije Wolde wrote:

Nadat a2 is voltooid is het de bedoeling dat de breier door breit tot de gewenste lengte, wat bedoelen ze hiermee? totdat ze 14 cm hebben behaald? dit is de eerste keer dat ik van boven naar beneden brei en dit stuk snap ik niet.

01.06.2019 - 00:35

country flag Dea wrote:

Buongiorno, per la manica taglia M c'è scritto di fare le diminuzioni ogni 5 ferri, quindi lavaorare 4 ferri e poi l 5 diminuire? Grazie

28.05.2019 - 15:28

DROPS Design answered:

Buongiorno Dea, si esatto, lavora 4 giri e sul quinto diminuisce. Buon lavoro!

28.05.2019 - 15:46

country flag Dea wrote:

Buongiorno, nella spiegazione dello sprone c'è un refuso " ALLO STESSO TEMPO sul 1° giro aumemntare per il RAGLAN ..." Ciao.

05.05.2019 - 10:10

DROPS Design answered:

Buongiorno Dea. Abbiamo corretto il testo. Grazie e buon lavoro!

05.05.2019 - 10:31

country flag Katrin Hülsenbusch wrote:

Bitte korrigieren sie die Skizze A2 für die Größen XL, XXL UND XXXL. Ich hatte entsprechend dem Diagramm eine Zunahme in der 3. REIHE gemacht, leider die Gesamtzahl der Maschen nicht nachgerechnet. Muss nun ribbeln... na ja noch nicht so schlimm. Aber vl. irritiert das noch andere? Danke für ihre schönen kostenlosen Anleitungen.

04.05.2019 - 09:08

DROPS Design answered:

Liebe Frau Hülsenbusch, danke für den Hinweis, A.2 sollte über 19 Maschen gestrickt werden, auch wenn das Diagram nur 18 zeigt, neue Diagramme kommen so schnell wie möglich. Viel Spaß beim stricken!

06.05.2019 - 15:35

country flag Mc wrote:

Comment faire pour avoir un alignement parfait, sur les rangs plastron tricotés en rond ? Merci

02.05.2019 - 10:23

DROPS Design answered:

Bonjour Mc, tricotez le diagramme A.2 approprié à la taille en augmentant bien comme le montre le diagramme, les motifs de l'empiècement tomberont bien tout le tour. Bon tricot!

02.05.2019 - 12:02

country flag Anne S Engevik wrote:

Hvordan få til øking av masker og samtidig få mønsteret til å passe?

03.02.2019 - 14:59

DROPS Design answered:

Hei Anne. Alle økninger er tegnet inn i diagrammet (sort oval), så om du følger dette vil mønsteret passe. Som du ser er det lagt til 1 maske i diagrammet på omgangen etter en økning. Feks i diagram A.2, omg 3 i S-L og omgang 5 i XL-XXXL strikkes det slik: 1 maske sennep, 1 kast, 2 masker sennep, 4 masker natur osv. Omgangen etter (4 eller 6 omgang) strikkes slik: 3 masker sennep (kastet = 2. masken), 6 masker natur osv. Strikk hver omgang akkurat slik den vises i diagrammet så blir dette riktig. God fornøyelse

08.02.2019 - 09:54

country flag A. Kruse wrote:

Ein schöner Pullover... aber der untere Rand rollt sich auf. Was kann man tun?

10.12.2018 - 12:12

DROPS Design answered:

Liebe Frau Kruse, Sie können den Pullover mit Stecknadeln auf einer geeigneten Unterlage spannen, anfeuchten (z.B. mit einer Sprühflasche für Blumen) und trocknen lassen, danach entfernen Sie die Stecknadeln, dann sollte sich der Rand nicht mehr rollen. Viel Spaß beim stricken!

10.12.2018 - 12:32

country flag Hanna wrote:

Hei, onkohan isompien kokojen (XL, XXL ja XXXL) A2-ruutupiirroksessa virhe kuvion alaosassa? Kuvion alapuolella lukee, että mallikerrassa on 19 silmukkaa. Kolmella alimmalla kerroksella kuvioon on kuitenkin piirretty vain 18 silmukkaa. Neljännellä kerroksella kuviossa on 19s, mutta edellisellä kerroksella ei ole merkitty lisäyksiä. Miten tässä kohdassa pitäisi neuloa? T. Hanna

04.11.2018 - 22:00