DROPS Brushed Alpaca Silk uni colour 77% Alpaca, 23% Silk |
3.95 $ /25g |
Order |
Clicking the ORDER button will redirect you to Wool Warehouse Direct Ltd website
The yarn cost is calculated from the pattern’s smallest size and the yarn’s cheapest product type. Looking for an even better price? You might find it on the DROPS Deals!
-------------------------------------------------------
Alternative Yarn – See how to change yarns here
Yarn Groups A to F – Use the same pattern and change the yarn here
Yarn usage using an alternative yarn – Use our yarn converter here
-------------------------------------------------------
DROPS Brushed Alpaca Silk uni colour 77% Alpaca, 23% Silk 3.95 $ /25g Order |
Clicking the ORDER button will redirect you to Wool Warehouse Direct Ltd website
The yarn cost is calculated from the pattern’s smallest size and the yarn’s cheapest product type. Looking for an even better price? You might find it on the DROPS Deals!
All measurements in charts are in cm.
Each of our patterns has specific tutorial videos to help you.
These step-by-step tutorials might also help you:
Why is the knitting/crochet tension so important?
Knitting tension is what determines the final measurements of your work, and is usually measured per 10 x 10 cm. It is provided like so: number of stitches in width x number of rows in height - eg: 19 stitches x 26 rows = 10 x 10 cm.
The knitting tension is very individual; some people knit/crochet loosely while others work tightly. You adjust the knitting tension with the needle size, which is why the suggested needle size only serve as a guide! You need to adjust this (up or down) to ensure that YOUR knitting tension matches the knitting tension provided in the pattern. If you work with a different knitting tension than provided you will have a different yarn consumption, and your work will have different measurements than what the pattern suggests.
The knitting tension also determines which yarns can replace each other. As long as you achieve the same knitting tension you can replace one yarn with another.
See DROPS lesson: How to measure your tension/gauge
See DROPS video: How to make a gauge tension swatch
How do I know how many balls of yarn I need?
The required amount of yarn is provided in grams, eg: 450 g. To calculate how many balls you’ll need you first need to know how many grams are in 1 ball (25g, 50g or 100g). This information is available if you click on the individual yarn quality on our pages. Divide the amount required with the amount of each ball. For example, if each ball is 50g (the most common amount), the calculation will be as follows: 450 / 50 = 9 balls.
Can I use a different yarn than what the pattern suggests?
The important thing when changing from one yarn to another is that the knitting/crochet tension remains the same. This is so that the measurements of the finished piece will be the same as on the sketch provided. It is easier to achieve the same knitting tension using yarns from the same yarn group. It is also possible to work with multiple strands of a thinner yarn to achieve the knitting tension of a thicker one. Please try our yarn converter. We recommend you to always work a test swatch.
Please NOTE: when changing yarn the garment might have a different look and feel to the garment in the photo, due to individual properties and qualities of each yarn.
See DROPS lesson: Can I use a different yarn than the one mentioned in the pattern?
What are the yarn groups?
All our yarns are categorised into yarn groups (from A to F) according to thickness and knitting tension – group A contains the thinnest yarns and group F the thickest. This makes it easier for you to find alternative yarns to our patterns, should you wish to switch yarn. All yarns within the same group have a similar knitting tension and can easily replace each other. However, different yarn qualities have different structures and properties which will give the finished work a unique look and feel.
How do I use the yarn converter?
At the top of all our patterns you’ll find a link to our yarn converter, which is a helpful tool should you wish to use a different yarn than suggested. By filling in the yarn quality you wish to replace, the amount (in your size) and number of strands, the converter will present good alternative yarns with the same knitting tension. Additionally it will tell you how much you’ll require in the new qualities and whether you’ll need to work with multiple strands. Most skeins are 50g (some are 25g or 100g).
If the pattern is worked with multiple colours, every colour will have to be converted separately. Similarly, if the pattern is worked with several strands of different yarns (for example 1 strand Alpaca and 1 strand Kid-Silk) you will have to find alternatives for each, individually.
Why do you show discontinued yarns in the patterns?
Since different yarns have different qualities and textures we have chosen to keep the original yarn in our patterns. However, you can easily find options among our available qualities by using our yarn converter, or simply pick a yarn from the same yarn group.
It is possible that some retailers still have discontinued yarns in stock, or that someone has a few skeins at home that they would like to find patterns for.
The yarn converter will provide both alternative yarn as well as required amount in the new quality.
What size should I knit?
If you think it's hard to decide what size to make, it can be a good idea to measure a garment you own already and like the size of. Then you can pick the size by comparing those measures with the ones available in the pattern's size chart.
You'll find the size chart at the bottom of the pattern.
See DROPS lesson: How to read size chart
Why do I get the wrong knitting tension with the suggested needle size?
The needle size provided in the pattern serves only as a guide, the important thing is to follow the knitting tension. And since knitting tension is very individual, you will have to adjust the needle size to ensure that YOUR tension is the same as in the pattern – maybe you’ll have to adjust 1, or even 2 needle sizes, up or down to achieve the correct tension. For this, we recommend that you work test swatches.
Should you work with a different knitting tension than the one provided, the measurements of the finished garment might deviate from the measurement sketch.
See DROPS lesson: How to measure your tension/gauge
See DROPS video: How to make a gauge tension swatch
Why is the pattern worked top-down?
Working a garment top-down provides more flexibility and room for personal adjustment. For example it is easier to try the garment on while working, as well as making adjustments to length of yoke and shoulder caps.
The instructions are carefully explaining every step, in the correct order. Diagrams are adjusted to the knitting direction and are worked as usual.
How do I work according to a knitting diagram?
The diagram depicts all rows/rounds, and every stitch seen from the right side. It is read from bottom to top, from right to left. 1 square = 1 stitch.
When working back and forth, every other row is worked from the right side and every other row is worked from the wrong side. When working from the wrong side, the diagram will have to be worked reversed: from left to right, knit stitches are purled, purl stitches are knit etc.
When working in the round every round is worked from the right side and the diagram are worked from right to left on all rounds.
See DROPS lesson: How to read knitting diagrams
How do I work according to a crochet diagram?
The diagram depicts all rows/rounds, and every stitch seen from the right side. It is worked from bottom to top, from right to left.
When working back and forth every other row is worked from the right side: from right to left and every other row is worked from the wrong side: from left to right.
When working in the round, every row in the diagram are worked from the right side, from right to left.
When working a circular diagram you start in the middle and work your way outwards, counter clockwise, row by row.
The rows usually start with a given number of chain stitches (equivalent to the height of the following stitch), this will either be depicted in the diagram or explained in the pattern.
See DROPS lesson: How to read crochet diagrams
How do I work several diagrams simultaneously on the same row/round?
Instructions for working several diagrams after each other on the same row/round, will often be written like so: “work A.1, A.2, A.3 a total of 0-0-2-3-4 times". This means you work A.1 once, then A.2 is worked once, and A.3 is repeated (in width) the number of times provided for your size – in this case like so: S = 0 times, M = 0 times, L=2 times, XL= 3 times and XXL = 4 times.
The diagrams are worked as usual: begin with the first row in A.1, then work the first row in A.2 etc.
See DROPS lesson: How to read knitting diagrams
See DROPS lesson: How to read crochet diagrams
Why are the sleeves shorter in larger sizes?
The total width of the garment (from wrist-to-wrist) will be larger in the larger sizes, despite the actual sleeves being shorter. The larger sizes have longer sleeve caps and wider shoulders, so there will be a good fit in all sizes.
Where on the garment is the length measured?
The measurement sketch/schematic drawing provides information regarding the full length of the garment. If it’s a jumper or a jacket the length is measured from the highest point on the shoulder (usually closest to the neckline), and straight down to the bottom of the garment. It is NOT measured from the tip of shoulder. Similarly, the length of yoke is measured from the highest point on the shoulder and down to where yoke is split into body and sleeves.
See DROPS lesson: How to read a schematic drawing
What is a repeat?
Diagrams are often repeated on the round or in height. 1 repeat is the diagram the way it appears in the pattern. If it says to work 5 repeats of A.1 in the round, then you work A.1 a total of 5 times after/next to each other in the round. If it says to work 2 repeats of A.1 vertically/in height you work the entire diagram once, then begin again at the start and work the entire diagram one more time.
Why does the piece start with more chain stitches than it’s worked with?
Chain stitches are slightly narrower than other stitches and to avoid working the cast-on edge too tight, we simply chain more stitches to begin with. The stitch count will be adjusted on the following row to fit the pattern and measurement sketch.
Why increase before the rib edge when the piece is worked top-down?
The rib edge is more elastic and will contract slightly compared to, for example, stocking stitch. By increasing before the rib edge, you avoid a visible difference in width between the rib edge and the rest of the body.
Why increase in the cast-off edge?
It’s very easy to cast off too tightly, and by making yarn overs while casting off (and simultaneously casting these off) you avoid a too tight cast off edge.
See DROPS video: How to bind off with yarn overs (yo)
How do I increase/decrease on every 3rd and 4th row/round alternately?
To achieve an even increase (or decrease) you can increase on, for example: every 3rd and 4th row alternately, like so: work 2 rows and increase on the 3rd row, work 3 rows and increase on the 4th. Repeat this until the increase is complete.
See DROPS lesson: Increase or decrease 1 st on every 3rd and 4th row alternately
How can I work a jacket in the round instead of back and forth?
Should you prefer to work in the round instead of back and forth, you may of course adjust the pattern. You’ll need to add steeks mid-front (usually 5 stitches), and follow the instructions. When you would normally turn and work from the wrong side, simply work across the steek and continue in the round. At the end you’ll cut the piece open, pick up stitches to work bands, and cover the cut edges.
See DROPS video: How to knit steeks and cut open
Can I work a jumper back and forth instead of in the round?
Should you prefer to work back and forth instead of in the round, you may of course adjust the pattern so you work the pieces separately and then assemble them at the end. Divide the stitches for the body in 2, add 1 edge stitch in each side (for sewing) and work the front and back pieces separately.
See DROPS lesson: Can I adapt a pattern for circular needles into straight needles?
Why is the pattern slightly different than what I see in the photo?
Pattern repeats can vary slightly in the different sizes, in order to get the correct proportions. If you’re not working the exact same size as the garment in the photo, yours might deviate slightly. This has been carefully developed and adjusted so that the complete impression of the garment is the same in all sizes.
Make sure to follow instructions and diagrams for your size!
How do I make a women’s size garment into a men’s size one?
If you have found a pattern you like which is available in women’s size it’s not very difficult to convert it to men’s size. The biggest difference will be the length of sleeves and body. Start working on the women size that you think would fit across the chest. The additional length will be worked right before you cast off for the armhole/sleeve cap. If the pattern is worked top-down you can add the length right after the armhole or before the first decrease on sleeve.
Regarding additional yarn amount, this will depend on how much length you add, but it is better with a skein too many than too few.
How do I prevent a hairy garment from shedding?
All yarns will have excess fibres (from production) that might come off as lint or shedding. Brushed yarns (ie hairier yarns) have more of these loose, excess fibres, causing more shedding.
Shedding also depends on what is worn under or over the garment, and whether this pulls at the yarn fibres. It’s therefore not possible to guarantee that there will be no shedding
Below are some tips on how to get the best result when working with hairier yarns:
1. When the garment is finished (before you wash it) shake it vigorously so the looser hairs come off. NOTE: do NOT use a lint roller, brush or any method that pulls at the yarn.
2. Place the garment in a plastic bag and put it in your freezer - the temperature will cause the fibres to become less attached to each other, and excess fibres will come off easier.
3. Leave in the freezer for a few hours before taking it out and shaking it again.
4. Wash the garment according to the instructions on the yarn label.
Why does my garment pill?
Pilling is a natural process that happens to even the most exclusive of fibers. It's a natural sign of wear and tear that is hard to avoid, and that is most visible in high friction areas of your garment like a sweater's arms and cuffs.
You can make your garment look as new by removing the pilling, using a fabric comb or a pill/lint remover.
Vaporeux |
|
|
|
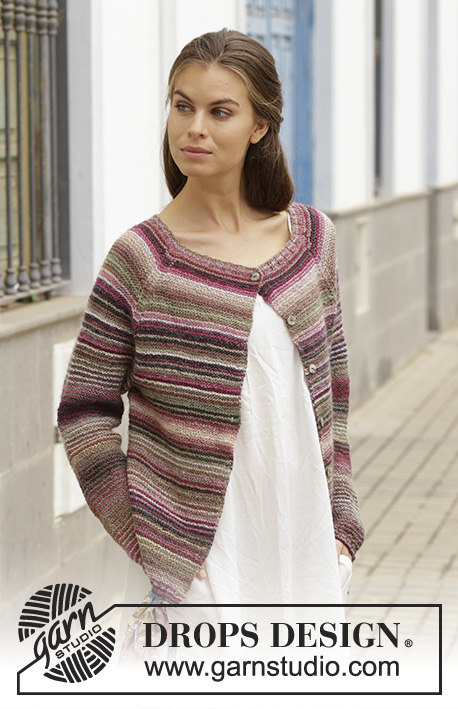
Knitted sweater with ribbed edges. Sizes S - XXXL. The piece is worked in DROPS Alpaca Bouclé and DROPS Brushed Alpaca Silk.
DROPS 188-18 |
|
INFORMATION FOR THE PATTERN: RIDGE/GARTER STITCH (worked back and forth): 1 ridge = Knit 2 rows. INCREASE TIP: All increases are worked from the right side! Increase 1 stitch by making 1 yarn over. On the next row, purl the yarn over twisted to avoid a hole. DECREASE TIP: To work out how to decrease evenly, count the total number of stitches on the needle (e.g. 71 stitches) and divide by the number of decreases to be made (e.g. 7) = 10.1. In this example, work approx. every 9th and 10th stitch together. ---------------------------------------------------------- SWEATER: The piece is worked back and forth on circular needle, bottom up. The sleeves are worked back and forth on circular needle. BACK PIECE: Cast on 71-71-77-83-89-95 stitches with circular needle size 8 mm / US 11 and 1 strand Alpaca Bouclé and 1 strand Brushed Alpaca Silk (= 2 strands). Purl 1 row from the wrong side. Then work rib as follows - from the right side: 4 stitches GARTER STITCH - see description above, * knit 3, purl 3 *, work from *-* until there are 7 stitches left on row, knit 3 stitches, 4 stitches garter stitch. Continue like this until the rib measures 5 cm / 2" – adjust so that the next row is worked from the right side. Change to circular needle size 9 mm / US 13. Knit 1 row (with 4 stitches garter stitch in each side) where you decrease 7-3-5-7-9-11 stitches evenly on row (but not over stitches in garter stitch) – read DECREASE TIP = 64-68-72-76-80-84 stitches. Continue with stockinette stitch with 4 stitches garter stitch in each side until the piece measures 42-43-44-45-46-47 cm / 16½"-17"-17¼"-17¾"-18"-18½" from the cast-on edge. REMEMBER THE GAUGE! At the start of the next 2 rows bind off 3 stitches in each side for armholes = 58-62-66-70-74-78 stitches. Continue with stockinette stitch and 1 edge stitch in garter stitch in each side. When piece measures 56-58-60-62-64-66 cm / 22"-22¾"-23⅝"-24⅜"-25¼"-26", bind off the middle 18-18-20-20-22-22 stitches for neck and finish each shoulder separately. Now bind off 1 stitch on the next row from the neck = 19-21-22-24-25-27 stitches. Then bind off for diagonal shoulder on each row from the side/armhole as follows: bind off 9-10-11-12-12-13 stitches 1 time and 10-11-11-12-13-14 stitches1 time. The piece measures approx. 60-62-64-66-68-70 cm / 23⅝"-24⅜"-25¼"-26"-26¾"-27½" from the top of shoulder and down. Work the other shoulder in the same way. FRONT PIECE: Cast on and work in the same way as for back piece, but when piece measures 52-54-55-57-58-60 cm / 20½"-21¼"-21½"-22½"-22¾"-23½" place the middle 10-10-10-10-12-12 stitches on a thread and each shoulder is finished separately. Continue to bind off stitches from each row from the neck as follows: bind off 2 stitches 2 times and 1 stitch 1-1-2-2-2-2 time = 19-21-22-24-25-27 stitches. When piece measures 56-58-60-62-64-66 cm / 22"-22¾"-23⅝"-24⅜"-25¼"-26" – adjust to match back piece, bind off for diagonal shoulders on each row from the side/armhole as follows: bind off 9-10-11-12-12-13 stitches 1 time and 10-11-11-12-13-14 stitches 1 time. Piece measures approx. 60-62-64-66-68-70 cm / 23⅝"-24⅜"-25¼"-26"-26¾"-27½" from top of shoulder down. Work the other shoulder in the same way. SLEEVES: The sleeve is worked back and forth on circular needle. Cast on 26-26-26-32-32-32 stitches (including 1 edge stitch in each side) with circular needle size 8 mm / US 11 and 1 strand Alpaca Bouclé and 1 strand Brushed Alpaca Silk (= 2 strands). Purl 1 row from the wrong side. Then work rib (= knit 3 /purl 3) with 1 edge stitch in garter stitch in each side until piece measures 5 cm / 2". Change to circular needle size 9 mm / US 13. Then work stockinette stitch with 1 edge stitch in garter stitch in each side. When piece measures 11-9-8-11-9-8 cm / 4½"-3½"-3"-4½"-3½"-3" increase 1 stitch in each side – read INCREASE TIP. Increase like this every 11-9-10-15-13-9 cm / 4½"-3½"-4"-6"-5"-3½" a total of 2-3-4-2-3-4 times = 30-32-34-36-38-40 stitches. When piece measures 44-43-42-41-40-39 cm / 17¼"-17"-16½"-16"-15¾"-15¼" (shorter measurements in larger sizes due to broader shoulders), bind off. Work the other sleeve in the same way. ASSEMBLY: Asembly is worked with 1 strand of each quality (= 2 strands). Sew shoulder seams with grafting stitches inside the bind off edge so the seam is flat. Sew sleeves to body. Sew the seams underneath the sleeves inside the 1 edge stitch in each side. Sew the side seams in the outermost loop of the outermost stitch, but leave approx. 10 cm / 4" for split at bottom. Repeat on the other side. Cut and fasten strands. NECK EDGE: Knit up 60-60-66-66-72-72 stitches (including stitches from the thread) around the neck with circular needle size 8 mm / US 11 and 1 strand of each quality (= 2 strands). Work rib (= knit 3 / purl 3) for 4 cm / 1½". Bind off with knit over knit and purl over purl. |
|
Have you made this or any other of our designs? Tag your pictures in social media with #dropsdesign so we can see them! Do you need help with this pattern?You'll find tutorial videos, a Comments/Questions area and more by visiting the pattern on garnstudio.com. © 1982-2024 DROPS Design A/S. We reserve all rights. This document, including all its sub-sections, has copyrights. Read more about what you can do with our patterns at the bottom of each pattern on our site. |
With over 40 years in knitting and crochet design, DROPS Design offers one of the most extensive collections of free patterns on the internet - translated to 17 languages. As of today we count 304 catalogs and 11422 patterns - 11417 of which are translated into English (US/in).
We work hard to bring you the best knitting and crochet have to offer, inspiration and advice as well as great quality yarns at incredible prices! Would you like to use our patterns for other than personal use? You can read what you are allowed to do in the Copyright text at the bottom of all our patterns. Happy crafting!
Comments / Questions (21)
Edith Finweg wrote:
Brauche ich tatsächlich nur 175 g, wenn ich diesen Pulli in XXL oder XXXL mit Brushed Alpaka Silk stricken möchte? Ich habe noch genauso viel Material. Wäre schlimm, wenn ich nicht mehr nachbestellen könnte und der Pulli erst halb fertig ist... :-(
22.11.2018 - 17:42DROPS Design answered:
Liebe Frau Finweg, dieser Pulli wird mit 2 Fäden gestrickt; 1 Faden Alpaca Bouclé + 1 Faden Brushed Alpaca Silk, in diesem Fall brauchen Sie nur 175 g Brushed Alpaca Silk + dazu 350 g Alpaca Bouclé. Wenn Sie ihn nur mit Brushed Alpaca Silk stricken möchten, sollen Sie die Garnmenge in Alpaca Bouclé umrechnen - benutzen Sie unser Garnumrechner und lesen Sie hier = mehr über Garnalternativen. Viel Spaß beim stricken!
23.11.2018 - 09:50Mette wrote:
Jeg er vild med modellen, men kunne godt tænke mig at strikke den i drops sky og evt på en pind 4,5 - kan jeg følge mønstret eller skal jeg regne noget om?
08.09.2018 - 13:32DROPS Design answered:
Hei Mette. Denne modellen er strikket med en strikkefasthet på 10 mx 14 p = 10 x 10 cm. Om du endrer på dette vil dimensjonene på plagget bli helt annerledes enn angitt. Det er brukt garn fra garngruppe E (evt 2 tråder fra C) og pinne 9. Sky tilhører garngruppe B, og selv med 2 tråder ville dette kun tilsvare garngruppe D. Om du endrer pinnestørrelsen fra 9 til 4,5 vil dette også endre på strikkefastheten og hele oppskriften vil måtte regnes om. Vi anbefaler at du forholder deg til den angitte strikkefastheten, men så lenge du gjør det kan du endre pinner og garn som du måtte ønske, uten å påvirke plaggets endelige mål. God fornøyelse.
10.09.2018 - 10:58Susanne Anklam wrote:
Ist es richtig , dass nur 300 g wolle für einen Pullover in S benötigt werden?
19.08.2018 - 14:34DROPS Design answered:
Liebe Susanne, ja, das ist korrekt, insgesamt werden 300 g benötigt. Beide Garne haben eine vergleichsweise lange Lauflänge und der Pullover wird luftig gestrickt. Falls Sie eine Garnalternative verwenden möchten, müssen Sie die Lauflänge berücksichtigen. Beachten Sie, dass Sie die Maschenprobe und die Maße einhalten müssen, damit das Garn reicht. Viel Spaß beim Stricken!
24.08.2018 - 10:32Lorena wrote:
Hola, Quiero hacer este jersey y me he comprado lo necesario, cambiando eso sí, la lana DROPS ALPACA BOUCLÉ por DROPS AIR, pero ya simplemente tejiendo la muestra los puntos me quedan muy sueltos. He comprado agujas circulares de 8mm y 9mm, tengo que apretar más los puntos? es cuestión de que las agujas no sean de la marca drops? Si pudiéseis darme unos consejos sobre cómo hacerlo os lo agradecería! Gracias de antemano!
27.04.2018 - 11:18DROPS Design answered:
Hola Lorena. ALPACA BOUCLÉ tiene una forma muy especial ( muy rizada ) y es bastante difícil buscar otra lana para sustituirla que tenga el mismo efecto. Y más aún con Alpaca Silk. Si lo vas a trabajar sólo con Air hay que usar agujas 4,5- 5 mm. Si vas a trabajar con Air y Alpaca Silk entonces se puede trabajar con agujas más gordas. Pero la labor en ambos casos va a salir diferente a la de la foto.
30.04.2018 - 20:43Renate wrote:
Gibt es ein Problem, wenn man den Pulli bis zum Armausschnitt in Runden auf der Rundnadel strickt? Ich würde dann einfach glatt rechts stricken.
11.04.2018 - 18:36DROPS Design answered:
Liebe Renate, wahrscheinlich können Sie auch den Pullover in Runden stricken, aber denken Sie daran, daß manchmal die Naht der Ausformung gehören. Viel spaß beim stricken!
12.04.2018 - 08:26Christine wrote:
Ich habe die Strickanleitung noch nicht genau gelesen. Wollte jedoch fragen, ob man anstelle der Rundstricknadeln auch "normale" Stricknadeln verwenden kann.
09.02.2018 - 13:47DROPS Design answered:
Liebe Christine, jedes Teil wird hin und zurück mit Rundnadel gestrickt, um genügend Platz für alle Maschen zu haben, gerne können sie mit Spitznadeln stricken, beachten Sie nur, daß die Maschenprobe immer stimmt (die Maschen werden etwas enger sein). Nur Hals wird in der Runde gestrickt. Viel Spaß beim stricken!
09.02.2018 - 17:42Anna wrote:
I really liked this sweater. I want to knit but I see that in the description of the sleeve there are inaccuracies in counting sts after the increases. And also the length of the sleeve seems to me too big for such a wide body. Tell me please whether everything is true in the description of the sleeve?
17.01.2018 - 07:21DROPS Design answered:
Dear Anna, pattern has been checked and everything looks fine. Happy knitting!
17.01.2018 - 11:28Géraldine wrote:
Beautiful oversize sweater
02.01.2018 - 23:58MGB wrote:
I would like to have such a simple sweater in a crochet pattern!
23.12.2017 - 13:52Nadja Heckel wrote:
Schöner Oversize Pullover ohne wuchtig zu wirken! Für Winter wie Sommer gleichermaßen, sehr gelungen! Mit oder Schmuck und Schal gestylt, bietet dieser viele Kombinationsmöglichkeiten
17.12.2017 - 09:03