DROPS Alpaca Bouclé
DROPS Alpaca Bouclé
80% Alpaca, 15% Wool, 5% Polyamide
from 5.00 $ /50g
DROPS Brushed Alpaca Silk
77% Alpaca, 23% Silk
from 3.95 $ /25g
Get the yarn to make this pattern from 35.80$.

The yarn cost is calculated from the pattern’s smallest size and the yarn’s cheapest product type. Looking for an even better price? You might find it on the DROPS Deals!

DROPS SS24

Vaporeux

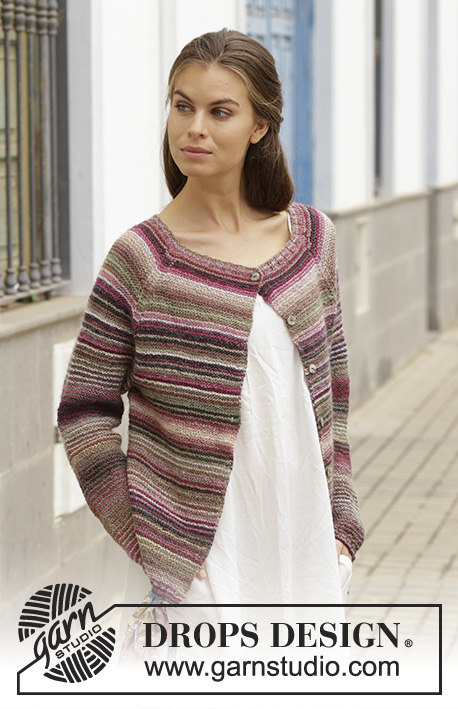
Knitted sweater with ribbed edges. Sizes S - XXXL. The piece is worked in DROPS Alpaca Bouclé and DROPS Brushed Alpaca Silk.

DROPS 188-18
DROPS Design: Pattern no ab-085
Yarn group C + C or E
-----------------------------------------------------------
Sizes: S - M - L - XL - XXL - XXXL
Materials:
DROPS ALPACA BOUCLÉ from Garnstudio (belongs to yarn group C)
200-200-250-250-300-350 color 0100, off white
And use:
DROPS BRUSHED ALPACA SILK from Garnstudio (belongs to yarn group C)
100-100-125-125-150-175 g color 12, powder pink

The piece can also be knitted with yarn from:
"Alternative yarn (Yarn group C)" – see link below.

DROPS CIRCULAR NEEDLE (60 or 80 cm / 24" or 32") SIZE 9 mm/US 13 – or the size needed to get 10 stitches and 14 rows stockinette stitch with 1 strand of each quality on 10 cm / 4" in width and 10 cm / 4" in height.

DROPS CIRCULAR NEEDLE (60 cm / 24") size 8 mm / US 11 for rib – or the size needed to get 11 stitches and 15 rows stockinette stitch with 1 strand of each quality on 10 cm / 4" in width and 10 cm / 4" in height.

-------------------------------------------------------

Alternative Yarn – See how to change yarns here
Yarn Groups A to F – Use the same pattern and change the yarn here
Yarn usage using an alternative yarn – Use our yarn converter here

-------------------------------------------------------

DROPS Alpaca Bouclé
DROPS Alpaca Bouclé
80% Alpaca, 15% Wool, 5% Polyamide
from 5.00 $ /50g
DROPS Brushed Alpaca Silk
77% Alpaca, 23% Silk
from 3.95 $ /25g
Get the yarn to make this pattern from 35.80$.

The yarn cost is calculated from the pattern’s smallest size and the yarn’s cheapest product type. Looking for an even better price? You might find it on the DROPS Deals!

Pattern instructions

NOTE: This pattern is written in American English. All measurements in charts are in cm. For conversion from inches to cm - click here. There are different terms for crocheting in American and British English. If this pattern includes crochet, click for "crochet terms" here. For this pattern in British English, please click here.
INFORMATION FOR THE PATTERN:

RIDGE/GARTER STITCH (worked back and forth):
1 ridge = Knit 2 rows.

INCREASE TIP:
All increases are worked from the right side!
Increase 1 stitch by making 1 yarn over. On the next row, purl the yarn over twisted to avoid a hole.

DECREASE TIP:
To work out how to decrease evenly, count the total number of stitches on the needle (e.g. 71 stitches) and divide by the number of decreases to be made (e.g. 7) = 10.1. In this example, work approx. every 9th and 10th stitch together.
----------------------------------------------------------

SWEATER:
The piece is worked back and forth on circular needle, bottom up. The sleeves are worked back and forth on circular needle.

BACK PIECE:
Cast on 71-71-77-83-89-95 stitches with circular needle size 8 mm / US 11 and 1 strand Alpaca Bouclé and 1 strand Brushed Alpaca Silk (= 2 strands). Purl 1 row from the wrong side. Then work rib as follows - from the right side: 4 stitches GARTER STITCH - see description above, * knit 3, purl 3 *, work from *-* until there are 7 stitches left on row, knit 3 stitches, 4 stitches garter stitch. Continue like this until the rib measures 5 cm / 2" – adjust so that the next row is worked from the right side. Change to circular needle size 9 mm / US 13. Knit 1 row (with 4 stitches garter stitch in each side) where you decrease 7-3-5-7-9-11 stitches evenly on row (but not over stitches in garter stitch) – read DECREASE TIP = 64-68-72-76-80-84 stitches. Continue with stockinette stitch with 4 stitches garter stitch in each side until the piece measures 42-43-44-45-46-47 cm / 16½"-17"-17¼"-17¾"-18"-18½" from the cast-on edge. REMEMBER THE GAUGE! At the start of the next 2 rows bind off 3 stitches in each side for armholes = 58-62-66-70-74-78 stitches. Continue with stockinette stitch and 1 edge stitch in garter stitch in each side. When piece measures 56-58-60-62-64-66 cm / 22"-22¾"-23⅝"-24⅜"-25¼"-26", bind off the middle 18-18-20-20-22-22 stitches for neck and finish each shoulder separately. Now bind off 1 stitch on the next row from the neck = 19-21-22-24-25-27 stitches. Then bind off for diagonal shoulder on each row from the side/armhole as follows: bind off 9-10-11-12-12-13 stitches 1 time and 10-11-11-12-13-14 stitches1 time. The piece measures approx. 60-62-64-66-68-70 cm / 23⅝"-24⅜"-25¼"-26"-26¾"-27½" from the top of shoulder and down. Work the other shoulder in the same way.

FRONT PIECE:
Cast on and work in the same way as for back piece, but when piece measures 52-54-55-57-58-60 cm / 20½"-21¼"-21½"-22½"-22¾"-23½" place the middle 10-10-10-10-12-12 stitches on a thread and each shoulder is finished separately. Continue to bind off stitches from each row from the neck as follows: bind off 2 stitches 2 times and 1 stitch 1-1-2-2-2-2 time = 19-21-22-24-25-27 stitches. When piece measures 56-58-60-62-64-66 cm / 22"-22¾"-23⅝"-24⅜"-25¼"-26" – adjust to match back piece, bind off for diagonal shoulders on each row from the side/armhole as follows: bind off 9-10-11-12-12-13 stitches 1 time and 10-11-11-12-13-14 stitches 1 time. Piece measures approx. 60-62-64-66-68-70 cm / 23⅝"-24⅜"-25¼"-26"-26¾"-27½" from top of shoulder down. Work the other shoulder in the same way.

SLEEVES:
The sleeve is worked back and forth on circular needle.
Cast on 26-26-26-32-32-32 stitches (including 1 edge stitch in each side) with circular needle size 8 mm / US 11 and 1 strand Alpaca Bouclé and 1 strand Brushed Alpaca Silk (= 2 strands). Purl 1 row from the wrong side. Then work rib (= knit 3 /purl 3) with 1 edge stitch in garter stitch in each side until piece measures 5 cm / 2". Change to circular needle size 9 mm / US 13. Then work stockinette stitch with 1 edge stitch in garter stitch in each side. When piece measures 11-9-8-11-9-8 cm / 4½"-3½"-3"-4½"-3½"-3" increase 1 stitch in each side – read INCREASE TIP. Increase like this every 11-9-10-15-13-9 cm / 4½"-3½"-4"-6"-5"-3½" a total of 2-3-4-2-3-4 times = 30-32-34-36-38-40 stitches. When piece measures 44-43-42-41-40-39 cm / 17¼"-17"-16½"-16"-15¾"-15¼" (shorter measurements in larger sizes due to broader shoulders), bind off. Work the other sleeve in the same way.

ASSEMBLY:
Asembly is worked with 1 strand of each quality (= 2 strands).
Sew shoulder seams with grafting stitches inside the bind off edge so the seam is flat. Sew sleeves to body. Sew the seams underneath the sleeves inside the 1 edge stitch in each side. Sew the side seams in the outermost loop of the outermost stitch, but leave approx. 10 cm / 4" for split at bottom. Repeat on the other side. Cut and fasten strands.

NECK EDGE:
Knit up 60-60-66-66-72-72 stitches (including stitches from the thread) around the neck with circular needle size 8 mm / US 11 and 1 strand of each quality (= 2 strands). Work rib (= knit 3 / purl 3) for 4 cm / 1½". Bind off with knit over knit and purl over purl.

Diagram

All measurements in charts are in cm.

diagram measurements

Each of our patterns has specific tutorial videos to help you.

Do you have a question? See a list of frequently asked questions (FAQ)

Knitting tension is what determines the final measurements of your work, and is usually measured per 10 x 10 cm. It is provided like so: number of stitches in width x number of rows in height - eg: 19 stitches x 26 rows = 10 x 10 cm.

The knitting tension is very individual; some people knit/crochet loosely while others work tightly. You adjust the knitting tension with the needle size, which is why the suggested needle size only serve as a guide! You need to adjust this (up or down) to ensure that YOUR knitting tension matches the knitting tension provided in the pattern. If you work with a different knitting tension than provided you will have a different yarn consumption, and your work will have different measurements than what the pattern suggests.

The knitting tension also determines which yarns can replace each other. As long as you achieve the same knitting tension you can replace one yarn with another.

See DROPS lesson: How to measure your tension/gauge

See DROPS video: How to make a gauge tension swatch

The required amount of yarn is provided in grams, eg: 450 g. To calculate how many balls you’ll need you first need to know how many grams are in 1 ball (25g, 50g or 100g). This information is available if you click on the individual yarn quality on our pages. Divide the amount required with the amount of each ball. For example, if each ball is 50g (the most common amount), the calculation will be as follows: 450 / 50 = 9 balls.

The important thing when changing from one yarn to another is that the knitting/crochet tension remains the same. This is so that the measurements of the finished piece will be the same as on the sketch provided. It is easier to achieve the same knitting tension using yarns from the same yarn group. It is also possible to work with multiple strands of a thinner yarn to achieve the knitting tension of a thicker one. Please try our yarn converter. We recommend you to always work a test swatch.

Please NOTE: when changing yarn the garment might have a different look and feel to the garment in the photo, due to individual properties and qualities of each yarn.

See DROPS lesson: Can I use a different yarn than the one mentioned in the pattern?

All our yarns are categorised into yarn groups (from A to F) according to thickness and knitting tension – group A contains the thinnest yarns and group F the thickest. This makes it easier for you to find alternative yarns to our patterns, should you wish to switch yarn. All yarns within the same group have a similar knitting tension and can easily replace each other. However, different yarn qualities have different structures and properties which will give the finished work a unique look and feel.

Click here for an overview of the yarns in each yarn group

At the top of all our patterns you’ll find a link to our yarn converter, which is a helpful tool should you wish to use a different yarn than suggested. By filling in the yarn quality you wish to replace, the amount (in your size) and number of strands, the converter will present good alternative yarns with the same knitting tension. Additionally it will tell you how much you’ll require in the new qualities and whether you’ll need to work with multiple strands. Most skeins are 50g (some are 25g or 100g).

If the pattern is worked with multiple colours, every colour will have to be converted separately. Similarly, if the pattern is worked with several strands of different yarns (for example 1 strand Alpaca and 1 strand Kid-Silk) you will have to find alternatives for each, individually.

Click here to see our yarn converter

Since different yarns have different qualities and textures we have chosen to keep the original yarn in our patterns. However, you can easily find options among our available qualities by using our yarn converter, or simply pick a yarn from the same yarn group.

It is possible that some retailers still have discontinued yarns in stock, or that someone has a few skeins at home that they would like to find patterns for.

The yarn converter will provide both alternative yarn as well as required amount in the new quality.

If you think it's hard to decide what size to make, it can be a good idea to measure a garment you own already and like the size of. Then you can pick the size by comparing those measures with the ones available in the pattern's size chart.

You'll find the size chart at the bottom of the pattern.

See DROPS lesson: How to read size chart

The needle size provided in the pattern serves only as a guide, the important thing is to follow the knitting tension. And since knitting tension is very individual, you will have to adjust the needle size to ensure that YOUR tension is the same as in the pattern – maybe you’ll have to adjust 1, or even 2 needle sizes, up or down to achieve the correct tension. For this, we recommend that you work test swatches.

Should you work with a different knitting tension than the one provided, the measurements of the finished garment might deviate from the measurement sketch.

See DROPS lesson: How to measure your tension/gauge

See DROPS video: How to make a gauge tension swatch

Working a garment top-down provides more flexibility and room for personal adjustment. For example it is easier to try the garment on while working, as well as making adjustments to length of yoke and shoulder caps.

The instructions are carefully explaining every step, in the correct order. Diagrams are adjusted to the knitting direction and are worked as usual.

The diagram depicts all rows/rounds, and every stitch seen from the right side. It is read from bottom to top, from right to left. 1 square = 1 stitch.

When working back and forth, every other row is worked from the right side and every other row is worked from the wrong side. When working from the wrong side, the diagram will have to be worked reversed: from left to right, knit stitches are purled, purl stitches are knit etc.

When working in the round every round is worked from the right side and the diagram are worked from right to left on all rounds.

See DROPS lesson: How to read knitting diagrams

The diagram depicts all rows/rounds, and every stitch seen from the right side. It is worked from bottom to top, from right to left.

When working back and forth every other row is worked from the right side: from right to left and every other row is worked from the wrong side: from left to right.

When working in the round, every row in the diagram are worked from the right side, from right to left.

When working a circular diagram you start in the middle and work your way outwards, counter clockwise, row by row.

The rows usually start with a given number of chain stitches (equivalent to the height of the following stitch), this will either be depicted in the diagram or explained in the pattern.

See DROPS lesson: How to read crochet diagrams

Instructions for working several diagrams after each other on the same row/round, will often be written like so: “work A.1, A.2, A.3 a total of 0-0-2-3-4 times". This means you work A.1 once, then A.2 is worked once, and A.3 is repeated (in width) the number of times provided for your size – in this case like so: S = 0 times, M = 0 times, L=2 times, XL= 3 times and XXL = 4 times.

The diagrams are worked as usual: begin with the first row in A.1, then work the first row in A.2 etc.

See DROPS lesson: How to read knitting diagrams

See DROPS lesson: How to read crochet diagrams

The total width of the garment (from wrist-to-wrist) will be larger in the larger sizes, despite the actual sleeves being shorter. The larger sizes have longer sleeve caps and wider shoulders, so there will be a good fit in all sizes.

The measurement sketch/schematic drawing provides information regarding the full length of the garment. If it’s a jumper or a jacket the length is measured from the highest point on the shoulder (usually closest to the neckline), and straight down to the bottom of the garment. It is NOT measured from the tip of shoulder. Similarly, the length of yoke is measured from the highest point on the shoulder and down to where yoke is split into body and sleeves.

See DROPS lesson: How to read a schematic drawing

Diagrams are often repeated on the round or in height. 1 repeat is the diagram the way it appears in the pattern. If it says to work 5 repeats of A.1 in the round, then you work A.1 a total of 5 times after/next to each other in the round. If it says to work 2 repeats of A.1 vertically/in height you work the entire diagram once, then begin again at the start and work the entire diagram one more time.

Chain stitches are slightly narrower than other stitches and to avoid working the cast-on edge too tight, we simply chain more stitches to begin with. The stitch count will be adjusted on the following row to fit the pattern and measurement sketch.

The rib edge is more elastic and will contract slightly compared to, for example, stocking stitch. By increasing before the rib edge, you avoid a visible difference in width between the rib edge and the rest of the body.

It’s very easy to cast off too tightly, and by making yarn overs while casting off (and simultaneously casting these off) you avoid a too tight cast off edge.

See DROPS video: How to bind off with yarn overs (yo)

To achieve an even increase (or decrease) you can increase on, for example: every 3rd and 4th row alternately, like so: work 2 rows and increase on the 3rd row, work 3 rows and increase on the 4th. Repeat this until the increase is complete.

See DROPS lesson: Increase or decrease 1 st on every 3rd and 4th row alternately

Should you prefer to work in the round instead of back and forth, you may of course adjust the pattern. You’ll need to add steeks mid-front (usually 5 stitches), and follow the instructions. When you would normally turn and work from the wrong side, simply work across the steek and continue in the round. At the end you’ll cut the piece open, pick up stitches to work bands, and cover the cut edges.

See DROPS video: How to knit steeks and cut open

Should you prefer to work back and forth instead of in the round, you may of course adjust the pattern so you work the pieces separately and then assemble them at the end. Divide the stitches for the body in 2, add 1 edge stitch in each side (for sewing) and work the front and back pieces separately.

See DROPS lesson: Can I adapt a pattern for circular needles into straight needles?

Pattern repeats can vary slightly in the different sizes, in order to get the correct proportions. If you’re not working the exact same size as the garment in the photo, yours might deviate slightly. This has been carefully developed and adjusted so that the complete impression of the garment is the same in all sizes.

Make sure to follow instructions and diagrams for your size!

If you have found a pattern you like which is available in women’s size it’s not very difficult to convert it to men’s size. The biggest difference will be the length of sleeves and body. Start working on the women size that you think would fit across the chest. The additional length will be worked right before you cast off for the armhole/sleeve cap. If the pattern is worked top-down you can add the length right after the armhole or before the first decrease on sleeve.

Regarding additional yarn amount, this will depend on how much length you add, but it is better with a skein too many than too few.

All yarns will have excess fibres (from production) that might come off as lint or shedding. Brushed yarns (ie hairier yarns) have more of these loose, excess fibres, causing more shedding.

Shedding also depends on what is worn under or over the garment, and whether this pulls at the yarn fibres. It’s therefore not possible to guarantee that there will be no shedding

Below are some tips on how to get the best result when working with hairier yarns:

1. When the garment is finished (before you wash it) shake it vigorously so the looser hairs come off. NOTE: do NOT use a lint roller, brush or any method that pulls at the yarn.

2. Place the garment in a plastic bag and put it in your freezer - the temperature will cause the fibres to become less attached to each other, and excess fibres will come off easier.

3. Leave in the freezer for a few hours before taking it out and shaking it again.

4. Wash the garment according to the instructions on the yarn label.

Pilling is a natural process that happens to even the most exclusive of fibers. It's a natural sign of wear and tear that is hard to avoid, and that is most visible in high friction areas of your garment like a sweater's arms and cuffs.

You can make your garment look as new by removing the pilling, using a fabric comb or a pill/lint remover.

Still can't find the answer you need? Then scroll down and leave your question so one of our experts can try to help you. This will be done normally within 5 to 10 working days.
In the meantime, you can read the questions and answers that others have left to this pattern or join the DROPS Workshop on Facebook to get help from fellow knitters/crocheters!

You might also like...

Post a comment to pattern DROPS 188-18

We would love to hear what you have to say about this pattern!

If you want to leave a question, please make sure you select the correct category in the form below, to speed up the answering process. Required fields are marked *.

Comments / Questions (21)

country flag Nicole wrote:

Bonjour, j’ai seulement des balles de laine Alpaca bouclé Mix (6) et du mohair bouclé de marque BE SWEET. (6 gris pale et 6 gris foncé). Est-ce que je peux mélanger le mohair avec l’Alpaca? Ou est-ce mieux de prendre deux laine de catégorie mohair. Merci , Nicole

17.01.2023 - 22:20

DROPS Design answered:

Bonjour Nicole, nous ne connaissons malheureusement pas la marque citée, n'hésitez pas à demander conseil au magasin où vous avez acheté votre laine - et rappelez-vous que vous devez toujours avoir le bon échantillon pour obtenir les mesures correspondantes à chaque taille indiquées dans le schéma. Bon tricot!

18.01.2023 - 09:33

country flag Isamastho wrote:

Bonjour\r\nTous le pull se tricote avec 2 fils? \r\nDans ce cas je ne comprend pas pourquoi il y a moitié moins de alpaca Silk\r\nMerci \r\nIsabelle

27.03.2022 - 21:27

DROPS Design answered:

Bonjour Isabelle, vous avez la moitié en poids car si 1 pelote Alpaca Bouclé a le même métrage qu'1 pelote Brushed Alpaca Silk, les premières font 50 g et les autres 25 grammes seulement, autrement dit, en taille S par exemple il vous faut 4 pelotes Alpaca bouclé et 4 pelotes Brushed Alpaca Silk. Bon tricot!

28.03.2022 - 10:30

country flag Alicja Jaworska wrote:

Dlaczego podany w ramce "Koszt włóczki na wykonanie tego wzoru to 113.60zł" skoro włóczki DROPS ALPACA BOUCLÉ na rozm. S potrzeba 200g a koszt jednego motka tej włóczki kosztuje 14,60zł czyli za 200g wychodzi: 58,40 zł.

27.08.2021 - 17:43

DROPS Design answered:

Witaj Alicjo, to dlatego że ten sweter jest wykonywany 2 nitkami, łączymy włóczkę alpaca boucle z brushed alpaca silk. Pozdrawiamy!

29.08.2021 - 16:24

country flag Maria wrote:

Hej! Hur syr man maskstygn? Får alltid så fula sömmar…

18.07.2021 - 11:43

DROPS Design answered:

Hej Maria, her på side 3 finder du nogle gode videoer som viser forskellige sting: montering - sy ihop

04.08.2021 - 11:16

country flag Gina wrote:

Nochmal ich, sorry, dass ich so blöde Fragen stelle: Wenn ich die Anleitung richtig verstehe, wird der Pulli doch mit doppelt Faden gestrickt. Richtig? Des Wegen habe ich mich über die Mengenangabe gewundert. Liebe Grüße aus Hamburg Gina

21.10.2019 - 22:26

DROPS Design answered:

Liebe Gina, ja genau, den Pulli stricken Sie mit 2 Fäden = 1 Faden Alpaca Bouclé + 1 Faden Brushed Alpaca Silk (Maschenprobe mit 2 Fäden = 10 Maschen x 14 Reihen glatt rechts). Viel Spaß beim stricken!

22.10.2019 - 10:47

country flag Gina wrote:

Hallo, ich habe eine Frage zur benötigten Wollmenge: Der Pulli sieht relativ groß aus und trotzdem braucht man nur 200 Gramm Wolle. In den Angaben zu der Alpaca Boucle steht , dass man 300 - 350 Gramm für einen Pulli in Grüße 38 braucht. Kommt man dann wirklich mit 200 Gramm für die Größen S order M aus? Vielen Dank im Voraus. Gina

19.10.2019 - 14:08

DROPS Design answered:

Liebe Gina, in S brauchen Sie 200 g Alpaca bouclé (= 4 Knäuel x 140 m) + 100 g Brushed Alpaca Silk (= 4 Knäuel x 140 m), dh insgesamt 300 g Garn und ca 1120 m. Viel Spaß beim stricken!

21.10.2019 - 09:33

country flag M Barrueco wrote:

Bjr. peuxt on connaitre les explications avec des aiguilles droites. ? combien de pelotes pour un pull taille xl ? merci

19.10.2019 - 10:51

DROPS Design answered:

Bonjour Mme Barrueco, chaque pièce se tricote ici en allers et retours sur aiguille circulaire pour avoir suffisamment de place pour y loger toutes les mailles, seul le col se tricote en rond (tricotez le col avant de faire la 2ème couture d'épaules si besoin). Vous trouverez ici plus d'infos sur les aiguilles circulaires et ici comment calculer le nombre de pelotes nécessaires. Bon tricot!

21.10.2019 - 13:46

country flag Caroline wrote:

I love the look of this garment and would like to make it out of a yarn group E (Andes) yarn how much either grams or meters would I need for XXL as I'm struggling to figure it out, thanks x

04.03.2019 - 13:58

DROPS Design answered:

Dear Caroline, please find here how to calculate the new amount of yarn if worked with a yarn group E remember however that the texture will be different due to the differences in the yarns. Your DROPS store will provide you any further assistance, even per mail or telephone. Happy knitting!

04.03.2019 - 16:00

country flag Paula wrote:

Hola, estoy intentando hacer el jersey pero me he quedado atascada en la parte de delante, no entiendo la finalidad de pasar los puntos al hilo ni como tengo que ir rematando, si pudiéseis explicármelo para que lo entienda os lo agradecería.

09.12.2018 - 21:37

DROPS Design answered:

Hola Paula. Los puntos centrales se dejan en espera para trabajar después la parte del escote. Ahora cada parte del delantero se termina por separado. Vas cerrando los puntos para formar el escote - al inicio de cada vuelta ( por el lado derecho - para el delantero derecho y por el lado revés para el delantero izquierdo). Como los hombros tienen forma inclinada, se cierra varias veces (al principio de la vuelta por el lado revés para el delantero derecho y por el lado derecho para el delantero izquierdo). Los puntos restantes en cada fila se trabaja como antes.

16.12.2018 - 22:25

country flag Dom wrote:

Bonjour combien faut il de pelote pour une taille s et m merci beaucoup

06.12.2018 - 23:07

DROPS Design answered:

Bonjour Dom, en taille S, il faut 200 g DROPS Alpaca Bouclé / 50 g la pelote = 4 pelotes + 100 g Brushed Alpaca Silk / 25 g la pelote = 4 pelotes. Bon tricot!

07.12.2018 - 08:15