DROPS Brushed Alpaca Silk
77% Alpaca, 23% Silk
from 2.90 £ /25g
Get the yarn to make this pattern from 34.80£.

The yarn cost is calculated from the pattern’s smallest size and the yarn’s cheapest product type. Looking for an even better price? You might find it on the DROPS Deals!

DROPS SS24

Greek Melody

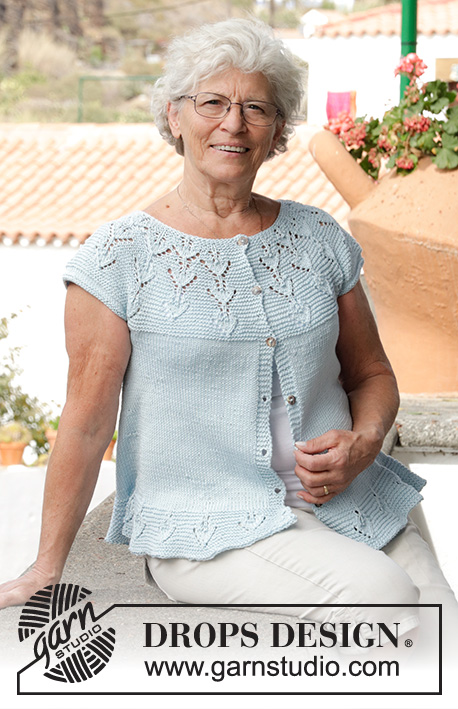
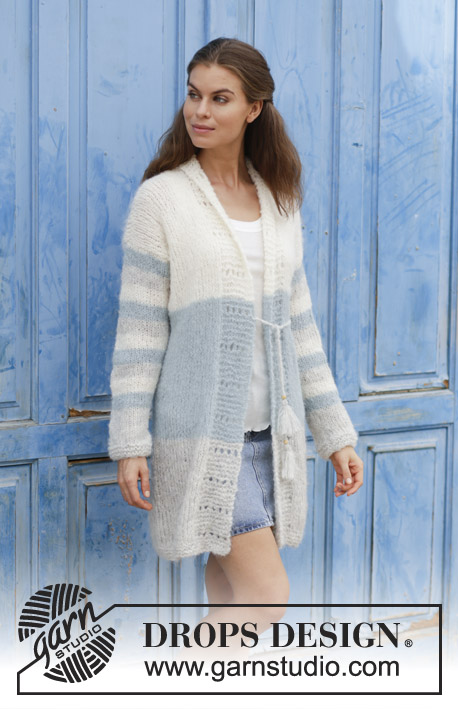
Knitted jacket with stripes, lace pattern and shawl collar. Size: S - XXXL Piece can be worked in 2 strands DROPS Brushed Alpaca Silk or 1 strand DROPS Melody.

DROPS 186-39
DROPS design: Pattern ml-023
Yarn group C + C or D
----------------------------------------------------------
Size: S - M - L - XL - XXL - XXXL
Materials:
DROPS BRUSHED ALPACA SILK from Garnstudio (belongs to yarn group C)
125-150-150-175-200-200 g colour 02, light grey
100-100-125-125-125-150 g colour 15, light sea green
75-75-100-100-100-125 g colour 01, off white
NOTE: If the garment is made in only 1 colour, it requires 300-300-350375-400-450 g Brushed Alpaca Silk.

Or use:
DROPS MELODY from Garnstudio (belongs to yarn group D)
150-150-150-200-200-200 g colour 03, pearl grey
100-100-150-150-150-150 g colour 09, light sea green
100-100-100-100-100-150 g colour 01, off white
NOTE: If the garment is made in only 1 colour, it requires 300-300-350375-400-450 g Melody.

Piece can also be knitted with yarn from:
“Alternative yarn (yarn group D)” - see link below.

DROPS DOUBLE POINTED NEEDLES AND CIRCULAR NEEDLE (40 and 80 cm) SIZE 8 mm – or size needed to get 12 stitches and 14 rows in stocking stitch with 2 strands Brushed Alpaca Silk or 1 strand Melody = width 10 cm and 10 cm vertically.

DROPS DOUBLE POINTED NEEDLES AND CIRCULAR NEEDLE (80 cm) SIZE 7 mm – or size needed to get 13 stitches and 15 rows in stocking stitch with 2 strands Brushed Alpaca Silk or 1 strand Melody = width 10 cm and 10 cm vertically.

ACCESSORIES: 2 wooden beads (10 mm) - for ties.
----------------------------------------------------------

-------------------------------------------------------

Alternative Yarn – See how to change yarns here
Yarn Groups A to F – Use the same pattern and change the yarn here
Yarn usage using an alternative yarn – Use our yarn converter here

-------------------------------------------------------

DROPS Brushed Alpaca Silk
77% Alpaca, 23% Silk
from 2.90 £ /25g
Get the yarn to make this pattern from 34.80£.

The yarn cost is calculated from the pattern’s smallest size and the yarn’s cheapest product type. Looking for an even better price? You might find it on the DROPS Deals!

Pattern instructions

NOTE: This pattern is written in British English. All measurements in charts are in cm. For conversion from cm to inches - click here. There are different terms for crocheting in British and American English. If this pattern includes crochet, click for "crochet terms" here. For this pattern in American English, please click here.
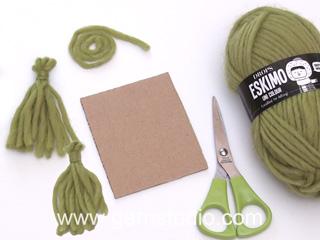
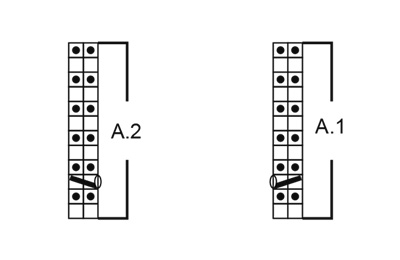
INFORMATION FOR PATTERN:

GARTER STITCH (worked in the round):
1 ridge = 2 rounds. Knit 1 round and purl 1 round.

GARTER STITCH (back and forth):
1 ridge = knit 2 rows.

PATTERN (applies to band):
See diagrams A.1 and A.2. Diagrams show all rows in pattern seen from the right side. Repeat A.1 and A.2 vertically (= 12 rows).

STRIPES-1 (applies to body):
STRIPE 1: Work 26-27-28-29-30-31 cm with 2 strands light grey Brushed Alpaca Silk or 1 strand pearl grey Melody.
STRIPE 2: Work 26-27-28-29-30-31 cm with 2 strands light sea green Brushed Alpaca Silk or 1 strand light sea green Melody.
Then work with 2 strands off white Brushed Alpaca Silk or 1 strand off white Melody until finished measurements.

STRIPE-2 (applies to sleeves):
STRIPE 1: Work 3½-3½-3½-3-3-3 cm with 2 strands light sea green Brushed Alpaca Silk or 1 strand light sea green Melody.
STRIPE 2: Work 3½-3½-3½-3-3-3 cm with 2 strands light grey Brushed Alpaca Silk or 1 strand pearl grey Melody.
STRIPE 3: Work 3½-3½-3½-3-3-3 cm with 2 strands off white Brushed Alpaca Silk or 1 strand off white Melody.
Repeat stripes 1-3 2 more times, then repeat stripe 1 1 more time. Then work with 2 strands light grey Brushed Alpaca Silk or 1 strand pearl grey Melody until finished measurements.

DECREASE TIP:
Begin 3 stitches before marker thread: Knit 2 stitches together, knit 2 (marker thread is between these stitches), slip 1 stitch knitwise, knit 1, pass slipped stitch over stitch worked.
----------------------------------------------------------

JACKET:
Work back and forth on circular needle from mid front, bottom up to armholes. Then work front pieces and back piece back and forth on circular needle separately. Work sleeves in the round on short circular needle/double pointed needles, top down.

Cast on 140-148-160-174-186-202 stitches (including 12-12-12-14-14-14 band stitches in each side of piece) on circular needle size 7 mm with 2 strands light grey Brushed Alpaca Silk or 1 strand pearl grey Melody - read STRIPES-1. Work 3 ridges in GARTER STITCH - see explanation above. Switch to circular needle size 8 mm. Then work as follows from right side: Work A.1 over the first 12-12-12-14-14-14 stitches (= band stitches), work in stocking stitch until 12-12-12-14-14-14 stitches remain, work A.2 over the last 12-12-12-14-14-14 stitches (= band stitches) - read PATTERN.
Insert 1 marker thread each side, 38-40-43-47-50-54 stitches in from mid front (back piece = 64-68-74-80-86-94 stitches). REMEMBER THE KNITTING TENSION! When piece measures 19 cm, decrease 2 stitches at each marker thread (= 4 stitches decreased) - read DECREASE TIP! Decrease like this every 17-18-19-20-21-22 cm 3 times in total = 128-136-148-162-174-190 stitches.
When piece measures 57-59-61-63-65-67 cm, work next row as follows from right side: Work the first 33-35-38-42-45-49 stitches, cast off the next 4 stitches for armhole (= 2 stitches on each side of marker thread), work the next 54-58-64-70-76-84 stitches, cast off the next 4 stitches for armhole, work 33-35-38-42-45-49 stitches. Finish each part separately.

BACK PIECE:
= 54-58-64-70-76-84 stitches. Continue in stocking stitch as before. When piece measures 75-78-81-84-87-90 cm, cast off the middle 10-10-10-12-12-12 stitches for neck and finish each shoulder separately. Cast off 1 stitch on next row from neck = 21-23-26-28-31-35 stitches. Continue until piece measures 77-80-83-86-89-92 cm and cast off. Work the other shoulder the same way.

RIGHT FRONT PIECE:
= 33-35-38-42-45-49 stitches. Continue with pattern A.1 over band stitches as before and in stocking stitch over the remaining stitches. When piece measures 77-80-83-86-89-92 cm, cast off the first 21-23-26-28-31-35 stitches from wrong side for shoulder, work the rest of row = 12-12-12-14-14-14 stitches remain on needle for shawl collar. Work short rows in garter stitch over these stitches, begin from right side as follows: Work 1 row over the first 8-8-8-9-9-9 stitches, turn and work back, work 1 row over all stitches, turn and work back. Continue like this until neck edge measures 6-6-6-7-7-7 cm at the shortest. Cast off.

LEFT FRONT PIECE:
Work as right front piece but reversed. I.e. continue pattern A.2 over band stitches, cast off the first 21-23-26-28-31-35 stitches from right side for shoulder and work the short rows over neck edge with beginning from wrong side.

SLEEVE:
Worked in the round on short circular needle/double pointed needles, switch to double pointed needles when needed.
Loosely cast on 48-50-53-55-58-60 stitches on short circular needle size 8 mm with 2 strands off white Brushed Alpaca Silk or 1 strand off white Melody. Work 1 round in stocking stitch. Then work in stocking stitch and STRIPES-2. Insert 1 marker thread at beginning of round = mid under sleeve. When piece measures 3 cm, decrease 1 stitch on each side of marker thread - remember DECREASE TIP (= 2 stitches decreased). Decrease like this every 4-3½-3½-3-2½-2½ cm 10-11-11-12-13-13 times in total = 28-28-31-31-32-34 stitches. When piece measures 42-41-40-38-37-34 cm (shorter measurements in the larger sizes because of wider shoulders), switch to double pointed needles size 7 mm. Work 3 ridges in GARTER STITCH - see explanation above. Cast off - to avoid a tight cast-off edge you may use a needle 1 size larger. Work the other sleeve the same way.

ASSEMBLY:
Sew the shoulder seams. Sew shawl collar together mid back (seam mid back should be inwards when collar is folded towards the back). Sew collar to neckline in the back of neck. Sew in sleeves.

TIES:
The jacket has 2 ties.
1 tie= cut 4 strands light grey Brushed Alpaca Silk or 2 strands pearl grey Melody of approx. 1.5 meters. Twine the strands tog until they resist, fold the strands double so that they twine. Tie a knot in one end and tie a knot approx. 10 cm from edge in the other side (the tie should be approx. 50 cm when finished, cut it to correct length). Thread the tie through a wooden bead and tie a knot - make 1 tassel (= cut 16 strands light grey Brushed Alpaca Silk or 8 strands pearl grey Melody of 16 cm) and tie another knot (with the strand from the tie) in the middle of the tassel. Fold the tassel double and tie a knot approx. 1½ cm down from wooden bead, around the tassel. Cut the tassel in bottom edge.
Fasten the tie in the left side on the outside of jacket approx. 10 cm below armhole (try the jacket on and adjust placement of the tie).
Make another tie the same way and fasten it at the edge of band on right front piece approx. 28-29-30-31-32-33 cm from shoulder and down.

Diagram

symbols = knit from the right side, purl from the wrong side
symbols = purl from the right side, knit from the wrong side
symbols = between 2 stitches make 1 yarn over
symbols = knit 2 together
symbols = slip 1 stitch knitwise, knit 1, pass slipped stitch over stitch worked
symbols = knitting direction
diagram
diagram

Each of our patterns has specific tutorial videos to help you.

Do you have a question? See a list of frequently asked questions (FAQ)

Knitting tension is what determines the final measurements of your work, and is usually measured per 10 x 10 cm. It is provided like so: number of stitches in width x number of rows in height - eg: 19 stitches x 26 rows = 10 x 10 cm.

The knitting tension is very individual; some people knit/crochet loosely while others work tightly. You adjust the knitting tension with the needle size, which is why the suggested needle size is only meant as a guide! You need to adjust this (up or down) to ensure that YOUR knitting tension matches the knitting tension provided in the pattern. If you work with a different knitting tension than provided you will have a different yarn consumption, and your work will have different measurements than what the pattern suggests.

The knitting tension also determines which yarns can replace each other. As long as you achieve the same knitting tension you can replace one yarn with another.

See DROPS lesson: How to measure your tension/gauge

See DROPS video: How to make a gauge tension swatch

The required amount of yarn is provided in grams, eg: 450 g. To calculate how many balls you’ll need you first need to know how many grams are in 1 ball (25g, 50g or 100g). This information is available if you click on the individual yarn quality on our pages. Divide the amount required with the amount of each ball. For example, if each ball is 50g (the most common amount), the calculation will be as follows: 450 / 50 = 9 balls.

The important thing when changing from one yarn to another is that the knitting/crochet tension remains the same. This is so that the measurements of the finished piece will be the same as on the sketch provided. It is easier to achieve the same knitting tension using yarns from the same yarn group. It is also possible to work with multiple strands of a thinner yarn to achieve the knitting tension of a thicker one. Please try our yarn converter. We recommend you to always work a test swatch.

Please NOTE: when changing yarn the garment might have a different look and feel to the garment in the photo, due to individual properties and qualities of each yarn.

See DROPS lesson: Can I use a different yarn than the one mentioned in the pattern?

All our yarns are categorised into yarn groups (from A to F) according to thickness and knitting tension – group A contains the thinnest yarns and group F the thickest. This makes it easier for you to find alternative yarns to our patterns, should you wish to switch yarn. All yarns within the same group have a similar knitting tension and can easily replace each other. However, different yarn qualities have different structures and properties which will give the finished work a unique look and feel.

Click here for an overview of the yarns in each yarn group

At the top of all our patterns you’ll find a link to our yarn calculator, which is a helpful tool should you wish to use a different yarn than suggested. By filling in the yarn quality you wish to replace, the amount (in your size) and number of strands, the calculator will present good alternative yarns with the same knitting tension. Additionally it will tell you how much you’ll require in the new qualities and whether you’ll need to work with multiple strands. Most skeins are 50g (some are 25g or 100g).

If the pattern is worked with multiple colours, every colour will have to be calculated separately. Similarly, if the pattern is worked with several strands of different yarns (for example 1 strand Alpaca and 1 strand Kid-Silk) you will have to find alternatives for each, individually.

Click here to see our yarn calculator

Since different yarns have different qualities and textures we have chosen to keep the original yarn in our patterns. However, you can easily find options among our available qualities by using our yarn calculator, or simply pick a yarn from the same yarn group.

It is possible that some retailers still have discontinued yarns in stock, or that someone has a few skeins at home that they would like to find patterns for.

The yarn calculator will provide both alternative yarn as well as required amount in the new quality.

If you think it's hard to decide what size to make, it can be a good idea to measure a garment you own already and like the size of. Then you can pick the size by comparing those measures with the ones available in the pattern's size chart.

You'll find the size chart at the bottom of the pattern.

See DROPS lesson: How to read size chart

The needle size provided in the pattern serves only as a guide, the important thing is to follow the knitting tension. And since knitting tension is very individual, you will have to adjust the needle size to ensure that YOUR tension is the same as in the pattern – maybe you’ll have to adjust 1, or even 2 needle sizes, up or down to achieve the correct tension. For this, we recommend that you work test swatches.

Should you work with a different knitting tension than the one provided, the measurements of the finished garment might deviate from the measurement sketch.

See DROPS lesson: How to measure your tension/gauge

See DROPS video: How to make a tension/gauge swatch

Working a garment top-down provides more flexibility and room for personal adjustment. For example it is easier to try the garment on while working, as well as making adjustments to length of yoke and shoulder caps.

The instructions are carefully explaining every step, in the correct order. Diagrams are adjusted to the knitting direction and are worked as usual.

The diagram depicts all rows/rounds, and every stitch seen from the right side. It is read from bottom to top, from right to left. 1 square = 1 stitch.

When working back and forth, every other row is worked from the right side and every other row is worked from the wrong side. When working from the wrong side, the diagram will have to be worked reversed: from left to right, knit stitches are purled, purl stitches are knit etc.

When working in the round every round is worked from the right side and the diagram are worked from right to left on all rounds.

See DROPS lesson: How to read knitting diagrams

The diagram depicts all rows/rounds, and every stitch seen from the right side. It is worked from bottom to top, from right to left.

When working back and forth every other row is worked from the right side: from right to left and every other row is worked from the wrong side: from left to right.

When working in the round, every row in the diagram are worked from the right side, from right to left.

When working a circular diagram you start in the middle and work your way outwards, counter clockwise, row by row.

The rows usually start with a given number of chain stitches (equivalent to the height of the following stitch), this will either be depicted in the diagram or explained in the pattern.

See DROPS lesson: How to read crochet diagrams

Instructions for working several diagrams after each other on the same row/round, will often be written like so: “work A.1, A.2, A.3 a total of 0-0-2-3-4 times". This means you work A.1 once, then A.2 is worked once, and A.3 is repeated (in width) the number of times provided for your size – in this case like so: S = 0 times, M = 0 times, L=2 times, XL= 3 times and XXL = 4 times.

The diagrams are worked as usual: begin with the first row in A.1, then work the first row in A.2 etc.

See DROPS lesson: How to read knitting diagrams

See DROPS lesson: How to read crochet diagrams

The total width of the garment (from wrist-to-wrist) will be larger in the larger sizes, despite the actual sleeves being shorter. The larger sizes have longer sleeve caps and wider shoulders, so there will be a good fit in all sizes.

The measurement sketch/schematic drawing provides information regarding the full length of the garment. If it’s a jumper or a jacket the length is measured from the highest point on the shoulder closest to the neckline, and straight down to the bottom of the garment. It is NOT measured from the tip of shoulder. Similarly, the length of yoke is measured from the highest point on the shoulder and down to where yoke is split into body and sleeves.

On a jacket measures are never taken along bands, unless specifically stated. Always measure inside band stitches when measuring the length.

See DROPS lesson: How to read a schematic drawing

Diagrams are often repeated on the round or in height. 1 repeat is the diagram the way it appears in the pattern. If it says to work 5 repeats of A.1 in the round, then you work A.1 a total of 5 times after/next to each other in the round. If it says to work 2 repeats of A.1 vertically/in height you work the entire diagram once, then begin again at the start and work the entire diagram one more time.

Chain stitches are slightly narrower than other stitches and to avoid working the cast-on edge too tight, we simply chain more stitches to begin with. The stitch count will be adjusted on the following row to fit the pattern and measurement sketch.

The rib edge is more elastic and will contract slightly compared to, for example, stocking stitch. By increasing before the rib edge, you avoid a visible difference in width between the rib edge and the rest of the body.

It’s very easy to cast off too tightly, and by making yarn overs while casting off (and simultaneously casting these off) you avoid a too tight cast off edge.

See DROPS video: How to bind off with yarn overs (yo)

To achieve an even increase (or decrease) you can increase on, for example: every 3rd and 4th row alternately, like so: work 2 rows and increase on the 3rd row, work 3 rows and increase on the 4th. Repeat this until the increase is complete.

See DROPS lesson: Increase or decrease 1 st on every 3rd and 4th row alternately

Should you prefer to work in the round instead of back and forth, you may of course adjust the pattern. You’ll need to add steeks mid-front (usually 5 stitches), and follow the instructions. When you would normally turn and work from the wrong side, simply work across the steek and continue in the round. At the end you’ll cut the piece open, pick up stitches to work bands, and cover the cut edges.

See DROPS video: How to knit steeks and cut open

Should you prefer to work back and forth instead of in the round, you may of course adjust the pattern so you work the pieces separately and then assemble them at the end. Divide the stitches for the body in 2, add 1 edge stitch in each side (for sewing) and work the front and back pieces separately.

See DROPS lesson: Can I adapt a pattern for circular needles into straight needles?

Pattern repeats can vary slightly in the different sizes, in order to get the correct proportions. If you’re not working the exact same size as the garment in the photo, yours might deviate slightly. This has been carefully developed and adjusted so that the complete impression of the garment is the same in all sizes.

Make sure to follow instructions and diagrams for your size!

If you have found a pattern you like which is available in women’s size it’s not very difficult to convert it to men’s size. The biggest difference will be the length of sleeves and body. Start working on the women size that you think would fit across the chest. The additional length will be worked right before you cast off for the armhole/sleeve cap. If the pattern is worked top-down you can add the length right after the armhole or before the first decrease on sleeve.

Regarding additional yarn amount, this will depend on how much length you add, but it is better with a skein too many than too few.

All yarns will have excess fibres (from production) that might come off as lint or shedding. Brushed yarns (ie hairier yarns) have more of these loose, excess fibres, causing more shedding.

Shedding also depends on what is worn under or over the garment, and whether this pulls at the yarn fibres. It’s therefore not possible to guarantee that there will be no shedding

Below are some tips on how to get the best result when working with hairier yarns:

1. When the garment is finished (before you wash it) shake it vigorously so the looser hairs come off. NOTE: do NOT use a lint roller, brush or any method that pulls at the yarn.

2. Place the garment in a plastic bag and put it in your freezer - the temperature will cause the fibres to become less attached to each other, and excess fibres will come off easier.

3. Leave in the freezer for a few hours before taking it out and shaking it again.

4. Wash the garment according to the instructions on the yarn label.

Pilling is a natural process that happens to even the most exclusive of fibers. It's a natural sign of wear and tear that is hard to avoid, and that is most visible in high friction areas of your garment like a sweater's arms and cuffs.

You can make your garment look as new by removing the pilling, using a fabric comb or a pill/lint remover.

Still can't find the answer you need? Then scroll down and leave your question so one of our experts can try to help you. This will be done normally within 5 to 10 working days.
In the meantime, you can read the questions and answers that others have left to this pattern or join the DROPS Workshop on Facebook to get help from fellow knitters/crocheters!

You might also like...

Post a comment to pattern DROPS 186-39

We would love to hear what you have to say about this pattern!

If you want to leave a question, please make sure you select the correct category in the form below, to speed up the answering process. Required fields are marked *.

Comments / Questions (28)

country flag Claudia wrote:

Guten Tag, Bei einer Länge von 19 cm 2 Maschen an jedem Markierungsfaden abnehmen (= 4 Maschen abgenommen) Sollen die Abnahmen im Rückenteilbereich stattfinden??

14.04.2024 - 13:10

DROPS Design answered:

Liebe Claudia, es wird jeweils 4 Maschen abgenommen: 2 an jeder Seite - siehe ABNAHMETIPP, dh 1 Masche beim jeden Vorderteil und 2 Maschen beim Rückenteil. Viel Spaß beim Stricken!

15.04.2024 - 08:37

country flag Lisa Egebo wrote:

Brushed Alpaca Silk er i nøgler à 25 g og løber ca. 140 cm. Melody er i nøgler à 50 g og løber også ca. 140 cm. Men hvorfor skal man så købe lige mange gram af hver garntype?

18.06.2021 - 14:16

country flag Benthe Gundersen wrote:

Hei igjen :) Takk for superraskt svar :)\r\nNår jeg begynner med mønster A2 så står det at jeg skal ha 1 kast på kroken, og 2 sammen. Hvis jeg sløyfer kastet så blir det rett...da blie det 5 hull..:D

02.06.2021 - 13:04

country flag Benthe Gundersen wrote:

Hei :) Når jeg strikker hullene i stolpene...mønster .A1 og A2 så får jeg 5 hull i A1 og 6 hull i A2 stolpen..stemmer dette?? Skal det ikke være like mange hull på hver side?

01.06.2021 - 23:47

DROPS Design answered:

Hej Benthe, jo der skal være lige mange huller i stolperne - kan du have 1 omslag for meget i den ene ? :)

02.06.2021 - 12:25

country flag Tove Hansen wrote:

Trenger hjelp for å sy sammen,skjønner ikke helt hvordan stolpene skal festes, finnes et film......?

09.10.2020 - 13:33

DROPS Design answered:

Hei Tove. Vi har dessverre ingen film på akkurat dette. Men når du er ferdig med forstykkene, syr du de to avfellingskantene sammen, bak i nakken. Se evnt hjelpevideo på : Hvordan montere med usynlig maskesting. Evnt se: Instruksjnsvideoer - Montering - Sy sammen, kanskje noen video der kan hjelpe deg. Deretter sys kragen til halsrigningen bak i nakken med små sting. God Fornøyelse!

12.10.2020 - 13:34

country flag Tove Hansen wrote:

Har ikke strikket mye, men her står det at en skal strikke med to tråder, vil det si dobbel tråd, to nøster samtidig..., tror kanskje jeg har gjort feil, striker bare med et nøste av gangen🤔

10.09.2020 - 16:04

DROPS Design answered:

Hej Tove. Om du stickar med garnet Brushed Alpaca Silk så ska du sticka med två trådar (=dubbel tråd) men stickar du med garnet Melody ska du kun sticka med 1 tråd. Mvh DROPS Design

11.09.2020 - 07:12

country flag Michelle wrote:

Continuer ainsi jusqu'à ce que le col mesure 6-6-6-7-7-7 cm au plus étroit bonjour, que voulez vous dire au plus étroit?? et à partir du début des rang raccourci ou à partir du rabat des épaules? sur les 9 m du rang raccourci ou sur les 5 m qui restent? merci

22.04.2020 - 07:48

DROPS Design answered:

Bonjour Michelle, mesurez votre col du côté mailles rabattues pour l'épaule (en fin de rang, vu sur l'endroit), du côté où vous avez tricoté moins de rangs, l'autre côté (côté extérieur du col, début de rang sur l'endroit) doit mesurer approximativement le double. Bon tricot!

22.04.2020 - 08:37

country flag Michelle wrote:

Bonsoir.. juste pour être sur de moi. Ici : Monter 140-148-160-174-186-202 mailles (y compris 12-12-12-14-14-14 mailles de bordure devant de chaque côté de l'ouvrage) avec l'aiguille circulaire 7 les maillles des bordures sont elles prise en compte dans le comptage des mailles a monter ou faut il les ajouter? merci

31.03.2020 - 23:30

DROPS Design answered:

Bonjour Michelle, les bordures des devants sont comprises dans le nombre de mailles à monter dès le début, vous n'avez pas à les monter en plus. Bon tricot!

01.04.2020 - 08:23

country flag Margot wrote:

Jeg vil strikke denne model i Helpatent hvor meget garn skal jeg så bruge mere? I L Vh Margot

02.03.2020 - 14:10

DROPS Design answered:

Hej Margot, du kan prøve at sammenligne målene med denne og se hvor meget garn der skal bruges. Searching for Spring Jacket Prøv også gerne vores garnomregner :)

03.03.2020 - 15:15

country flag CHRISTINE BAKER wrote:

I'm knitting this sweater again in a smaller size. However, just want to confirm the cast on 140 stitches - do I have to add 12 on each side - making it 164 stitches?

04.01.2020 - 03:06

DROPS Design answered:

Dear Christine, for the smallest size you should cast on 140 stitches that INCLUDES the 12 stitches for the band on both sides, so you do not have to add them. Happy Knitting!

04.01.2020 - 10:23