
Popular categories
Looking for a yarn?


|
|
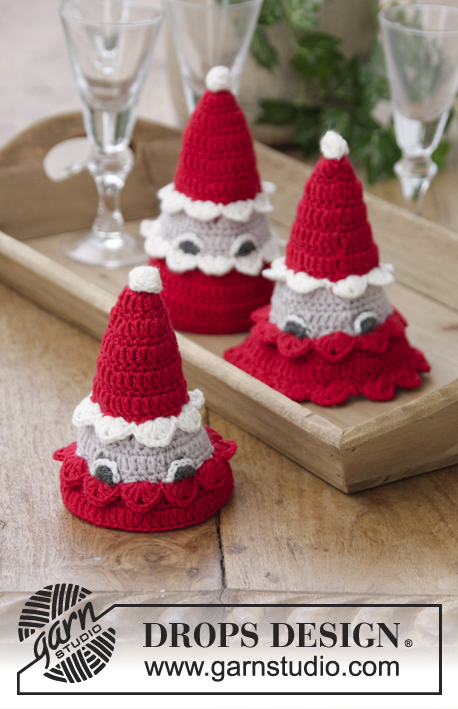
The Santa Bunch |
|
 |
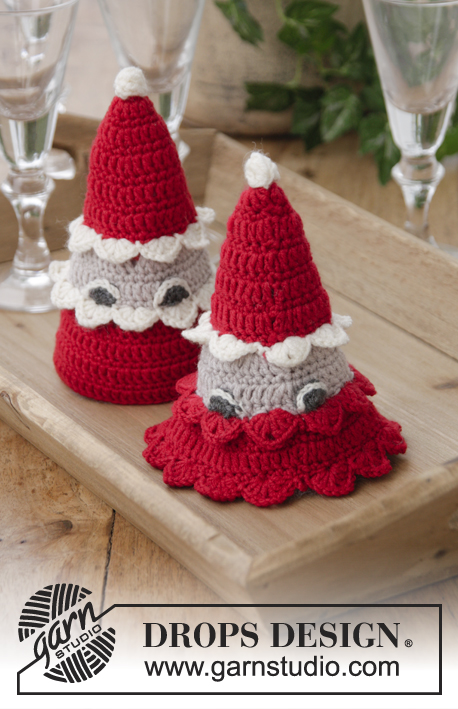 |
Crocheted Santas for Christmas. The piece is worked in DROPS BabyMerino.
DROPS Extra 0-1411 |
|
|
INFORMATION FOR THE PATTERN: CROCHET INFO: The first double crochet on round is replaced by 1 chain stitch. Finish round with 1 slip stitch in first chain stitch. The first treble crochet on round is replaced by 3 chain stitches. Finish round with 1 slip stitch in 3rd chain stitch. COLOUR CHANGE: To get a neat transition when changing colour, work the last stitch as follows: Insert hook into first chain stitch from beginning of round, pick up new strand, make a yarn over with new strand and pull it through stitch on hook. 7 DOUBLE TREBLE CROCHETS TOGETHER: Work 6 double treble crochets in first stitch, but wait with last yarn over and pull through on each of these double treble crochets, work 1 more double treble crochet in same stitch and pull the last yarn over through all 8 loops on hook. ---------------------------------------------------------- MALE SANTA: The piece is worked top down. Then you work hair, beard, tassel and eyes. You can stuff the Santa if you wish. You then need to work a bottom as described below. Fill the Santa with stuffing and crochet the bottom. BODY: Work 4 chain stitches with hook size 3 mm and red and form them to a ring with 1 slip stitch in first chain stitch. ROUND 1: Work 8 double crochets around the ring – read CROCHET INFO. ROUND 2: * 1 treble crochet in first double crochet, 2 treble crochets in next double crochet *, work from *-* to end of round = 12 treble crochets. ROUND 3: * 1 double crochet in each of the 2 first/next treble crochets, 2 double crochets in next treble crochet *, work from *-* to end of round = 16 double crochets. ROUND 4: * 1 treble crochet in each of the 3 first/next double crochets, 2 treble crochets in next double crochet *, work from *-* to end of round = 20 treble crochets. ROUND 5: Work 1 double crochet in each treble crochet = 20 double crochets. ROUND 6: * 1 treble crochet in each of the 4 first/next double crochets, 2 treble crochets in next double crochet *, work from *-* to end of round = 24 treble crochets. ROUND 7: Work 1 double crochet in each treble crochet = 24 double crochets. ROUND 8: * 1 treble crochet in each of the first 5 double crochets, 2 treble crochets in next double crochet *, work from *-* to end of round = 28 treble crochets. ROUND 9: Work 1 double crochet in each treble crochet = 28 double crochets. ROUND 10: * 1 treble crochet in each of the 6 first double crochets, 2 treble crochets in next double crochet *, work from *-* to end of round = 32 treble crochets. ROUND 11: Work 1 double crochet in each treble crochet = 32 double crochets. ROUND 12: * Work 4 chain stitches, skip 3 double crochets, work 1 slip stitch in back loop of next double crochet * work from *-* to end of round = 8 chain-spaces. Read COLOUR CHANGE and change to light beige before next round. ROUND 13: Work slip stitches to first space, work 5 treble crochets around each space = 40 treble crochets. ROUND 14: Work 1 double crochet in each treble crochet = 40 double crochets. ROUND 15: * 1 treble crochet in each of the 9 first/next double crochets, 2 treble crochets in next double crochet *, work from *-* to end of round = 44 treble crochets. ROUND 16: Work 1 double crochet in each treble crochet = 44 double crochets. ROUND 17: * Work 4 chain stitches, skip 3 double crochets, work 1 slip stitch in back loop of next double crochet * work from *-* to end of round = 11 chain-spaces. Change to red before next round. ROUND 18: Work slip stitches to first space, * work 4 treble crochets around first space, 4 treble crochets around next space, 5 treble crochets around next space *, work from *-* a total of 3 times, work 4 treble crochets around next space and 5 treble crochets around next space = 48 treble crochets. ROUND 19: Work 1 double crochet in each treble crochet = 48 double crochets. ROUND 20: * 1 treble crochet in each of the 11 first/next double crochets, 2 treble crochets in next double crochet *, work from *-* to end of round = 52 treble crochets. ROUND 21: Work 1 double crochet in each treble crochet = 52 double crochets. ROUND 22: * 1 treble crochet in each of the 12 first/next double crochets, 2 treble crochets in next double crochet *, work from *-* to end of round = 56 treble crochets. ROUND 23: Work 1 double crochet in each treble crochet = 56 double crochets. ROUND 24: * 1 treble crochet in each of the 13 first/next double crochets, 2 treble crochets in next double crochet *, work from *-* to end of round = 60 treble crochets. Cut and fasten strand. TASSEL: Work 5 chain stitches (including 4 chain stitches to turn). Work 7 DOUBLE TREBLE CROCHETS TOGETHER – see description above, in the first chain stitch worked. Cut the strand. Pull both strand-ends through the opening at top of Santa and fasten them on wrong side of piece. HAIR: The hair is worked in last round of double crochets before the red spaces (i.e. in the 11th round). Work with off white and hook size 3 mm as follows: Work 1 slip stitch in first double crochet, * skip 1 double crochet, work 3 treble crochets, 3 chain stitches, 3 treble crochets in next double crochet, skip 1 double crochet, work 1 slip stitch in next double crochet *, work from *-* to end of round and finish with 1 slip stitch in first slip stitch on round. Cut and fasten strand. BEARD: The beard is worked in the same way as the hair. Work with off white, but work in round with double crochets before the spaces with light beige (i.e. in 16th round). EYE: Work 3 chain stitches (including 2 chain stitches to turn) with hook size 3 mm and a left-over of dark grey. Work 5 half treble crochets in the first chain stitch worked. Change to off white. Turn piece and work 1 slip stitch in each of the 5 half treble crochets, then work 1 slip stitch in 2nd chain stitch at beginning of previous row. Cut the strands and work another eye in the same way. Fasten the eyes to front of Santa with small invisible stitches. Place one eye over one treble crochet group on beard, there should be 1 treble crochet group between the 2 eyes. BOTTOM: Work 4 chain stitches with hook size 3 mm and red and form them to a ring with 1 slip stitch in first chain stitch. ROUND 1: Work 12 double crochets around ring – read CROCHET INFO. ROUND 2: Work 2 treble crochets in each double crochet = 24 treble crochets. ROUND 3: * 1 double crochet in first/next treble crochet, 2 double crochets in next treble crochet *, work from *-* to end of round = 36 double crochets. ROUND 4: * 1 treble crochet in each of the 2 first/next double crochets, 2 treble crochets in next double crochet*, work from *-* to end of round = 48 treble crochets. ROUND 5: * 1 double crochet in each of the 3 first/next treble crochets, 2 double crochets in next treble crochet *, work from *-* to end of round = 60 double crochets. Cut and fasten strand. ASSEMBLY: Fill the Santa with stuffing. Lay the bottom on the Santa and crochet together with red and 1 double crochet through a stitch from both layers. Cut and fasten strand. ---------------------------------------------------------- FEMALE SANTA: Work in the same way as male Santa, but finish female Santa after the 21st round = 52 double crochets. On 16th round work a lace edge in the same way as the beard on male Santa, but worked in red. Then work a lace edge at the bottom with red as follows: 1 slip stitch in first stitch, * skip 1 double crochet, 3 treble crochets + 3 chain stitches + 3 treble crochets in next double crochet, skip 1 double crochet, 1 slip stitch in next double crochet *, work from *-* to end of round and finish with 1 slip stitch in slip stitch at beginning of round. Cut and fasten strands. Work tassel, hair and eyes in same way as male Santa. BOTTOM: Work rounds 1-4. in the same way as for male Santa, then work as follows: ROUND 5: * 1 double crochet in each of the 11 first/next treble crochets, 2 double crochets in next treble crochet *, work from *-* to end of round = 52 double crochets. Cut and fasten strand. ASSEMBLY: Fill the Santa with stuffing. Lay the bottom towards the santas 21th round (= 52 double crochets) and crochet together with red and 1 double crochet through a stitch from both layers. Cut and fasten strand. ---------------------------------------------------------- SANTA CHILDREN: Work in the same way as the male Santa, but finish the children after the 20th round = 52 treble crochets. Work tassel, hair and eyes in the same way as for the male Santa. Work a lace edge in red in the 16th round in the same way as for the female Santa. Cut and fasten the strands. BOTTOM: Work in the same way as for the female Santa. ASSEMBLY: Fill the Santas with stuffing. Lay the bottom on the Santa and crochet together with red and 1 double crochet through a stitch from both layers. Cut and fasten strand. |
|
|
Have you made this or any other of our designs? Tag your pictures in social media with #dropsdesign so we can see them! Do you need help with this pattern?You'll find tutorial videos, a Comments/Questions area and more by visiting the pattern on garnstudio.com. © 1982-2024 DROPS Design A/S. We reserve all rights. This document, including all its sub-sections, has copyrights. Read more about what you can do with our patterns at the bottom of each pattern on our site. |
|


With over 40 years in knitting and crochet design, DROPS Design offers one of the most extensive collections of free patterns on the internet - translated to 17 languages. As of today we count 304 catalogues and 11422 patterns - 11422 of which are translated into English (UK/cm).
We work hard to bring you the best knitting and crochet have to offer, inspiration and advice as well as great quality yarns at incredible prices! Would you like to use our patterns for other than personal use? You can read what you are allowed to do in the Copyright text at the bottom of all our patterns. Happy crafting!
Comments / Questions (4)
Er det riktig at disse hekles i ullgarn? Har kjøpt det garnet som det står, men ser ikke ut som at de er heklet i ullgarn. BabrMerino fra drops er vell ullgang...
09.11.2020 - 16:25DROPS Design answered:
Hej Ida. Ja det stämmer att dessa hekles i DROPS BabyMerino, vilket är ett garn av 100 % merinoull. Mvh DROPS Design
10.11.2020 - 09:28Liebes Drops Team, wie viel Wolle benötigt man wenn man alle 3 Wichtel zusammen häkeln möchte?
29.09.2019 - 09:08DROPS Design answered:
Liebe Melanie, vielleicht brauchen Sie dann 2 Knäuel rot, und 1 in je den beiden anderen Farben. Viel Spaß beim häkeln!
30.09.2019 - 15:45Bonjour Je suis Débutante au crochet et je bloque au niveau des cheveux pour le père Noël : Une fois que j'ai fait ma mc dans la 1ere maille est-ce que je dois faire 4ml avant de sauter la 2ème maille et piquer dans la 3ème J'ai du mal à comprendre comment passer de la mc à la 3ème maille pour faire les doubles brides Merci
10.12.2018 - 07:19DROPS Design answered:
Bonjour Nathalie, pour les cheveux, joignez le fil naturel dans le dernier tour de mailles serrées avant les arceaux avec 1 maille coulée dans la 1ère maille serrée, et répétez ensuite de *-* comme indiqué. La maille coulée va permettre d'attacher le fil au personnage. Bon crochet!
10.12.2018 - 10:16Dobrý den, moc děkuji za skvělé překlady a přeju paní Hano krásné svátky a šťastný nový rok. Ještě mám dotaz k ceně příze uvedené u návodu. Není to nějak moc za 3 Santy? :-) Monika Opčenská
19.12.2017 - 19:56DROPS Design answered:
Dobrý den, Moniko, díky za milý komentář i přání. K ceně příze u návodu: program je nastaven tak, aby počítal každé uvedené klubíčko - u každé ze 3 figurek jsou vždy 3 klubíčka + zbytek, tedy 3 x 3 = 9 klubek po 88 Kč... a z toho vyjde ta závratná suma, která v praxi tak velká samozřejmě není (protože celková spotřeba na Santí rodinku bude menší než 9 klubek). Každopádně ale díky za připomínku - předám dál, je to zbytečně matoucí. Krásně propletené svátky! Hana
21.12.2017 - 00:21