DROPS Flora
DROPS Flora
65% Wool, 35% Alpaca
from 3.30 $ /50g
Get the yarn to make this pattern from 19.80$.

The yarn cost is calculated from the pattern’s smallest size and the yarn’s cheapest product type. Looking for an even better price? You might find it on the DROPS Deals!

DROPS SS24

Morven

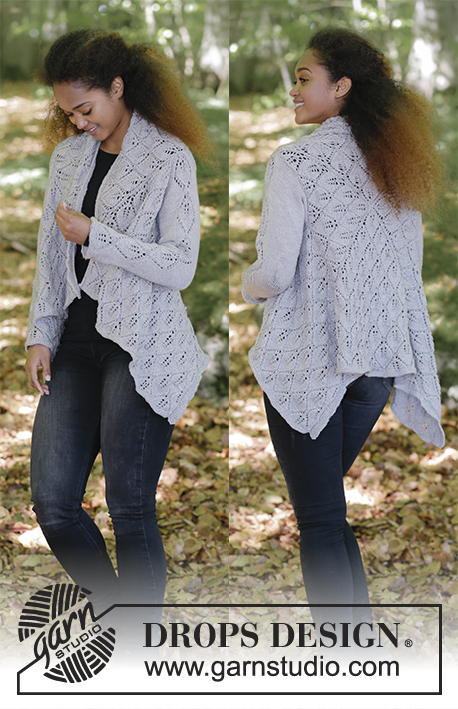
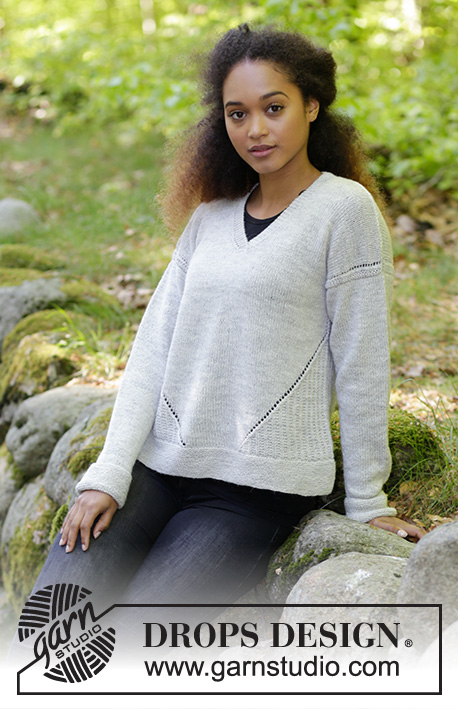
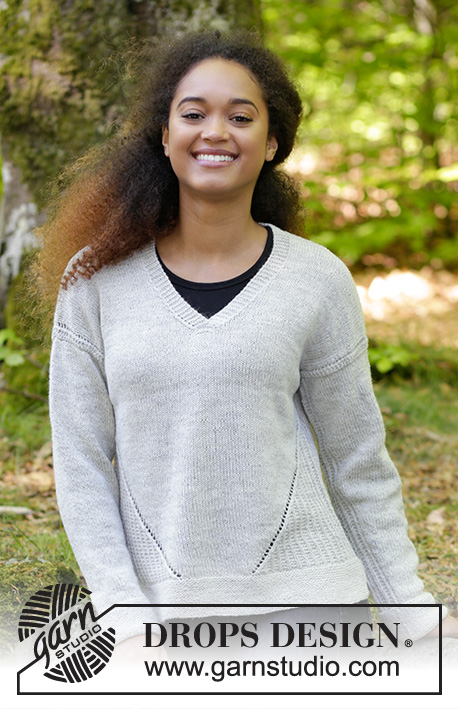
Knitted sweater with V-neck, texture and lace pattern. Size: S - XXXL Piece is knitted in DROPS Flora.

DROPS 184-28
DROPS design: Pattern fl-016
Yarn group A
----------------------------------------------------------
Size: S - M - L - XL - XXL - XXXL
Materials:
DROPS FLORA from Garnstudio (belongs to yarn group A)
300-350-350-400-450-500 g color 03, light gray

Piece can also be knitted with yarn from:
"Alternative yarn (yarn group A)" - see link below.

DROPS DOUBLE POINTED NEEDLES AND CIRCULAR NEEDLE (40 + 60 or 80 cm / 16" + 24" or 32") SIZE 3 mm/US 2.5 – or size needed to get 24 stitches and 32 rows in stockinette stitch = width 10 cm / 4" and 10 cm / 4" vertically.

DROPS CIRCULAR NEEDLE (60 or 80 cm / 24" or 32") SIZE 2.5 mm/ US 1.5 - for edges in garter stitch.

-------------------------------------------------------

Alternative Yarn – See how to change yarns here
Yarn Groups A to F – Use the same pattern and change the yarn here
Yarn usage using an alternative yarn – Use our yarn converter here

-------------------------------------------------------

DROPS Flora
DROPS Flora
65% Wool, 35% Alpaca
from 3.30 $ /50g
Get the yarn to make this pattern from 19.80$.

The yarn cost is calculated from the pattern’s smallest size and the yarn’s cheapest product type. Looking for an even better price? You might find it on the DROPS Deals!

Pattern instructions

NOTE: This pattern is written in American English. All measurements in charts are in cm. For conversion from inches to cm - click here. There are different terms for crocheting in American and British English. If this pattern includes crochet, click for "crochet terms" here. For this pattern in British English, please click here.
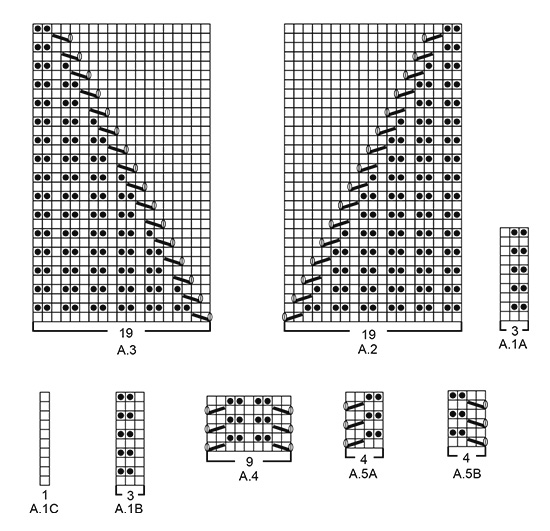
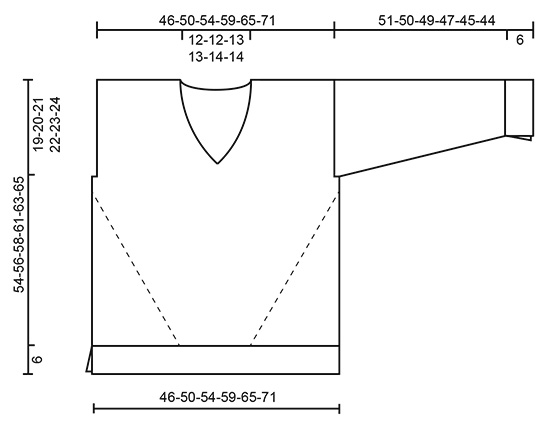
INFORMATION FOR PATTERN:

GARTER STITCH (back and forth):
1 ridge = knit 2 rows.

PATTERN:
See diagrams A.1 to A.5. Diagrams show all rows in pattern seen from the right side.

DECREASE TIP (applies to V-neck):
Decrease for V-neck inside 7 edge stitches in garter stitch. All decreases are done from the right side.
Decrease as follows after 7 edge stitches in garter stitch: Slip 1 stitch knitwise, knit 1, pass slipped stitch over stitch worked (= 1 stitch decreased).
Decrease as follows before 7 edge stitches in garter stitch: Begin 2 stitches before the 7 edge stitches and knit 2 together (= 1 stitch decreased).

INCREASE TIP (applies to mid under sleeve):
Begin 5 stitches before stitch with marker thread, make 1 yarn over, knit 1, A.4 (= 9 stitches), knit 1, make 1 yarn over (= 2 stitches increased). On next round knit yarn overs twisted to avoid holes.
----------------------------------------------------------

SWEATER:
Work from bottom up. Work front and back piece on circular needle in parts until after vent, then work piece in the round on circular needle up to armhole before working back and forth on circular needle in parts until finished measurements. Work sleeves back and forth on circular needle after vent, then work in the round on double pointed needles/short circular needle.

BACK PIECE:
Cast on 109-119-129-141-155-169 stitches on circular needle size 2.5 mm / US 1.5 with Flora. Work in GARTER STITCH - see explanation above, for 6 cm / 2⅜" (finish by knitting 1 row from wrong side). Put piece aside and work the front piece.

FRONT PIECE:
Cast on 109-119-129-141-155-169 stitches and work garter stitch as on back piece for 6 cm / 2⅜" (finish after knitting 1 row from wrong side). Now place the parts together as explained under BODY:

BODY:
Switch to circular needle size 3 mm / US 2.5. Knit the 109-119-129-141-155-169 stitches from front piece, cast on 1 new stitch on needle, knit the 109-119-129-141-155-169 stitches from back piece and cast on 1 new stitch on needle = 220-240-260-284-312-340 stitches. Knit 1 row over all stitches.
Work next round as follows: Work A.1A over the first 24-27-30-33-33-36 stitches (= 8-9-10-11-11-12 repetitions of 3 stitches), A.2 (= 19 stitches), 23-27-31-37-51-59 stitches in stockinette stitch, A.3 (= 19 stitches), A.1B over the next 24-27-30-33-33-36 stitches (= 8-9-10-11-11-12 repetitions of 3 stitches), A.1C (= 1 stitch), A.1A over the next 24-27-30-33-33-36 stitches, A.2 (= 19 stitches), 23-27-31-37-51-59 stitches in stockinette stitch, A.3 (= 19 stitches), A.1B over the next 24-27-30-33-33-36 stitches and finish with A.1C (= 1 stitch).
Continue pattern like this (A.2 and A.3 will be diagonal as triangles out towards each side and there will be more and more stockinette stitch mid front and mid back). REMEMBER THE GAUGE!
When 9 stitches in textured pattern remain in each side of body, insert 1 marker thread in the middle of these 9 stitches in each side - move the marker threads upwards when working. Now work A.4 over the middle 9 stitches in each side, continue the other stitches in stockinette stitches. When piece measures 35-36-37-39-40-41 cm / 13¾"-14¼"-14½"-15¼"-15¾"-16", bind off 1 stitch in each side for armholes (i.e. Bind off stitch with marker thread). Cut the yarn. Then finish front and back piece separately.

BACK PIECE:
= 109-119-129-141-155-169 stitches. Purl 1 row from wrong side (continue pattern in each side as before) and cast AT THE SAME TIME on 1 new stitch in each side for seam = 111-121-131-143-157-171 stitches. Work next row as follows from right side: 1 edge stitch in garter stitch, A.5A (= 4 stitches), work in stockinette stitch until 5 stitches remain on row, work A.5B (= 4 stitches) and finish with 1 edge stitch in garter stitch. Continue pattern like this.
When piece measures 52-54-56-59-61-63 cm / 20½"-21¼"-22"-23¼"-24"-24¾", bind off the middle 25-25-27-27-29-29 stitches for neck and finish each shoulder separately. Continue with stockinette stitch, A5 and 1 edge stitch in garter stitch towards the side. Cast in addition off 1 stitch for neck at beginning of the next 2 rows from neck = 41-46-50-56-62-69 stitches remain on the shoulder. Work until piece measures approx. 54-56-58-61-63-65 cm / 21¼"-22"-22¾"-24"-24¾"-25½", adjust so that next row is worked from wrong side. Knit 1 row from wrong side and bind off by knitting from right side but to avoid a tight bind-off edge make 1 yarn over after every 5th stitch while binding off (bind off yarn overs as regular stitches). Work the other shoulder the same way.

FRONT PIECE:
= 109-119-129-141-155-169 stitches. Purl 1 row from wrong side (continue pattern in each side as before) and cast AT THE SAME TIME on 1 new stitch in each side for seam = 111-121-131-143-157-171 stitches. Then work 4 rows in stockinette stitch with 1 edge stitch in garter stitch and A.5A/A.5B in each side - AT THE SAME TIME work the middle 7 stitches in garter stitch.
Work next row from right side after the 2 ridges as follows: 1 edge stitch in garter stitch, A.5A (= 4 stitches), 47-52-57-63-70-77 stitches in stockinette stitch, slip these 52-57-62-68-75-82 stitches on 1 stitch holder or leave them on a needle, knit until 5 stitches remain on row, work A.5B (= 4 stitches) and finish with 1 edge stitch in garter stitch. Work back from wrong side with 1 edge stitch in garter stitch, A.5B (= 4 stitches) and purl until 7 stitches remain on row towards mid front, knit these 7 stitches.
Continue back and forth like this with 7 edge stitches in garter stitch towards mid front, stockinette stitch, A.5B and 1 edge stitch in garter stitch towards the side. AT THE SAME TIME on first row from right side, decrease for V-neck - read DECREASE TIP. Decrease like this every other row (i.e. every row from right side) 5-5-6-6-7-7 times in total, on every 4th row 4 times in total in all sizes and then on every 6th row 2 times in total in all sizes = 48-53-57-63-69-76 stitches. Work until piece measures 54-56-58-61-63-65 cm / 21¼"-22"-22¾"-24"-24¾"-25½", adjust so that next row is worked from wrong side. Knit 1 row from wrong side and knit 1 row from right side over all stitches. On next row (wrong side), bind off the first 41-46-50-56-62-69 stitches for shoulder = 7 stitches remain on row, knit these stitches. Continue in garter stitch back and forth over the 7 stitches until edge in garter stitch measures approx. 7-7-8-8-8-8 cm / 2¾"-2¾"-3"-3"-3"-3" from shoulder and bind off (= neck edge).
Slip stitches in the other side of piece back on circular needle size 3 mm / US 2.5 and pick in addition up 1 stitch in each of the 7 stitches in garter stitch towards mid front (pick up at the back of stitches).
Work back and forth the same way as in the other side but continue A.5A towards armhole and decrease for V-neck before the 7 edge stitches towards mid front (from right side). When piece measures 54-56-58-61-63-65 cm / 21¼"-22"-22¾"-24"-24¾"-25½" and 1 row has been knitted from wrong side over all stitches, work next row as follows from right side: bind off the first 41-46-50-56-62-69 stitches = 7 stitches remain on row, knit these stitches. Continue in garter stitch back and forth over the 7 stitches until edge in garter stitch measures approx. 7-7-8-8-8-8 cm / 2¾"-2¾"-3"-3"-3"-3" from shoulder and bind off (= neck edge).

SLEEVE:
Cast on 51-53-55-57-59-61 stitches on circular needle size 2.5 mm / US 1.5 with Flora. Work in garter stitch back and forth on needle for 6 cm / 2⅜". Then work piece in the round, i.e. distribute the stitches on double pointed needles size 3 mm / US 2.5 - beginning of round, i.e. opening on edge in garter stitch = mid under sleeve. Work in stockinette stitch in the round with A.4 over the middle 9 stitches under sleeve. Insert 1 marker thread in the middle stitch of A.4 and move the marker thread upwards when working. When piece measures 8 cm / 3⅛", increase 2 stitches mid under sleeve - read INCREASE TIP. Increase 19-21-22-24-25-26 times in total, in S: On every 7th round, in M and L: On every 6th round, in XL: On every 5th round, in XXL: Alternately on every 4th and 5th round, in XXXL: On every 4th round = 89-95-99-105-109-113 stitches. When piece measures 51-50-49-47-45-44 cm / 20"-19¾"-19¼"-18½"-17¾"-17¼" bind off all stitches but to avoid a tight bind-off edge make 1 yarn over after every 5th stitch while binding off (bind off yarn overs as regular stitches).
Work another sleeve the same way.

ASSEMBLY:
Sew shoulder seams inside bind-off edge so that there are 2 ridges mid on top of shoulder. Sew neck edge together mid back (seam should be in towards wrong side). Sew neck edge to neck line in the back of neck.
Sew in sleeves inside 1 edge stitch.

Diagram

All measurements in charts are in cm.

symbols = knit from the right side, purl from the wrong side
symbols = purl from the right side, knit from the wrong side
symbols = between 2 stitches make 1 yarn over
symbols = knit 2 together
symbols = slip 1 stitch knitwise, knit 1, pass slipped stitch over stitch worked
diagram
diagram

Each of our patterns has specific tutorial videos to help you.

Do you have a question? See a list of frequently asked questions (FAQ)

Knitting tension is what determines the final measurements of your work, and is usually measured per 10 x 10 cm. It is provided like so: number of stitches in width x number of rows in height - eg: 19 stitches x 26 rows = 10 x 10 cm.

The knitting tension is very individual; some people knit/crochet loosely while others work tightly. You adjust the knitting tension with the needle size, which is why the suggested needle size only serve as a guide! You need to adjust this (up or down) to ensure that YOUR knitting tension matches the knitting tension provided in the pattern. If you work with a different knitting tension than provided you will have a different yarn consumption, and your work will have different measurements than what the pattern suggests.

The knitting tension also determines which yarns can replace each other. As long as you achieve the same knitting tension you can replace one yarn with another.

See DROPS lesson: How to measure your tension/gauge

See DROPS video: How to make a gauge tension swatch

The required amount of yarn is provided in grams, eg: 450 g. To calculate how many balls you’ll need you first need to know how many grams are in 1 ball (25g, 50g or 100g). This information is available if you click on the individual yarn quality on our pages. Divide the amount required with the amount of each ball. For example, if each ball is 50g (the most common amount), the calculation will be as follows: 450 / 50 = 9 balls.

The important thing when changing from one yarn to another is that the knitting/crochet tension remains the same. This is so that the measurements of the finished piece will be the same as on the sketch provided. It is easier to achieve the same knitting tension using yarns from the same yarn group. It is also possible to work with multiple strands of a thinner yarn to achieve the knitting tension of a thicker one. Please try our yarn converter. We recommend you to always work a test swatch.

Please NOTE: when changing yarn the garment might have a different look and feel to the garment in the photo, due to individual properties and qualities of each yarn.

See DROPS lesson: Can I use a different yarn than the one mentioned in the pattern?

All our yarns are categorised into yarn groups (from A to F) according to thickness and knitting tension – group A contains the thinnest yarns and group F the thickest. This makes it easier for you to find alternative yarns to our patterns, should you wish to switch yarn. All yarns within the same group have a similar knitting tension and can easily replace each other. However, different yarn qualities have different structures and properties which will give the finished work a unique look and feel.

Click here for an overview of the yarns in each yarn group

At the top of all our patterns you’ll find a link to our yarn converter, which is a helpful tool should you wish to use a different yarn than suggested. By filling in the yarn quality you wish to replace, the amount (in your size) and number of strands, the converter will present good alternative yarns with the same knitting tension. Additionally it will tell you how much you’ll require in the new qualities and whether you’ll need to work with multiple strands. Most skeins are 50g (some are 25g or 100g).

If the pattern is worked with multiple colours, every colour will have to be converted separately. Similarly, if the pattern is worked with several strands of different yarns (for example 1 strand Alpaca and 1 strand Kid-Silk) you will have to find alternatives for each, individually.

Click here to see our yarn converter

Since different yarns have different qualities and textures we have chosen to keep the original yarn in our patterns. However, you can easily find options among our available qualities by using our yarn converter, or simply pick a yarn from the same yarn group.

It is possible that some retailers still have discontinued yarns in stock, or that someone has a few skeins at home that they would like to find patterns for.

The yarn converter will provide both alternative yarn as well as required amount in the new quality.

If you think it's hard to decide what size to make, it can be a good idea to measure a garment you own already and like the size of. Then you can pick the size by comparing those measures with the ones available in the pattern's size chart.

You'll find the size chart at the bottom of the pattern.

See DROPS lesson: How to read size chart

The needle size provided in the pattern serves only as a guide, the important thing is to follow the knitting tension. And since knitting tension is very individual, you will have to adjust the needle size to ensure that YOUR tension is the same as in the pattern – maybe you’ll have to adjust 1, or even 2 needle sizes, up or down to achieve the correct tension. For this, we recommend that you work test swatches.

Should you work with a different knitting tension than the one provided, the measurements of the finished garment might deviate from the measurement sketch.

See DROPS lesson: How to measure your tension/gauge

See DROPS video: How to make a gauge tension swatch

Working a garment top-down provides more flexibility and room for personal adjustment. For example it is easier to try the garment on while working, as well as making adjustments to length of yoke and shoulder caps.

The instructions are carefully explaining every step, in the correct order. Diagrams are adjusted to the knitting direction and are worked as usual.

The diagram depicts all rows/rounds, and every stitch seen from the right side. It is read from bottom to top, from right to left. 1 square = 1 stitch.

When working back and forth, every other row is worked from the right side and every other row is worked from the wrong side. When working from the wrong side, the diagram will have to be worked reversed: from left to right, knit stitches are purled, purl stitches are knit etc.

When working in the round every round is worked from the right side and the diagram are worked from right to left on all rounds.

See DROPS lesson: How to read knitting diagrams

The diagram depicts all rows/rounds, and every stitch seen from the right side. It is worked from bottom to top, from right to left.

When working back and forth every other row is worked from the right side: from right to left and every other row is worked from the wrong side: from left to right.

When working in the round, every row in the diagram are worked from the right side, from right to left.

When working a circular diagram you start in the middle and work your way outwards, counter clockwise, row by row.

The rows usually start with a given number of chain stitches (equivalent to the height of the following stitch), this will either be depicted in the diagram or explained in the pattern.

See DROPS lesson: How to read crochet diagrams

Instructions for working several diagrams after each other on the same row/round, will often be written like so: “work A.1, A.2, A.3 a total of 0-0-2-3-4 times". This means you work A.1 once, then A.2 is worked once, and A.3 is repeated (in width) the number of times provided for your size – in this case like so: S = 0 times, M = 0 times, L=2 times, XL= 3 times and XXL = 4 times.

The diagrams are worked as usual: begin with the first row in A.1, then work the first row in A.2 etc.

See DROPS lesson: How to read knitting diagrams

See DROPS lesson: How to read crochet diagrams

The total width of the garment (from wrist-to-wrist) will be larger in the larger sizes, despite the actual sleeves being shorter. The larger sizes have longer sleeve caps and wider shoulders, so there will be a good fit in all sizes.

The measurement sketch/schematic drawing provides information regarding the full length of the garment. If it’s a jumper or a jacket the length is measured from the highest point on the shoulder (usually closest to the neckline), and straight down to the bottom of the garment. It is NOT measured from the tip of shoulder. Similarly, the length of yoke is measured from the highest point on the shoulder and down to where yoke is split into body and sleeves.

See DROPS lesson: How to read a schematic drawing

Diagrams are often repeated on the round or in height. 1 repeat is the diagram the way it appears in the pattern. If it says to work 5 repeats of A.1 in the round, then you work A.1 a total of 5 times after/next to each other in the round. If it says to work 2 repeats of A.1 vertically/in height you work the entire diagram once, then begin again at the start and work the entire diagram one more time.

Chain stitches are slightly narrower than other stitches and to avoid working the cast-on edge too tight, we simply chain more stitches to begin with. The stitch count will be adjusted on the following row to fit the pattern and measurement sketch.

The rib edge is more elastic and will contract slightly compared to, for example, stocking stitch. By increasing before the rib edge, you avoid a visible difference in width between the rib edge and the rest of the body.

It’s very easy to cast off too tightly, and by making yarn overs while casting off (and simultaneously casting these off) you avoid a too tight cast off edge.

See DROPS video: How to bind off with yarn overs (yo)

To achieve an even increase (or decrease) you can increase on, for example: every 3rd and 4th row alternately, like so: work 2 rows and increase on the 3rd row, work 3 rows and increase on the 4th. Repeat this until the increase is complete.

See DROPS lesson: Increase or decrease 1 st on every 3rd and 4th row alternately

Should you prefer to work in the round instead of back and forth, you may of course adjust the pattern. You’ll need to add steeks mid-front (usually 5 stitches), and follow the instructions. When you would normally turn and work from the wrong side, simply work across the steek and continue in the round. At the end you’ll cut the piece open, pick up stitches to work bands, and cover the cut edges.

See DROPS video: How to knit steeks and cut open

Should you prefer to work back and forth instead of in the round, you may of course adjust the pattern so you work the pieces separately and then assemble them at the end. Divide the stitches for the body in 2, add 1 edge stitch in each side (for sewing) and work the front and back pieces separately.

See DROPS lesson: Can I adapt a pattern for circular needles into straight needles?

Pattern repeats can vary slightly in the different sizes, in order to get the correct proportions. If you’re not working the exact same size as the garment in the photo, yours might deviate slightly. This has been carefully developed and adjusted so that the complete impression of the garment is the same in all sizes.

Make sure to follow instructions and diagrams for your size!

If you have found a pattern you like which is available in women’s size it’s not very difficult to convert it to men’s size. The biggest difference will be the length of sleeves and body. Start working on the women size that you think would fit across the chest. The additional length will be worked right before you cast off for the armhole/sleeve cap. If the pattern is worked top-down you can add the length right after the armhole or before the first decrease on sleeve.

Regarding additional yarn amount, this will depend on how much length you add, but it is better with a skein too many than too few.

All yarns will have excess fibres (from production) that might come off as lint or shedding. Brushed yarns (ie hairier yarns) have more of these loose, excess fibres, causing more shedding.

Shedding also depends on what is worn under or over the garment, and whether this pulls at the yarn fibres. It’s therefore not possible to guarantee that there will be no shedding

Below are some tips on how to get the best result when working with hairier yarns:

1. When the garment is finished (before you wash it) shake it vigorously so the looser hairs come off. NOTE: do NOT use a lint roller, brush or any method that pulls at the yarn.

2. Place the garment in a plastic bag and put it in your freezer - the temperature will cause the fibres to become less attached to each other, and excess fibres will come off easier.

3. Leave in the freezer for a few hours before taking it out and shaking it again.

4. Wash the garment according to the instructions on the yarn label.

Pilling is a natural process that happens to even the most exclusive of fibers. It's a natural sign of wear and tear that is hard to avoid, and that is most visible in high friction areas of your garment like a sweater's arms and cuffs.

You can make your garment look as new by removing the pilling, using a fabric comb or a pill/lint remover.

Still can't find the answer you need? Then scroll down and leave your question so one of our experts can try to help you. This will be done normally within 5 to 10 working days.
In the meantime, you can read the questions and answers that others have left to this pattern or join the DROPS Workshop on Facebook to get help from fellow knitters/crocheters!

You might also like...

Post a comment to pattern DROPS 184-28

We would love to hear what you have to say about this pattern!

If you want to leave a question, please make sure you select the correct category in the form below, to speed up the answering process. Required fields are marked *.

Comments / Questions (22)

country flag Ellen wrote:

Hva menes med 9 masker steukturmønster? Betyr det 9 masker med midtmasken under ermet?

05.01.2023 - 18:29

DROPS Design answered:

Hei Ellen. Mønstret du strikker / diagrammer = strukturmønster, og når det gjenstår totalt 9 masker med strukturmønster i hver side på bolen settes det 1 merketråd i den midterste av disse 9 maskene i hver side – la merketrådene følge med videre oppover. Detter er da under ermet ja. mvh DROPS Design

06.01.2023 - 14:03

country flag Petra Stammkötter wrote:

Ich verstehe leider die Diagramme im Rumpfteil nicht. Sind hier nun lediglich jede zweite Runde, also 1, 3, 5 usw. Eingezeichnet oder ist jede Runde eingezeichnet? Mir erschließt sich das nicht und ich finde die Bezeichnung Hin+und Rückreihen sehr irreführend

28.08.2022 - 21:10

DROPS Design answered:

Liebe Frau Stammkötter, beide Hin- und Rückreihe sind im Diagram gezeichnet; Hinreihen lesen Sie rechts nach links und Rückreihen lesen Sie links nach rechts. A.1A (als Beispiel) stricken Sie so: 1. Reihe (Hinreihe): 3 M rechts, 2. Reihe (RückReihe): 1 M links, 2 M re. So bekommen Sie ein RippenMuster: 2 M kraus rechts, 1 Masche glatt rechts. Viel Spaß beim stricken!

29.08.2022 - 09:03

country flag Karen Bondy wrote:

After you complete the 10 rows of pattern A1A and B do you switch to stockinette for those stitches or do you stay in pattern?

11.06.2020 - 19:33

DROPS Design answered:

Dear Mrs Bondy, after you have worked the 10 rows of A.1A and A.1B repeat these rows in height until there are 9 sts remaining in pattern (due to A.2 and A.3) to work A.4. Happy knitting!

12.06.2020 - 07:47

country flag JR wrote:

I'm having trouble with knowing where to start the 9 stitch pattern under the arm in the pattern A.2 and A.3 as I am not seeing a place where 9 stitches would be left in the "texture"?

14.12.2019 - 01:01

DROPS Design answered:

Dear JR, when working A.2 and A.3 on body, the lace/texture pattern will goes diagonally = there will be more stocking stitch in the middle of front/back piece and less stitches worked in texture pattern between the yarn overs (see end of A.2 and beg of A.3 in diagram). When only 9 stitches in texture pattern remain in each side, you then work A.4 over these 9 stitches (= starting and ending with the lace pattern as before + texture as before). Happy knitting!

16.12.2019 - 07:50

country flag JR wrote:

I am just having some trouble understanding the below section: When 9 stitches in textured pattern remain in each side of body, insert 1 marker thread in the middle of these 9 stitches in each side . Now work A.4 over the middle 9 stitches in each side. And do I continue these 9 stitches until said measurement is reached?

10.12.2019 - 20:22

DROPS Design answered:

Dear JR, yes, you continue working A.4 over these 9 stitches on each side undtil piece measures 35-36-37-39-40-41 cm and now cast off the stitch with the marker thread on each side and continue each piece separately. Happy knitting!

11.12.2019 - 08:18

country flag Karen Bondy wrote:

Beautiful. I can't wait to start

03.08.2019 - 19:36

country flag Kuntz wrote:

Bonjour je ne comprend pas se que deviennent les 33 mailles de A1A et les 33 mailles de A1B. Vu que A2 et A3 on toujours 19 mailles chacun ?

26.07.2019 - 12:30

DROPS Design answered:

Bonjour Mme Kuntz! Continuer le point fantaisie, les diagrammes A.2 et A.3 vont partir en diagonale sur les côtés comme des triangles, et on aura plus de mailles jersey au milieu devant et au milieu dos. Le nombre totale de mailles est le meme. Bon tricot!

27.07.2019 - 00:02

country flag Maartje Van Onselen wrote:

Hoe brei ik een kantsteek?

20.05.2019 - 19:07

DROPS Design answered:

Dag Maartje,

Een kantsteek brei je in ribbelsteek, dus zowel de heengaande als de teruggaande naald recht.

22.05.2019 - 13:01

country flag ANNE B wrote:

MERCI il me semblait bien que A2 et A3 mangeaient les autres diagrammes!!!!! Bravo et merci pour cette prompte bienveillance à répondre,

30.04.2019 - 10:11

country flag ANNE B wrote:

Merci de votre prompte réponse, mais désolée ne vois pas comment arriver à ces 9 mailles? Où sont elles? Faut il répéter A1A et A1B pour obtenir même hauteur que diagrammes A2 et A3? Merci

29.04.2019 - 17:57

DROPS Design answered:

Bonjour Anne B, vous allez continuer A.2 et A.3 pour continuer les diagonales ajourées, le nombre de mailles entre A.2 et A.3 (= A.1, A.1B et A.1C) vont progressivement diminuer, "mangées" par A.2 et A.3, quand il restera 9 mailles en point texturé de chaque côté, tricotez alors A.4 sur ces 9 m. Bon tricot!

30.04.2019 - 09:48