
Popular categories
Looking for a yarn?


|
||||||||||||||||
Season Greetings |
||||||||||||||||
 |
 |
|||||||||||||||
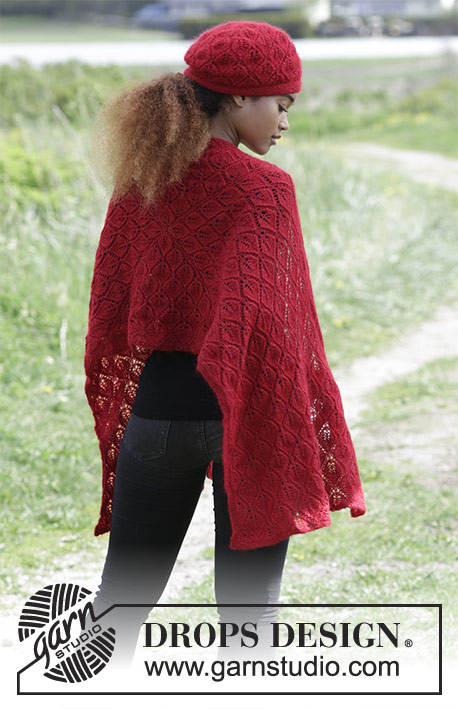
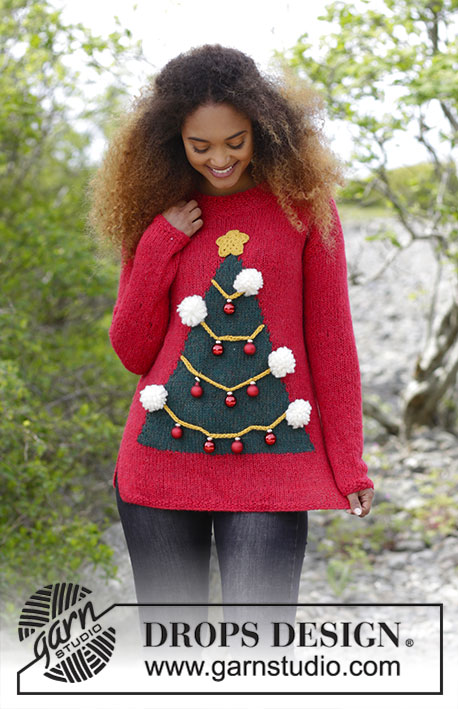
Knitted Christmas sweater with round yoke and multi-colored Nordic pattern, worked top down. Sizes S - XXXL The piece is worked in DROPS Karisma.
DROPS 183-5 |
||||||||||||||||
|
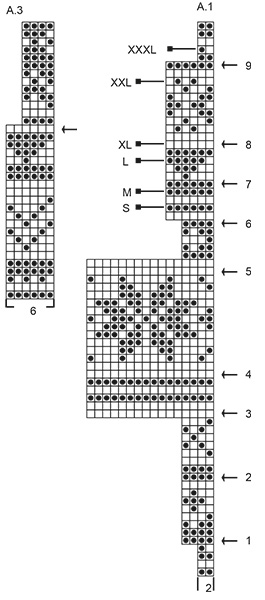
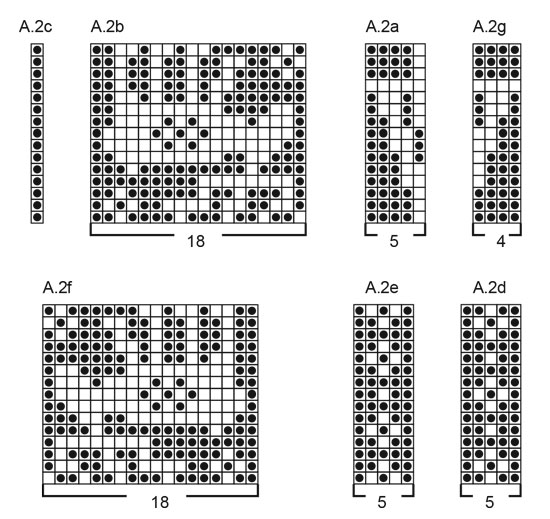
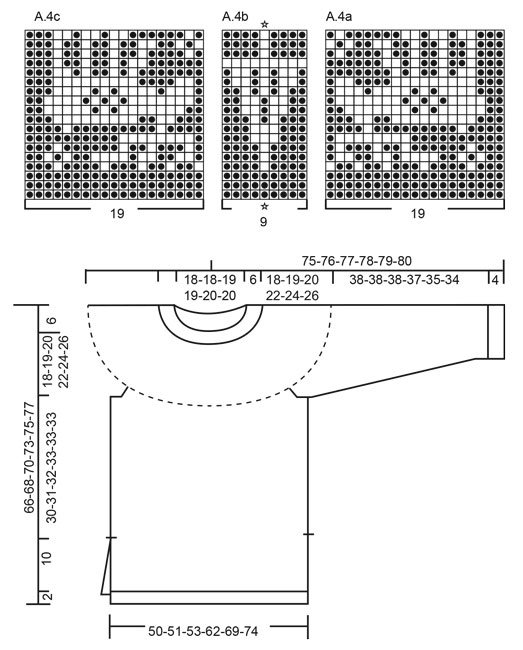
RIDGE/GARTER STITCH (worked back and forth): 1 ridge = Knit 2 rows. PATTERN: See diagrams A.1 to A.4. The whole pattern is worked in stockinette stitch. INCREASE/DECREASE TIP (evenly spaced): To work out how to increase/decrease evenly, count the total number of stitches on needle (e.g. 148 stitches) and divide by the number of increases/decreases to be made (e.g. 16) = 9.3. In this example increase after approx. every 9th stitch by making 1 yarn over, on the next round knit the yarn overs twisted to avoid holes. When decreasing knit approx. every 8th and 9th stitch together. KNITTING TIP: To avoid the knitting gauge becoming tighter when working pattern, it is important that the strands at the back of the piece do not pull. You can use a larger needle size when working pattern if this is a problem. DECREASE TIP (for mid under sleeve): Start 3 stitches before the marker thread, knit 2 together, knit 2 (the marker thread sits in the middle of these 2 stitches), slip 1 stitch as if to knit, knit 1, pass the slipped stitch over the knitted stitch (= 2 stitches decreased). ---------------------------------------------------------- SWEATER: The sweater is worked in the round with circular needle, top down. You can work an elevation in the back of the neck for a better fit, so that the yoke is a little higher at the back. You can leave out the elevation if you wish, the neck will then be the same both front and back – see description for elevation further down in the pattern. After the yoke work the body in the round with circular needle. The body is divided at the split, then worked back and forth. The sleeves are worked in the round with circular needle/double pointed needles, top down. NECK: Cast on 148-148-152-156-160-164 stitches with short circular needle size 3.5 mm / US 4 and with red. Insert 1 marker at the beginning of the round (= mid back). Knit 1 round. Then work rib (= knit 2 / purl 2) for 6 cm / 2⅜". Change to short circular needle size 4.5 mm / US 7 and knit 1 round where you increase 16-20-20-22-24-26 stitches evenly on round - read INCREASE/DECREASE TIP = 164-168-172-178-184-190 stitches. Now work an elevation in the back of the neck or go straight to working the yoke if you do not want an elevation. ELEVATION IN BACK OF NECK: Skip this section if you do not want an elevation. Knit 13-13-14-14-15-15 stitches past the marker, turn, tighten strand and purl 26-26-28-28-30-30 stitches back. Turn, tighten the strand and knit 39-39-42-42-45-45 stitches, turn, tighten the strand and purl 52-52-56-56-60-60 stitches back. Continue by working over 13-13-14-14-15-15 more stitches each time you turn, until you have worked over a total of 104-104-112-112-120-120 stitches, turn and knit to mid back. YOKE: = 164-168-172-178-184-190 stitches. Continue by working pattern in the round according to diagram A.1 and increase evenly on each round marked with an arrow in the diagram as described below - read PATTERN, REMEMBER THE GAUGE! ARROW-1: Increase 28-28-32-34-40-44 stitches = 192-196-204-212-224-234 stitches. ARROW-2: Increase 24-28-32-32-40-42 stitches = 216-224-236-244-264-276 stitches. ARROW-3: Increase 20-24-28-34-36-40 stitches = 236-248-264-278-300-316 stitches. ARROW-4: Increase 20-24-24-26-36-36 stitches = 256-272-288-304-336-352 stitches. ARROW-5: Increase 28-28-24-20-24-20 stitches = 284-300-312-324-360-372 stitches. ARROW-6: Increase 22-24-18-24-18-18 stitches = 306-324-330-348-378-390 stitches. SIZES S - M: Go to ALL SIZES. SIZES L - XL: ARROW-7: Increase 12-18 stitches = 342-366 stitches. SIZE XXL: ARROW-7: Increase 18 stitches = 396 stitches. ARROW-8: Increase 12 stitches = 408 stitches. SIZE XXXL: ARROW-7: Increase 18 stitches = 408 stitches. ARROW-8: Increase 18 stitches = 426 stitches. ARROW-9: Increase 14 stitches = 440 stitches. ALL SIZES: Work up to and including the last round for your size. The piece measures approx. 24-25-26-28-30-32 cm / 9½"-9¾"-10¼"-11"-11¾"-12½" from the cast-on edge (if you have not reached this measurement, continue without increases until you have reached the right measurement - but no further than the next to last round in A.1 - adjust so that the next round to be worked after you have reached the measurement is a round in only 1 color). Work the next round in A.1 as follows: Work 47-48-50-56-63-68 stitches (= half back piece), place the next 60-66-72-72-78-84 stitches on a thread (= sleeve), cast on 6-6-6-12-12-12 new stitches (= the side), work 93-96-99-111-126-136 stitches (= front piece), place the next 60-66-72-72-78-84 stitches on a thread (= sleeve), cast on 6-6-6-12-12-12 new stitches (= the side) and work the last 46-48-49-55-63-68 stitches (= half back piece). Body and sleeves are now worked separately. BODY: = 198-204-210-246-276-296 stitches. Insert 1 marker thread in the middle of the 6-6-6-12-12-12 new stitches cast on in each side (= 99-102-105-123-138-147 stitches on front and back pieces) - THE PIECE IS NOW MEASURED FROM HERE! Work up to and including the last round in A.1 in all sizes. When A.1 has been completed in height, work 1 round with red where the number of stitches is adjusted to 196-206-216-246-272-292 stitches. Then work pattern in the round according to diagram A.2 as follows: ** Work A.2a (= 5 stitches), * A.2b (= 18 stitches), A.2c (= 1 stitch) *, work from *-* a total of 1-1-1-1-2-2 times, work A.2b (= 18 stitches), work * A.2d (= 5 stitches), A.2e (= 5 stitches) *, work from *-* a total of 1-2-2-4-1-2 times, work A.2d (= 5 stitches) a total of 1-0-1-0-1-1 time, work A.2f (= 18 stitches), work * A.2c (= 1 stitch), A.2f (= 18 stitches) *, work from *-* a total of 1-1-1-1-2-2 times and work A.2g (= 4 stitches) **, repeat from **-** 1 more time. Continue until A.2 has been completed in height. Work 1 round with red and adjust the number of stitches to 198-204-210-246-276-294 stitches by increasing/decreasing evenly on round. Then work pattern in the round according to diagram A.3 (= 33-34-35-41-46-49 repeats of 6 stitches). On the round marked with an arrow, adjust the number of stitches to 196-204-212-248-276-296. Continue until A.3 has been completed in height (= 49-51-53-62-69-74 repeats of 4 stitches). Work stockinette stitch with red from here. When the piece measures 30-31-32-33-33-33 cm / 11¾"-12¼"-12½"-13"-13"-13" from the marker thread, divide the piece in the sides for the split and the front and back pieces are finished separately back and forth on the circular needle. BACK PIECE: = 99-102-105-123-138-147 stitches. Continue working stockinette stitch with 4 stitches in GARTER STITCH - see description above, in each side. When the piece measures 40-41-42-43-43-43 cm / 15¾"-16"-16½"-17"-17"-17", change to circular needle size 3.5 mm / US 4 and work 1 row where you increase 23-24-25-31-32-35 stitches evenly on row = 122-126-130-154-170-182 stitches. Then work as follows from the right side: Work 4 stitches in garter stitch, * knit 2, purl 2 *, work from *-* until there are 6 stitches left on the row, knit 2 and work 4 stitches garter stitch. Work like this for 2 cm / ¾". Change back to circular needle size 4.5 mm / US 7 and bind off with knit over knit and purl over purl. The piece measures approx. 42-43-44-45-45-45 cm / 16½"-17"-17¼"-17¾"-17¾"-17¾". FRONT PIECE: = 99-102-105-123-138-147 stitches. Work in the same way as for the back piece. SLEEVE: The sleeve is worked in the round. Place stitches from the thread in the one side of the piece on short circular needle/double pointed needles size 4.5 mm / US 7, in addition knit up 1 stitch in each of the 6-6-6-12-12-12 new stitches cast on under the sleeve (continue with diagram A.1 as before) = 66-72-78-84-90-96 stitches. Insert 1 marker thread in the mid under sleeve (= in the middle of the 6-6-6-12-12-12 stitches which were knitted up under the sleeve) - the next round begins from here. THE PIECE IS NOW MEASURED FROM HERE! When the piece measures 2 cm / ¾" decrease 1 stitch on each side of the marker thread - read DECREASE TIP. Decrease every 3-2½-2-2-1½-1½ cm / 1⅛"-⅞"-¾"-¾"-½"-½" a total of 12-14-16-18-20-22 times = 42-44-46-48-50-52 stitches. Continue in the round according to A.1 over all stitches until the diagram has been completed in height. Insert 1 marker mid top of sleeve = mid stitch. NOTE: Now you are working diagram A.4, but because of decreases mid under sleeve, you need to adjust so do as follows: Count the number of stitches on each side of the mid stitch on top of sleeve and see how many stitches there is room for of the first repeat of A.4a on the round and how many stitches there is room for of the last repeat of A.4c on the round. In other words you work pattern as follows: Work the number of stitches there is room for of A.4a, work A.4a (= 19 stitches), A.4b (= 9 stitches, see star in the diagram = mid stitch), A.4c (= 19 stitches) and work the number of stitches there is room for of A.4c. When A.4 has been completed, work pattern in the round according to diagram A.3 - adjust so that first stitch in diagram is at the mid of top of sleeve. When A.3 has been completed in height, continue with stockinette stitch and red. When the piece measures 38-38-38-37-35-34 cm / 15"-15"-15"-14½"-13¾"-13½" from the marker thread mid under sleeve, change to double pointed needles size 3.5 mm / US 4 and knit 1 round where you increase 6-4-6-4-6-4 stitches evenly on round = 48-48-52-52-56-56 stitches. Work rib (= knit 2 / purl 2) for 4 cm / 1½". Change to double pointed needles size 4.5 mm / US 7 and bind off with knit over knit and purl over purl. The sleeve measures approx. 42-42-42-41-39-38 cm / 16½"-16½"-16½"-16"-15¼"-15". Work the other sleeve in the same way. |
||||||||||||||||
Diagram explanations |
||||||||||||||||
|
||||||||||||||||
|
||||||||||||||||
|
||||||||||||||||
|
||||||||||||||||
|
Have you made this or any other of our designs? Tag your pictures in social media with #dropsdesign so we can see them! Do you need help with this pattern?You'll find tutorial videos, a Comments/Questions area and more by visiting the pattern on garnstudio.com. © 1982-2024 DROPS Design A/S. We reserve all rights. This document, including all its sub-sections, has copyrights. Read more about what you can do with our patterns at the bottom of each pattern on our site. |
||||||||||||||||


With over 40 years in knitting and crochet design, DROPS Design offers one of the most extensive collections of free patterns on the internet - translated to 17 languages. As of today we count 304 catalogs and 11422 patterns - 11417 of which are translated into English (US/in).
We work hard to bring you the best knitting and crochet have to offer, inspiration and advice as well as great quality yarns at incredible prices! Would you like to use our patterns for other than personal use? You can read what you are allowed to do in the Copyright text at the bottom of all our patterns. Happy crafting!
Comments / Questions (28)
Auf der deutschen Drops Facebook Seite habe ich ein Foto gepostet mit den Raporten in der Reihenfolge wie es in der Anleitung steht. Völlig falsch. Die Raporte 2 d und 2 e kommen so auf dem Bild gar nicht vor. Stricken lassen und korrigieren. Habe mir alles zusammgebastelt damit es so aussieht wie auf dem Bild.
23.11.2018 - 13:34DROPS Design answered:
Liebe Brigitte, in allen Grössen haben Sie auf beiden Seiten A.2d und A.2e und 2. A.2d (vor A.2f) nur nicht in den 2. und 4. Grösse. Diese Diagramme kann man auf dem Bild hier nicht sehen, da sie auf die Seiten sind. Viel Spaß beim stricken!
23.11.2018 - 15:33Hallo,habe diesen Pullover endlich beendet. Leider ist die Anleitung nach der Ärmeltrennung mit dem Raport Hirsch und Tannenbäume völlig falsch. Habe das Gefühl das ihr die Anleitungen nur ins deutsche übersetzten lässt aber nicht gleichzeitig von der gleichen Person Probestricken lässt. Denn dann würden ihr von den Fehlern wissen. Ihr habt wirklich schöne Anleitungen. Leider habe ich bisher nur Anleitungen von Euch mit Fehlern gehabt.
22.11.2018 - 17:30DROPS Design answered:
Liebe Brigitte, können Sie uns bitte mehr darüber sagen, welche Grösse Sie gestrickt haben, und wo genau es falsch sein sollte, damit wir die Anleitung neu mal schauen - haben Sie auch gesehen, daß A.3 im September korrigiert wurde?
23.11.2018 - 11:14Hallo, meine Maschenprobe glatt re gestrickt hat gepasst. Jetzt beim in Runden stricken und mit 2 Farben habe ich eine Maschenzahl von 21 und eine Reihenzahl von 23. Muss das so sein? Lieben Dank im voraus
25.10.2018 - 06:01DROPS Design answered:
Liebe Sandra, die Maschenprobe muss dieselbe sein, versuchen Sie mit dickeren Nadelstärke, damit die Maschenprobe korrekt bleibt. Viel Spaß beim stricken!
25.10.2018 - 08:48Hallo, wenn ich bei Größe S Ärmel nach den Abnahmen noch 42 M habe, welche Masche ist dann meine Mittelmasche für A4? Die Mitte wäre ja genau zwischen je 21 M und somit keine Masche die ich in A. 4b stricken kann? Lieben Dank im voraus für die schnelle Hilfe
22.10.2018 - 13:23DROPS Design answered:
Liebe Sandra, Sie können die 21. Masche als Mittelmasche nehmen, bei der 2. Ärmel spiegleverkehr kalkulieren. Viel Spaß beim stricken!
22.10.2018 - 14:25Hallo liebes Drops Team, ab wann sollte man denn zur langen Rundnadel 4,5 wechseln? Wozu braucht man die lange 3,5? Und wie ist das bei den Ärmeln zu verstehen? Um auf die 66 Maschen zu kommen muss man die kompletten 6 extra angeschlagenen Maschen mit aufnehmen, oder? Wie funktioniert das? Gibt es hierzu ein Video? Danke und LG
11.10.2018 - 09:16DROPS Design answered:
Liebe Laura K, Sie fangen mit den 40 cm Rundnadel 4,5 für den Hals, dann werden Sie für die Rundpasse regelmäßig zunehmen - nach und nach bekommen Sie zuviele Masche für die 40 cm Rundnadel, dann wechseln Sie zu der längeren Nadeln. Die 80 cm Rundnadel 3,5 brauchen Sie für das Bündchen unten am Rücken- bzw Vorderteil. Für die Ärmel werden 60 M stillgelegt dann werden 6 neuen Maschen in den 6 am Rumpfteil angeschlagten Maschen aufgenommen = 66 M. Siehe hier (ca 6:35) wie man die Ärmel strickt. Viel Spaß beim stricken!
11.10.2018 - 10:12Men når jeg tager nye masker ud så bliver mønsteret skævt. selve diagrammet ser således ud: 1 omgang: 5 hvide og 1 grå. \\\\r\\\\n2. Omgang: 1 grå, 3 hvide, 3 grå osv og slut omgangen med 2 grå. (På denne omgang skal jeg tage 1 maske ud i første maske og 1 maske i anden sidste maske.\\\\r\\\\n3. Omgang: 2 grå, 1 hvid, 5 grå osv og slut med 3 grå. \\\\r\\\\n4.-6. Omgang: hele omgangen grå. Hvordan skal jeg strikke de nye masker?
16.03.2018 - 18:44Bonjour, ce n'est pas forcément sue ce modèle que je me pose des questions mai je cherche des modèles tricot aux aiguilles non circulaires.Y en a t'il sur votre site, je viens de le découvrir et le trouve fabuleux Merci
14.02.2018 - 21:18DROPS Design answered:
Bonjour Mme Le Floch, tout à fait, en fonction du modèle, on va tricoter en rond sur aiguille circulaire ou bien en allers et retours. Vous trouverez quelques informations utiles ici. Bon tricot!
15.02.2018 - 09:50Hallo, Ich stricke gerade diesen Pullover in Größe L und bin beim Muster A2 und frage mich ob das Muster nicht wie folgt lauten müsste: g,f,c,f,d,e,d,e,d,b,c,b,a und nicht wie folgt in der Anleitung geschrieben: a,b,c,b,d,e,d,e,d,f,c,f,g ?! Freue mich auf eine schnelle Antwort. Viele Grüße!
05.12.2017 - 21:32DROPS Design answered:
Liebe Frau Swer, die Diagramme sind so richtig, Sie stricken von oben nach unten und von der Mitte am Rückenteil, so beginnt man mit a (Mitte am Ruckenteil) bis g (Mitte am Vorderteil) und noch einmal wiederholen von a bis g wie geschrieben. Viel Spaß beim stricken!
06.12.2017 - 09:30