
Popular categories
Looking for a yarn?


|
||||||||||||||||
Season Greetings |
||||||||||||||||
 |
 |
|||||||||||||||
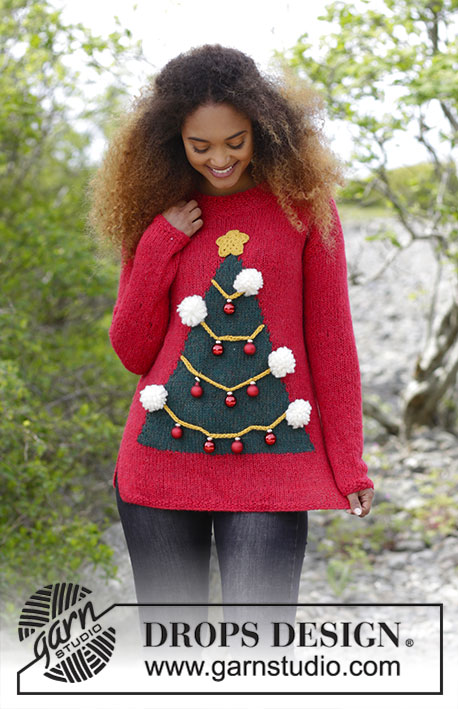
Knitted Christmas jumper with round yoke and multi-coloured Nordic pattern, worked top down. Sizes S - XXXL The piece is worked in DROPS Karisma.
DROPS 183-5 |
||||||||||||||||
|
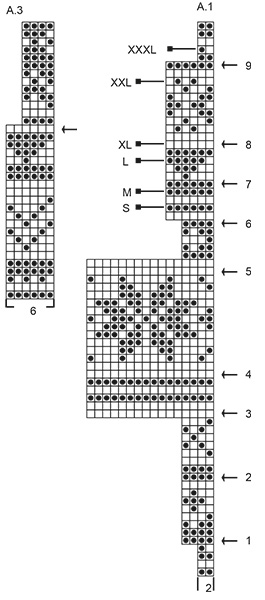
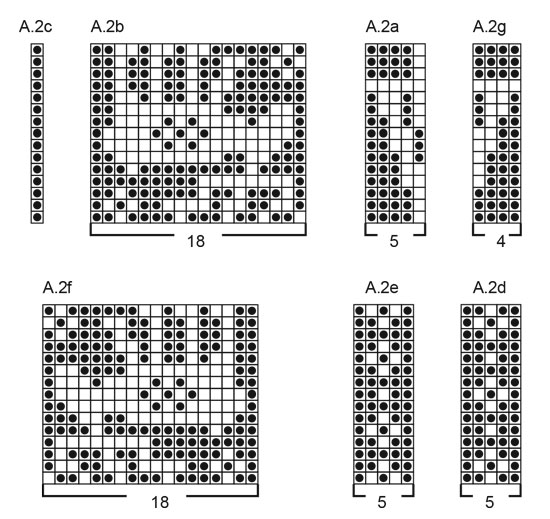
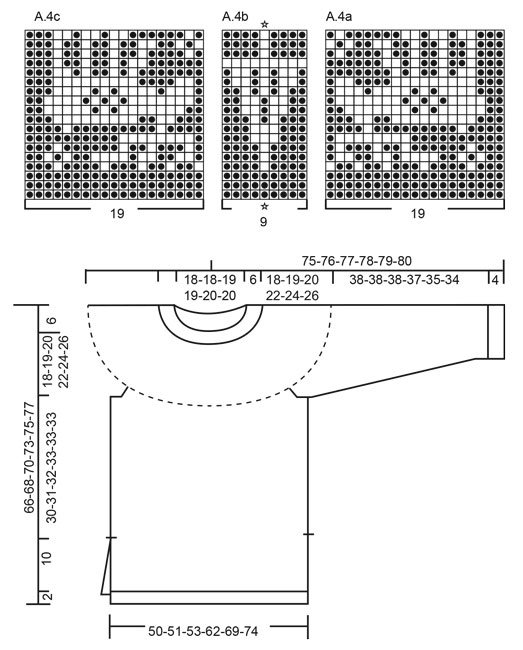
RIDGE/GARTER STITCH (worked back and forth): 1 ridge = Knit 2 rows. PATTERN: See diagrams A.1 to A.4. The whole pattern is worked in stocking stitch. INCREASE/DECREASE TIP (evenly spaced): To work out how to increase/decrease evenly, count the total number of stitches on needle (e.g. 148 stitches) and divide by the number of increases/decreases to be made (e.g. 16) = 9.3. In this example increase after approx. every 9th stitch by making 1 yarn over, on the next round knit the yarn overs twisted to avoid holes. When decreasing knit approx. every 8th and 9th stitch together. KNITTING TIP: To avoid the knitting tension becoming tighter when working pattern, it is important that the strands at the back of the piece do not pull. You can use a larger needle size when working pattern if this is a problem. DECREASE TIP (for mid under sleeve): Start 3 stitches before the marker thread, knit 2 together, knit 2 (the marker thread sits in the middle of these 2 stitches), slip 1 stitch as if to knit, knit 1, pass the slipped stitch over the knitted stitch (= 2 stitches decreased). ---------------------------------------------------------- JUMPER: The jumper is worked in the round with circular needle, top down. You can work an elevation in the back of the neck for a better fit, so that the yoke is a little higher at the back. You can leave out the elevation if you wish, the neck will then be the same both front and back – see description for elevation further down in the pattern. After the yoke work the body in the round with circular needle. The body is divided at the split, then worked back and forth. The sleeves are worked in the round with circular needle/double pointed needles, top down. NECK: Cast on 148-148-152-156-160-164 stitches with short circular needle size 3.5 mm and with red. Insert 1 marker at the beginning of the round (= mid back). Knit 1 round. Then work rib (= knit 2 / purl 2) for 6 cm. Change to short circular needle size 4.5 mm and knit 1 round where you increase 16-20-20-22-24-26 stitches evenly on round - read INCREASE/DECREASE TIP = 164-168-172-178-184-190 stitches. Now work an elevation in the back of the neck or go straight to working the yoke if you do not want an elevation. ELEVATION IN BACK OF NECK: Skip this section if you do not want an elevation. Knit 13-13-14-14-15-15 stitches past the marker, turn, tighten strand and purl 26-26-28-28-30-30 stitches back. Turn, tighten the strand and knit 39-39-42-42-45-45 stitches, turn, tighten the strand and purl 52-52-56-56-60-60 stitches back. Continue by working over 13-13-14-14-15-15 more stitches each time you turn, until you have worked over a total of 104-104-112-112-120-120 stitches, turn and knit to mid back. YOKE: = 164-168-172-178-184-190 stitches. Continue by working pattern in the round according to diagram A.1 and increase evenly on each round marked with an arrow in the diagram as described below - read PATTERN, REMEMBER THE KNITTING TENSION! ARROW-1: Increase 28-28-32-34-40-44 stitches = 192-196-204-212-224-234 stitches. ARROW-2: Increase 24-28-32-32-40-42 stitches = 216-224-236-244-264-276 stitches. ARROW-3: Increase 20-24-28-34-36-40 stitches = 236-248-264-278-300-316 stitches. ARROW-4: Increase 20-24-24-26-36-36 stitches = 256-272-288-304-336-352 stitches. ARROW-5: Increase 28-28-24-20-24-20 stitches = 284-300-312-324-360-372 stitches. ARROW-6: Increase 22-24-18-24-18-18 stitches = 306-324-330-348-378-390 stitches. SIZES S - M: Go to ALL SIZES. SIZES L - XL: ARROW-7: Increase 12-18 stitches = 342-366 stitches. SIZE XXL: ARROW-7: Increase 18 stitches = 396 stitches. ARROW-8: Increase 12 stitches = 408 stitches. SIZE XXXL: ARROW-7: Increase 18 stitches = 408 stitches. ARROW-8: Increase 18 stitches = 426 stitches. ARROW-9: Increase 14 stitches = 440 stitches. ALL SIZES: Work up to and including the last round for your size. The piece measures approx. 24-25-26-28-30-32 cm from the cast-on edge (if you have not reached this measurement, continue without increases until you have reached the right measurement - but no further than the next to last round in A.1 - adjust so that the next round to be worked after you have reached the measurement is a round in only 1 colour). Work the next round in A.1 as follows: Work 47-48-50-56-63-68 stitches (= half back piece), place the next 60-66-72-72-78-84 stitches on a thread (= sleeve), cast on 6-6-6-12-12-12 new stitches (= the side), work 93-96-99-111-126-136 stitches (= front piece), place the next 60-66-72-72-78-84 stitches on a thread (= sleeve), cast on 6-6-6-12-12-12 new stitches (= the side) and work the last 46-48-49-55-63-68 stitches (= half back piece). Body and sleeves are now worked separately. BODY: = 198-204-210-246-276-296 stitches. Insert 1 marker thread in the middle of the 6-6-6-12-12-12 new stitches cast on in each side (= 99-102-105-123-138-147 stitches on front and back pieces) - THE PIECE IS NOW MEASURED FROM HERE! Work up to and including the last round in A.1 in all sizes. When A.1 has been completed in height, work 1 round with red where the number of stitches is adjusted to 196-206-216-246-272-292 stitches. Then work pattern in the round according to diagram A.2 as follows: ** Work A.2a (= 5 stitches), * A.2b (= 18 stitches), A.2c (= 1 stitch) *, work from *-* a total of 1-1-1-1-2-2 times, work A.2b (= 18 stitches), work * A.2d (= 5 stitches), A.2e (= 5 stitches) *, work from *-* a total of 1-2-2-4-1-2 times, work A.2d (= 5 stitches) a total of 1-0-1-0-1-1 time, work A.2f (= 18 stitches), work * A.2c (= 1 stitch), A.2f (= 18 stitches) *, work from *-* a total of 1-1-1-1-2-2 times and work A.2g (= 4 stitches) **, repeat from **-** 1 more time. Continue until A.2 has been completed in height. Work 1 round with red and adjust the number of stitches to 198-204-210-246-276-294 stitches by increasing/decreasing evenly on round. Then work pattern in the round according to diagram A.3 (= 33-34-35-41-46-49 repeats of 6 stitches). On the round marked with an arrow, adjust the number of stitches to 196-204-212-248-276-296. Continue until A.3 has been completed in height (= 49-51-53-62-69-74 repeats of 4 stitches). Work stocking stitch with red from here. When the piece measures 30-31-32-33-33-33 cm from the marker thread, divide the piece in the sides for the split and the front and back pieces are finished separately back and forth on the circular needle. BACK PIECE: = 99-102-105-123-138-147 stitches. Continue working stocking stitch with 4 stitches in GARTER STITCH - see description above, in each side. When the piece measures 40-41-42-43-43-43 cm, change to circular needle size 3.5 mm and work 1 row where you increase 23-24-25-31-32-35 stitches evenly on row = 122-126-130-154-170-182 stitches. Then work as follows from the right side: Work 4 stitches in garter stitch, * knit 2, purl 2 *, work from *-* until there are 6 stitches left on the row, knit 2 and work 4 stitches garter stitch. Work like this for 2 cm. Change back to circular needle size 4.5 mm and cast off with knit over knit and purl over purl. The piece measures approx. 42-43-44-45-45-45 cm. FRONT PIECE: = 99-102-105-123-138-147 stitches. Work in the same way as for the back piece. SLEEVE: The sleeve is worked in the round. Place stitches from the thread in the one side of the piece on short circular needle/double pointed needles size 4.5 mm, in addition knit up 1 stitch in each of the 6-6-6-12-12-12 new stitches cast on under the sleeve (continue with diagram A.1 as before) = 66-72-78-84-90-96 stitches. Insert 1 marker thread in the mid under sleeve (= in the middle of the 6-6-6-12-12-12 stitches which were knitted up under the sleeve) - the next round begins from here. THE PIECE IS NOW MEASURED FROM HERE! When the piece measures 2 cm decrease 1 stitch on each side of the marker thread - read DECREASE TIP. Decrease every 3-2½-2-2-1½-1½ cm a total of 12-14-16-18-20-22 times = 42-44-46-48-50-52 stitches. Continue in the round according to A.1 over all stitches until the diagram has been completed in height. Insert 1 marker mid top of sleeve = mid stitch. NOTE: Now you are working diagram A.4, but because of decreases mid under sleeve, you need to adjust so do as follows: Count the number of stitches on each side of the mid stitch on top of sleeve and see how many stitches there is room for of the first repeat of A.4a on the round and how many stitches there is room for of the last repeat of A.4c on the round. In other words you work pattern as follows: Work the number of stitches there is room for of A.4a, work A.4a (= 19 stitches), A.4b (= 9 stitches, see star in the diagram = mid stitch), A.4c (= 19 stitches) and work the number of stitches there is room for of A.4c. When A.4 has been completed, work pattern in the round according to diagram A.3 - adjust so that first stitch in diagram is at the mid of top of sleeve. When A.3 has been completed in height, continue with stocking stitch and red. When the piece measures 38-38-38-37-35-34 cm from the marker thread mid under sleeve, change to double pointed needles size 3.5 mm and knit 1 round where you increase 6-4-6-4-6-4 stitches evenly on round = 48-48-52-52-56-56 stitches. Work rib (= knit 2 / purl 2) for 4 cm. Change to double pointed needles size 4.5 mm and cast off with knit over knit and purl over purl. The sleeve measures approx. 42-42-42-41-39-38 cm. Work the other sleeve in the same way. |
||||||||||||||||
Diagram explanations |
||||||||||||||||
|
||||||||||||||||
|
||||||||||||||||
|
||||||||||||||||
|
||||||||||||||||
|
Have you made this or any other of our designs? Tag your pictures in social media with #dropsdesign so we can see them! Do you need help with this pattern?You'll find tutorial videos, a Comments/Questions area and more by visiting the pattern on garnstudio.com. © 1982-2024 DROPS Design A/S. We reserve all rights. This document, including all its sub-sections, has copyrights. Read more about what you can do with our patterns at the bottom of each pattern on our site. |
||||||||||||||||


With over 40 years in knitting and crochet design, DROPS Design offers one of the most extensive collections of free patterns on the internet - translated to 17 languages. As of today we count 304 catalogues and 11422 patterns - 11422 of which are translated into English (UK/cm).
We work hard to bring you the best knitting and crochet have to offer, inspiration and advice as well as great quality yarns at incredible prices! Would you like to use our patterns for other than personal use? You can read what you are allowed to do in the Copyright text at the bottom of all our patterns. Happy crafting!
Comments / Questions (28)
Hallo, das Muster A4 für den Ärmel hat drei rote Reihen bis das Geweih des Rentiers beginnt. Das Muster A2 für den Rumpf hat keine roten Reihen bis das Geweih des Rentiers beginnt. Das bedeutet, dass der Abstand zwischen dem Ende von A1 und dem Beginn des Geweihs des Rentiers unterschiedlich ist. Ist das so gewollt? Viele Grüße
19.01.2024 - 09:51DROPS Design answered:
Liebe Petra, stricken Sie genauso viele Runden mit rot vor die Rentiere, so sind beide Muster gleich. Viel Spaß beim stricken!
19.01.2024 - 15:49Hallo, ist es richtig, dass ich beim Rumpf und an den Ärmeln unterschiedlich viele rote Reihen zwischen der letzten weißen Reihe von A1 und dem Beginn des Rentiers habe? Am Rumpf sind es 3 rote Reihen und am Ärmel 5 rote Reihen.
18.01.2024 - 21:39DROPS Design answered:
Liebe Petra, nach der Verteilung muss das diagram A.1 weiter gestrickt werden, Das Muster ist das gleiche beim Rumpf und Ärmel. Viel Spaß beim stricken!
19.01.2024 - 09:20Hello! I don't understand how to decrease sts of the sleeves so as not to break the pattern. Or will the sleeves' pattern be broken anyway?
06.09.2023 - 16:44DROPS Design answered:
Dear Katerina, when you decrease mid under sleeve, the pattern will be broken because of the decrease - work as many stitches as possible in pattern, but just make sure to line up diagrams (so that you will work less stitches in pattern at the beg / end of the rounds). Happy knitting!
07.09.2023 - 09:09Hello! I made the elevation in back of neck (size XXL). Now the back and front have a different leight (the leight of back = 30 cm, and leight of front = 27 cm). My next step - to separate the sleeves from the torso at a 30 cm from the cast-on edge, according to instructions . But I'm not sure how exacltly to measure the length. Should the piece be measured along the back or along the front cast-on edge (should the leight of front = 30 cm)? Thank you!
03.09.2023 - 13:36DROPS Design answered:
Dear Katerina, you should measure from the cast on edge in the mid front. Happy knitting!
03.09.2023 - 23:43Hello! Is this pattern suitable for knitting a sweater for man?
28.07.2023 - 17:33DROPS Design answered:
Hi Katerina, it’s not very difficult to convert women's size to men’s size. The biggest difference will be the length of sleeves and body. Start working on the women size that you think would fit across the chest. The additional length will be worked right before you cast off for the armhole/sleeve cap. If the pattern is worked top-down you can add the length right after the armhole or before the first decrease on sleeve. Regarding additional yarn amount, this will depend on how much length you add, but it is better with a skein too many than too few. Happy knitting!
29.07.2023 - 09:36Jo napot, probalom megerteni hogyan lehet szaporitani a kerek raglan pulover koteseben a minta kozben de sajnos elege hianyosan van le irva itt. Kerhetnek esetleg egy ertheto, reszletes leirast, azaz mikor - hany soronkent kell szaporitani, hany szemnekent kell szaporitani es hogyan kell szaporitani a norvegmintaban ugy hogy esztetikus legyen, mert ez igy erthetelen. Valaszukat elore is koszonom!
12.02.2023 - 09:58Hi I've knitted upto the start of the reindeer pattern ive been knitting from mid back in rounds do I change to side to knit in rounds ? Ty
21.11.2022 - 00:18DROPS Design answered:
Dear Alison, the markers on the sides are only for taking measurements for the body. You continue working from the mid back. Happy knitting!
21.11.2022 - 01:14Hallo, Ich finde diesen Pulli top, leider habe ich schon eine Frage, nach der ersten Zunahme nach den Pfeil ist die Maschenzahl 234,wenn ich sie nach dem Muster durch 4 teile geht es nicht auf, müsste es nicht 232 Maschen sein? Oder beende ich das Muster einfach mitten im Mustersatz🤔 Danke für die Hilfe
14.06.2022 - 23:03DROPS Design answered:
Liebe Veronika, danke für den Hinweis, unser Design Team wird das noch mal prüfen - aber sicher können Sie das schon mal so z.B. arrangieren: bei dem 1. Pfeil lieber 46 Maschen zunehmen und bei dem 2. Pfeil nur 40, so haben Sie wieder die 276 Maschen und das Muster kann in der Runde passen. Viel Spaß beim stricken!
15.06.2022 - 09:12Hallo, die Anleitung ist gut verständlich und läst sich gut nacharbeiten, leider rollt sich der untere Rand des Rumpfteils, 2 Maschen rechts 2 M links, nach oben oder biegt sich um. Wie kann ich das verhindern?
30.01.2022 - 19:01DROPS Design answered:
Liebe Frau Illhardt, Sie können den Pullover mit Stecknadeln auf einer geeigneten Unterlage spannen, anfeuchten (z.B. mit einer Sprühflasche für Blumen) und trocknen lassen, danach entfernen Sie die Stecknadeln, dann sollte sich der Rand nicht mehr rollen. Viel Spaß beim stricken!
31.01.2022 - 10:02Hej, jag behöver hjälp med att välja ett alternativt garn eftersom ull brukar klia. Vilket garn i grupp B skulle ni rekommendera som inte kliar? På förhand tack för svar! Mvh Mia
02.01.2022 - 13:25DROPS Design answered:
Hej Marie. Jag hade valt Merino Extra Fine eller Sky. Mvh DROPS Design
03.01.2022 - 10:06