
Popular categories
Looking for a yarn?


|
|||||||||||||||||||||||||||||||
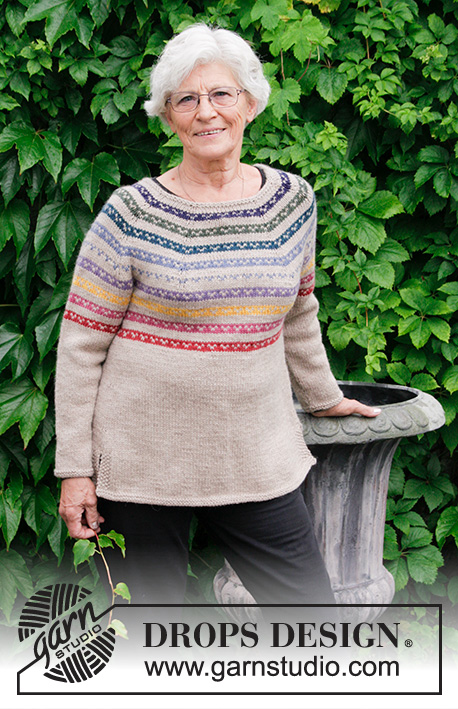
Rainbow Hugs Jacket |
|||||||||||||||||||||||||||||||
 |
 |
||||||||||||||||||||||||||||||
Knitted jacket with Nordic Fana pattern, round yoke, stripes, worked top down with split in sides. Sizes S - XXXL. The piece is worked in DROPS Nepal.
DROPS 183-26 |
|||||||||||||||||||||||||||||||
|
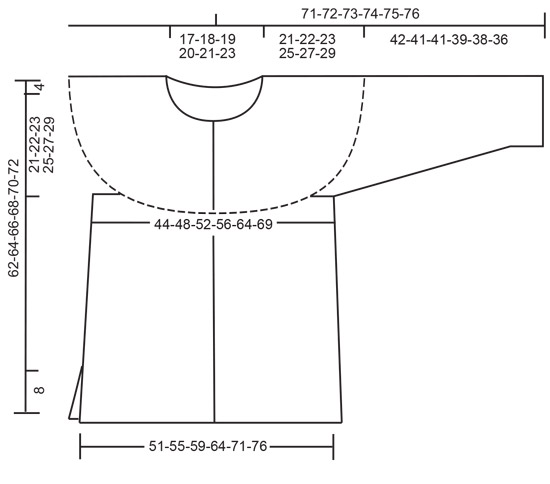
INFORMATION FOR THE PATTERN: RIDGE/GARTER STITCH (worked back and forth – for yoke and body): 1 ridge = Knit 2 rows. RIDGE/GARTER STITCH (worked in the round – for sleeves): 1 ridge = 2 rounds. Knit 1 round and purl 1 round. MOSS STITCH: ROW 1: * Knit 1, purl 1 *, work from *-*. ROW 2: Knit over purl and purl over knit. Repeat row 2. PATTERN: See diagram A.1. The diagram shows all rows in pattern seen from right side. The whole pattern is worked in stocking stitch. ROUND YOKE: All increases are worked from the right side! Increase on yoke on each side of the stitches with markers (= 16 increased stitches per row – see arrows in A.1) as follows: Make 1 yarn over on each side of stitch with marker. On next row purl yarn overs twisted to avoid holes. INCREASE TIP (for body): All increases are worked from right side! Work until there are 2 stitches left before marker thread, make 1 yarn over (= 1 stitch increased), knit 4 stitches (marker thread sits in middle of these 4 stitches), make 1 yarn over (= 1 stitch increased). Increase in this way at both marker threads (= a total of 4 stitches increased). Purl the yarn overs twisted on next row to avoid holes. DECREASE TIP (for sleeves): Decrease 1 stitch on each side of marker thread as follows: Work until there are 3 stitches left before marker thread, slip 1 stitch as if to knit, knit 1, pass slipped stitch over, knit 2 (marker thread sits in middle of these 2 stitches), knit the next 2 stitches together. The stitches which do not fit into the pattern are worked in background colour. BUTTONHOLES (for band): Work buttonholes in right band. When band measures approx. 1.5 cm work 7-7-7-8-8-8 buttonholes evenly spread (the buttonholes are worked in purl section seen from right side). 1 buttonhole = purl 2 stitches together and make 1 yarn over – top buttonhole should be approx. 2 cm from the top, the other buttonholes with approx. 7 cm between each. ---------------------------------------------------------- JACKET: The piece is worked back and forth with circular needle from mid front and top down. You can work an elevation in back of neck for a better fit, so the neck is a little higher at back. You can skip this elevation if you wish; the neck will then be the same front and back – see description of elevation further down in text. After the yoke, work the body back and forth with circular needle. The sleeves are worked in the round with double pointed needles, top down. The bands are worked back and forth to finish. NECKLINE: Cast on 76-80-84-88-92-98 stitches (including 1 edge stitch in garter stitch in each side towards mid front) with circular needle size 4mm and beige. Work 2 RIDGES – see description above. Change to circular needle size 5 mm. Then work as follows - from the right side: 1edge stitch in garter stitch, 13-14-15-16-17-18 stitches stocking stitch and increase 0-2-2-2-3-5 stitches evenly over these stitches, * 1 yarn over, knit 1 *, work from *-* a total of 11 times, 26-28-30-32-34-37 stitches stocking stitch and increase 0-4-4-4-6-9 stitches evenly over these stitches, * 1 yarn over, knit 1 *, work from *-* a total of 11 times, 13-14-15-16-17-19 stitches stocking stitch and increase 0-2-2-2-3-4 stitches evenly over these stitches and finish with 1 edge stitch in garter stitch = 98-110-114-118-126-138 stitches. Work the yarn overs twisted, there should be no holes. Now you can work an elevation in back of neck or go straight to yoke if you do not want an elevation. ELEVATION IN BACK OF NECK: Skip this section if you do not want an elevation. Insert 1 marker between the 2 middle stitches on the row (= mid back). Purl 1 row from wrong side. Start from the right side with beige and knit until you have reached 11-11-12-13-13-14 stitches past the marker, turn, tighten strand and purl 22-22-24-26-26-28 stitches. Turn, tighten strand and knit 33-33-36-39-39-42 stitches, turn, tighten strand and purl 44-44-48-52-52-56 stitches. Turn, tighten strand and knit 55-55-60-65-65-70 stitches, turn, tighten strand and purl 66-66-72-78-78-84 stitches. Turn, tighten strand and knit to end of row. YOKE: Insert 8 marker threads in the piece from wrong side as follows: Work 1 edge stitch in garter stitch, 5-7-6-8-9-8 stitches stocking stitch, insert 1 marker in next stitch, * 11-12-13-13-14-16 stitches stocking stitch, insert 1 marker in next stitch *, work from *-* until there are 7-10-8-10-10-9 stitches left (= a total of 7 times), finish with 6-9-7-9-9-8 stitches in stocking stitch and 1 edge stitch in garter stitch. On the next row from the right side work A.1 (= 4 stitches) with 1 edge stitch in garter stitch in each side of piece (= 24-27-28-29-31-34 times) AT THE SAME TIME as you increase 1 stitch on each side of each marker – read ROUND YOKE, on the rows marked with an arrow in diagram A.1. REMEMBER THE KNITTING TENSION! Increase a total of 9-10-11-12-13-14 times (when you have increased this number of times, you no longer increase on the rows marked with arrows in the diagram) = 242-270-290-310-334-362 stitches. Continue this pattern without increases until the piece measures21-22-23-25-27-29 cm from the cast-on edge mid front. The next row is worked as follows from the wrong side – make sure it is a row worked in beige: Work 35-39-41-45-50-55 stitches (= right front piece), place the next 52-58-64-66-68-72 stitches on 1 thread (= sleeve), cast on 6-6-8-8-10-10 new stitches on needle (= under sleeve), work 68-76-80-88-98-108 stitches (= back piece), place the next 52-58-64-66-68-72 stitches on 1 thread (= sleeve), cast on 6-6-8-8-10-10 new stitches on needle (= under sleeve) and work the remaining 35-39-41-45-50-55 stitches (= left front piece). BODY: = 150-166-178-194-218-238 stitches. Insert 1 marker thread in each side, in the middle of the 6-6-8-8-10-10 stitches that where cast on. And insert 1 marker in piece to measure from, THE PIECE IS NOW MEASURED FROM HERE! Let the marker threads follow in piece. Continue back and forth with stocking stitch, A.1 and 1 edge stitch in garter stitch in each side. When A.1 has been completed in height continue working with beige. Insert 1 marker thread in each side, in the middle of the 6-6-8-8-10-10 new stitches cast on. Allow the marker thread to follow your work onwards. When piece measures 3 cm from where sleeves were placed on a thread, increase 1 stitch on each side of each marker thread (= 4 stitches increased) – read INCREASE TIP! Increase in this way every 5th row a total of 6 times = 174-190-202-218-242-262 stitches. When piece measures 29-30-31-31-31-31 cm from where the piece was divided (adjust so that the last row was from the wrong side), divide the piece at the marker threads; front and back pieces are finished separately (= 8 cm split). LEFT FRONT PIECE: = 44-48-51-55-61-66 stitches. Work as follows from the right side: Work 1 edge stitch in garter stitch, work stocking stitch until there are 5 stitches left before the first marker thread and 5 stitches MOSS STITCH – see description above, turn the piece. Continue the pattern in this way over these stitches. When piece measures 36-37-38-38-38-38 cm from the marker, change to circular needle size 4mm and work 2 ridges over all stitches. Then cast off with circular needle size 5mm (this is so the cast-off edge will not be tight). The piece measures a total of 62-64-66-68-70-72 cm measured from the shoulder. BACK PIECE: = 86-94-100-108-120-130 stitches. Work as follows from the right side: Work 5 stitches moss stitch, work stocking stitch until there are 5 stitches left before the marker thread in the side and finish with 5 stitches moss stitch, turn the piece. Continue the pattern in this way over these stitches. When piece measures 36-37-38-38-38-38 cm from the marker, adjust so that it matches the front piece, change to circular needle size 4 mm and work 2 ridges over all stitches. Then cast off with circular needle size 5 mm. RIGHT FRONT PIECE: = 44-48-51-55-61-66 stitches. Work as follows from the right side: Work 5 stitches moss stitch, work stocking stitch until there is 1 stitch left on the row, finish with 1 edge stitch in garter stitch. Continue the pattern in this way over these stitches. When piece measures 36-37-38-38-38-38 cm from the marker, adjust so that it matches the left front piece, change to circular needle size 4 mm and work 2 ridges over all stitches. Then cast off with circular needle size 5 mm. SLEEVE: The piece is worked in the round with double pointed needles. Place the 52-58-64-66-68-72 stitches from the thread in one side of the piece on double pointed needles size 5 mm and, in addition, knit up 1 stitch in each of the 6-6-8-8-10-10 new stitches cast on under sleeve = 58-64-72-74-78-82 stitches. THE PIECE IS NOW MEASURED FROM HERE! Insert a marker thread in the middle of the new stitches. Continue with stocking stitch and A.1. When A.1 has been completed in height, continue with beige. When the piece measures 3 cm decrease 2 stitches mid under sleeve – read DECREASE TIP. Decrease in this way every 3-3-2-2-1½-1½ cm a total of 10-12-16-16-17-18 times = 38-40-40-42-44-46 stitches. When piece measures 41-40-40-38-37-35 cm, change to double pointed needles size 4 mm and work 2 RIDGES – see description above, over all stitches. Cast off with double pointed needles size 5 mm (this is so the cast-off edge will not be tight). The sleeve measures approx. 42-41-41-39-38-36 cm from where it was separated from body. Work the other sleeve in the same way. BAND: Start at the top by neck on the left front piece and knit up stitches inside the 1 edge stitch in garter stitch. Knit up approx. 118-138 stitches (divisible by 4 + 2) from the right side with circular needle size 4 mm and beige. Knit 1 row, then work as follows – from the right side: 2 stitches garter stitch, * knit 2 / purl 2 *, repeat from *-* until there are 4 stitches left, knit 2 and 2 stitches garter stitch. Continue the rib like this until the band measures 3 cm. Cast off with garter stitch over garter stitch, knit over knit and purl over purl. Repeat on right band, but knit up starting from the bottom – remember BUTTONHOLES – see description above. Sew the buttons onto the left band. |
|||||||||||||||||||||||||||||||
Diagram explanations |
|||||||||||||||||||||||||||||||
|
|||||||||||||||||||||||||||||||

|
|||||||||||||||||||||||||||||||
|
|||||||||||||||||||||||||||||||
|
Have you made this or any other of our designs? Tag your pictures in social media with #dropsdesign so we can see them! Do you need help with this pattern?You'll find tutorial videos, a Comments/Questions area and more by visiting the pattern on garnstudio.com. © 1982-2024 DROPS Design A/S. We reserve all rights. This document, including all its sub-sections, has copyrights. Read more about what you can do with our patterns at the bottom of each pattern on our site. |
|||||||||||||||||||||||||||||||


With over 40 years in knitting and crochet design, DROPS Design offers one of the most extensive collections of free patterns on the internet - translated to 17 languages. As of today we count 304 catalogues and 11422 patterns - 11422 of which are translated into English (UK/cm).
We work hard to bring you the best knitting and crochet have to offer, inspiration and advice as well as great quality yarns at incredible prices! Would you like to use our patterns for other than personal use? You can read what you are allowed to do in the Copyright text at the bottom of all our patterns. Happy crafting!
Comments / Questions (10)
Ik ben dit patroon aan het breien in maat XL. Ik ben de pas aan het breien, en meet nu 25 cm vanaf de opzetrand (langs de middenvoor rand). Maar ik heb pas 11x gemeerderd, ik ben nu dus bij de 11e pijl van het telpatroon. Dus qua hoogte zou ik nu de steken moeten verdelen in mouwen en lijf, maar ik kom nog 16 steken tekort. Hoe zal ik dit oplossen? NB Ik brei met Drops Nepal op nld 5,5, ik heb een steekgrootte van 17 steken/10cm en 20 naalden/10cm
17.02.2023 - 20:02DROPS Design answered:
Dag Rolien,
Om het patroon te kunnen volgen zou je dezelfde stekenverhouding moeten hebben als in het patroon. Als je minder steken in de hoogte hebt, dan kun je af en toe een naald extra breien (zonder te meerderen). In jou geval dus 2 naalden extra op 20 naalden.
18.02.2023 - 10:03Guten Abend, ich stecke bei der Teilung der Arbeit (Rumpfteil zu getrennte Vorder-/Rückteile) fest. Laut Anleitung soll ich bei Größe M am Ende der Rumpfteil-Zunahmen 190 Maschen haben. Danach soll ich dann aber teilen in rechtes/linkes Vorderteil a 42 Maschen und Rückenteil mit 82 Maschen. Das ergibt aber nur 166 Maschen, also der Anzahl der Maschen vor den Rumpfteil-Zunahmen. Ich nehme an, korrekt müssten es je 48 Maschen für linkes/rechtes Vorderteil und 94 fürs Rückenteil sein?
29.10.2021 - 22:51DROPS Design answered:
Liebe Marie, Sie sind ja recht, danke für den Hinweis; die Maschanzahl sollen korrigiert werden, teilen Sie die Arbeit an den Seiten, wo Sie die Markierungen am Anfang Rumpfteil eingesetzt haben. Viel Spaß beim stricken!
02.11.2021 - 13:41Hei! Onkohan ohjeessa virhe silmukka määrissä, kun lähdetään tekemään etu- ja takakappaleita erikseen? Lisäysten jälkeen ohjeen mukaan työssä on L koossa 202 silmukkaa, jonka jälkeen etu-kappaleisiin tulee 45 ja 45 silmukkaa sekä takakappaleeseen 88 silmukkaa. 24 silmukkaa jää työhön, mutta niitä ei ole ohjeessa.
26.04.2020 - 20:44I can't find the designated button. What is the size of the button, please.
13.02.2020 - 17:12DROPS Design answered:
Dear Mrs Collins, you will find all our buttons here - the jagged # 534 are 20 mm. Happy knitting!
14.02.2020 - 08:08Ich habe gerade gesehen, dass die letzte Reihe für die Erhöhung doch korrigiert wurde. Danke! :-)
21.09.2019 - 12:17This is so beautiful, though it is not a sweater for now, but I will look to make it toward the fall
02.05.2019 - 19:10Bonjour, merci de m expliquer les augm. du début. En taille S, on monte 76 mailles, puis on fait 11 X 0 augm. après 14 m., 11 X 0 augm. après 26 m. suiv. +1 X 0 augm. Comment obtenir 98 mailles au total sans aucune augm. ? Pour la taille M, sont prévues : après 15 m -11 X 2 augm, après 26 m. suiv -11 X 4 augm, puis 1 X 2 augm. sur les 15 dernières m. Cela devrait faire 15m+22 augm+28m+44 augm+15m+2 augm =126 m. et non 110. Où est le pb ? Merci, et bonne journée
06.03.2019 - 12:14DROPS Design answered:
Bonjour Tapiola, le décompte des mailles se fait ainsi: Taille S: 1 + 13 + (*1 jeté, 1 m end*, répéter de *-* 11 fois au total = 11 x 2 m) + 26 + (11 x 2) + 13 + 1 =98 m. Taille M: 1 + (14+2) + (*1 jeté, 1 m end*, répéter de *-* 11 fois au total = 11 x 2 m) + (28+4) + (11 x 2) + (14+2) +1 =110 m.Bon tricot!
06.03.2019 - 15:58Brei size M. Nadat de mouwen op een hulpdraad zijn gezet, ga je bij een hoogte van 3 cm meerderen. Tot zo ver duidelijk, 6 x 4 steken is dus 24, opgeteld bij de 166 van het lijf kom je dan inderdaad op 190 steken. Alleen wanneer er gesplitst wordt voor de splitten, kom ik niet weer op 190 steken...maar wel op 166. Voorpanden. 2 x 42 en achterpand 82 opgeteld die 166 steken, kunnen jullie mij zeggen of ik het verkeerd lees?
17.01.2019 - 19:35DROPS Design answered:
Dag Marieke,
Het klopt zoals je het leest; je meerdert in totaal 24 steken, dus van 166 naar 190 steken. En volgens mij staat er inderdaad een foutje in het patroon waardoor de meerderingen in de zijnaden niet meegenomen zijn vanaf de splitten. Je kunt de aangegeven aantallen steken negeren en het werk splitsen bij de markeerdraden.
23.01.2019 - 11:15Ich muss doch aber irgendwo die erste Reihe, in der ich mit Wenden beginne, auch zu Ende stricken. Wo stricken ich denn Blendenmaschen?? Die Blende wird doch am Ende separat angestrickt?? Das verstehe ich schon, dass ich auch ohne Erhöhung stricken kann.
12.10.2018 - 12:54DROPS Design answered:
Liebe Monika, oops Sie sind ja recht, Blendemaschen werden später aufgenommen und gestrickt, mein Fehler. Nach der Reihe über 55-70 M (= Hinreihe), stricken Sie die nächste Rückreihe bis zur Ende der Reihe (= 1 Seite ist "fertig"), dann wenden Sie und stricken Sie die nächste Hinreihe bis zur Ende = alle Maschen sind jetzt gestrickt.
12.10.2018 - 14:22Just started the yoke in size small. Inserted the markers as written, but ended the row with 4 stitches not 7. Counted 3 times and have 98 stitches total. Is this a mistake in the pattern or did I miss something.
06.04.2018 - 23:14DROPS Design answered:
Hi Linda, You have 98 stitches when you have finished the neck and are starting on the yoke. On the first row of the yoke you work 1 edge stitch (garter stitch) 5 stitches in stocking stitch and then insert a marker in the next stitch - so you have worked 7 stitches so far. Work 11 more stitches and insert next marker in next stitch, so now you have worked 19 stitches (7 + 12). Repeat these last 12 stitches another 6 times, so you have worked 91 stitches (7 + 12 x 7) and then you will have 7 stitches left. I hope this helps and happy knitting!
09.04.2018 - 08:21