
Popular categories
Looking for a yarn?


|
||||||||||||||||||||||||||||||||||||||||||||||||||||||||||||||||
Flowering Heart |
||||||||||||||||||||||||||||||||||||||||||||||||||||||||||||||||
 |
 |
|||||||||||||||||||||||||||||||||||||||||||||||||||||||||||||||
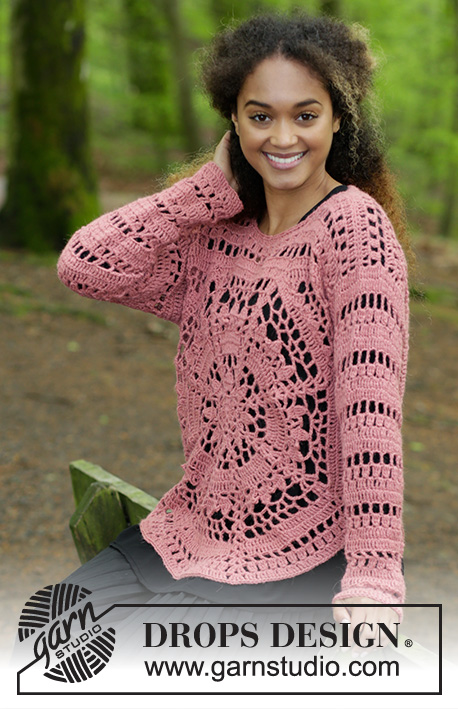
Crocheted jumper with octagon and lace pattern. Sizes S - XXXL. The piece is worked in DROPS Puna or DROPS Sky.
DROPS 183-21 |
||||||||||||||||||||||||||||||||||||||||||||||||||||||||||||||||
|
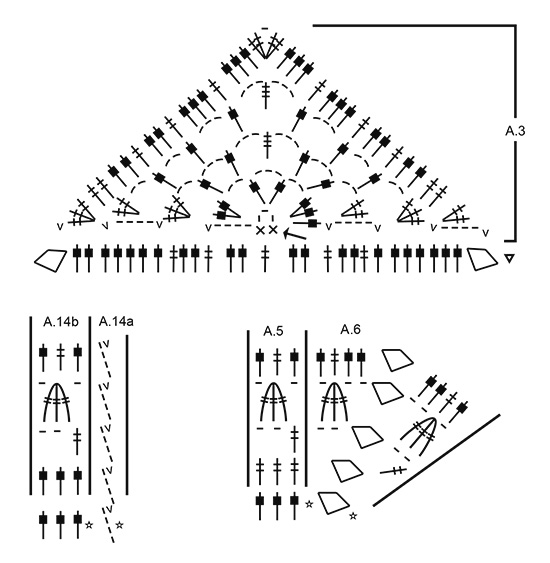
INFORMATION FOR THE PATTERN: PATTERN: See diagrams A.1 to A.14. INCREASE TIP: Increase 1 double treble crochet by working 2 double treble crochets in same stitch. DECREASE TIP-1: Work 1 double treble crochet in each of the next 2 stitches, but wait with the last yarn over and pull through on both these double treble crochets, make a yarn over and pull it through all 3 loops on hook (= 1 double treble crochet decreased). DECREASE TIP-2: To work out how to decrease evenly, count the total number of double treble crochets on the round (e.g. 66 double treble crochets) and divide by the number of decreases to be made (e.g. 6) = 11. In this example, work every 10th and 11th double treble crochet together. ---------------------------------------------------------- FRONT PIECE: To start with, work an octagon for all sizes. Then work 2 corners on the shape so it is a hexagon. Then work an edge around the shape. Finally, work the shoulders and sleeves. OCTAGON: Start with hook size 4.5.mm and Puna and work pattern in the round according to diagram A.1 - REMEMBER THE CROCHET TENSION! When A.1 has been completed, the shape measures approx. 10 cm in diameter from side to side. Now continue in the round as follows: Work A.2b a total of 8 times on the round - diagram A.2a shows how the round starts and ends and is worked in addition to A.2b. When the whole of diagrams A.2a and A.2b have been worked in height, the shape measures approx. 44 cm in diameter from side to side. There are now 8 sides of 27 double treble crochets and 8 corners of 2 double treble crochets, 1 chain stitch and 2 double treble crochets. Cut and fasten the strand. CORNER: Work a corner on side-2 and a corner on side-8 - see sketch. Start with the corner on side-2 and work back and forth according to diagram A.3. The first row starts by the arrow - each row is fastened with 1 slip stitch in the stitches along side-2 as shown in diagram. When the whole of diagram A.3 has been completed, cut and fasten the strand. Work the other corner on side-8 in the same way, cut and fasten the strand. EDGE AROUND SHAPE: There are now 6 sides to the shape - see sketch. There are now 67 double treble crochets on side-1, 47 double treble crochets on sides-2/3 and sides-7/8, there are 27 double treble crochets on side-4, side-5 and side-6 and there are 6 corners of 2 double treble crochets, 1 chain stitch and 2 double treble crochets. READ THE WHOLE OF THE NEXT SECTION BEFORE CONTINUING! Start at the corner of side-2 and work pattern according to diagrams as follows: Work A.4a - shows how rounds start and end and is worked in addition, work A.4b around the corner, A.5 a total of 16 times in width, * A.6 around next corner, A.5 a total of 9 times in width *, repeat from *-* 2 more times, work A.6 around the next corner, A.5 a total of 16 times in width, A.7 around next corner, A.4b around the same corner, work A.5 a total of 23 times in width, finish with A.7. Increase on first round - READ INCREASE TIP - as follows (do not increase over corners): Side-1: increase 2 double treble crochets. Side-2/3: increase 1 double treble crochet. Side-7/8: increase 1 double treble crochet. When all of diagrams A.4 to A.7 have been completed in height, there are 77 double treble crochets on side-1, 56 double treble crochets on each of side-2/3 and side-7/8, there are 35 double treble crochets on each of side-4, side-5 and side-6, and there are 4 corners of 2 double treble crochets, 1 chain stitch and 2 double treble crochets and 2 corners of 2 tripple treble crochets, 1 chain stitch and 2 tripple treble crochets. DO NOT cut the strand! Now size S/M is finished. For sizes L/XL and XXL/XXXL continue as follows: Sizes L/XL - XXL/XXXL: READ THE WHOLE OF THE NEXT SECTION BEFORE CONTINUING! Work slip stitches as far as the corner and then continue as follows: Work A.4a - shows how the rounds start and end and is worked in addition, work A.4b around the corner, A.5 a total of 19 times in width, * A.6 around next corner, A.5 a total of 12 times in width *, repeat from *-* 2 more times, work A.6 around the same corner, A.5 a total of 19 times in width, A.7 around next corner, A.4b around the same corner, work A.5 a total of 26 times in width, finish with A.7. Increase/decrease on first round as follows (do not decrease over corners): Side-1: increase 1-1 double treble crochet. Side-2/3: increase 1-1 double treble crochet Side-4: decrease 2-2 double treble crochets - READ DECREASE TIP-1. Side-5: decrease 2-2 double treble crochets. Side-6: decrease 2-2 double treble crochets. Side 7/-8: increase 1-1 double treble crochet. When all of diagrams A.4 to A.7 have been completed in height, there are 86 double treble crochets on side-1, 65 double treble crochets on each of side-2/3 and side-7/8, there are 41 double treble crochets on each of side-4, side-5 and side-6, and there are 6 corners of 2 double treble crochets, 1 chain stitch and 2 double treble crochets. DO NOT cut the strand! Now size L/XL is finished (L/XL has 4 more rounds than S/M). For size XXL/XXXL continue as follows: Size XXL/XXXL: READ THE WHOLE OF THE NEXT SECTION BEFORE CONTINUING! Work slip stitches as far as the corner and then continue as follows: Work A.4a - shows how the rounds start and end and is worked in addition, work A.4b around the corner, A.5 a total of 22 times in width, * A.6 around the next corner, A.5 a total of 14 times in breadth *, repeat from *-* 2 more times, work A.6 around the next corner, A.5 a total of 22 times in width, A.7 around the next corner, A.4b around the same corner, work A.5 a total of 29 times in width, finish with A.7. Increase on the first round as follows (do not increase over corners): Increase 1 double treble crochet on each of the 6 sides. When all of A.4 to A.7 have been completed in height, there are 95 double treble crochets on side-1, 74 double treble crochets on each of side-2/3 and side-7/8, there are 50 double treble crochets on each of side-4, side-5 and side-6, and there are 6 corners of 2 double treble crochets, 1 chain stitch and 2 double treble crochets. DO NOT cut the strand! Now size XXL/XXXL is finished (XXL/XXXL has 8 rounds more than S/M). ALL SIZES - SHOULDER: Now work back and forth, only on side-1. Work the first shoulder starting from the wrong side as follows: Work slip stitches as far as the corner, turn and work diagram A.8 around the corner-space, A.9 a total of 6-7-8 times, finish with A.10 = towards neck. When all of diagrams A.8 to A.10 have been completed in height, cut and fasten the strand. The middle 19-22-25 double treble crochets on the edge of the shape = neck. Work the other shoulder, starting from the wrong side as follows: Work A.11 = towards neck, A.12 a total of 6-7-8 times and finish with A.13 around the corner. When all of diagrams A.11 to A.13 have been completed in height, cut and fasten the strand. BACK PIECE: Work in the same way as the front piece until you are about to start on the shoulders. Instead of working shoulder, work back and forth along the whole of side-1 = 81-90-99 double treble crochets (including double crochets in the corners) + 2 corner-spaces on the row. Work as follows starting from the wrong side: Work A.8 around the corner-space, A.9 a total of 27-30-33 times in width, finish with A.13 around corner-space. When all of diagrams A.8/A.9/A.13 have been completed in height, cut and fasten the strand. ASSEMBLY: Sew the shoulder seams - sew in the outermost loop of the outermost stitch. Sew the side seams as follows: Start in the corner between side-3 and side-4 and sew upwards until there is approx. 19-21-23 cm left before the shoulder = armhole. Start in the corner between side-6 and side-7 and sew upwards until there is approx. 19-21-23 cm left before the shoulder = armhole. NECKLINE: Work an edge around the neck. Start on one shoulder and work 1 double crochet, work * 3 chain stitches, skip approx. 1½ cm, work 1 double crochet *, repeat from *-* around the neck, finish with 3 chain stitches and 1 slip stitch in the first double crochet. SLEEVE: The piece is worked in the round from the armhole, starting mid under the armhole in the side. Start with hook size 4.5 mm and Puna and work 66-75-81 double treble crochets evenly spaced around the armhole (work in/around double treble crochet/chain-space). Then work as follows: Work pattern according to diagram A.14b a total of 22-25-27 times on the round - diagram A.14a shows how the rounds start and end and is worked in addition to A.14b. Then repeat A.14 in height and decrease evenly on the first round in the diagram - read DECREASE TIP-2, as follows: Decrease 6 double treble crochets 3-5-2 times and decrease 3-0-9 double treble crochets 2-0-2 times = 42-45-51 double treble crochets after the last decreases. When piece measures approx. 45-42-40 cm (shorter measurements in larger sizes because of broader shoulders) finish after the 1st or the 4th round in A.14. Cut and fasten the strand. Work 1 more sleeve in the same way. |
||||||||||||||||||||||||||||||||||||||||||||||||||||||||||||||||
Diagram explanations |
||||||||||||||||||||||||||||||||||||||||||||||||||||||||||||||||
|
||||||||||||||||||||||||||||||||||||||||||||||||||||||||||||||||

|
||||||||||||||||||||||||||||||||||||||||||||||||||||||||||||||||
|
||||||||||||||||||||||||||||||||||||||||||||||||||||||||||||||||

|
||||||||||||||||||||||||||||||||||||||||||||||||||||||||||||||||

|
||||||||||||||||||||||||||||||||||||||||||||||||||||||||||||||||
|
Have you made this or any other of our designs? Tag your pictures in social media with #dropsdesign so we can see them! Do you need help with this pattern?You'll find tutorial videos, a Comments/Questions area and more by visiting the pattern on garnstudio.com. © 1982-2024 DROPS Design A/S. We reserve all rights. This document, including all its sub-sections, has copyrights. Read more about what you can do with our patterns at the bottom of each pattern on our site. |
||||||||||||||||||||||||||||||||||||||||||||||||||||||||||||||||


With over 40 years in knitting and crochet design, DROPS Design offers one of the most extensive collections of free patterns on the internet - translated to 17 languages. As of today we count 304 catalogues and 11422 patterns - 11422 of which are translated into English (UK/cm).
We work hard to bring you the best knitting and crochet have to offer, inspiration and advice as well as great quality yarns at incredible prices! Would you like to use our patterns for other than personal use? You can read what you are allowed to do in the Copyright text at the bottom of all our patterns. Happy crafting!
Comments / Questions (35)
Bonjour, je ne comprends pas très bien le diagramme A7. Au 1er rang, lorsque les coins sont terminés et lorsque l\'on termine 16 fois A5 sur le côté 7/8, faut-il ajouter une double bride au bout de ce même côté avant de crocheter A4b dans le coin? Ensuite crocheter 23 fois A5 sur le côté 1 et ajouter une double bride à la fin de ce même côté? Cela ne me paraît pas logique. Merci!
27.11.2018 - 10:34DROPS Design answered:
Bonjour Anne, le coin va se composer de A.7 juste avant le coin et A.4b dans le coin (vu de droite à gauche), A.4a ne servant qu'à commencer et terminer le tour - A.7 fait la transition entre A.5 et A.4b, il vient terminer A.5: 1 double-bride et 2 ml au 1er rang (comme dans A.5). Bon crochet!
27.11.2018 - 13:10Ik ben met de rand om de vorm bezig, maar hij komt niet uit. Hoeveel dubbele stokjes moet ik aan het einde van de 1e toer hebben op de rand?
01.11.2018 - 20:42DROPS Design answered:
Elise Heijligers
Als je de 8-hoek, met de driehoeken erop gehaakt, klaar hebt heb je 67 dubbele stokjes (op kant-1,) plus 2 maal 47 dubbele stokjes (op kanten-2/3 en kanten-7/8,) 3 maal 27 dubbele stokjes (op kant-4, kant-5 en kant-6) en 6 maal 2 dubbele stokjes, 1 losse en 2 dubbele stokjes, waarmee je op een totaal aan dubbele stokjes komt van: 272 steken. Van die 272 heb je 266 stokjes en 6 lossen.
02.11.2018 - 07:55This isn't technically about this pattern per se but I would like to know where on your site I can understand the differences between your yarn groups. I don't understand about the letters A-F, etc. Is this explained somewhere in one place? Thank you!
18.10.2018 - 18:35DROPS Design answered:
Hi Leah! Please see HERE. Happy crocheting!
18.10.2018 - 20:12Possono fare un tutorial su youtube dei vostri modelli?
08.09.2018 - 22:08DROPS Design answered:
Buonasera Maria Rosa, ci sono già dei video che spiegano le tecniche dei nostri modelli e li può trovare nella pagina del modello. In ogni caso è possibile fare dei videotutorial utilizzando i modelli DROPS ma è necessario fare riferimento alla fonte, cioè al sito www.garnstudio.com e indicare il numero del modello. Buon lavoro!
09.09.2018 - 20:08Bonjour Je commence a faire le contour (A4a, A4b, A5, .....) je n arrive absolument pas à savoir ou je dois commencer sur le coin du côté2 même après avoir lu vos réponses dans les commentaires Merci par avance de votre aide Cordialement
17.02.2018 - 14:13DROPS Design answered:
Bonjour Mme Luciani, vous commencez au niveau du coin de A.2, tout en haut à gauche de l'ouvrage vu sur l'endroit, c'est-à-dire dans l'arceau du coin de A.3 et vous crochetez en descendant le long du côté 3, puis les côtés 4, 5, 6, 7 en remontant vers le coin de A.3 du côté 8 et terminez par la grande longueur du côté 1. Bon crochet!
19.02.2018 - 09:13Kunt u mij verder helpen, op de 2 bovenste hoeken trekt mijn werk, alsof er niet genoeg ruimte word gehaakt.
14.02.2018 - 12:58DROPS Design answered:
Hoi Carien, Wellicht is dit op te lossen door verdeeld over de laatst toer extra stokjes te haken. Als het trekt bij de 'aanzet', dus waar je A.3 tegen de kanten hebt gehaakt, kun je proberen met een grotere naald en evt. de laatste toer weer met de gewone naalddikte te doen. (Natuurlijk ook altijd even controleren of het aantal steken wel klopt.)
15.02.2018 - 21:46Dit is idd de toer de al gehaakt is. Hierboven op komt A4 en A7,Alleen heb ik in die toer die al gehaakt is geen 2 hoeken maar 1 hoek. ??
12.02.2018 - 11:09DROPS Design answered:
Hoi Carien, Dat klopt. Je haakt A4 aan het begin van de toer en A.7 aan het eind van de toer, dus die hoeken zitten niet naast elkaar. Dus je haakt eerst A.4b in de eerste hoek van kant-2, dan haak je over kant 4, 5, 6 en 7 volgens beschrijving en eindig je in de hoek van kant 8 met A.7
15.02.2018 - 21:42Patroon A3 eindigd met 1 hoek. Nu zie ik dat bij patroon A4 en A7 onderaan 2 hoeken zijn getekend. Klopt dit?
11.02.2018 - 14:31DROPS Design answered:
Hallo Carien, Ik denk dat je het diamantachtige symbool bedoelt met de hoek (...?) Bij toer A.4 en A.7 zie je een sterretje staan in de eerste toer en dat betekent dat deze toer reeds gehaakt is. (Zie verklaring bij symbolen: deze toer is reeds gehaakt! Begin op de volgende toer! )
11.02.2018 - 21:41Comment peut on crocheter 3 diagrammes sur un coté et un coin? A10 et a11 correspondent au milieu entre les 2 epaules?
31.01.2018 - 16:16DROPS Design answered:
Bonjour Mme Dyckmans, en commençant par le côté épaule (sur l'envers), on crochète A.8 pour la 1ère épaule (A.13 pour l'autre épaule), puis on répète 6-7-8 fois A.9 en largeur (A.12 pour l'autre épaule) et on termine par A.10 (A.11 pour l'autre épaule) pour les diminutions de l'encolure. Entre A.11 et A.10, c'est-à-dire au milieu de l'encolure, les 19-22-25 double-brides du milieu du dernier rang du côté 1 ne seront pas crochetées = bas de l'encolure. Bon crochet!
01.02.2018 - 08:35Donc on ne crochete qu un seul coté du triangle au bout du côté 1?
31.01.2018 - 15:52DROPS Design answered:
Bonjour Mme Dyckmans, le terme "triangle" me gène un peu, les épaules se font de chaque côté le long du côté 1, en laissant au milieu les mailles de l'encolure non travaillées (voir schéma, partie en pointillés au-dessus du côté 1 jusqu'en haut). Bon crochet!
31.01.2018 - 16:08