DROPS Puna
DROPS Puna
100% Alpaca
from 3.55 € /50g
Get the yarn to make this pattern from 35.50€.

The yarn cost is calculated from the pattern’s smallest size and the yarn’s cheapest product type. Looking for an even better price? You might find it on the DROPS Deals!

DROPS SS24

Flowering Heart

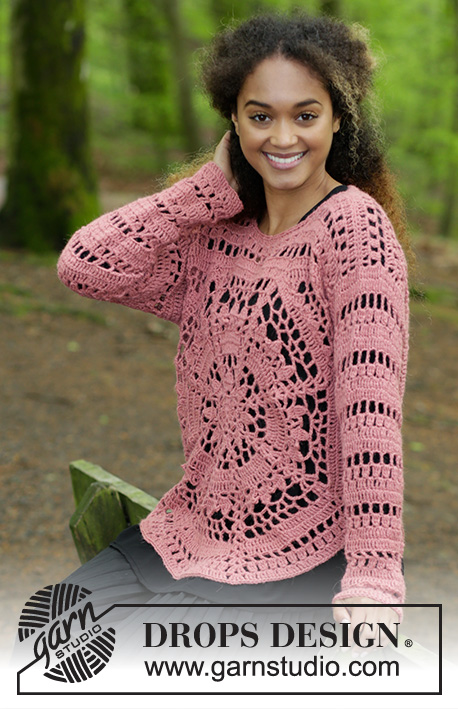
Crocheted jumper with octagon and lace pattern. Sizes S - XXXL. The piece is worked in DROPS Puna or DROPS Sky.

DROPS 183-21
DROPS Design: Pattern no pu-024
Yarn group B
-----------------------------------------------------------
Sizes: S/M - L/XL - XXL/XXXL
Materials:
DROPS PUNA from Garnstudio (belongs to yarn group B)
500-600-700 g colour 10, old pink

Or use:
DROPS SKY from Garnstudio (belongs to yarn group B)
300-350-450 g colour 10, heather

The piece can also be crocheted with yarn from:
"Alternative yarn (Yarn group B)" – see link below.

DROPS CROCHET HOOK SIZE 4.5 MM – or the size needed to get 18 double treble crochets and 6 rows on 10 cm in width and 10 cm in height.
----------------------------------------------------------

-------------------------------------------------------

Alternative Yarn – See how to change yarns here
Yarn Groups A to F – Use the same pattern and change the yarn here
Yarn usage using an alternative yarn – Use our yarn converter here

-------------------------------------------------------

DROPS Puna
DROPS Puna
100% Alpaca
from 3.55 € /50g
Get the yarn to make this pattern from 35.50€.

The yarn cost is calculated from the pattern’s smallest size and the yarn’s cheapest product type. Looking for an even better price? You might find it on the DROPS Deals!

Pattern instructions

NOTE: This pattern is written in British English. All measurements in charts are in cm. For conversion from cm to inches - click here. There are different terms for crocheting in British and American English. If this pattern includes crochet, click for "crochet terms" here. For this pattern in American English, please click here.
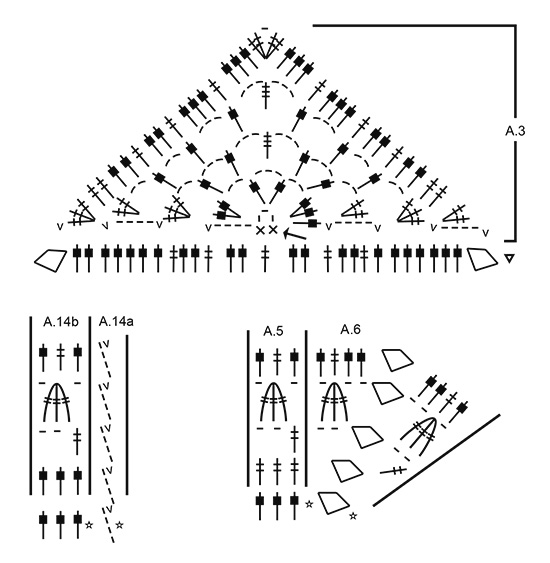
INFORMATION FOR THE PATTERN:

PATTERN:
See diagrams A.1 to A.14.

INCREASE TIP:
Increase 1 double treble crochet by working 2 double treble crochets in same stitch.

DECREASE TIP-1:
Work 1 double treble crochet in each of the next 2 stitches, but wait with the last yarn over and pull through on both these double treble crochets, make a yarn over and pull it through all 3 loops on hook (= 1 double treble crochet decreased).

DECREASE TIP-2:
To work out how to decrease evenly, count the total number of double treble crochets on the round (e.g. 66 double treble crochets) and divide by the number of decreases to be made (e.g. 6) = 11. In this example, work every 10th and 11th double treble crochet together.
----------------------------------------------------------

FRONT PIECE:
To start with, work an octagon for all sizes. Then work 2 corners on the shape so it is a hexagon. Then work an edge around the shape. Finally, work the shoulders and sleeves.

OCTAGON:
Start with hook size 4.5.mm and Puna and work pattern in the round according to diagram A.1 - REMEMBER THE CROCHET TENSION! When A.1 has been completed, the shape measures approx. 10 cm in diameter from side to side. Now continue in the round as follows: Work A.2b a total of 8 times on the round - diagram A.2a shows how the round starts and ends and is worked in addition to A.2b. When the whole of diagrams A.2a and A.2b have been worked in height, the shape measures approx. 44 cm in diameter from side to side. There are now 8 sides of 27 double treble crochets and 8 corners of 2 double treble crochets, 1 chain stitch and 2 double treble crochets. Cut and fasten the strand.

CORNER:
Work a corner on side-2 and a corner on side-8 - see sketch. Start with the corner on side-2 and work back and forth according to diagram A.3. The first row starts by the arrow - each row is fastened with 1 slip stitch in the stitches along side-2 as shown in diagram. When the whole of diagram A.3 has been completed, cut and fasten the strand. Work the other corner on side-8 in the same way, cut and fasten the strand.

EDGE AROUND SHAPE:
There are now 6 sides to the shape - see sketch. There are now 67 double treble crochets on side-1, 47 double treble crochets on sides-2/3 and sides-7/8, there are 27 double treble crochets on side-4, side-5 and side-6 and there are 6 corners of 2 double treble crochets, 1 chain stitch and 2 double treble crochets.

READ THE WHOLE OF THE NEXT SECTION BEFORE CONTINUING!
Start at the corner of side-2 and work pattern according to diagrams as follows: Work A.4a - shows how rounds start and end and is worked in addition, work A.4b around the corner, A.5 a total of 16 times in width, * A.6 around next corner, A.5 a total of 9 times in width *, repeat from *-* 2 more times, work A.6 around the next corner, A.5 a total of 16 times in width, A.7 around next corner, A.4b around the same corner, work A.5 a total of 23 times in width, finish with A.7.
Increase on first round - READ INCREASE TIP - as follows (do not increase over corners):
Side-1: increase 2 double treble crochets.
Side-2/3: increase 1 double treble crochet.
Side-7/8: increase 1 double treble crochet.
When all of diagrams A.4 to A.7 have been completed in height, there are 77 double treble crochets on side-1, 56 double treble crochets on each of side-2/3 and side-7/8, there are 35 double treble crochets on each of side-4, side-5 and side-6, and there are 4 corners of 2 double treble crochets, 1 chain stitch and 2 double treble crochets and 2 corners of 2 tripple treble crochets, 1 chain stitch and 2 tripple treble crochets. DO NOT cut the strand! Now size S/M is finished. For sizes L/XL and XXL/XXXL continue as follows:

Sizes L/XL - XXL/XXXL:
READ THE WHOLE OF THE NEXT SECTION BEFORE CONTINUING!
Work slip stitches as far as the corner and then continue as follows: Work A.4a - shows how the rounds start and end and is worked in addition, work A.4b around the corner, A.5 a total of 19 times in width, * A.6 around next corner, A.5 a total of 12 times in width *, repeat from *-* 2 more times, work A.6 around the same corner, A.5 a total of 19 times in width, A.7 around next corner, A.4b around the same corner, work A.5 a total of 26 times in width, finish with A.7.
Increase/decrease on first round as follows (do not decrease over corners):
Side-1: increase 1-1 double treble crochet.
Side-2/3: increase 1-1 double treble crochet
Side-4: decrease 2-2 double treble crochets - READ DECREASE TIP-1.
Side-5: decrease 2-2 double treble crochets.
Side-6: decrease 2-2 double treble crochets.
Side 7/-8: increase 1-1 double treble crochet.
When all of diagrams A.4 to A.7 have been completed in height, there are 86 double treble crochets on side-1, 65 double treble crochets on each of side-2/3 and side-7/8, there are 41 double treble crochets on each of side-4, side-5 and side-6, and there are 6 corners of 2 double treble crochets, 1 chain stitch and 2 double treble crochets. DO NOT cut the strand! Now size L/XL is finished (L/XL has 4 more rounds than S/M). For size XXL/XXXL continue as follows:

Size XXL/XXXL:
READ THE WHOLE OF THE NEXT SECTION BEFORE CONTINUING!
Work slip stitches as far as the corner and then continue as follows: Work A.4a - shows how the rounds start and end and is worked in addition, work A.4b around the corner, A.5 a total of 22 times in width, * A.6 around the next corner, A.5 a total of 14 times in breadth *, repeat from *-* 2 more times, work A.6 around the next corner, A.5 a total of 22 times in width, A.7 around the next corner, A.4b around the same corner, work A.5 a total of 29 times in width, finish with A.7.
Increase on the first round as follows (do not increase over corners):
Increase 1 double treble crochet on each of the 6 sides.
When all of A.4 to A.7 have been completed in height, there are 95 double treble crochets on side-1, 74 double treble crochets on each of side-2/3 and side-7/8, there are 50 double treble crochets on each of side-4, side-5 and side-6, and there are 6 corners of 2 double treble crochets, 1 chain stitch and 2 double treble crochets. DO NOT cut the strand! Now size XXL/XXXL is finished (XXL/XXXL has 8 rounds more than S/M).

ALL SIZES - SHOULDER:
Now work back and forth, only on side-1. Work the first shoulder starting from the wrong side as follows: Work slip stitches as far as the corner, turn and work diagram A.8 around the corner-space, A.9 a total of 6-7-8 times, finish with A.10 = towards neck. When all of diagrams A.8 to A.10 have been completed in height, cut and fasten the strand. The middle 19-22-25 double treble crochets on the edge of the shape = neck. Work the other shoulder, starting from the wrong side as follows: Work A.11 = towards neck, A.12 a total of 6-7-8 times and finish with A.13 around the corner. When all of diagrams A.11 to A.13 have been completed in height, cut and fasten the strand.

BACK PIECE:
Work in the same way as the front piece until you are about to start on the shoulders. Instead of working shoulder, work back and forth along the whole of side-1 = 81-90-99 double treble crochets (including double crochets in the corners) + 2 corner-spaces on the row. Work as follows starting from the wrong side: Work A.8 around the corner-space, A.9 a total of 27-30-33 times in width, finish with A.13 around corner-space. When all of diagrams A.8/A.9/A.13 have been completed in height, cut and fasten the strand.

ASSEMBLY:
Sew the shoulder seams - sew in the outermost loop of the outermost stitch. Sew the side seams as follows: Start in the corner between side-3 and side-4 and sew upwards until there is approx. 19-21-23 cm left before the shoulder = armhole. Start in the corner between side-6 and side-7 and sew upwards until there is approx. 19-21-23 cm left before the shoulder = armhole.

NECKLINE:
Work an edge around the neck. Start on one shoulder and work 1 double crochet, work * 3 chain stitches, skip approx. 1½ cm, work 1 double crochet *, repeat from *-* around the neck, finish with 3 chain stitches and 1 slip stitch in the first double crochet.

SLEEVE:
The piece is worked in the round from the armhole, starting mid under the armhole in the side. Start with hook size 4.5 mm and Puna and work 66-75-81 double treble crochets evenly spaced around the armhole (work in/around double treble crochet/chain-space). Then work as follows: Work pattern according to diagram A.14b a total of 22-25-27 times on the round - diagram A.14a shows how the rounds start and end and is worked in addition to A.14b. Then repeat A.14 in height and decrease evenly on the first round in the diagram - read DECREASE TIP-2, as follows: Decrease 6 double treble crochets 3-5-2 times and decrease 3-0-9 double treble crochets 2-0-2 times = 42-45-51 double treble crochets after the last decreases. When piece measures approx. 45-42-40 cm (shorter measurements in larger sizes because of broader shoulders) finish after the 1st or the 4th round in A.14. Cut and fasten the strand. Work 1 more sleeve in the same way.

Diagram

symbols = slip stitch
symbols = chain stitch
symbols = 6 chain stitches
symbols = double crochet around chain stitch
symbols = double crochet in stitch
symbols = treble crochet around chain-space/chain-stitch ring
symbols = double treble crochet around chain-space
symbols = double treble crochet in stitch
symbols = the round starts with 1 chain stitch. The round ends with 1 slip stitch in first chain stitch at start of round, then work slip stitches to the middle of the first 6-chain-space
symbols = the round starts with 4 chain stitches. The round ends with 1 slip stitch in the 4th chain stitch at the beginning of the round, then work slip stitches to the middle of the first chain-space.
symbols = the round starts with 5 chain stitches. The round ends with 1 slip stitch in the 5th chain stitch at the beginning of the round, then work slip stitches to middle of the first chain-space.
symbols = work around the same chain stitch as follows: 2 double treble crochets, 1 chain stitch and 2 double treble crochets
symbols = work around the same chain stitch as follows: 2 triple treble crochets, 1 chain stitch and 2 triple treble crochets
symbols = 1 triple treble crochet around the chain-space
symbols = 1 triple treble crochet in stitch
symbols = 4 double treble crochets worked together as follows: work 1 double treble crochet in each of the 4 stitches - but wait with the last yarn over and pull through on each of these double treble crochets, make a yarn over and pull it through all 5 loops on hook
symbols = 3 double treble crochets worked together as follows: work 3 double treble crochets around the chain stitch - but wait with the last yarn over and pull through on each of these double treble crochets, make a yarn over and pull it through all 4 loops on hook
symbols = shows last round of A.2, the round has already been worked! Start at arrow!
symbols = this round has already been worked! Start on next round!
symbols = shows where first row of A.3 starts
symbols = 4 chain stitches, form them to a ring with 1 slip stitch in first chain stitch – see point on circle, the round starts and ends here
diagram
diagram
diagram
diagram
Do you have a question? See a list of frequently asked questions (FAQ)

Knitting tension is what determines the final measurements of your work, and is usually measured per 10 x 10 cm. It is provided like so: number of stitches in width x number of rows in height - eg: 19 stitches x 26 rows = 10 x 10 cm.

The knitting tension is very individual; some people knit/crochet loosely while others work tightly. You adjust the knitting tension with the needle size, which is why the suggested needle size is only meant as a guide! You need to adjust this (up or down) to ensure that YOUR knitting tension matches the knitting tension provided in the pattern. If you work with a different knitting tension than provided you will have a different yarn consumption, and your work will have different measurements than what the pattern suggests.

The knitting tension also determines which yarns can replace each other. As long as you achieve the same knitting tension you can replace one yarn with another.

See DROPS lesson: How to measure your tension/gauge

See DROPS video: How to make a gauge tension swatch

The required amount of yarn is provided in grams, eg: 450 g. To calculate how many balls you’ll need you first need to know how many grams are in 1 ball (25g, 50g or 100g). This information is available if you click on the individual yarn quality on our pages. Divide the amount required with the amount of each ball. For example, if each ball is 50g (the most common amount), the calculation will be as follows: 450 / 50 = 9 balls.

The important thing when changing from one yarn to another is that the knitting/crochet tension remains the same. This is so that the measurements of the finished piece will be the same as on the sketch provided. It is easier to achieve the same knitting tension using yarns from the same yarn group. It is also possible to work with multiple strands of a thinner yarn to achieve the knitting tension of a thicker one. Please try our yarn converter. We recommend you to always work a test swatch.

Please NOTE: when changing yarn the garment might have a different look and feel to the garment in the photo, due to individual properties and qualities of each yarn.

See DROPS lesson: Can I use a different yarn than the one mentioned in the pattern?

All our yarns are categorised into yarn groups (from A to F) according to thickness and knitting tension – group A contains the thinnest yarns and group F the thickest. This makes it easier for you to find alternative yarns to our patterns, should you wish to switch yarn. All yarns within the same group have a similar knitting tension and can easily replace each other. However, different yarn qualities have different structures and properties which will give the finished work a unique look and feel.

Click here for an overview of the yarns in each yarn group

At the top of all our patterns you’ll find a link to our yarn calculator, which is a helpful tool should you wish to use a different yarn than suggested. By filling in the yarn quality you wish to replace, the amount (in your size) and number of strands, the calculator will present good alternative yarns with the same knitting tension. Additionally it will tell you how much you’ll require in the new qualities and whether you’ll need to work with multiple strands. Most skeins are 50g (some are 25g or 100g).

If the pattern is worked with multiple colours, every colour will have to be calculated separately. Similarly, if the pattern is worked with several strands of different yarns (for example 1 strand Alpaca and 1 strand Kid-Silk) you will have to find alternatives for each, individually.

Click here to see our yarn calculator

Since different yarns have different qualities and textures we have chosen to keep the original yarn in our patterns. However, you can easily find options among our available qualities by using our yarn calculator, or simply pick a yarn from the same yarn group.

It is possible that some retailers still have discontinued yarns in stock, or that someone has a few skeins at home that they would like to find patterns for.

The yarn calculator will provide both alternative yarn as well as required amount in the new quality.

If you think it's hard to decide what size to make, it can be a good idea to measure a garment you own already and like the size of. Then you can pick the size by comparing those measures with the ones available in the pattern's size chart.

You'll find the size chart at the bottom of the pattern.

See DROPS lesson: How to read size chart

The needle size provided in the pattern serves only as a guide, the important thing is to follow the knitting tension. And since knitting tension is very individual, you will have to adjust the needle size to ensure that YOUR tension is the same as in the pattern – maybe you’ll have to adjust 1, or even 2 needle sizes, up or down to achieve the correct tension. For this, we recommend that you work test swatches.

Should you work with a different knitting tension than the one provided, the measurements of the finished garment might deviate from the measurement sketch.

See DROPS lesson: How to measure your tension/gauge

See DROPS video: How to make a tension/gauge swatch

Working a garment top-down provides more flexibility and room for personal adjustment. For example it is easier to try the garment on while working, as well as making adjustments to length of yoke and shoulder caps.

The instructions are carefully explaining every step, in the correct order. Diagrams are adjusted to the knitting direction and are worked as usual.

The diagram depicts all rows/rounds, and every stitch seen from the right side. It is read from bottom to top, from right to left. 1 square = 1 stitch.

When working back and forth, every other row is worked from the right side and every other row is worked from the wrong side. When working from the wrong side, the diagram will have to be worked reversed: from left to right, knit stitches are purled, purl stitches are knit etc.

When working in the round every round is worked from the right side and the diagram are worked from right to left on all rounds.

See DROPS lesson: How to read knitting diagrams

The diagram depicts all rows/rounds, and every stitch seen from the right side. It is worked from bottom to top, from right to left.

When working back and forth every other row is worked from the right side: from right to left and every other row is worked from the wrong side: from left to right.

When working in the round, every row in the diagram are worked from the right side, from right to left.

When working a circular diagram you start in the middle and work your way outwards, counter clockwise, row by row.

The rows usually start with a given number of chain stitches (equivalent to the height of the following stitch), this will either be depicted in the diagram or explained in the pattern.

See DROPS lesson: How to read crochet diagrams

Instructions for working several diagrams after each other on the same row/round, will often be written like so: “work A.1, A.2, A.3 a total of 0-0-2-3-4 times". This means you work A.1 once, then A.2 is worked once, and A.3 is repeated (in width) the number of times provided for your size – in this case like so: S = 0 times, M = 0 times, L=2 times, XL= 3 times and XXL = 4 times.

The diagrams are worked as usual: begin with the first row in A.1, then work the first row in A.2 etc.

See DROPS lesson: How to read knitting diagrams

See DROPS lesson: How to read crochet diagrams

The total width of the garment (from wrist-to-wrist) will be larger in the larger sizes, despite the actual sleeves being shorter. The larger sizes have longer sleeve caps and wider shoulders, so there will be a good fit in all sizes.

The measurement sketch/schematic drawing provides information regarding the full length of the garment. If it’s a jumper or a jacket the length is measured from the highest point on the shoulder closest to the neckline, and straight down to the bottom of the garment. It is NOT measured from the tip of shoulder. Similarly, the length of yoke is measured from the highest point on the shoulder and down to where yoke is split into body and sleeves.

On a jacket measures are never taken along bands, unless specifically stated. Always measure inside band stitches when measuring the length.

See DROPS lesson: How to read a schematic drawing

Diagrams are often repeated on the round or in height. 1 repeat is the diagram the way it appears in the pattern. If it says to work 5 repeats of A.1 in the round, then you work A.1 a total of 5 times after/next to each other in the round. If it says to work 2 repeats of A.1 vertically/in height you work the entire diagram once, then begin again at the start and work the entire diagram one more time.

Chain stitches are slightly narrower than other stitches and to avoid working the cast-on edge too tight, we simply chain more stitches to begin with. The stitch count will be adjusted on the following row to fit the pattern and measurement sketch.

The rib edge is more elastic and will contract slightly compared to, for example, stocking stitch. By increasing before the rib edge, you avoid a visible difference in width between the rib edge and the rest of the body.

It’s very easy to cast off too tightly, and by making yarn overs while casting off (and simultaneously casting these off) you avoid a too tight cast off edge.

See DROPS video: How to bind off with yarn overs (yo)

To achieve an even increase (or decrease) you can increase on, for example: every 3rd and 4th row alternately, like so: work 2 rows and increase on the 3rd row, work 3 rows and increase on the 4th. Repeat this until the increase is complete.

See DROPS lesson: Increase or decrease 1 st on every 3rd and 4th row alternately

Should you prefer to work in the round instead of back and forth, you may of course adjust the pattern. You’ll need to add steeks mid-front (usually 5 stitches), and follow the instructions. When you would normally turn and work from the wrong side, simply work across the steek and continue in the round. At the end you’ll cut the piece open, pick up stitches to work bands, and cover the cut edges.

See DROPS video: How to knit steeks and cut open

Should you prefer to work back and forth instead of in the round, you may of course adjust the pattern so you work the pieces separately and then assemble them at the end. Divide the stitches for the body in 2, add 1 edge stitch in each side (for sewing) and work the front and back pieces separately.

See DROPS lesson: Can I adapt a pattern for circular needles into straight needles?

Pattern repeats can vary slightly in the different sizes, in order to get the correct proportions. If you’re not working the exact same size as the garment in the photo, yours might deviate slightly. This has been carefully developed and adjusted so that the complete impression of the garment is the same in all sizes.

Make sure to follow instructions and diagrams for your size!

If you have found a pattern you like which is available in women’s size it’s not very difficult to convert it to men’s size. The biggest difference will be the length of sleeves and body. Start working on the women size that you think would fit across the chest. The additional length will be worked right before you cast off for the armhole/sleeve cap. If the pattern is worked top-down you can add the length right after the armhole or before the first decrease on sleeve.

Regarding additional yarn amount, this will depend on how much length you add, but it is better with a skein too many than too few.

All yarns will have excess fibres (from production) that might come off as lint or shedding. Brushed yarns (ie hairier yarns) have more of these loose, excess fibres, causing more shedding.

Shedding also depends on what is worn under or over the garment, and whether this pulls at the yarn fibres. It’s therefore not possible to guarantee that there will be no shedding

Below are some tips on how to get the best result when working with hairier yarns:

1. When the garment is finished (before you wash it) shake it vigorously so the looser hairs come off. NOTE: do NOT use a lint roller, brush or any method that pulls at the yarn.

2. Place the garment in a plastic bag and put it in your freezer - the temperature will cause the fibres to become less attached to each other, and excess fibres will come off easier.

3. Leave in the freezer for a few hours before taking it out and shaking it again.

4. Wash the garment according to the instructions on the yarn label.

Pilling is a natural process that happens to even the most exclusive of fibers. It's a natural sign of wear and tear that is hard to avoid, and that is most visible in high friction areas of your garment like a sweater's arms and cuffs.

You can make your garment look as new by removing the pilling, using a fabric comb or a pill/lint remover.

Still can't find the answer you need? Then scroll down and leave your question so one of our experts can try to help you. This will be done normally within 5 to 10 working days.
In the meantime, you can read the questions and answers that others have left to this pattern or join the DROPS Workshop on Facebook to get help from fellow knitters/crocheters!

Post a comment to pattern DROPS 183-21

We would love to hear what you have to say about this pattern!

If you want to leave a question, please make sure you select the correct category in the form below, to speed up the answering process. Required fields are marked *.

Comments / Questions (35)

country flag Puri wrote:

Hola, no se cómo hacer la vuelta 5 de A.1, no entiendo qué hay que hacer en el símbolo del hexágono cuando dice 6 puntos de cadena, ¿me podéis ayudar? Gracias.

05.10.2023 - 20:59

DROPS Design answered:

Hola Puri, el hexágono son 6 puntos de cadeneta. Por lo tanto, trabajas un arco de 6 cadenetas entre los 2 puntos bajos de los otros arcos.

09.10.2023 - 00:53

country flag Mikaela Söderström wrote:

Hej! Jag förstår inte hur jag ska virka diagram A.3. Var slutar det första varvet och var börjar varv nr 2? Tacksam för svar! Mvh Mikaela

04.08.2023 - 21:20

DROPS Design answered:

Hej Mikaela, du starter i midten af diagrammet ved pilen med 1fm,3lm, 1fm, 4 lm, hæft med 1 km, næste række starter med 2 dobbeltst, 2 lm osv :)

10.08.2023 - 13:48

country flag Kenzie wrote:

Hi there, how do u work A4.a to 4.7 in pattern?

03.03.2022 - 00:09

DROPS Design answered:

Dear Kenzie, depending on your size you will work A.4 to A.7 a different way - see written pattern. this lesson might help you to understand how to work these diagrams. Happy crocheting!

03.03.2022 - 10:18

country flag Federica wrote:

Grazie, ma non ho capito se devo iniziare diagramma A.4b dal vertice dell' angolo o dalla base dalla parte destra e poi salire e continuare sul lato con l'altro diagramma A.5 fino ad arrivare alla base dell' altro angolo del lato 8.

26.09.2021 - 21:14

country flag Federica wrote:

In che punto dell' angolo devo iniziare a lavorare? Non ho capito neanche quando devo iniziare a fare gli aumenti... Aiutoooo!

26.09.2021 - 18:14

DROPS Design answered:

Buonasera Federica, deve lavorare gli angoli sui lati 2 e 8 seguendo i diagramma A.3. Buon lavoro!

26.09.2021 - 21:09

country flag Federica wrote:

Grazie mille, provo ad andare avanti....

16.08.2021 - 07:59

country flag Federica Trombetti wrote:

Buongiorno, è la prima volta che lavoro con diagramma. non ho capito come si procede per l'angolo del diagramma A3. A.3. La prima riga inizi all’altezza della freccia – ogni riga è affrancata con 1 maglia passata nelle maglie lungo il lato-2 come mostrato nel diagramma Ho iniziato dove indica la freccia con una m.b.. , 3 cat, 1 mb Poi 4 cat, 1 m. bassissima e inizio il secondo giro. e' corretto? e quindi inizio con 2 m. doppie nell'arco di catenelle ecc. ecc..

15.08.2021 - 12:16

DROPS Design answered:

Buonasera Federica, si, esatto deve procedere in quel modo. Abbiamo corretto il testo, ogni riga va affrancata con 1 maglia bassissima nelle maglie del lato 2. Buon lavoro!

15.08.2021 - 23:39

country flag Luisa wrote:

Grazie

19.12.2020 - 18:49

country flag Rikke wrote:

Hej Drops, jeg har prøvet flere gange men forstår ikke hvordan jeg skal lave indtagningerne til ærme - der står både jævnt fordelt og så 6 db.stangmasker x gange og 3 db.stangmasker x gange og det er her jeg ikke kan følge med - hvordan beregner jeg hvornår disse indtagninger skal gøres? Jeg har prøvet flere gange men kan ikke få det til at passe med 42 masker når jeg er færdig (ender altid med lidt flere) Hvad gør jeg forkert? Tak

29.10.2020 - 21:24

DROPS Design answered:

Hej Rikke, jo du har 66 masker, tager 6 dbl.st ind jævnt fordelt hver gang du hækler første række i diagrammet 3 gange (ialt 18 indt) og så tager du ind (stadigvæk på første række i diagrammet) jævnt fordelt 3 dbl.st 2 gange (ialt 6 indt) 66-24= 42 dbl.st tilbage :)

04.11.2020 - 12:12

country flag Petra Lindberg wrote:

Hej! Enl diagram A4b ska det vara tredubbelstolpar i hörnen på sida 1, men i texten på slutet av beskrivning av kant runt rutan står det att det ska vara dubbelstolpar i alla 6 hörn?

06.06.2019 - 17:32

DROPS Design answered:

Hei Petra. Det stemmer at det i disse 2 hjørnene skal være trippelstaver (for at formen skal bli riktig mot skuldrene), så i teksten skulle det stått dobbelstaver/trippelstaver. Vi skal få lagt til dette slik at det ikke blir forvirring. God fornøyelse

07.06.2019 - 09:25