DROPS Puna
DROPS Puna
100% Alpaca
from 4.65 $ /50g
Get the yarn to make this pattern from 41.85$.

The yarn cost is calculated from the pattern’s smallest size and the yarn’s cheapest product type. Looking for an even better price? You might find it on the DROPS Deals!

DROPS SS24

Winter Grace

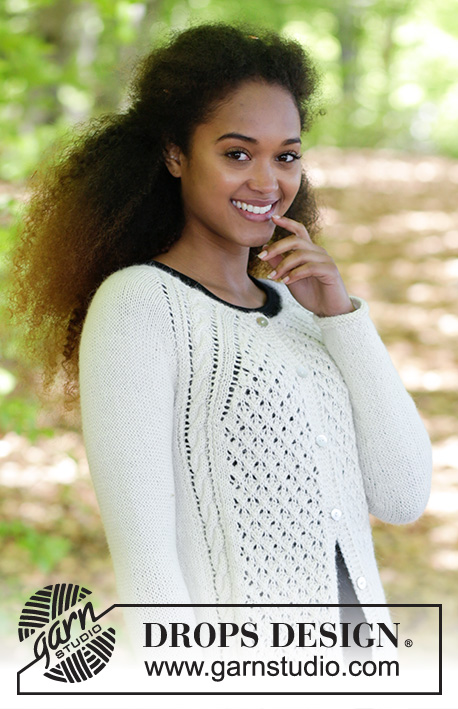
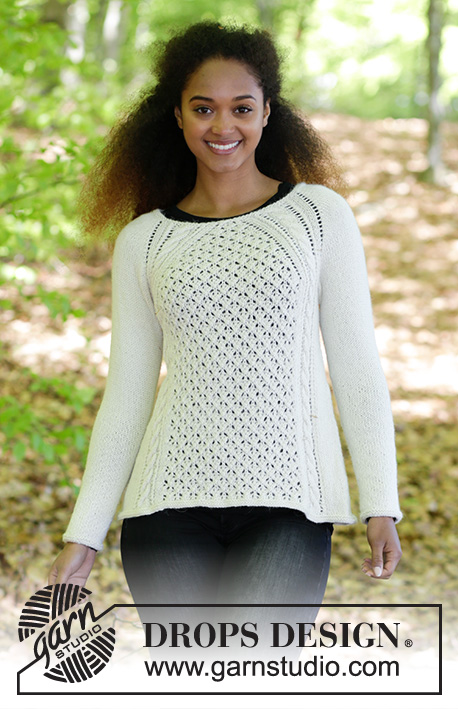
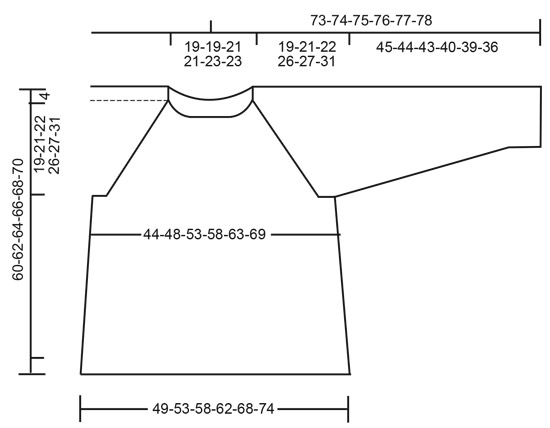
Sweater with cables, lace pattern and raglan, knitted top down. Size: S - XXXL Piece is knitted in DROPS Puna or DROPS Daisy.

DROPS 183-9
DROPS design: Pattern pu-020
Yarn group B
----------------------------------------------------------
Size: S - M - L - XL - XXL - XXXL
Materials:
DROPS PUNA from Garnstudio (belongs to yarn group B)
450-500-550-600-650-700 g color 01, off white

Or use
DROPS DAISY from Garnstudio (belongs to yarn group B)
450-500-550-600-650-700 g colour 01, off white

Piece can also be knitted with yarn from:
"Alternative yarn (yarn group B)" - see link below.

DROPS DOUBLE POINTED NEEDLES AND CIRCULAR NEEDLE (40 + 60 or 80 cm / 16" + 24" or 32") SIZE 4 mm/US 6 – or size needed to get 21 stitches and 28 rows in stockinette stitch = width 10 cm / 4" and 10 cm / 4" vertically.

DROPS CABLE NEEDLE - for cables

-------------------------------------------------------

Alternative Yarn – See how to change yarns here
Yarn Groups A to F – Use the same pattern and change the yarn here
Yarn usage using an alternative yarn – Use our yarn converter here

-------------------------------------------------------

DROPS Puna
DROPS Puna
100% Alpaca
from 4.65 $ /50g
Get the yarn to make this pattern from 41.85$.

The yarn cost is calculated from the pattern’s smallest size and the yarn’s cheapest product type. Looking for an even better price? You might find it on the DROPS Deals!

Pattern instructions

NOTE: This pattern is written in American English. All measurements in charts are in cm. For conversion from inches to cm - click here. There are different terms for crocheting in American and British English. If this pattern includes crochet, click for "crochet terms" here. For this pattern in British English, please click here.
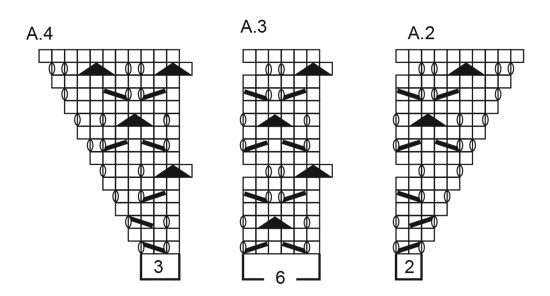
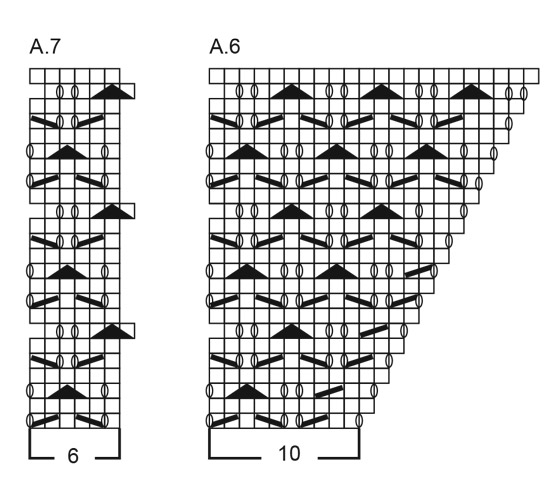
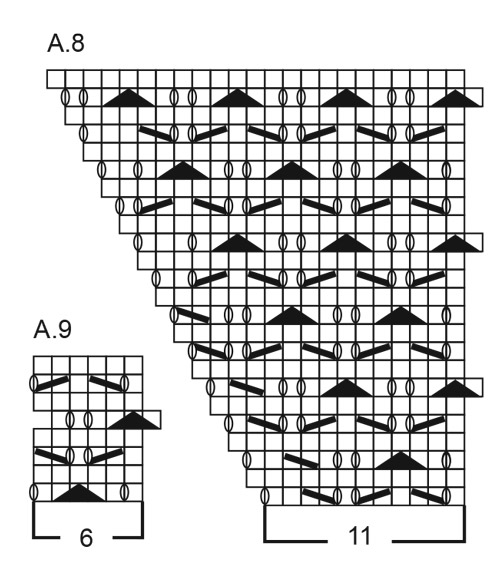
INFORMATION FOR PATTERN:

GARTER STITCH (worked in the round):
1 ridge = 2 rounds. Knit 1 round and purl 1 round.

PATTERN:
See diagrams A.1 to A.9.

DECREASE TIP:
Decrease under sleeve as follows: Begin 3 stitches before marker thread, knit 2 together, knit 2 (marker thread is in the middle of these stitches), slip 1 stitch knitwise, knit 1, pass slipped stitch over stitch worked (= 2 stitches decreased).

INCREASE TIP (applies to increase in the sides of body):
Begin 1 stitch before marker, 1 yarn over, knit 2 (marker is in the middle of these 2 stitches), 1 yarn over (= 2 stitches increased). On next round knit yarns over twisted to avoid holes.
----------------------------------------------------------

SWEATER:
Worked in the round on circular needle from top down.

YOKE:
Cast on 86-86-94-94-102-102 stitches on a short circular needle size 4 mm / US 6 with Puna or Daisy. Work 2 ridges in GARTER STITCH - see explanation above. On to last round in ridge increase 20-20-24-24-28-28 stitches evenly = 106-106-118-118-130-130 stitches. REMEMBER THE GAUGE! Work next round as follows: * A.1 (= 18 stitches), A.2 (= 2 stitches), A.3 0-0-1-1-2-2 times (= 0-0-6-6-12-12 stitches), A.4 (= 3 stitches), A.5, 1 yarn over, 12 stitches in stockinette stitch (= sleeve), 1 yarn over *, work from *-* 2 times in total.

Continue this pattern and upwards, increase as shown in A.2 and A.4. On sleeves increase on each side of the 12 stitches in stockinette stitch, increase every other round with 1 yarn over as explained above. On next round knit yarn overs to make a holes. Work the increased stitches in stockinette stitch. Increase 8 stitches in total every other round. When A.2, A.3 and A.4 has been worked 1 time vertically, there are 170-170-182-182-194-194 stitches on needle. Work next round as follows:

* A.1 (= 18 stitches), A.6 (= 10 stitches), A.7 0-0-1-1-2-2 times (= 0-0-6-6-12-12 stitches), A.8 (= 11 stitches), A.5 (= 18 stitches), 28 stitches in stockinette stitch (= sleeve) *, work from *-* 2 times in total. Continue this pattern upwards, and continue increases on sleeves.

Every time A.6, A.7 and A.8 have been worked 1 time vertically, work 4 repetitions more of A.7 between A.6 and A.8. Continue pattern until you have increased 25-29-30-35-37-43 times in total in A.2, A.3, A.6 and A.8, and in each side on each sleeve = 306-338-358-398-426-474 stitches.

Work next round as follows: Work first 91-99-107-117-127-139 stitches (= front piece), slip the next 62-70-72-82-86-98 stitches on a stitch holder, cast on 8-8-10-10-12-12 new stitches under sleeve, work the next 91-99-107-117-127-139 stitches (= back piece), slip the next 62-70-72-82-86-98 stitches on a stitch holder, cast on 8-8-10-10-12-12 new stitches. Piece measures approx. 19-21-22-26-28-31 cm / 7½"-8¼"-8¾"-10¼"-11½"-12¼" from cast-on edge. NOW MEASURE THE PIECE FROM HERE!

BODY:
= 198-214-234-254-278-302 stitches. Insert 1 marker thread in each side, in the middle of the new stitches. Continue A.1 and A.5 as before and work in stockinette stitch over the new stitches in the side. Over stitches in A.6, A.7 and A.8 (= 55-63-71-81-91-103 stitches on back piece and on front piece) work pattern according to A.9. Begin on the row in A.9 that makes the pattern fits on last pattern row in A.6 to A.8 - work the stitches that do not fit the pattern in each side in stockinette stitch. When piece measures 4 cm / 1½", increase 1 stitch on each side of marker threads (= 4 stitches increased). Increase every 6 cm / 2⅜" 5 times in total = 218-234-254-274-298-322 stitches. When piece measures 36-35-37-35-36-34 cm / 14¼"-13¾"-14½"-13¾"-14¼"-13½", decrease 3 stitch over each cable in A.1 and A.5 = 206-222-242-262-286-310 stitches. Work 2 ridges over all stitches, then bind off. Sweater measures approx. 60-62-64-66-68-70 cm / 23⅝"-24⅜"-25¼"-26"-26¾"-27½" from shoulder.

SLEEVE:
Worked in the round on a short circular needle, switch to double pointed needles when needed.
Slip stitches from sleeve back on a short circular needle size 4 mm / US 6, pick up 1 stitch in each of the 8-8-10-10-12-12 stitches cast on under sleeve = 70-78-82-92-98-110 stitches. Insert 1 marker thread in the middle of the new stitches under sleeve – NOW MEASURE PIECE FROM HERE. Work in stockinette stitch in the round on circular needle/double pointed needles. When piece measures 3 cm / 1", decrease 1 stitch on each side of marker - READ DECREASE TIP. Decrease every 2½-2-2-1½-1½-1 cm / ⅞"-¾"-¾"-½"-½"-¼" 14-17-18-22-24-29 times in total. After all decreases are done, 42-44-46-48-50-52 stitches remain on round. When piece measures 44-43-42-39-38-35 cm / 17¼"-17"-16½"-15¼"-15"-13¾" (shorter measurements in the larger sizes because of longer yoke), work 2 ridges in GARTER STITCH - see explanation above. Then loosely bind off by knitting. Work the other sleeve the same way.

Diagram

All measurements in charts are in cm.

symbols = knit
symbols = purl
symbols = between 2 stitches make 1 yarn over
symbols = knit 2 together
symbols = knit 2 twisted together
symbols = slip 1 stitch knitwise, knit 1, pass slipped stitch over stitch worked
symbols = slip 1 stitch knitwise, knit 2 stitches together, pass slipped stitch over stitches worked together
symbols = slip 3 stitches on cable needle behind piece, knit 3, knit 3 from cable needle
symbols = slip 3 stitches on cable needle in front of piece, knit 3, knit 3 from cable needle
diagram
diagram
diagram
diagram
diagram

Each of our patterns has specific tutorial videos to help you.

Do you have a question? See a list of frequently asked questions (FAQ)

Knitting tension is what determines the final measurements of your work, and is usually measured per 10 x 10 cm. It is provided like so: number of stitches in width x number of rows in height - eg: 19 stitches x 26 rows = 10 x 10 cm.

The knitting tension is very individual; some people knit/crochet loosely while others work tightly. You adjust the knitting tension with the needle size, which is why the suggested needle size only serve as a guide! You need to adjust this (up or down) to ensure that YOUR knitting tension matches the knitting tension provided in the pattern. If you work with a different knitting tension than provided you will have a different yarn consumption, and your work will have different measurements than what the pattern suggests.

The knitting tension also determines which yarns can replace each other. As long as you achieve the same knitting tension you can replace one yarn with another.

See DROPS lesson: How to measure your tension/gauge

See DROPS video: How to make a gauge tension swatch

The required amount of yarn is provided in grams, eg: 450 g. To calculate how many balls you’ll need you first need to know how many grams are in 1 ball (25g, 50g or 100g). This information is available if you click on the individual yarn quality on our pages. Divide the amount required with the amount of each ball. For example, if each ball is 50g (the most common amount), the calculation will be as follows: 450 / 50 = 9 balls.

The important thing when changing from one yarn to another is that the knitting/crochet tension remains the same. This is so that the measurements of the finished piece will be the same as on the sketch provided. It is easier to achieve the same knitting tension using yarns from the same yarn group. It is also possible to work with multiple strands of a thinner yarn to achieve the knitting tension of a thicker one. Please try our yarn converter. We recommend you to always work a test swatch.

Please NOTE: when changing yarn the garment might have a different look and feel to the garment in the photo, due to individual properties and qualities of each yarn.

See DROPS lesson: Can I use a different yarn than the one mentioned in the pattern?

All our yarns are categorised into yarn groups (from A to F) according to thickness and knitting tension – group A contains the thinnest yarns and group F the thickest. This makes it easier for you to find alternative yarns to our patterns, should you wish to switch yarn. All yarns within the same group have a similar knitting tension and can easily replace each other. However, different yarn qualities have different structures and properties which will give the finished work a unique look and feel.

Click here for an overview of the yarns in each yarn group

At the top of all our patterns you’ll find a link to our yarn converter, which is a helpful tool should you wish to use a different yarn than suggested. By filling in the yarn quality you wish to replace, the amount (in your size) and number of strands, the converter will present good alternative yarns with the same knitting tension. Additionally it will tell you how much you’ll require in the new qualities and whether you’ll need to work with multiple strands. Most skeins are 50g (some are 25g or 100g).

If the pattern is worked with multiple colours, every colour will have to be converted separately. Similarly, if the pattern is worked with several strands of different yarns (for example 1 strand Alpaca and 1 strand Kid-Silk) you will have to find alternatives for each, individually.

Click here to see our yarn converter

Since different yarns have different qualities and textures we have chosen to keep the original yarn in our patterns. However, you can easily find options among our available qualities by using our yarn converter, or simply pick a yarn from the same yarn group.

It is possible that some retailers still have discontinued yarns in stock, or that someone has a few skeins at home that they would like to find patterns for.

The yarn converter will provide both alternative yarn as well as required amount in the new quality.

If you think it's hard to decide what size to make, it can be a good idea to measure a garment you own already and like the size of. Then you can pick the size by comparing those measures with the ones available in the pattern's size chart.

You'll find the size chart at the bottom of the pattern.

See DROPS lesson: How to read size chart

The needle size provided in the pattern serves only as a guide, the important thing is to follow the knitting tension. And since knitting tension is very individual, you will have to adjust the needle size to ensure that YOUR tension is the same as in the pattern – maybe you’ll have to adjust 1, or even 2 needle sizes, up or down to achieve the correct tension. For this, we recommend that you work test swatches.

Should you work with a different knitting tension than the one provided, the measurements of the finished garment might deviate from the measurement sketch.

See DROPS lesson: How to measure your tension/gauge

See DROPS video: How to make a gauge tension swatch

Working a garment top-down provides more flexibility and room for personal adjustment. For example it is easier to try the garment on while working, as well as making adjustments to length of yoke and shoulder caps.

The instructions are carefully explaining every step, in the correct order. Diagrams are adjusted to the knitting direction and are worked as usual.

The diagram depicts all rows/rounds, and every stitch seen from the right side. It is read from bottom to top, from right to left. 1 square = 1 stitch.

When working back and forth, every other row is worked from the right side and every other row is worked from the wrong side. When working from the wrong side, the diagram will have to be worked reversed: from left to right, knit stitches are purled, purl stitches are knit etc.

When working in the round every round is worked from the right side and the diagram are worked from right to left on all rounds.

See DROPS lesson: How to read knitting diagrams

The diagram depicts all rows/rounds, and every stitch seen from the right side. It is worked from bottom to top, from right to left.

When working back and forth every other row is worked from the right side: from right to left and every other row is worked from the wrong side: from left to right.

When working in the round, every row in the diagram are worked from the right side, from right to left.

When working a circular diagram you start in the middle and work your way outwards, counter clockwise, row by row.

The rows usually start with a given number of chain stitches (equivalent to the height of the following stitch), this will either be depicted in the diagram or explained in the pattern.

See DROPS lesson: How to read crochet diagrams

Instructions for working several diagrams after each other on the same row/round, will often be written like so: “work A.1, A.2, A.3 a total of 0-0-2-3-4 times". This means you work A.1 once, then A.2 is worked once, and A.3 is repeated (in width) the number of times provided for your size – in this case like so: S = 0 times, M = 0 times, L=2 times, XL= 3 times and XXL = 4 times.

The diagrams are worked as usual: begin with the first row in A.1, then work the first row in A.2 etc.

See DROPS lesson: How to read knitting diagrams

See DROPS lesson: How to read crochet diagrams

The total width of the garment (from wrist-to-wrist) will be larger in the larger sizes, despite the actual sleeves being shorter. The larger sizes have longer sleeve caps and wider shoulders, so there will be a good fit in all sizes.

The measurement sketch/schematic drawing provides information regarding the full length of the garment. If it’s a jumper or a jacket the length is measured from the highest point on the shoulder (usually closest to the neckline), and straight down to the bottom of the garment. It is NOT measured from the tip of shoulder. Similarly, the length of yoke is measured from the highest point on the shoulder and down to where yoke is split into body and sleeves.

See DROPS lesson: How to read a schematic drawing

Diagrams are often repeated on the round or in height. 1 repeat is the diagram the way it appears in the pattern. If it says to work 5 repeats of A.1 in the round, then you work A.1 a total of 5 times after/next to each other in the round. If it says to work 2 repeats of A.1 vertically/in height you work the entire diagram once, then begin again at the start and work the entire diagram one more time.

Chain stitches are slightly narrower than other stitches and to avoid working the cast-on edge too tight, we simply chain more stitches to begin with. The stitch count will be adjusted on the following row to fit the pattern and measurement sketch.

The rib edge is more elastic and will contract slightly compared to, for example, stocking stitch. By increasing before the rib edge, you avoid a visible difference in width between the rib edge and the rest of the body.

It’s very easy to cast off too tightly, and by making yarn overs while casting off (and simultaneously casting these off) you avoid a too tight cast off edge.

See DROPS video: How to bind off with yarn overs (yo)

To achieve an even increase (or decrease) you can increase on, for example: every 3rd and 4th row alternately, like so: work 2 rows and increase on the 3rd row, work 3 rows and increase on the 4th. Repeat this until the increase is complete.

See DROPS lesson: Increase or decrease 1 st on every 3rd and 4th row alternately

Should you prefer to work in the round instead of back and forth, you may of course adjust the pattern. You’ll need to add steeks mid-front (usually 5 stitches), and follow the instructions. When you would normally turn and work from the wrong side, simply work across the steek and continue in the round. At the end you’ll cut the piece open, pick up stitches to work bands, and cover the cut edges.

See DROPS video: How to knit steeks and cut open

Should you prefer to work back and forth instead of in the round, you may of course adjust the pattern so you work the pieces separately and then assemble them at the end. Divide the stitches for the body in 2, add 1 edge stitch in each side (for sewing) and work the front and back pieces separately.

See DROPS lesson: Can I adapt a pattern for circular needles into straight needles?

Pattern repeats can vary slightly in the different sizes, in order to get the correct proportions. If you’re not working the exact same size as the garment in the photo, yours might deviate slightly. This has been carefully developed and adjusted so that the complete impression of the garment is the same in all sizes.

Make sure to follow instructions and diagrams for your size!

If you have found a pattern you like which is available in women’s size it’s not very difficult to convert it to men’s size. The biggest difference will be the length of sleeves and body. Start working on the women size that you think would fit across the chest. The additional length will be worked right before you cast off for the armhole/sleeve cap. If the pattern is worked top-down you can add the length right after the armhole or before the first decrease on sleeve.

Regarding additional yarn amount, this will depend on how much length you add, but it is better with a skein too many than too few.

All yarns will have excess fibres (from production) that might come off as lint or shedding. Brushed yarns (ie hairier yarns) have more of these loose, excess fibres, causing more shedding.

Shedding also depends on what is worn under or over the garment, and whether this pulls at the yarn fibres. It’s therefore not possible to guarantee that there will be no shedding

Below are some tips on how to get the best result when working with hairier yarns:

1. When the garment is finished (before you wash it) shake it vigorously so the looser hairs come off. NOTE: do NOT use a lint roller, brush or any method that pulls at the yarn.

2. Place the garment in a plastic bag and put it in your freezer - the temperature will cause the fibres to become less attached to each other, and excess fibres will come off easier.

3. Leave in the freezer for a few hours before taking it out and shaking it again.

4. Wash the garment according to the instructions on the yarn label.

Pilling is a natural process that happens to even the most exclusive of fibers. It's a natural sign of wear and tear that is hard to avoid, and that is most visible in high friction areas of your garment like a sweater's arms and cuffs.

You can make your garment look as new by removing the pilling, using a fabric comb or a pill/lint remover.

Still can't find the answer you need? Then scroll down and leave your question so one of our experts can try to help you. This will be done normally within 5 to 10 working days.
In the meantime, you can read the questions and answers that others have left to this pattern or join the DROPS Workshop on Facebook to get help from fellow knitters/crocheters!

You might also like...

Post a comment to pattern DROPS 183-9

We would love to hear what you have to say about this pattern!

If you want to leave a question, please make sure you select the correct category in the form below, to speed up the answering process. Required fields are marked *.

Comments / Questions (17)

country flag Marta wrote:

Buongiorno, mi piacerebbe realizzare con il motivo traforato una sciarpa/stola 40 cm x 180 cm sempre con il filato puna. Quanta lana mi occorre? Grazie

16.11.2023 - 11:05

DROPS Design answered:

Buonasera Marta, per un aiuto così personalizzato può rivolgersi al suo rivenditore DROPS di fiducia. Buon lavoro!

16.11.2023 - 20:48

country flag Silvia wrote:

Ciao, sto lavorando la taglia XL. Non mi trovo quando dice "Proseguire con il motivo finché non avete aumentato in tutto 25-29-30-35-37-43 volte nei diagrammi A.2, A.3, A.6 e A.8, e da ciascun lato per ogni manica = 306-338-358-398-426-474 maglie." Se infatti aumento 35 m a ogni lato delle maniche, e 35 ciascuno ai lati di A6 e A8 mi trovo con 392 maglie. Di conseguenza, dopo mi trovo con 114 maglie ciascuno sul davanti e dietro invece di 117. Cosa sbaglio?

18.01.2023 - 18:19

country flag Mary wrote:

Bei einer Länge von 36-35-37-35-36-34 cm 3 Maschen über jedem Zopf von A.1 und A.5 abnehmen = wie nimmt man hier am besten ab? 3 mal 2 rechts zusammenstricken sieht nicht so gut aus

18.04.2019 - 16:14

DROPS Design answered:

Liebe Mary, um 3 Maschen in A.1 und A.5 abzunehmen, sollen die 6 Maschen von jedem Zopf 3 mal 2 M rechts zusammen gestrickt, dann wird es kraus rechts für den Rand gestrickt, die Abnahmen sieht man nicht, und so vermeidet man, daß der Rand bei den Zöpfe breiter als gewünscht sind. Viel Spaß beim stricken!

23.04.2019 - 11:46

country flag Simard wrote:

Comment faire 2 mailles ensemble torse endroit

04.03.2019 - 04:48

DROPS Design answered:

Bonjour Mme Simard, cette vidéo montre comment tricoter 2 mailles ensemble torse à l'endroit. Bon tricot!

04.03.2019 - 11:34

Hazel wrote:

Hi, I am knitting the small size and have completed A6 and A8 vertically once - 45 pattern stitches on the diagram. I have 266 stitches altogether and need to continue increasing until there are 306 stitches. Which other pattern diagrams should I use next and how do I incorporate them?

27.09.2018 - 16:38

DROPS Design answered:

Dear Hazel, continue increasing and working in pattern as before, ie after 1 repeat of A.6, A.7 and A.8 in height, you can work 4 more repeats of A.7 in width between A.6 and A.8 = start lace pattern with A.6, repeat A.7 and finish panel with A.8 until all decreases have been done. Happy knitting!

28.09.2018 - 07:57

country flag Bitten wrote:

Jeg skal bruge mønsteret uden udtagninger, er det så skiftevis A1 og A5 jeg skal bruge?

27.05.2018 - 19:43

DROPS Design answered:

Hej Bitten, A.1 og A.5 er mønsteret med snoningen i hver side af blusen. A.7 er det midterste på blusen :)

30.05.2018 - 13:09

country flag ToveGeerthsen wrote:

Hvordan kommer jeg videre, når mønsteret er strikket? Help me!

18.03.2018 - 15:40

DROPS Design answered:

Hej Tove, hvor langt er du kommet i opskriften? Det er samme mønster som beskrives i første omgang, som går igen i hele blusen. Kan du evt få hjælp i butikken hvor du har købt dit garn...

20.03.2018 - 09:44

country flag Julie Tastet wrote:

Bonjour, j'ai monté 86 mailles pour le 1er rang comme indiqué dans le modèle soit environ une longueur de 40 cm. S'agit-il bien de l'encolure du pull ? Je n'ai jamais tricoté un pull de haut en bas. Ca me paraît petit pour passer la tête et l'encolure a l'air assez large sur le modèle. Merci beaucoup pour votre réponse.

07.03.2018 - 17:22

DROPS Design answered:

Bonjour Mme Tastet, on monte bien 86 m pour l'encolure en taille S et M, après les 2 côtes mousse, on va augmenter à 106 m. Si votre échantillon est juste en hauteur et en largeur, vous devriez avoir les bonnes mesures. Bon tricot!

08.03.2018 - 08:50

country flag Vendela wrote:

Hi! How do I compensate for the one stich offset at the fifth row in pattern A.9, to prevent the pattern from successively migrating into the pattern A.1? Thank you!

18.02.2018 - 19:37

DROPS Design answered:

Dear Mrs Vendela, adjust the pattern so that you have correct number of sts in A.9, ie you can just dec with slip 1 as if to K, k1, psso (instead of slip 1, K2 tog, psso), so that the dec is compensated with next yo. Make sure you always have correct number of sts and that diagrams line up. Happy knitting!

19.02.2018 - 10:17

country flag Carine Van Hecke wrote:

Hallo, ik wil een medium breien. Dat is 106 steken op de hals na de 2 ribbels. Als ik echter de volgende rij de steken tel kom ik maar aan 70. Ik snap het niet, wat vergeet ik mee te tellen ? Dank bij voorbaat

19.01.2018 - 12:42

DROPS Design answered:

Hoi Carine: Je breit 1x A.1 (= 18 st), 2 x A.2 (= 2 st), 0 x A.3 (= 0 st), A.4 (= 3 st), A.5 (= 18 st), 1 omslag (= 1 st), 12 tricotst ( = 12 st), 1 omslag (= 1 st) Als ik bovenstaande optel en x 2 doe kom ik op 110 steken en dat klopt want naast de 106 steken die je al had, komen er 4 omslagen op de toer bij.

20.01.2018 - 12:26