DROPS Alpaca Bouclé
DROPS Alpaca Bouclé
80% Alpaca, 15% Wool, 5% Polyamide
from 3.85 € /50g
Get the yarn to make this pattern from 34.65€.

The yarn cost is calculated from the pattern’s smallest size and the yarn’s cheapest product type. Looking for an even better price? You might find it on the DROPS Deals!

DROPS SS24

Forest Mist

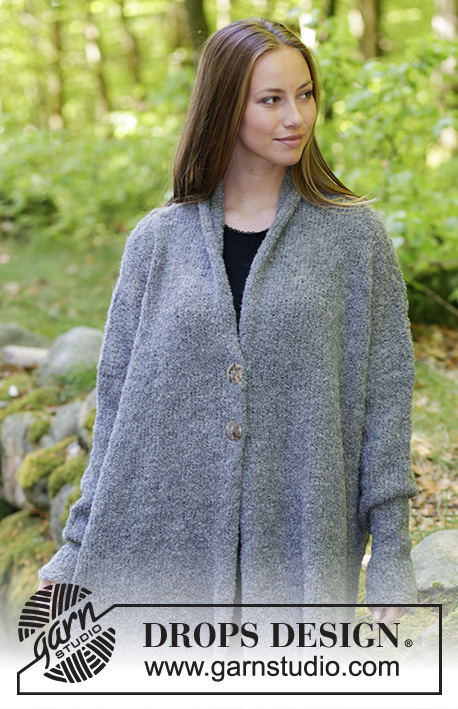
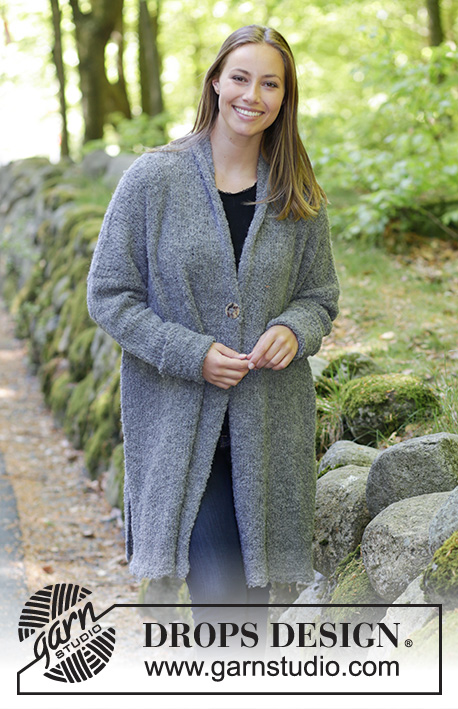
Knitted jacket with shawl collar, split in sides and diagonal shoulders. Sizes S - XXXL. The piece is worked in DROPS Alpaca Bouclé.

DROPS 184-17
DROPS Design: Pattern no ab-078
Yarn group C or A + A
-----------------------------------------------------------
Sizes: S - M - L - XL - XXL - XXXL
Materials:
DROPS ALPACA BOUCLÉ from Garnstudio (belongs to yarn group C)
450-500-500-550-650-700 g colour 0517, grey

The piece can also be knitted with yarn from:
"Alternative yarn (Yarn group C)" – see link below.

DROPS CIRCULAR NEEDLE (60 or 80 cm) SIZE 5 MM – or the size needed to get 17 stitches and 22 rows stocking stitch on 10 cm in width and 10 cm in height.

DROPS CIRCULAR NEEDLE (60 or 80 cm) SIZE 4 MM for garter stitch edges – or the size needed to get 19 stitches and 25 rows stocking stitch on 10 cm in width and 10 cm in height.

DROPS MOTHER OF PEARL BUTTONS, Arched (white) NO 540: 2 items in all sizes.
----------------------------------------------------------

-------------------------------------------------------

Alternative Yarn – See how to change yarns here
Yarn Groups A to F – Use the same pattern and change the yarn here
Yarn usage using an alternative yarn – Use our yarn converter here

-------------------------------------------------------

DROPS Alpaca Bouclé
DROPS Alpaca Bouclé
80% Alpaca, 15% Wool, 5% Polyamide
from 3.85 € /50g
Get the yarn to make this pattern from 34.65€.

The yarn cost is calculated from the pattern’s smallest size and the yarn’s cheapest product type. Looking for an even better price? You might find it on the DROPS Deals!

Pattern instructions

NOTE: This pattern is written in British English. All measurements in charts are in cm. For conversion from cm to inches - click here. There are different terms for crocheting in British and American English. If this pattern includes crochet, click for "crochet terms" here. For this pattern in American English, please click here.
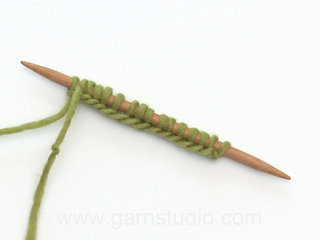
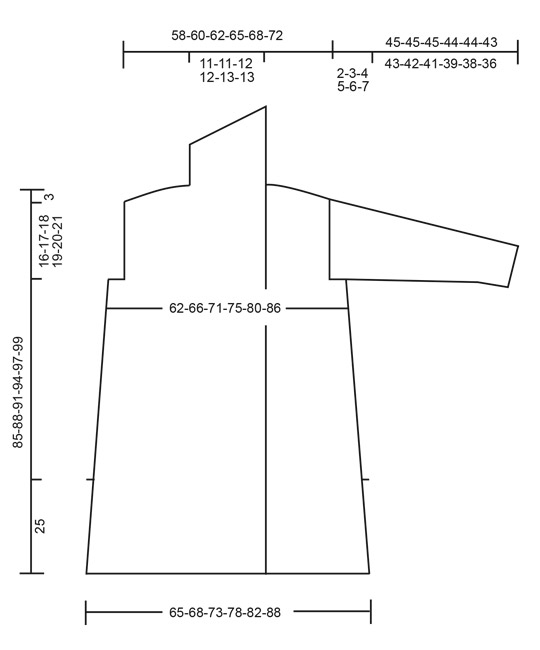
INFORMATION FOR THE PATTERN:

RIDGE/GARTER STITCH (worked back and forth):
1 ridge = Knit 2 rows.

MEASURING TIP:
Because of the weight of the yarn, take all length measurements when holding the piece up, or the garment will be too long when worn.

DECREASE TIP (for sides):
Decrease inside 1 edge stitch in garter stitch. All decreases are worked from the right side.
Decrease as follows after the 1 edge stitch in garter stitch: Slip 1 stitch as if to knit, knit 1, pass the slipped stitch over (= 1 stitch decreased).
Decrease as follows before the 1 edge stitch in garter stitch: Start 2 stitches before the edge stitch and knit 2 together (= 1 stitch decreased).

INCREASE TIP (for sleeves):
Increase 1 stitch inside the 1 edge stitch in garter stitch by making 1 yarn over. On the next row work the yarn over twisted to avoid a hole (the increased stitches are worked in stocking stitch).

BUTTONHOLES:
Work buttonholes on right band. 1 BUTTONHOLE = knit together 5th and 6th stitch from the edge (= in the transition between the 5 band stitches in garter stitch and the stocking stitch section) and make 1 yarn over. On the next round knit the yarn over to leave a hole.
Work buttonholes when the piece measures:
S: 49 and 59 cm
M: 50 and 60 cm
L: 51 and 61 cm
XL: 52 and 62 cm
XXL: 53 and 63 cm
XXXL: 54 and 64 cm
----------------------------------------------------------

JACKET:
The piece is worked back and forth with circular needle and is sewn together at the end.

BACK PIECE:
Cast on 110-116-124-132-140-150 stitches with circular needle size 5 mm and Alpaca Bouclé. Change to circular needle size 4 mm and work 2 RIDGES – see description above. Change back to circular needle size 5 mm. Work stocking stitch with 5 edge stitches in garter stitch in each side. REMEMBER THE KNITTING TENSION! When the piece measures 25 cm – read MEASURING TIP, cast on 1 stitch at the end of the next 2 rows (the split ends here) = 112-118-126-134-142-152 stitches. Continue working stocking stitch with 1 edge stitch in garter stitch in each side. When the piece measures 30 cm decrease 1 stitch in each side – read DECREASE TIP (= 2 stitches decreased). Repeat the decreases when the piece measures 50 cm = 108-114-122-130-138-148 stitches. When the piece measures 66-68-70-72-74-75 cm cast off 4-5-7-9-10-12 stitches at the beginning of the next 2 rows for the armholes = 100-104-108-112-118-124 stitches. Continue with stocking stitch and 1 edge stitch in garter stitch in each side towards the armholes. When the piece measures 82-85-88-91-94-96 cm, place stitches on a thread for the diagonal shoulders and cast off stitches for for the neck:
Place stitches on a thread for the diagonal shoulders at the beginning of each row from the armhole as follows in each side (work the stitches before placing them on the thread): Place 11-12-13-14-15-16 stitches on the thread 2 times, then 19-19-18-18-18-19 stitches on the thread 1 time.
When all stitches on the shoulder have been placed on the thread there are 18-18-20-20-22-22 stitches left for the neck in the middle of the back piece. Cast off these stitches for neck. All stitches have now been cast off/placed on the thread and the piece measures approx. 85-88-91-94-97-99 cm (measured from top of shoulder down).
Place the stitches from the thread on the one shoulder back on circular needle size 5 mm. Knit 1 row from the wrong side – NOTE. To avoid holes in the transitions where stitches have been on the thread, pick up the loop between 2 stitches and knit it twisted together with the next stitch on the row. Cast off. To avoid a tight cast off edge you can cast off with a larger needle size. Repeat on the other shoulder.

RIGHT FRONT PIECE:
Cast on 73-76-82-86-92-97 stitches with circular needle size 5 mm and Alpaca Bouclé. Change to circular needle size 4 mm. Work 2 ridges. Change back to circular needle size 5 mm. Work stocking stitch with 5 edge stitches in garter stitch in each side (= 5 band stitches in garter stitch at the beginning of the row from the right side and 5 edge stitches in garter stitch at the end of the row in the side). When the piece measures 25 cm cast on 1 new stitch at the end of the row from the right side (the split ends here) = 74-77-83-87-93-98 stitches. Then work stocking stitch with 5 band stitches in garter stitch and 1 edge stitch in garter stitch in the side. When the piece measures 30 cm decrease 1 stitch in the side as for the back piece (= 1 stitch decreased). Repeat the decrease when the piece measures 50 cm = 72-75-81-85-91-96 stitches. REMEMBER BUTTONHOLES - see description above! When the piece measures 66-68-70-72-74-75 cm cast off 4-5-7-9-10-12 stitches at the start of the next row from the wrong side (= in the side) for armhole = 68-70-74-76-81-84 stitches. Continue with stocking stitch with 5 band stitches in garter stitch and 1 edge stitch in garter stitch towards the armhole. When the piece measures 82-85-88-91-94-96 cm, place stitches on a thread for diagonal shoulder:
Place stitches on a thread for diagonal shoulder at the start of each row from the armhole as follows (work the stitches before placing them on the thread): Place 11-12-13-14-15-16 stitches on the thread 2 times, then 19-19-18-18-18-19 stitches on the thread 1 time = 27-27-30-30-33-33 stitches left for the collar. The work measures approx. 85-88-91-94-97-99 cm (measured from top of shoulder).
Now continue with stocking stitch and 5 band stitches in garter stitch over the 27-27-30-30-33-33 stitches for collar, and work short rows so that the collar will lie neatly. Start from the wrong side and work as follows:
ROW 1: work all stitches, turn.
ROW 2: work 9-9-10-10-11-11 stitches, tighten strand, turn.
ROW 3: work back.
ROW 4: work 18-18-20-20-22-22 stitches, tighten strand, turn.
ROW 5: work back.
ROW 6: work all stitches, turn.
ROW 7: work back.
ROW 8: work all stitches
Repeat rows 1 - 8 until the collar measures approx. 6-6-6-6-7-7 cm at the shortest point (= along the side towards shoulder/armhole). Loosely cast off.
Place the stitches from the thread back on circular needle size 5 mm. Knit 1 row from the wrong side – NOTE. To avoid holes in the transition where stitches have been on the thread, pick up the loop between stitches and knit it twisted together with the next stitch on the row. Then cast off with knit from the right side (make sure the cast off edge is not tight).

LEFT FRONT PIECE:
Cast on 73-76-82-86-92-97 stitches with circular needle size 5 mm and Alpaca Bouclé. Change to circular needle size 4 mm. Work 2 ridges. Change back to circular needle size 5 mm. Work stocking stitch with 5 stitches in garter stitch in each side (= 5 edge stitches in garter stitch in the side at the beginning of the row from the right side and 5 band stitches in garter stitch at the end of the row from the right side). When the piece measures 25 cm cast on 1 new stitch at the end of the next row from the wrong side (the split ends here) = 74-77-83-87-93-98 stitches. Then work stocking stitch with 5 band stitches in garter stitch and 1 edge stitch in garter stitch in the side. When the piece measures 30 cm decrease 1 stitch in the side as for the right front piece (= 1 stitch decreased). Repeat the decrease when the piece measures 50 cm = 72-75-81-85-91-96 stitches. When the piece measures 66-68-70-72-74-75 cm cast off 4-5-7-9-10-12 stitches at the beginning of the next row from the right side (= in the side) for armhole = 68-70-74-76-81-84 stitches. Continue with stocking stitch with 5 band stitches in garter stitch and 1 edge stitch in garter stitch towards the armhole. When the piece measures 82-85-88-91-94-96 cm, place stitches on a thread for diagonal shoulder:
Place stitches on a thread for the diagonal shoulder at the beginning of each row from the armhole as follows (work the stitches before placing them on the thread): Place 11-12-13-14-15-16 stitches on the thread 2 times, then 19-19-18-18-18-19 stitches on the thread 1 time = 27-27-30-30-33-33 stitches left for collar. The piece measures approx. 85-88-91-94-97-99 cm (measured from top of shoulder).
Now continue with stocking stitch and 5 band stitches in garter stitch over the 27-27-30-30-33-33 stitches for the collar and work short rows so that the collar lies neatly. Start from the right side and work as follows:
ROW 1: work all stitches, turn.
ROW 2: work 9-9-10-10-11-11 stitches, tighten the strand, turn.
ROW 3: work back.
ROW 4: work 18-18-20-20-22-22 stitches, tighten strand, turn.
ROW 5: work back.
ROW 6: work all stitches, turn.
ROW 7: work back.
ROW 8: work all stitches
Repeat rows 1 - 8 until the collar measures approx. 6-6-6-6-7-7 cm at the shortest point (= along the side towards shoulder/armhole).
Loosely cast off. Place the stitches from the thread on the shoulder back on circular needle size 5 mm. Knit 1 row from the wrong side – NOTE! To avoid holes in the transition where stitches were placed on the thread, pick up the loop between 2 stitches and knit it twisted together with the next stitch on the row. Then cast off with knit from the right side (make sure the cast off edge is not tight).

SLEEVE:
The piece is worked back and forth with circular needle.
Cast on 34-36-38-40-40-42 stitches with circular needle size 5 mm and Alpaca Bouclé. Change to circular needle size 4 mm. Work 2 ridges. Change back to circular needle size 5 mm and work stocking stitch with 1 edge stitch in garter stitch in each side. When the piece measures 7-7-11-7-11-9 cm increase 1 stitch in each side – read INCREASE TIP (= 2 stitches increased). Increase in this way every 4th-4th-3rd-3rd-2nd-2nd cm a total 9-9-10-11-12-13 times = 52-54-58-62-64-68 stitches. When the piece measures 43-42-41-39-38-36 cm insert 1 marker thread in each side. Then work stocking stitch back and forth over all stitches for 2-3-4-5-6-7 cm from the marker threads (the piece now measures approx. 45-45-45-44-44-43 cm). Cast off 5 stitches at the beginning of the next 2 rows in each side, then cast off the remaining stitches (make sure the cast off edge is not tight).
Work 1 more sleeve in the same way.

ASSEMBLY:
Sew the shoulder seams inside the cast off edge. Sew the sleeves to the body – marker threads in each side of the sleeve should meet the outermost stitch cast off for sleeve in the body. Sew the seam under the sleeves and the side seams edge to edge in the outermost loop of the outermost stitch, but stop by the stitch cast on after 25 cm on the body (= split). Sew together the cast off edge on the 2 parts of collar and sew the whole collar to the neck on the back piece. Cut and fasten strands. Sew the buttons onto the left band approx. 4 cm from the edge.

Diagram

diagram measurements

Each of our patterns has specific tutorial videos to help you.

Do you have a question? See a list of frequently asked questions (FAQ)

Knitting tension is what determines the final measurements of your work, and is usually measured per 10 x 10 cm. It is provided like so: number of stitches in width x number of rows in height - eg: 19 stitches x 26 rows = 10 x 10 cm.

The knitting tension is very individual; some people knit/crochet loosely while others work tightly. You adjust the knitting tension with the needle size, which is why the suggested needle size is only meant as a guide! You need to adjust this (up or down) to ensure that YOUR knitting tension matches the knitting tension provided in the pattern. If you work with a different knitting tension than provided you will have a different yarn consumption, and your work will have different measurements than what the pattern suggests.

The knitting tension also determines which yarns can replace each other. As long as you achieve the same knitting tension you can replace one yarn with another.

See DROPS lesson: How to measure your tension/gauge

See DROPS video: How to make a gauge tension swatch

The required amount of yarn is provided in grams, eg: 450 g. To calculate how many balls you’ll need you first need to know how many grams are in 1 ball (25g, 50g or 100g). This information is available if you click on the individual yarn quality on our pages. Divide the amount required with the amount of each ball. For example, if each ball is 50g (the most common amount), the calculation will be as follows: 450 / 50 = 9 balls.

The important thing when changing from one yarn to another is that the knitting/crochet tension remains the same. This is so that the measurements of the finished piece will be the same as on the sketch provided. It is easier to achieve the same knitting tension using yarns from the same yarn group. It is also possible to work with multiple strands of a thinner yarn to achieve the knitting tension of a thicker one. Please try our yarn converter. We recommend you to always work a test swatch.

Please NOTE: when changing yarn the garment might have a different look and feel to the garment in the photo, due to individual properties and qualities of each yarn.

See DROPS lesson: Can I use a different yarn than the one mentioned in the pattern?

All our yarns are categorised into yarn groups (from A to F) according to thickness and knitting tension – group A contains the thinnest yarns and group F the thickest. This makes it easier for you to find alternative yarns to our patterns, should you wish to switch yarn. All yarns within the same group have a similar knitting tension and can easily replace each other. However, different yarn qualities have different structures and properties which will give the finished work a unique look and feel.

Click here for an overview of the yarns in each yarn group

At the top of all our patterns you’ll find a link to our yarn calculator, which is a helpful tool should you wish to use a different yarn than suggested. By filling in the yarn quality you wish to replace, the amount (in your size) and number of strands, the calculator will present good alternative yarns with the same knitting tension. Additionally it will tell you how much you’ll require in the new qualities and whether you’ll need to work with multiple strands. Most skeins are 50g (some are 25g or 100g).

If the pattern is worked with multiple colours, every colour will have to be calculated separately. Similarly, if the pattern is worked with several strands of different yarns (for example 1 strand Alpaca and 1 strand Kid-Silk) you will have to find alternatives for each, individually.

Click here to see our yarn calculator

Since different yarns have different qualities and textures we have chosen to keep the original yarn in our patterns. However, you can easily find options among our available qualities by using our yarn calculator, or simply pick a yarn from the same yarn group.

It is possible that some retailers still have discontinued yarns in stock, or that someone has a few skeins at home that they would like to find patterns for.

The yarn calculator will provide both alternative yarn as well as required amount in the new quality.

If you think it's hard to decide what size to make, it can be a good idea to measure a garment you own already and like the size of. Then you can pick the size by comparing those measures with the ones available in the pattern's size chart.

You'll find the size chart at the bottom of the pattern.

See DROPS lesson: How to read size chart

The needle size provided in the pattern serves only as a guide, the important thing is to follow the knitting tension. And since knitting tension is very individual, you will have to adjust the needle size to ensure that YOUR tension is the same as in the pattern – maybe you’ll have to adjust 1, or even 2 needle sizes, up or down to achieve the correct tension. For this, we recommend that you work test swatches.

Should you work with a different knitting tension than the one provided, the measurements of the finished garment might deviate from the measurement sketch.

See DROPS lesson: How to measure your tension/gauge

See DROPS video: How to make a tension/gauge swatch

Working a garment top-down provides more flexibility and room for personal adjustment. For example it is easier to try the garment on while working, as well as making adjustments to length of yoke and shoulder caps.

The instructions are carefully explaining every step, in the correct order. Diagrams are adjusted to the knitting direction and are worked as usual.

The diagram depicts all rows/rounds, and every stitch seen from the right side. It is read from bottom to top, from right to left. 1 square = 1 stitch.

When working back and forth, every other row is worked from the right side and every other row is worked from the wrong side. When working from the wrong side, the diagram will have to be worked reversed: from left to right, knit stitches are purled, purl stitches are knit etc.

When working in the round every round is worked from the right side and the diagram are worked from right to left on all rounds.

See DROPS lesson: How to read knitting diagrams

The diagram depicts all rows/rounds, and every stitch seen from the right side. It is worked from bottom to top, from right to left.

When working back and forth every other row is worked from the right side: from right to left and every other row is worked from the wrong side: from left to right.

When working in the round, every row in the diagram are worked from the right side, from right to left.

When working a circular diagram you start in the middle and work your way outwards, counter clockwise, row by row.

The rows usually start with a given number of chain stitches (equivalent to the height of the following stitch), this will either be depicted in the diagram or explained in the pattern.

See DROPS lesson: How to read crochet diagrams

Instructions for working several diagrams after each other on the same row/round, will often be written like so: “work A.1, A.2, A.3 a total of 0-0-2-3-4 times". This means you work A.1 once, then A.2 is worked once, and A.3 is repeated (in width) the number of times provided for your size – in this case like so: S = 0 times, M = 0 times, L=2 times, XL= 3 times and XXL = 4 times.

The diagrams are worked as usual: begin with the first row in A.1, then work the first row in A.2 etc.

See DROPS lesson: How to read knitting diagrams

See DROPS lesson: How to read crochet diagrams

The total width of the garment (from wrist-to-wrist) will be larger in the larger sizes, despite the actual sleeves being shorter. The larger sizes have longer sleeve caps and wider shoulders, so there will be a good fit in all sizes.

The measurement sketch/schematic drawing provides information regarding the full length of the garment. If it’s a jumper or a jacket the length is measured from the highest point on the shoulder closest to the neckline, and straight down to the bottom of the garment. It is NOT measured from the tip of shoulder. Similarly, the length of yoke is measured from the highest point on the shoulder and down to where yoke is split into body and sleeves.

On a jacket measures are never taken along bands, unless specifically stated. Always measure inside band stitches when measuring the length.

See DROPS lesson: How to read a schematic drawing

Diagrams are often repeated on the round or in height. 1 repeat is the diagram the way it appears in the pattern. If it says to work 5 repeats of A.1 in the round, then you work A.1 a total of 5 times after/next to each other in the round. If it says to work 2 repeats of A.1 vertically/in height you work the entire diagram once, then begin again at the start and work the entire diagram one more time.

Chain stitches are slightly narrower than other stitches and to avoid working the cast-on edge too tight, we simply chain more stitches to begin with. The stitch count will be adjusted on the following row to fit the pattern and measurement sketch.

The rib edge is more elastic and will contract slightly compared to, for example, stocking stitch. By increasing before the rib edge, you avoid a visible difference in width between the rib edge and the rest of the body.

It’s very easy to cast off too tightly, and by making yarn overs while casting off (and simultaneously casting these off) you avoid a too tight cast off edge.

See DROPS video: How to bind off with yarn overs (yo)

To achieve an even increase (or decrease) you can increase on, for example: every 3rd and 4th row alternately, like so: work 2 rows and increase on the 3rd row, work 3 rows and increase on the 4th. Repeat this until the increase is complete.

See DROPS lesson: Increase or decrease 1 st on every 3rd and 4th row alternately

Should you prefer to work in the round instead of back and forth, you may of course adjust the pattern. You’ll need to add steeks mid-front (usually 5 stitches), and follow the instructions. When you would normally turn and work from the wrong side, simply work across the steek and continue in the round. At the end you’ll cut the piece open, pick up stitches to work bands, and cover the cut edges.

See DROPS video: How to knit steeks and cut open

Should you prefer to work back and forth instead of in the round, you may of course adjust the pattern so you work the pieces separately and then assemble them at the end. Divide the stitches for the body in 2, add 1 edge stitch in each side (for sewing) and work the front and back pieces separately.

See DROPS lesson: Can I adapt a pattern for circular needles into straight needles?

Pattern repeats can vary slightly in the different sizes, in order to get the correct proportions. If you’re not working the exact same size as the garment in the photo, yours might deviate slightly. This has been carefully developed and adjusted so that the complete impression of the garment is the same in all sizes.

Make sure to follow instructions and diagrams for your size!

If you have found a pattern you like which is available in women’s size it’s not very difficult to convert it to men’s size. The biggest difference will be the length of sleeves and body. Start working on the women size that you think would fit across the chest. The additional length will be worked right before you cast off for the armhole/sleeve cap. If the pattern is worked top-down you can add the length right after the armhole or before the first decrease on sleeve.

Regarding additional yarn amount, this will depend on how much length you add, but it is better with a skein too many than too few.

All yarns will have excess fibres (from production) that might come off as lint or shedding. Brushed yarns (ie hairier yarns) have more of these loose, excess fibres, causing more shedding.

Shedding also depends on what is worn under or over the garment, and whether this pulls at the yarn fibres. It’s therefore not possible to guarantee that there will be no shedding

Below are some tips on how to get the best result when working with hairier yarns:

1. When the garment is finished (before you wash it) shake it vigorously so the looser hairs come off. NOTE: do NOT use a lint roller, brush or any method that pulls at the yarn.

2. Place the garment in a plastic bag and put it in your freezer - the temperature will cause the fibres to become less attached to each other, and excess fibres will come off easier.

3. Leave in the freezer for a few hours before taking it out and shaking it again.

4. Wash the garment according to the instructions on the yarn label.

Pilling is a natural process that happens to even the most exclusive of fibers. It's a natural sign of wear and tear that is hard to avoid, and that is most visible in high friction areas of your garment like a sweater's arms and cuffs.

You can make your garment look as new by removing the pilling, using a fabric comb or a pill/lint remover.

Still can't find the answer you need? Then scroll down and leave your question so one of our experts can try to help you. This will be done normally within 5 to 10 working days.
In the meantime, you can read the questions and answers that others have left to this pattern or join the DROPS Workshop on Facebook to get help from fellow knitters/crocheters!

You might also like...

Post a comment to pattern DROPS 184-17

We would love to hear what you have to say about this pattern!

If you want to leave a question, please make sure you select the correct category in the form below, to speed up the answering process. Required fields are marked *.

Comments / Questions (2)

country flag Anna Jas wrote:

Klopt het dat voor het vest model Forest Mist maat S slechts 450 gram Alpaca Bouclé benodigd is, terwijl voor trui model Outlander ( 71 / 36) 550 gram garen nodig is? Hoe kan dit?

15.10.2018 - 13:20

country flag Bauer Jennifer wrote:

Bonjour je suis débutante et je ne sais pas si c'est adapté?

16.03.2018 - 11:53

DROPS Design answered:

Bonjour Mme Bauer, lisez attentivement les explications, consultez nos vidéos pour comprendre les différentes techniques et n'hésitez pas à poser vos questions ici si besoin. Votre magasin saura également vous apporter toute assistance complémentaire. Bon tricot!

16.03.2018 - 14:14