DROPS Fabel
DROPS Fabel
75% Wool, 25% Polyamide
from 3.00 $ /50g
Get the yarn to make this pattern from 6.00$.

The yarn cost is calculated from the pattern’s smallest size and the yarn’s cheapest product type. Looking for an even better price? You might find it on the DROPS Deals!

DROPS SS24

Queen of Hearts Socks

Socks with hearts, knitted from toe and up. Piece is knitted in DROPS Fabel.

DROPS 183-24
DROPS design: Pattern fa-384
Yarn group A
----------------------------------------------------------
Sizes: US: 5/6½ - 7½/9 - 9½/10½
EU: 35/37 - 38/40 - 41/43 .
Foot length: approx. 22-24-27 cm / 8¾"-9½"-10½"
Sock height: approx. 22 cm / 8¾"

Materials:
DROPS FABEL from Garnstudio (belongs to yarn group A)
50-50-100 g color 400, black
50-50-100 g color 916, grand canyon

Piece can also be knitted with yarn from:
"Alternative yarn (yarn group A)" - see link below.

DROPS DOUBLE POINTED NEEDLES size 2.5 mm / US 1.5 – or size needed to get 26 stitches and 34 rows in stockinette stitch = width 10 cm / 4" and 10 cm / 4" vertically.

DROPS DOUBLE POINTED NEEDLES SIZE 2 mm / US 0 for rib – or size needed to get 29 stitches and 38 rows in stockinette stitch = width 10 cm / 4" and 10 cm / 4" vertically.

-------------------------------------------------------

Alternative Yarn – See how to change yarns here
Yarn Groups A to F – Use the same pattern and change the yarn here
Yarn usage using an alternative yarn – Use our yarn converter here

-------------------------------------------------------

DROPS Fabel
DROPS Fabel
75% Wool, 25% Polyamide
from 3.00 $ /50g
Get the yarn to make this pattern from 6.00$.

The yarn cost is calculated from the pattern’s smallest size and the yarn’s cheapest product type. Looking for an even better price? You might find it on the DROPS Deals!

Pattern instructions

NOTE: This pattern is written in American English. All measurements in charts are in cm. For conversion from inches to cm - click here. There are different terms for crocheting in American and British English. If this pattern includes crochet, click for "crochet terms" here. For this pattern in British English, please click here.
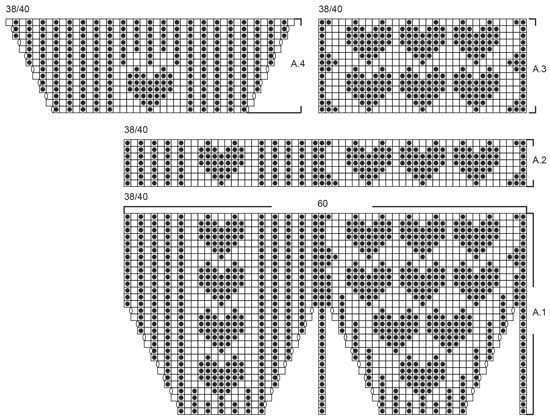
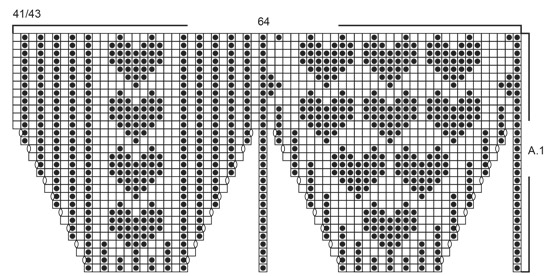
INFORMATION FOR PATTERN:

PATTERN:
See diagrams A.1 to A.4 - choose diagram for your size. Work the entire pattern in stockinette stitch.

HEEL DECREASE:
Work in stockinette stitch back and forth with pattern as before.
ROW 1 (= right side): Work until 1 stitch remains, turn piece.
ROW 2 (= wrong side): Slip first stitch purlwise, tighten yarn and work until 1 stitch remains, turn piece.
ROW 3 (= right side): Slip first stitch knitwise, tighten yarn and work until 2 stitch remains, turn piece.
ROW 4 (= wrong side): Slip first stitch purlwise, tighten yarn and work until 2 stitches remains, turn piece.
Continue short rows the same way until 17 stitches remain in the middle of row.

Continue back and forth but now work 1 stitch more for every row over heel. To avoid holes in the transitions, lift the horizontal yarn before the stitch to be knitted up and slip it twisted on the needle. Work strand tog with next stitch (from right side knit strand and stitch together and from wrong side purl strand and stitch together). Work like this until all heel stitches have been worked.

----------------------------------------------------------

SOCKS:
Worked in the round on double pointed needles from toe and up.

Cast on 28 stitches on double pointed needles size 2.5 mm / US 1.5 with black. Work diagram A.1, when diagram has been worked 1 time vertically, there are 56-60-64 stitches on round. Now continue according to diagram A.2 over all stitches until piece measures approx. 13-15-17 cm / 5"-6"-6¾" from cast-on edge, adjust after one whole repetition of A.2 vertically (if knitting gauge does not fit vertically adjust pattern when working over the other diagrams).

Work diagram A.3 over the first 29-31-33 stitches and work A.4 over the last 27-29-31 stitches. When diagrams have been worked 1 time vertically, there are 70-74-78 stitches on round. Slip the first 29-31-33 stitches on 1 stitch holder, slip the next 7 stitches on 1 new stitch holder and slip the last 7 stitches at the end of round on 1 more stitch holder (1 stitch holder with 29-31-33 stitches for foot and 2 stitch holders with 7 stitches for sides of heel).
There are 27-29-31 stitches on needle, work HEEL DECREASE - see explanation above, over these stitches.

After heel decrease continue back and forth over heel and stitches placed on stitch holder in the sides as follows: Use black and work stitch at the end of every row together with the outermost stitch of the 7 stitches on each side of heel (from right side knit the 2 stitches twisted together and from wrong side purl the 2 stitches together). Continue to work like this until all stitches from sides have been worked together with stitches from heel. NOW MEASURE PIECE FROM HERE! Slip the 29-31-33 stitches on last stitch holder back on needles = 56-60-64 stitches. Now work in the round, work A.2 over all stitches as before until piece measures approx. 10 cm / 4" - adjust after 1 whole repetition. Knit 3 rounds with black while increasing 4 stitches evenly on last round = 60-64-68 stitches. Switch to double pointed needles size 2 mm and work rib knit 2 and purl 2 until rib measures approx. 3 cm / 1". Loosely bind off stitches with knit over knit and purl over purl.
Fold cast-on edge double, use grafting/kitchener stitches and sew together opening at the front of toe. Cut the yarn and fasten. Knit another sock the same way.

Diagram

All measurements in charts are in cm.

symbols = black
symbols = grand canyon
symbols = between 2 stitches make 1 yarn over, on next round work yarn over twisted to avoid holes
diagram
diagram
diagram
diagram

Each of our patterns has specific tutorial videos to help you.

Do you have a question? See a list of frequently asked questions (FAQ)

Knitting tension is what determines the final measurements of your work, and is usually measured per 10 x 10 cm. It is provided like so: number of stitches in width x number of rows in height - eg: 19 stitches x 26 rows = 10 x 10 cm.

The knitting tension is very individual; some people knit/crochet loosely while others work tightly. You adjust the knitting tension with the needle size, which is why the suggested needle size only serve as a guide! You need to adjust this (up or down) to ensure that YOUR knitting tension matches the knitting tension provided in the pattern. If you work with a different knitting tension than provided you will have a different yarn consumption, and your work will have different measurements than what the pattern suggests.

The knitting tension also determines which yarns can replace each other. As long as you achieve the same knitting tension you can replace one yarn with another.

See DROPS lesson: How to measure your tension/gauge

See DROPS video: How to make a gauge tension swatch

The required amount of yarn is provided in grams, eg: 450 g. To calculate how many balls you’ll need you first need to know how many grams are in 1 ball (25g, 50g or 100g). This information is available if you click on the individual yarn quality on our pages. Divide the amount required with the amount of each ball. For example, if each ball is 50g (the most common amount), the calculation will be as follows: 450 / 50 = 9 balls.

The important thing when changing from one yarn to another is that the knitting/crochet tension remains the same. This is so that the measurements of the finished piece will be the same as on the sketch provided. It is easier to achieve the same knitting tension using yarns from the same yarn group. It is also possible to work with multiple strands of a thinner yarn to achieve the knitting tension of a thicker one. Please try our yarn converter. We recommend you to always work a test swatch.

Please NOTE: when changing yarn the garment might have a different look and feel to the garment in the photo, due to individual properties and qualities of each yarn.

See DROPS lesson: Can I use a different yarn than the one mentioned in the pattern?

All our yarns are categorised into yarn groups (from A to F) according to thickness and knitting tension – group A contains the thinnest yarns and group F the thickest. This makes it easier for you to find alternative yarns to our patterns, should you wish to switch yarn. All yarns within the same group have a similar knitting tension and can easily replace each other. However, different yarn qualities have different structures and properties which will give the finished work a unique look and feel.

Click here for an overview of the yarns in each yarn group

At the top of all our patterns you’ll find a link to our yarn converter, which is a helpful tool should you wish to use a different yarn than suggested. By filling in the yarn quality you wish to replace, the amount (in your size) and number of strands, the converter will present good alternative yarns with the same knitting tension. Additionally it will tell you how much you’ll require in the new qualities and whether you’ll need to work with multiple strands. Most skeins are 50g (some are 25g or 100g).

If the pattern is worked with multiple colours, every colour will have to be converted separately. Similarly, if the pattern is worked with several strands of different yarns (for example 1 strand Alpaca and 1 strand Kid-Silk) you will have to find alternatives for each, individually.

Click here to see our yarn converter

Since different yarns have different qualities and textures we have chosen to keep the original yarn in our patterns. However, you can easily find options among our available qualities by using our yarn converter, or simply pick a yarn from the same yarn group.

It is possible that some retailers still have discontinued yarns in stock, or that someone has a few skeins at home that they would like to find patterns for.

The yarn converter will provide both alternative yarn as well as required amount in the new quality.

If you think it's hard to decide what size to make, it can be a good idea to measure a garment you own already and like the size of. Then you can pick the size by comparing those measures with the ones available in the pattern's size chart.

You'll find the size chart at the bottom of the pattern.

See DROPS lesson: How to read size chart

The needle size provided in the pattern serves only as a guide, the important thing is to follow the knitting tension. And since knitting tension is very individual, you will have to adjust the needle size to ensure that YOUR tension is the same as in the pattern – maybe you’ll have to adjust 1, or even 2 needle sizes, up or down to achieve the correct tension. For this, we recommend that you work test swatches.

Should you work with a different knitting tension than the one provided, the measurements of the finished garment might deviate from the measurement sketch.

See DROPS lesson: How to measure your tension/gauge

See DROPS video: How to make a gauge tension swatch

Working a garment top-down provides more flexibility and room for personal adjustment. For example it is easier to try the garment on while working, as well as making adjustments to length of yoke and shoulder caps.

The instructions are carefully explaining every step, in the correct order. Diagrams are adjusted to the knitting direction and are worked as usual.

The diagram depicts all rows/rounds, and every stitch seen from the right side. It is read from bottom to top, from right to left. 1 square = 1 stitch.

When working back and forth, every other row is worked from the right side and every other row is worked from the wrong side. When working from the wrong side, the diagram will have to be worked reversed: from left to right, knit stitches are purled, purl stitches are knit etc.

When working in the round every round is worked from the right side and the diagram are worked from right to left on all rounds.

See DROPS lesson: How to read knitting diagrams

The diagram depicts all rows/rounds, and every stitch seen from the right side. It is worked from bottom to top, from right to left.

When working back and forth every other row is worked from the right side: from right to left and every other row is worked from the wrong side: from left to right.

When working in the round, every row in the diagram are worked from the right side, from right to left.

When working a circular diagram you start in the middle and work your way outwards, counter clockwise, row by row.

The rows usually start with a given number of chain stitches (equivalent to the height of the following stitch), this will either be depicted in the diagram or explained in the pattern.

See DROPS lesson: How to read crochet diagrams

Instructions for working several diagrams after each other on the same row/round, will often be written like so: “work A.1, A.2, A.3 a total of 0-0-2-3-4 times". This means you work A.1 once, then A.2 is worked once, and A.3 is repeated (in width) the number of times provided for your size – in this case like so: S = 0 times, M = 0 times, L=2 times, XL= 3 times and XXL = 4 times.

The diagrams are worked as usual: begin with the first row in A.1, then work the first row in A.2 etc.

See DROPS lesson: How to read knitting diagrams

See DROPS lesson: How to read crochet diagrams

The total width of the garment (from wrist-to-wrist) will be larger in the larger sizes, despite the actual sleeves being shorter. The larger sizes have longer sleeve caps and wider shoulders, so there will be a good fit in all sizes.

The measurement sketch/schematic drawing provides information regarding the full length of the garment. If it’s a jumper or a jacket the length is measured from the highest point on the shoulder (usually closest to the neckline), and straight down to the bottom of the garment. It is NOT measured from the tip of shoulder. Similarly, the length of yoke is measured from the highest point on the shoulder and down to where yoke is split into body and sleeves.

See DROPS lesson: How to read a schematic drawing

Diagrams are often repeated on the round or in height. 1 repeat is the diagram the way it appears in the pattern. If it says to work 5 repeats of A.1 in the round, then you work A.1 a total of 5 times after/next to each other in the round. If it says to work 2 repeats of A.1 vertically/in height you work the entire diagram once, then begin again at the start and work the entire diagram one more time.

Chain stitches are slightly narrower than other stitches and to avoid working the cast-on edge too tight, we simply chain more stitches to begin with. The stitch count will be adjusted on the following row to fit the pattern and measurement sketch.

The rib edge is more elastic and will contract slightly compared to, for example, stocking stitch. By increasing before the rib edge, you avoid a visible difference in width between the rib edge and the rest of the body.

It’s very easy to cast off too tightly, and by making yarn overs while casting off (and simultaneously casting these off) you avoid a too tight cast off edge.

See DROPS video: How to bind off with yarn overs (yo)

To achieve an even increase (or decrease) you can increase on, for example: every 3rd and 4th row alternately, like so: work 2 rows and increase on the 3rd row, work 3 rows and increase on the 4th. Repeat this until the increase is complete.

See DROPS lesson: Increase or decrease 1 st on every 3rd and 4th row alternately

Should you prefer to work in the round instead of back and forth, you may of course adjust the pattern. You’ll need to add steeks mid-front (usually 5 stitches), and follow the instructions. When you would normally turn and work from the wrong side, simply work across the steek and continue in the round. At the end you’ll cut the piece open, pick up stitches to work bands, and cover the cut edges.

See DROPS video: How to knit steeks and cut open

Should you prefer to work back and forth instead of in the round, you may of course adjust the pattern so you work the pieces separately and then assemble them at the end. Divide the stitches for the body in 2, add 1 edge stitch in each side (for sewing) and work the front and back pieces separately.

See DROPS lesson: Can I adapt a pattern for circular needles into straight needles?

Pattern repeats can vary slightly in the different sizes, in order to get the correct proportions. If you’re not working the exact same size as the garment in the photo, yours might deviate slightly. This has been carefully developed and adjusted so that the complete impression of the garment is the same in all sizes.

Make sure to follow instructions and diagrams for your size!

If you have found a pattern you like which is available in women’s size it’s not very difficult to convert it to men’s size. The biggest difference will be the length of sleeves and body. Start working on the women size that you think would fit across the chest. The additional length will be worked right before you cast off for the armhole/sleeve cap. If the pattern is worked top-down you can add the length right after the armhole or before the first decrease on sleeve.

Regarding additional yarn amount, this will depend on how much length you add, but it is better with a skein too many than too few.

All yarns will have excess fibres (from production) that might come off as lint or shedding. Brushed yarns (ie hairier yarns) have more of these loose, excess fibres, causing more shedding.

Shedding also depends on what is worn under or over the garment, and whether this pulls at the yarn fibres. It’s therefore not possible to guarantee that there will be no shedding

Below are some tips on how to get the best result when working with hairier yarns:

1. When the garment is finished (before you wash it) shake it vigorously so the looser hairs come off. NOTE: do NOT use a lint roller, brush or any method that pulls at the yarn.

2. Place the garment in a plastic bag and put it in your freezer - the temperature will cause the fibres to become less attached to each other, and excess fibres will come off easier.

3. Leave in the freezer for a few hours before taking it out and shaking it again.

4. Wash the garment according to the instructions on the yarn label.

Pilling is a natural process that happens to even the most exclusive of fibers. It's a natural sign of wear and tear that is hard to avoid, and that is most visible in high friction areas of your garment like a sweater's arms and cuffs.

You can make your garment look as new by removing the pilling, using a fabric comb or a pill/lint remover.

Still can't find the answer you need? Then scroll down and leave your question so one of our experts can try to help you. This will be done normally within 5 to 10 working days.
In the meantime, you can read the questions and answers that others have left to this pattern or join the DROPS Workshop on Facebook to get help from fellow knitters/crocheters!

You might also like...

Post a comment to pattern DROPS 183-24

We would love to hear what you have to say about this pattern!

If you want to leave a question, please make sure you select the correct category in the form below, to speed up the answering process. Required fields are marked *.

Comments / Questions (20)

country flag Ingela wrote:

Skulle gärna vilja sticka de här strumporna. Men garnet Fabel Longprint Grand Canyon nr 916 har tydligen utgått. Vad kan jag ersätta det med för garn som har samma egenskaper som Fabels longprint-garn? Har försökt använda garnkonverteraren, men inte lyckats få fram något ersättningsgarn. Tacksam för hjälp

18.01.2024 - 18:48

DROPS Design answered:

Hej Ingela, jo du kan ersätta DROPS Fabel 916 med färg 310 som också är röd/orange: DROPS Fabel

19.01.2024 - 10:56

country flag Flo wrote:

Bonjour Je ne comprends pas pourquoi il y a des lignes verticales en plus en jacquard entre le dessus et le dessous du pied (sur le côté) alors qu’on ne retrouve pas ces lignes supplémentaires sur le diagramme. Pouvez vous m’expliquer d’où elles viennent? Merci.

09.01.2024 - 08:17

DROPS Design answered:

Bonjour Flo, sauf si je comprends mal votre question, les rayures verticales de chaque côté du pied sont celles dans la 2ème partie de A.2 et dans A.4. Bon tricot!

09.01.2024 - 08:59

country flag Jutta wrote:

Leider gibt es die Farbe Grand Canyon nicht mehr. Welche Farben kann man nehmen, um die Herzchen farblich so schön zu bekommen?

29.11.2023 - 10:03

DROPS Design answered:

Liebe Jutta, gerne können Sie eine andere Farbe Fabel oder von einer anderen Wolle der Garngruppe A - Ihr DROPS Laden kann Ihnen gerne -auch per Telefon oder per E-Mail- weiterhelfen. Viel Spaß beim stricken!

29.11.2023 - 14:13

country flag Gaetane wrote:

Bonjour, je ne comprends toujours pas votre transition de maille relever entre le talon et le dessus du pied, j en ai fait beaucoup de bas tricoter et c est la 1 ère fois que je lit cette technique! Dur à saisir ! Auriez vous un vidéo pour votre technique? Merci de votre patience envers moi suis désolé! Mais je veut vraiment réussir à saisir ,j aimes ce modèle ! Voilà ! Merci 🙏

15.08.2023 - 13:37

DROPS Design answered:

Bonjour Gaetane, bien sûr, c'est la même technique que celle utilisée dans cette vidéo, relever le fil entre les mailles sur l'aiguille et les mailles en attente de chaque côté du talon et le tricoter torse avec la maille suivante/précédente, va permettre d'éviter un trou. Vous pouvez également refermer ce petit trou en faisant quelques points à la fin. Bon tricot!

15.08.2023 - 16:06

country flag Gaetane wrote:

Bonjour , lorsqu’on a terminé le talon, au moment de reprendre les 29 m, , on ne relève aucune maille du côté? Pour rejoindre les 29 m ? Ça fait un trou ! 🤔🤔 On procède comment ? Merci 🙏

14.08.2023 - 20:26

DROPS Design answered:

Bonjour Gaetane, vous pouvez relever 1 maille à la transition entre le talon et les mailles en attente et tricotez cette maille torse avec la maille suivante (la 1ère du dessus du pied) et, de l'autre côté, relevez 1 maille après les mailles en attente et tricote la dernière de ces mailles avec cette maille relevée. Bon tricot!

15.08.2023 - 09:05

country flag Gaetane wrote:

Bonjour , concernant le vidéo des diminutions du talon, je saisi pas : après qu on a 5 m, de chaque côté, sur le vidéo c est 6 m et où place t on le marqueur moi j ai 17 m au centre et le vidéo 8m , je comprends pas ça merci 🙏

14.08.2023 - 15:21

DROPS Design answered:

Bonjour Gaetane, dans la vidéo, on ne tricote pas sur le même nombre de mailles, cette vidéo montre juste la technique, suivez bien les indications du modèles que vous réalisez, donc en l'occurrence vous devez avoir bien 17 mailles au centre avant de reprendre les mailles une à une à la fin de chaque rang. Bon tricot!

14.08.2023 - 15:59

country flag Gaetane wrote:

Bonjour , je saisi pas trop cet étape la : . Tricoter ce fil ensemble avec la maille suivante (sur l'endroit, tricoter ensemble à l'endroit le fil et la maille et sur l'envers, tricoter ensemble à l'envers le fil et la maille).? Qu entendez vous par fil et.. merci 🙏 serait-ce les mailles glissées?

18.06.2023 - 14:49

DROPS Design answered:

Bonjour Gaetane, dans cette vidéo, nous montrons comment tricoter ce type de talon en diagonale et comment tricoter la 2ème partie du talon, à partir du time code 3:42, puis au time code 4:04 comment relever le fil sur l'endroit pour le tricoter avec la maille suivante et au time code 5:25 comment relever le fil sur l'envers pour le tricoter avec la maille suivante. Bon tricot!

19.06.2023 - 09:05

country flag Gaetane wrote:

Très joli ce modèle merci 🙏 peut on le faire avec aiguilles circulaires? Vu qu on tricote en rond ? 🙏😊

14.06.2023 - 14:00

DROPS Design answered:

Bonjour Gaetane, tout à fait, mais il vous faudra utiliser la technique du magic loop. Bon tricot!

14.06.2023 - 14:21

country flag Gaetane wrote:

Bonjour . Comment faire le jeté? Et comment tricoter le jeté torse ? Merci 🙏

13.06.2023 - 14:55

DROPS Design answered:

Bonjour Gaetane, dans cette vidéo, nous montrons comment faire 1 jeté et comment le tricoter torse au rang suivant (= dans le brin arrière au lieu du brin avant); dans la vidéo, on tricote en rangs, ici, vous tricoterez en rond, autrement dit, tricotez le jeté à l'endroit, dans le brin arrière au lieu du brin avant. Bon tricot!

13.06.2023 - 16:06

country flag Svitlana Schneider wrote:

Vielen Dank für die Antwort, können Sie mit noch die Sache mit verkürzen Reihen beschreiben..aus einer Masche entsteht 2 ,was mach ich mit den Maschen beim zurück stricken ?leider verstehe ich es nicht. Vielen herzlichen Dank in voraus glg Svitlana

19.01.2023 - 11:26

DROPS Design answered:

Liebe Frau Schneider, die verkürzten Reihen der Ferse werden so gestrickt: am Ende jeder Reihe lassen Sie 1 Maschen ungearbeitet, wenden Sie dann die nächste Reihe genau so stricken (es sind je 1 Masche beidseitig nicht gestrickt), diese 2 Reihe wiederholen bis 17 Maschn gestrickt werden, dann am Ende jeder Reihe stricken Sie 1 Masche mehr bis alle Maschen gestrickt werden. Siehe auch dieses Video. Viel Spaß beim stricken!

19.01.2023 - 11:30