DROPS Kid-Silk
DROPS Kid-Silk
75% Mohair, 25% Silk
from 6.75 $ /25g
DROPS Lace
DROPS Lace
70% Alpaca, 30% Silk
Discontinued
find alternatives
DROPS SS24

Hot Coal

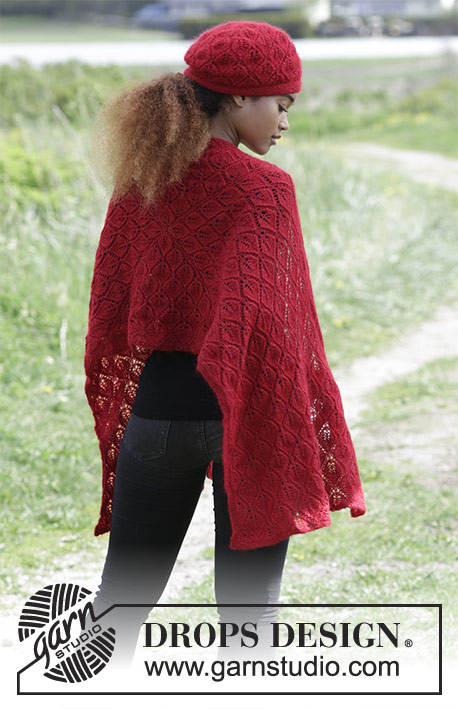
Set consists of: Knitted scarf and hat with lace pattern. Set is worked in DROPS Lace and DROPS Kid-Silk.

DROPS 183-7
DROPS design: Pattern la-034
Yarn group A + A
----------------------------------------------------------
For entire set use approx. 150 g DROPS Lace and 150 g DROPS Kid-Silk.
----------------------------------------------------------

SCARF:
Measurements: Length: approx. 154 cm / 60½" Width: approx. 50 cm / 19¾"
Materials:
DROPS LACE from Garnstudio (belongs to yarn group A)
150 g color 3620, red
And use:
DROPS KID-SILK from Garnstudio (belongs to yarn group A)
150 g color 14, red

Piece can also be knitted with yarn from:
"Alternative yarn (yarn group A)" - see link below.

DROPS DOUBLE POINTED NEEDLES AND CIRCULAR NEEDLE (60 or 80 cm / 24" or 32") SIZE 3 mm/US 2.5 – or size needed to get 24 stitches and 32 rows in stockinette stitch with 1 strand of each quality = width 10 cm / 4" and 10 cm / 4" vertically.
----------------------------------------------------------

HAT:
Size: One-size
Head circumference: approx. 56/58 cm / 22"/22¾"
Materials:
DROPS LACE from Garnstudio (belongs to yarn group A)
50 g color 3620, red
And use:
DROPS KID-SILK from Garnstudio (belongs to yarn group A)
25 g color 14, red

Piece can also be knitted with yarn from:
"Alternative yarn (yarn group A)" - see link below.

DROPS DOUBLE POINTED NEEDLES AND CIRCULAR NEEDLE (40 cm / 16") SIZE 3 mm/US 2.5 – or size needed to get 24 stitches and 32 rows in stockinette stitch with 1 strand of each quality = width 10 cm / 4" and 10 cm / 4" vertically.

-------------------------------------------------------

Alternative Yarn – See how to change yarns here
Yarn Groups A to F – Use the same pattern and change the yarn here
Yarn usage using an alternative yarn – Use our yarn converter here

-------------------------------------------------------

DROPS Kid-Silk
DROPS Kid-Silk
75% Mohair, 25% Silk
from 6.75 $ /25g
DROPS Lace
DROPS Lace
70% Alpaca, 30% Silk
Discontinued
find alternatives

Pattern instructions

NOTE: This pattern is written in American English. All measurements in charts are in cm. For conversion from inches to cm - click here. There are different terms for crocheting in American and British English. If this pattern includes crochet, click for "crochet terms" here. For this pattern in British English, please click here.
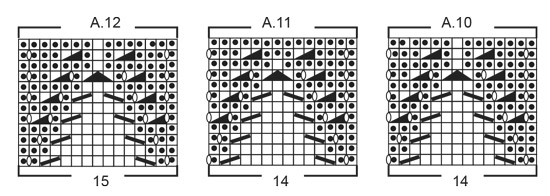
INFORMATION FOR PATTERN:

GARTER STITCH (back and forth):
1 ridge = knit 2 rows.

GARTER STITCH (worked in the round):
1 ridge = 2 rounds. Knit 1 round and purl 1 round.

PATTERN:
Scarf: See diagrams A.1 to A.12.
Hat: See diagrams A.1 and A.13 to A.15.
Diagrams show all rows in pattern seen from the right side.

BIND-OFF TIP:
To avoid a tight bind-off edge you may use a needle ½ size larger.
----------------------------------------------------------

SCARF:
Worked in the round in a square on double pointed needles/circular needle, begin from the middle of scarf. When square is done, the width of scarf is done and bind off in 2 of the sides. Then work back and forth out to each of the 2 other sides.

Cast on 12 stitches on double pointed needles size 3 mm / US 2.5 with 1 strand Lace and 1 strand Kid-Silk (= 2 strands). * Knit 1, 1 yarn over, knit 1, purl 1 *, work from *-* 4 times in total on round (on next round work yarn overs twisted to avoid holes) = 16 stitches. Work pattern in the round according to diagram A.1 4 times in total on round - read PATTERN above. Switch to circular needle when needed. REMEMBER THE GAUGE! When entire diagram A.1 has been worked, there are 128 stitches on round.
Insert 4 markers without working as follows: Insert first marker at beginning of round, insert second marker after 32 stitches, insert third marker after 32 stitches and insert 4th marker after 32 stitches, move markers upwards when working.
Now work pattern as follows: Work * A.2 (= 2 stitches), A.3 over the next 28 stitches (= 2 repetitions of 14 stitches) and A.4 (= 2 stitches) *, work from *-* 4 times in total on round. When A.2/A.3/A.4 are done vertically, there are 60 stitches between each marker (= 240 stitches on round).
Now work pattern as follows: Work * A.2 (= 2 stitches), A.3 over the next 56 stitches (= 4 repetitions of 14 stitches) and A.4 (= 2 stitches) *, work from *-* 4 times in total on round. When A.2/A.3/A.4 are done vertically, there are 88 stitches between each marker (= 352 stitches on round).
Now work pattern as follows: Work * A.2 (= 2 stitches), A.3 over the next 84 stitches (= 6 repetitions of 14 stitches) and A.4 (= 2 stitches) *, work from *-* 4 times in total on round. Continue this pattern to and with 12th round (= round with arrow in diagrams). There are now 102 stitches between each marker (= 408 stitches on round).
Then work pattern as follows: * continue on 13th round in A.2/A.3/A.4 until next marker, work A.5 (= 9 stitches), A.6 over the next 84 stitches (= 6 repetitions of 14 stitches), A.7 (= 9 stitches), marker *, work from *-* 2 times in total. Continue this pattern until 2 rounds remain in diagrams. Work next round in pattern but skip the first 2 yarn overs in A.2 and skip last yarn over in A.4 (see star in diagrams).
Work last round in pattern as follows: NOTE! Skip the first 2 squares in A.2 and skip last square in A.4 - work from first to second marker and slip the 113 stitches on 1 stitch holder (= part-1), work until third marker and slip the 113 stitches on 1 stitch holder (= side), work until fourth marker and slip the 113 stitches on 1 stitch holder (= part- 2), work until first marker = 113 stitches on needle (= side). Work rib (= knit 1/purl 1) with 1 edge stitch in garter stitch in each side over these stitches for 1½ cm / ½". Loosely bind off - read BIND-OFF TIP above. Slip the 113 stitches from the other side (= from second to third marker) on circular needle size 3 mm / US 2.5. Begin from wrong side and work rib (= knit 1/purl 1) with 1 edge stitch in garter stitch in each side over these stitches for 1½ cm / ½". Loosely bind off. Square measures approx. 50 cm / 19¾" in width and 47 cm / 18½" vertically.

PART-1:
Work piece back and forth on circular needle.
Slip the 113 stitches from part-1 on circular needle size 3 mm / US 2.5 and insert 1 marker - NOW MEASURE PIECE FROM HERE! Beginning from right side and work as follows: Pick up 4 stitches at the edge of ridges on the side, work A.8 (= 14 stitches), work A.3 over the next 84 stitches (= 6 repetitions of 14 stitches), work A.9 (= 15 stitches) and pick up 4 stitches in the side of ridges on the side = 121 stitches. Continue the 4 stitches in each side in garter stitch. Continue this pattern until piece measures approx. 47 cm / 18½", adjust after one whole repetition vertically.
Now work pattern as follows from right side: Work 4 stitches in garter stitch, A.10 (= 14 stitches), A.11 over the next 84 stitches (= 6 repetitions of 14 stitches), A.12 (= 15 stitches) and 4 stitches in garter stitch. When diagram is done vertically, work 2 ridges and loosely bind off. Piece measures approx. 52 cm / 20½".

PART-2:
Work as part-1. I.e. slip the 113 stitches from part-2 on circular needle size 3 mm / US 2.5 and insert 1 marker. Begin by picking up stitches in the side of ridges and work pattern as on part-1.

----------------------------------------------------------

HAT:
Work hat in the round in a square on double pointed needles/a short circular needle, top down.
Cast on 12 stitches on double pointed needles size 3 mm / US 2.5 with 1 strand Lace and 1 strand Kid-Silk (= 2 strands). * Knit 1, 1 yarn over, knit 1, purl 1 *, work from *-* 4 times in total on round (on next round work yarn overs twisted to avoid holes) = 16 stitches. Work pattern in the round according to diagram A.1 4 times in total on round - read PATTERN above. Switch to circular needle when needed. REMEMBER THE GAUGE! When entire diagrams A.1 has been worked, there are 128 stitches on round. Now work pattern as follows: Work * A.13 (= 3 stitches), A.14 (= 14 stitches) and A.15 (= 15 stitches) *, work from *-* 4 times in total on round. When diagrams have been worked vertically, there are 168 stitches on needle. Displace the beginning of the round 1 stitch to the left. Then work pattern as follows: Work A.14 over all stitches (= 12 repetitions of 14 stitches). Work diagram 1 time vertically. Knit 1 round while at the same time decreasing 46 stitches evenly = 122 stitches. Work in GARTER STITCH - see explanation above, for 3 cm / 1" and loosely bind off - read BIND-OFF TIP above. Piece measures approx. 24 cm / 9½".

This pattern has been corrected.

Updated online: 28.01.2019
Correction - SCARF: Then work pattern as follows: * continue on 13th round in A.2/A.3/A.4 until next marker, work A.5 (= 9 stitches), A.6 over the next 84 stitches (= 6 repetitions of 14 stitches), A.7 (= 9 stitches), marker *, work from *-* 2 times in total.
Updated online: 28.09.2023
Correction in diagrams A.13 and A.15 from 12th row.

Diagram

All measurements in charts are in cm.

symbols = knit from the right side, purl from the wrong side
symbols = purl from the right side, knit from the wrong side
symbols = knit 2 together
symbols = slip 1 stitch knitwise, knit 1, pass slipped stitch over stitch worked
symbols = purl 2 together
symbols = slip 1 stitch knitwise, knit 2 stitches together, pass slipped stitch over stitches worked together
symbols = between 2 stitches make 1 yarn over
symbols = this refers to the last 2 round in pattern
diagram
diagram
diagram
diagram

Each of our patterns has specific tutorial videos to help you.

Do you have a question? See a list of frequently asked questions (FAQ)

Knitting tension is what determines the final measurements of your work, and is usually measured per 10 x 10 cm. It is provided like so: number of stitches in width x number of rows in height - eg: 19 stitches x 26 rows = 10 x 10 cm.

The knitting tension is very individual; some people knit/crochet loosely while others work tightly. You adjust the knitting tension with the needle size, which is why the suggested needle size only serve as a guide! You need to adjust this (up or down) to ensure that YOUR knitting tension matches the knitting tension provided in the pattern. If you work with a different knitting tension than provided you will have a different yarn consumption, and your work will have different measurements than what the pattern suggests.

The knitting tension also determines which yarns can replace each other. As long as you achieve the same knitting tension you can replace one yarn with another.

See DROPS lesson: How to measure your tension/gauge

See DROPS video: How to make a gauge tension swatch

The required amount of yarn is provided in grams, eg: 450 g. To calculate how many balls you’ll need you first need to know how many grams are in 1 ball (25g, 50g or 100g). This information is available if you click on the individual yarn quality on our pages. Divide the amount required with the amount of each ball. For example, if each ball is 50g (the most common amount), the calculation will be as follows: 450 / 50 = 9 balls.

The important thing when changing from one yarn to another is that the knitting/crochet tension remains the same. This is so that the measurements of the finished piece will be the same as on the sketch provided. It is easier to achieve the same knitting tension using yarns from the same yarn group. It is also possible to work with multiple strands of a thinner yarn to achieve the knitting tension of a thicker one. Please try our yarn converter. We recommend you to always work a test swatch.

Please NOTE: when changing yarn the garment might have a different look and feel to the garment in the photo, due to individual properties and qualities of each yarn.

See DROPS lesson: Can I use a different yarn than the one mentioned in the pattern?

All our yarns are categorised into yarn groups (from A to F) according to thickness and knitting tension – group A contains the thinnest yarns and group F the thickest. This makes it easier for you to find alternative yarns to our patterns, should you wish to switch yarn. All yarns within the same group have a similar knitting tension and can easily replace each other. However, different yarn qualities have different structures and properties which will give the finished work a unique look and feel.

Click here for an overview of the yarns in each yarn group

At the top of all our patterns you’ll find a link to our yarn converter, which is a helpful tool should you wish to use a different yarn than suggested. By filling in the yarn quality you wish to replace, the amount (in your size) and number of strands, the converter will present good alternative yarns with the same knitting tension. Additionally it will tell you how much you’ll require in the new qualities and whether you’ll need to work with multiple strands. Most skeins are 50g (some are 25g or 100g).

If the pattern is worked with multiple colours, every colour will have to be converted separately. Similarly, if the pattern is worked with several strands of different yarns (for example 1 strand Alpaca and 1 strand Kid-Silk) you will have to find alternatives for each, individually.

Click here to see our yarn converter

Since different yarns have different qualities and textures we have chosen to keep the original yarn in our patterns. However, you can easily find options among our available qualities by using our yarn converter, or simply pick a yarn from the same yarn group.

It is possible that some retailers still have discontinued yarns in stock, or that someone has a few skeins at home that they would like to find patterns for.

The yarn converter will provide both alternative yarn as well as required amount in the new quality.

If you think it's hard to decide what size to make, it can be a good idea to measure a garment you own already and like the size of. Then you can pick the size by comparing those measures with the ones available in the pattern's size chart.

You'll find the size chart at the bottom of the pattern.

See DROPS lesson: How to read size chart

The needle size provided in the pattern serves only as a guide, the important thing is to follow the knitting tension. And since knitting tension is very individual, you will have to adjust the needle size to ensure that YOUR tension is the same as in the pattern – maybe you’ll have to adjust 1, or even 2 needle sizes, up or down to achieve the correct tension. For this, we recommend that you work test swatches.

Should you work with a different knitting tension than the one provided, the measurements of the finished garment might deviate from the measurement sketch.

See DROPS lesson: How to measure your tension/gauge

See DROPS video: How to make a gauge tension swatch

Working a garment top-down provides more flexibility and room for personal adjustment. For example it is easier to try the garment on while working, as well as making adjustments to length of yoke and shoulder caps.

The instructions are carefully explaining every step, in the correct order. Diagrams are adjusted to the knitting direction and are worked as usual.

The diagram depicts all rows/rounds, and every stitch seen from the right side. It is read from bottom to top, from right to left. 1 square = 1 stitch.

When working back and forth, every other row is worked from the right side and every other row is worked from the wrong side. When working from the wrong side, the diagram will have to be worked reversed: from left to right, knit stitches are purled, purl stitches are knit etc.

When working in the round every round is worked from the right side and the diagram are worked from right to left on all rounds.

See DROPS lesson: How to read knitting diagrams

The diagram depicts all rows/rounds, and every stitch seen from the right side. It is worked from bottom to top, from right to left.

When working back and forth every other row is worked from the right side: from right to left and every other row is worked from the wrong side: from left to right.

When working in the round, every row in the diagram are worked from the right side, from right to left.

When working a circular diagram you start in the middle and work your way outwards, counter clockwise, row by row.

The rows usually start with a given number of chain stitches (equivalent to the height of the following stitch), this will either be depicted in the diagram or explained in the pattern.

See DROPS lesson: How to read crochet diagrams

Instructions for working several diagrams after each other on the same row/round, will often be written like so: “work A.1, A.2, A.3 a total of 0-0-2-3-4 times". This means you work A.1 once, then A.2 is worked once, and A.3 is repeated (in width) the number of times provided for your size – in this case like so: S = 0 times, M = 0 times, L=2 times, XL= 3 times and XXL = 4 times.

The diagrams are worked as usual: begin with the first row in A.1, then work the first row in A.2 etc.

See DROPS lesson: How to read knitting diagrams

See DROPS lesson: How to read crochet diagrams

The total width of the garment (from wrist-to-wrist) will be larger in the larger sizes, despite the actual sleeves being shorter. The larger sizes have longer sleeve caps and wider shoulders, so there will be a good fit in all sizes.

The measurement sketch/schematic drawing provides information regarding the full length of the garment. If it’s a jumper or a jacket the length is measured from the highest point on the shoulder (usually closest to the neckline), and straight down to the bottom of the garment. It is NOT measured from the tip of shoulder. Similarly, the length of yoke is measured from the highest point on the shoulder and down to where yoke is split into body and sleeves.

See DROPS lesson: How to read a schematic drawing

Diagrams are often repeated on the round or in height. 1 repeat is the diagram the way it appears in the pattern. If it says to work 5 repeats of A.1 in the round, then you work A.1 a total of 5 times after/next to each other in the round. If it says to work 2 repeats of A.1 vertically/in height you work the entire diagram once, then begin again at the start and work the entire diagram one more time.

Chain stitches are slightly narrower than other stitches and to avoid working the cast-on edge too tight, we simply chain more stitches to begin with. The stitch count will be adjusted on the following row to fit the pattern and measurement sketch.

The rib edge is more elastic and will contract slightly compared to, for example, stocking stitch. By increasing before the rib edge, you avoid a visible difference in width between the rib edge and the rest of the body.

It’s very easy to cast off too tightly, and by making yarn overs while casting off (and simultaneously casting these off) you avoid a too tight cast off edge.

See DROPS video: How to bind off with yarn overs (yo)

To achieve an even increase (or decrease) you can increase on, for example: every 3rd and 4th row alternately, like so: work 2 rows and increase on the 3rd row, work 3 rows and increase on the 4th. Repeat this until the increase is complete.

See DROPS lesson: Increase or decrease 1 st on every 3rd and 4th row alternately

Should you prefer to work in the round instead of back and forth, you may of course adjust the pattern. You’ll need to add steeks mid-front (usually 5 stitches), and follow the instructions. When you would normally turn and work from the wrong side, simply work across the steek and continue in the round. At the end you’ll cut the piece open, pick up stitches to work bands, and cover the cut edges.

See DROPS video: How to knit steeks and cut open

Should you prefer to work back and forth instead of in the round, you may of course adjust the pattern so you work the pieces separately and then assemble them at the end. Divide the stitches for the body in 2, add 1 edge stitch in each side (for sewing) and work the front and back pieces separately.

See DROPS lesson: Can I adapt a pattern for circular needles into straight needles?

Pattern repeats can vary slightly in the different sizes, in order to get the correct proportions. If you’re not working the exact same size as the garment in the photo, yours might deviate slightly. This has been carefully developed and adjusted so that the complete impression of the garment is the same in all sizes.

Make sure to follow instructions and diagrams for your size!

If you have found a pattern you like which is available in women’s size it’s not very difficult to convert it to men’s size. The biggest difference will be the length of sleeves and body. Start working on the women size that you think would fit across the chest. The additional length will be worked right before you cast off for the armhole/sleeve cap. If the pattern is worked top-down you can add the length right after the armhole or before the first decrease on sleeve.

Regarding additional yarn amount, this will depend on how much length you add, but it is better with a skein too many than too few.

All yarns will have excess fibres (from production) that might come off as lint or shedding. Brushed yarns (ie hairier yarns) have more of these loose, excess fibres, causing more shedding.

Shedding also depends on what is worn under or over the garment, and whether this pulls at the yarn fibres. It’s therefore not possible to guarantee that there will be no shedding

Below are some tips on how to get the best result when working with hairier yarns:

1. When the garment is finished (before you wash it) shake it vigorously so the looser hairs come off. NOTE: do NOT use a lint roller, brush or any method that pulls at the yarn.

2. Place the garment in a plastic bag and put it in your freezer - the temperature will cause the fibres to become less attached to each other, and excess fibres will come off easier.

3. Leave in the freezer for a few hours before taking it out and shaking it again.

4. Wash the garment according to the instructions on the yarn label.

Pilling is a natural process that happens to even the most exclusive of fibers. It's a natural sign of wear and tear that is hard to avoid, and that is most visible in high friction areas of your garment like a sweater's arms and cuffs.

You can make your garment look as new by removing the pilling, using a fabric comb or a pill/lint remover.

Still can't find the answer you need? Then scroll down and leave your question so one of our experts can try to help you. This will be done normally within 5 to 10 working days.
In the meantime, you can read the questions and answers that others have left to this pattern or join the DROPS Workshop on Facebook to get help from fellow knitters/crocheters!

You might also like...

Coal hot

Marina, Italy

Hot Coal

Sonja, Germany

Post a comment to pattern DROPS 183-7

We would love to hear what you have to say about this pattern!

If you want to leave a question, please make sure you select the correct category in the form below, to speed up the answering process. Required fields are marked *.

Comments / Questions (37)

country flag Martine CALLE wrote:

Re Bonjour Je vous remercie pour votre réponse si rapide et attend avec impatience la solution car ce modèle est très agréable à tricoter , de plus c'est un cadeau pour ma fille qui a flashé sur l'ensemble ps j'ai lu les commentaires sur l'écharpe avant que je me lance avez vous une version corrigée ?? encore merci martine

23.02.2021 - 10:55

DROPS Design answered:

Bonjour Mme Calle, la correction date de 2019, si vous venez d'imprimer les explications, le modèle et les diagrammes sont justes. Bon tricot!

23.02.2021 - 12:34

country flag Callé Martine wrote:

Je suis en panne sur le bonnet , je suis bloquée sur la 12eme ligne du groupe 13 -14 -15 qui ne correspond pas au nombre de mailles ni au profil du dessin pouvez vous me dépanner assez vite merci d'avance

23.02.2021 - 08:36

DROPS Design answered:

Bonjour Mme Callé, effectivement, il semble y avoir un jeté en trop dans A.15, nos stylistes vont vérifier le diagramme dès que possible. Merci d'avance pour votre patience.

23.02.2021 - 09:12

country flag Barbara wrote:

Hallo, bei den letzten beiden Runden im Quadrat sollten sie beiden Umschläge am Anfang und am Ende A2 und A4 nicht gestrickt werden. Was ist mit den beiden Abschnitten, auf denen ich A5 und A7 stricke? Sollen die 3 Umschläge da auch weggelassen werden? Danke für die Antwort schon mal! Barbara

27.01.2021 - 09:07

DROPS Design answered:

Liebe Barbara, die Maschen zwischen den 2. und 3. Markierer werden im Bündchen gestrickt. dh wie die letzten 113 letzten Maschen. Der Tuch wird dann in 2 Teile von den Maschen in A.2-A.4 weiter gestrickt. Viel Spaß beim stricken!

27.01.2021 - 13:08

country flag Doreen wrote:

Hallo. In der Anleitung zum Schal steht gleich am Anfang, dass man die Umschläge im der Rückrunde verschränkt stricken soll, um Löcher zu vermeiden. Ist das nur für die erste Runde oder in jeder Runde nach Umschlägen?

14.12.2020 - 13:12

DROPS Design answered:

Liebe Doreen, ja genau, nur die Umschläge der 1. Runde werden verschränkt gestrickt, die Umschläge von Diagrammen werden ganz "normal" gestrickt, um das Loch- bzw Blättermuster zu bilden. Viel Spaß beim stricken!

14.12.2020 - 13:39

country flag Delavaquerie wrote:

Bonjour, Je veux juste me servir de ce modèle pour reproduire le motif pour un pull. Quel diagramme choisir pour avoir le motif complet ? Merci d'avance. Bien cordialement. Annie

25.11.2020 - 18:13

DROPS Design answered:

Bonjour Annie, tout dépend de votre tension, de la taille, de la forme, des mesures etc... vous trouverez ici différents modèles de pulls au point de feuilles, ils pourront probablement vous inspirer. Bon tricot!

26.11.2020 - 09:42

country flag Bianca Van Den Meiracker wrote:

Dank U, door het weglaten van de omslagen zoals u ook aangeeft, heb ik de muts succesvol gebreidf.

19.11.2020 - 14:11

country flag Bianca Vd Meiracker wrote:

Ik heb de eerste en laatste omslag weggelaten. Ik hoop dat daarmee het probleem opgelost wordt.

05.11.2020 - 19:02

country flag Bianca Vd Meiracker wrote:

Bij de muts klopt het schema nie in A15. Dat is twee keer eerder opgemerkt, bij 1 ontkent u dat. Ik weet niet hoe verder. In tour 11 eindigt,zoals alle naalden,op een omslag en een averecht stk. In nld 12, komen de laatste omslag en averechts steek van A15 niet meer voor. In totaal v a n A13,14 en 15, geteld in nld 11 is 44stk. nld 12 42stk. HELP svp. Dank u, de sjaal heb ik al gemaakt en is prachtig!

05.11.2020 - 18:46

DROPS Design answered:

Dag Bianca,

De telpatronen heb ik nog eens grondig nagekeken en ik denk dat er inderdaad iets niet klopt op de 11e toer. Mijn idee is dat de eerste omslag van A.13 en de laatste omslag van A.15 moet komen te vervallen. Dit heb ik doorgegeven aan de ontwerpafdeling ter controle, dus ik hoop dat er spoedig een correctie op het patroon komt, zodat je verder kunt.

19.11.2020 - 11:12

country flag Deborah Gueganton wrote:

How many balls of this yarn to make a shawl like this please? Thank you

19.03.2020 - 11:03

DROPS Design answered:

Dear Mrs Gueganton, you will find required yarn amount under header - read more here. Happy knitting!

19.03.2020 - 11:53

country flag Hanneke wrote:

Ben wel teleurgesteld dat ik geen antwoord heb gekregen op mijn vraag van 14-12-19. Heb het zelf opgelost. In naald 21 brei ik nu de eerste 2 steken van A8 samen en de laatste 2 steken van A9 ook (1 afhalen, 1 recht, overhalen). Dan staan er aan het eind weer 113 steken op de naald (rand van ribbels niet meegerekend). Let op, dit geldt dus alleen voor deel 1 en deel 2 van de sjaal als je A8, A3, A9 aan het breien bent.

18.01.2020 - 09:42