-------------------------------------------------------
Alternative Yarn – See how to change yarns here
Yarn Groups A to F – Use the same pattern and change the yarn here
Yarn usage using an alternative yarn – Use our yarn converter here
-------------------------------------------------------
This pattern has been corrected. Click here to see the correction/s.
= = knit from the right side, purl from the wrong side | |
= between 2 stitches make 1 yarn over. On next row purl yarn over to make holes. | |
= between 2 stitches make 1 yarn over. On next row purl yarn over twisted to avoid hole. | |
= knit 2 together | |
= slip 1 stitch knitwise, knit 1, pass slipped stitch over | |
= slip 1 stitch kbitwise, knit 2 stitches together, pass slipped stitch over |
Each of our patterns has specific tutorial videos to help you.
These step-by-step tutorials might also help you:
Why is the knitting/crochet tension so important?
Knitting tension is what determines the final measurements of your work, and is usually measured per 10 x 10 cm. It is provided like so: number of stitches in width x number of rows in height - eg: 19 stitches x 26 rows = 10 x 10 cm.
The knitting tension is very individual; some people knit/crochet loosely while others work tightly. You adjust the knitting tension with the needle size, which is why the suggested needle size is only meant as a guide! You need to adjust this (up or down) to ensure that YOUR knitting tension matches the knitting tension provided in the pattern. If you work with a different knitting tension than provided you will have a different yarn consumption, and your work will have different measurements than what the pattern suggests.
The knitting tension also determines which yarns can replace each other. As long as you achieve the same knitting tension you can replace one yarn with another.
See DROPS lesson: How to measure your tension/gauge
See DROPS video: How to make a gauge tension swatch
How do I know how many balls of yarn I need?
The required amount of yarn is provided in grams, eg: 450 g. To calculate how many balls you’ll need you first need to know how many grams are in 1 ball (25g, 50g or 100g). This information is available if you click on the individual yarn quality on our pages. Divide the amount required with the amount of each ball. For example, if each ball is 50g (the most common amount), the calculation will be as follows: 450 / 50 = 9 balls.
Can I use a different yarn than what the pattern suggests?
The important thing when changing from one yarn to another is that the knitting/crochet tension remains the same. This is so that the measurements of the finished piece will be the same as on the sketch provided. It is easier to achieve the same knitting tension using yarns from the same yarn group. It is also possible to work with multiple strands of a thinner yarn to achieve the knitting tension of a thicker one. Please try our yarn converter. We recommend you to always work a test swatch.
Please NOTE: when changing yarn the garment might have a different look and feel to the garment in the photo, due to individual properties and qualities of each yarn.
See DROPS lesson: Can I use a different yarn than the one mentioned in the pattern?
What are the yarn groups?
All our yarns are categorised into yarn groups (from A to F) according to thickness and knitting tension – group A contains the thinnest yarns and group F the thickest. This makes it easier for you to find alternative yarns to our patterns, should you wish to switch yarn. All yarns within the same group have a similar knitting tension and can easily replace each other. However, different yarn qualities have different structures and properties which will give the finished work a unique look and feel.
How do I use the yarn calculator?
At the top of all our patterns you’ll find a link to our yarn calculator, which is a helpful tool should you wish to use a different yarn than suggested. By filling in the yarn quality you wish to replace, the amount (in your size) and number of strands, the calculator will present good alternative yarns with the same knitting tension. Additionally it will tell you how much you’ll require in the new qualities and whether you’ll need to work with multiple strands. Most skeins are 50g (some are 25g or 100g).
If the pattern is worked with multiple colours, every colour will have to be calculated separately. Similarly, if the pattern is worked with several strands of different yarns (for example 1 strand Alpaca and 1 strand Kid-Silk) you will have to find alternatives for each, individually.
Why do you show discontinued yarns in the patterns?
Since different yarns have different qualities and textures we have chosen to keep the original yarn in our patterns. However, you can easily find options among our available qualities by using our yarn calculator, or simply pick a yarn from the same yarn group.
It is possible that some retailers still have discontinued yarns in stock, or that someone has a few skeins at home that they would like to find patterns for.
The yarn calculator will provide both alternative yarn as well as required amount in the new quality.
What size should I knit?
If you think it's hard to decide what size to make, it can be a good idea to measure a garment you own already and like the size of. Then you can pick the size by comparing those measures with the ones available in the pattern's size chart.
You'll find the size chart at the bottom of the pattern.
See DROPS lesson: How to read size chart
Why do I get the wrong knitting tension with the suggested needle size?
The needle size provided in the pattern serves only as a guide, the important thing is to follow the knitting tension. And since knitting tension is very individual, you will have to adjust the needle size to ensure that YOUR tension is the same as in the pattern – maybe you’ll have to adjust 1, or even 2 needle sizes, up or down to achieve the correct tension. For this, we recommend that you work test swatches.
Should you work with a different knitting tension than the one provided, the measurements of the finished garment might deviate from the measurement sketch.
See DROPS lesson: How to measure your tension/gauge
See DROPS video: How to make a tension/gauge swatch
Why is the pattern worked top-down?
Working a garment top-down provides more flexibility and room for personal adjustment. For example it is easier to try the garment on while working, as well as making adjustments to length of yoke and shoulder caps.
The instructions are carefully explaining every step, in the correct order. Diagrams are adjusted to the knitting direction and are worked as usual.
How do I work according to a knitting diagram?
The diagram depicts all rows/rounds, and every stitch seen from the right side. It is read from bottom to top, from right to left. 1 square = 1 stitch.
When working back and forth, every other row is worked from the right side and every other row is worked from the wrong side. When working from the wrong side, the diagram will have to be worked reversed: from left to right, knit stitches are purled, purl stitches are knit etc.
When working in the round every round is worked from the right side and the diagram are worked from right to left on all rounds.
See DROPS lesson: How to read knitting diagrams
How do I work according to a crochet diagram?
The diagram depicts all rows/rounds, and every stitch seen from the right side. It is worked from bottom to top, from right to left.
When working back and forth every other row is worked from the right side: from right to left and every other row is worked from the wrong side: from left to right.
When working in the round, every row in the diagram are worked from the right side, from right to left.
When working a circular diagram you start in the middle and work your way outwards, counter clockwise, row by row.
The rows usually start with a given number of chain stitches (equivalent to the height of the following stitch), this will either be depicted in the diagram or explained in the pattern.
See DROPS lesson: How to read crochet diagrams
How do I work several diagrams simultaneously on the same row/round?
Instructions for working several diagrams after each other on the same row/round, will often be written like so: “work A.1, A.2, A.3 a total of 0-0-2-3-4 times". This means you work A.1 once, then A.2 is worked once, and A.3 is repeated (in width) the number of times provided for your size – in this case like so: S = 0 times, M = 0 times, L=2 times, XL= 3 times and XXL = 4 times.
The diagrams are worked as usual: begin with the first row in A.1, then work the first row in A.2 etc.
See DROPS lesson: How to read knitting diagrams
See DROPS lesson: How to read crochet diagrams
Why are the sleeves shorter in larger sizes?
The total width of the garment (from wrist-to-wrist) will be larger in the larger sizes, despite the actual sleeves being shorter. The larger sizes have longer sleeve caps and wider shoulders, so there will be a good fit in all sizes.
Where on the garment is the length measured?
The measurement sketch/schematic drawing provides information regarding the full length of the garment. If it’s a jumper or a jacket the length is measured from the highest point on the shoulder closest to the neckline, and straight down to the bottom of the garment. It is NOT measured from the tip of shoulder. Similarly, the length of yoke is measured from the highest point on the shoulder and down to where yoke is split into body and sleeves.
On a jacket measures are never taken along bands, unless specifically stated. Always measure inside band stitches when measuring the length.
See DROPS lesson: How to read a schematic drawing
What is a repeat?
Diagrams are often repeated on the round or in height. 1 repeat is the diagram the way it appears in the pattern. If it says to work 5 repeats of A.1 in the round, then you work A.1 a total of 5 times after/next to each other in the round. If it says to work 2 repeats of A.1 vertically/in height you work the entire diagram once, then begin again at the start and work the entire diagram one more time.
Why does the piece start with more chain stitches than it’s worked with?
Chain stitches are slightly narrower than other stitches and to avoid working the cast-on edge too tight, we simply chain more stitches to begin with. The stitch count will be adjusted on the following row to fit the pattern and measurement sketch.
Why increase before the rib edge when the piece is worked top-down?
The rib edge is more elastic and will contract slightly compared to, for example, stocking stitch. By increasing before the rib edge, you avoid a visible difference in width between the rib edge and the rest of the body.
Why increase in the cast-off edge?
It’s very easy to cast off too tightly, and by making yarn overs while casting off (and simultaneously casting these off) you avoid a too tight cast off edge.
See DROPS video: How to bind off with yarn overs (yo)
How do I increase/decrease on every 3rd and 4th row/round alternately?
To achieve an even increase (or decrease) you can increase on, for example: every 3rd and 4th row alternately, like so: work 2 rows and increase on the 3rd row, work 3 rows and increase on the 4th. Repeat this until the increase is complete.
See DROPS lesson: Increase or decrease 1 st on every 3rd and 4th row alternately
How can I work a jacket in the round instead of back and forth?
Should you prefer to work in the round instead of back and forth, you may of course adjust the pattern. You’ll need to add steeks mid-front (usually 5 stitches), and follow the instructions. When you would normally turn and work from the wrong side, simply work across the steek and continue in the round. At the end you’ll cut the piece open, pick up stitches to work bands, and cover the cut edges.
See DROPS video: How to knit steeks and cut open
Can I work a jumper back and forth instead of in the round?
Should you prefer to work back and forth instead of in the round, you may of course adjust the pattern so you work the pieces separately and then assemble them at the end. Divide the stitches for the body in 2, add 1 edge stitch in each side (for sewing) and work the front and back pieces separately.
See DROPS lesson: Can I adapt a pattern for circular needles into straight needles?
Why is the pattern slightly different than what I see in the photo?
Pattern repeats can vary slightly in the different sizes, in order to get the correct proportions. If you’re not working the exact same size as the garment in the photo, yours might deviate slightly. This has been carefully developed and adjusted so that the complete impression of the garment is the same in all sizes.
Make sure to follow instructions and diagrams for your size!
How do I make a women’s size garment into a men’s size one?
If you have found a pattern you like which is available in women’s size it’s not very difficult to convert it to men’s size. The biggest difference will be the length of sleeves and body. Start working on the women size that you think would fit across the chest. The additional length will be worked right before you cast off for the armhole/sleeve cap. If the pattern is worked top-down you can add the length right after the armhole or before the first decrease on sleeve.
Regarding additional yarn amount, this will depend on how much length you add, but it is better with a skein too many than too few.
How do I prevent a hairy garment from shedding?
All yarns will have excess fibres (from production) that might come off as lint or shedding. Brushed yarns (ie hairier yarns) have more of these loose, excess fibres, causing more shedding.
Shedding also depends on what is worn under or over the garment, and whether this pulls at the yarn fibres. It’s therefore not possible to guarantee that there will be no shedding
Below are some tips on how to get the best result when working with hairier yarns:
1. When the garment is finished (before you wash it) shake it vigorously so the looser hairs come off. NOTE: do NOT use a lint roller, brush or any method that pulls at the yarn.
2. Place the garment in a plastic bag and put it in your freezer - the temperature will cause the fibres to become less attached to each other, and excess fibres will come off easier.
3. Leave in the freezer for a few hours before taking it out and shaking it again.
4. Wash the garment according to the instructions on the yarn label.
Why does my garment pill?
Pilling is a natural process that happens to even the most exclusive of fibers. It's a natural sign of wear and tear that is hard to avoid, and that is most visible in high friction areas of your garment like a sweater's arms and cuffs.
You can make your garment look as new by removing the pilling, using a fabric comb or a pill/lint remover.
Fuego de Dragon |
|||||||||||||||||||
|
|
||||||||||||||||||
Knitted shawl with edge in lace pattern. Piece is knitted in DROPS BabyAlpaca Silk.
DROPS 183-17 |
|||||||||||||||||||
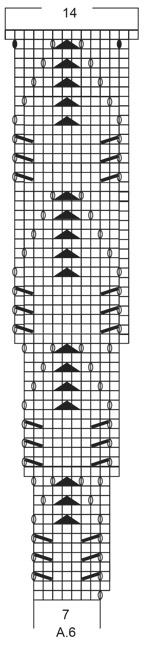
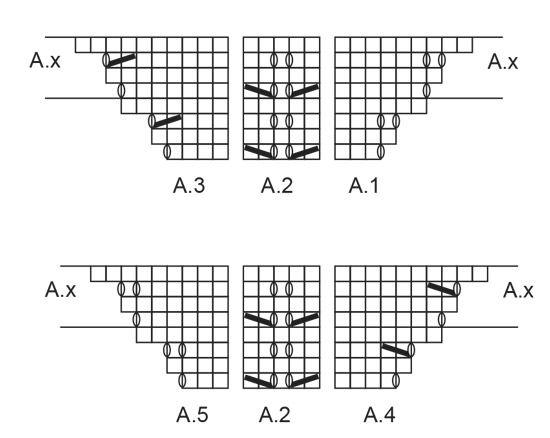
INFORMATION FOR PATTERN: GARTER STITCH (back and forth): 1 ridge = knit 2 rows. PATTERN: See diagrams A.1 to A.6. Diagrams show all rows in pattern seen from the right side. ---------------------------------------------------------- SHAWL: Cast on 3 stitches on circular needle size 3 mm with BabyAlpaca Silk. Work and increase as follows: ROW 1: Work 1 edge stitch in GARTER STITCH - see explanation above, 1 yarn over, knit 1, 1 yarn over, 1 edge stitch in garter stitch = 5 stitches. Insert a marker in the middle stitch. ROW 2 and all rows from wrong side: Work 1 edge stitch in garter stitch in each side (knit from wrong side) and purl all stitches and yarn overs. ROW 3: 1 edge stitch in garter stitch, knit 1, 1 yarn over, knit 1, 1 yarn over, knit 1 and 1 edge stitch in garter stitch = 7 stitches. ROW 5: 1 edge stitch in garter stitch, 1 yarn over, knit 1, 1 yarn over, knit 3, 1 yarn over, knit 1, 1 yarn over and 1 edge stitch in garter stitch = 11 stitches. ROW 7: 1 edge stitch in garter stitch, 1 yarn over, knit 3, 1 yarn over, knit 3, 1 yarn over, knit 3, 1 yarn over and 1 edge stitch in garter stitch = 15 stitches. ROW 9: 1 edge stitch in garter stitch, 1 yarn over, knit 1, 1 yarn over, knit 3 and insert a marker in the middle stitch of these stitches, 1 yarn over, knit 1, 1 yarn over, knit 3 (in the middle of these stitches there is already a marker = middle stitch), 1 yarn over, knit 1, 1 yarn over, knit 3 and insert a marker in the middle stitch of these stitches, 1 yarn over, knit 1, 1 yarn over and 1 edge stitch in garter stitch = 23 stitches. ROW 11: 1 edge stitch in garter stitch, 1 yarn over, knit until middle stitch, 1 yarn over, knit 1 (= middle stitch), 1 yarn over and knit until 1 edge stitch, 1 yarn over and 1 edge stitch in garter stitch = 27 stitches. Work PATTERN according to diagram A.1 to A.5 from right side as follows: Work 1 edge stitch in garter stitch, A.1 over 3 stitches, A.2 over 5 stitches (first marker is in the middle of A.2), A.3 over 4 stitches, 1 stitch in stocking stitch (second marker is this stitch = middle stitch), A.4 over 4 stitches, A.2 over 5 stitches (third marker is in the middle of A.2), A.5 over 3 stitches and 1 edge stitch in garter stitch = 31 stitches. REMEMBER THE KNITTING TENSION! When A.1 to A.5 have been worked 1 time vertically, there are 51 stitches on row. Repeat increases as shown in A.x. Increase alternately 4 and 8 stitches on every row from right side (i.e. 12 stitches for every repetition vertically), work the increased stitches in stocking stitch on each side of every A.2. Move the markers upwards when working to mark middle stitch and middle of A.2. Repeat as shown in A.x 24 times in total vertically, there are 339 stitches in total on needle. Piece measures approx. 36 cm. EDGE: Now work an edge in lace pattern as follows: 1 edge stitch in garter stitch, A.6 (= 48 repetitions of 7 stitches on first row) until 2 stitches remain on row, 1 stitch in stocking stitch, 1 edge stitch in garter stitch. Continue pattern back and forth like this until entire diagram has been worked vertically. There are now 675 stitches on needle. Work 2 ridges. Cast off. To avoid a tight cast-off edge use a larger needle or make a yarn over that is casted off after approx. every 4th stitch. Fasten off. |
|||||||||||||||||||
Diagram explanations |
|||||||||||||||||||
|
|||||||||||||||||||
Have you made this or any other of our designs? Tag your pictures in social media with #dropsdesign so we can see them! Do you need help with this pattern?You'll find tutorial videos, a Comments/Questions area and more by visiting the pattern on garnstudio.com. © 1982-2024 DROPS Design A/S. We reserve all rights. This document, including all its sub-sections, has copyrights. Read more about what you can do with our patterns at the bottom of each pattern on our site. |
With over 40 years in knitting and crochet design, DROPS Design offers one of the most extensive collections of free patterns on the internet - translated to 17 languages. As of today we count 304 catalogues and 11422 patterns - 11422 of which are translated into English (UK/cm).
We work hard to bring you the best knitting and crochet have to offer, inspiration and advice as well as great quality yarns at incredible prices! Would you like to use our patterns for other than personal use? You can read what you are allowed to do in the Copyright text at the bottom of all our patterns. Happy crafting!
Comments / Questions (45)
Emanuela wrote:
Quindi su 51 maglie lavoro così: A1:1 maglia vivagno, 1 gettato, 6 maglie, A2: 2 maglie insieme a diritto, 1 gettato, 1 maglia a diritto, 1 gettato, 1 accavallata sempl. , A3: 7 maglie a diritto, 1 gettato. Poi Prima di iniziare la parte di AX verso sinistra ( cioè X capirci tra A4 e A5) mi avanzano 14 maglie centrali. Come le lavoro?
16.11.2020 - 14:10DROPS Design answered:
Buonasera Emanuela, una volta arrivata a 51 maglie può mettere i segnapunti per dividere i diagrammi: maglia di vivagno, A.1, A.2, A.3, maglia centrale, A.4, A.2, A.5, 1 maglia di vivagno. Poi continua lavorando solo A.X, aumentando sulle righe 1 e 3 di A.X: ad esempio, alla fine di A.1 c'erano 9 maglie, nella riga dopo lavora 1 gettato prima delle 9 maglie e dopo le 10 maglie di A.3. Spero che ora sia più comprensibile. Buon lavoro!
16.11.2020 - 22:02Emanuela wrote:
Quindi su 51maglie faccio: partendo da destra 1 maglia vivagno , 1maglia gettata, 6 maglie diritte, 2 maglie insieme a diritto, 1 gettato, 1 maglia diritto, 1 gettato, 2 maglie insieme a diritto , 7 maglie diritte , 1 gett., e poi 1 gett., 7maglie diritte, 2 maglie insieme diritte, 1gett. 1 maglia diritta,1gett., 2 maglie insieme, 6 maglie diritte, 1 gett., 1 maglia vivagno.
14.11.2020 - 22:20DROPS Design answered:
Buonasera Emanuela, la lavorazione è corretta tranne quella di A.2: 2 maglie insieme a diritto, 1 gettato, 1 maglia diritto, 1 gettato, 1 accavallata semplice. Buon lavoro!
14.11.2020 - 23:06Emanuela Mulloni wrote:
Per gentilezza se mi spiegate CON UN GRAFICO, il lavoro come si svolge, dopo aver fatto le 51 maglie sul ferro. Ho comprato la vostra lana e vorrei andare avanti con il progetto, perché come è spiegato si diventa MATTI. Grazie Se non ho spiegazioni chiare, non acquisterò più la vostra lana. Grazie
12.11.2020 - 17:40DROPS Design answered:
Buon pomeriggio Emanuela, dopo aver lavorato i diagrammi A.1-A.5 deve proseguire solo su A.X. Buon lavoro!
13.11.2020 - 15:27Emanuela Mulloni wrote:
Buonasera da Emanuela. Ho comprato la lana Drops (come il modello dello scialle) . Ho bisogno assoluto delle spiegazioni molto semplici perché se no non vado avanti con il lavoro. Io sono arrivata al ferro 11 = 27 maglie. Da qui non vado avanti. Ho provato a fare anche un grafico ma il lavoro non viene come il vostro grafico. Per piacere se mi spiegate i vari passaggi .Grazie
25.10.2020 - 19:31DROPS Design answered:
Buongiorno Emanuela. Dopo il ferro 11, deve iniziare a lavorare i diagrammi A.1-A.5 come indicato. I diagrammi si leggono dal basso verso l'alto, da destra verso sinistra sui ferri di andata e da sinistra verso destra sui ferri di ritorno. Il lavoro inizia dal punto centrale del lato più lungo; il bordo traforato in basso è l'ultima parte che viene lavorata. Buon lavoro!
29.10.2020 - 10:53Claire Poirier wrote:
I would like the abbreviations for the chart please,thank you
20.09.2019 - 14:30DROPS Design answered:
Dear Mrs Poirier, you will find diagram key just above diagrams and more informations about diagrams here. Happy knitting!
23.09.2019 - 07:52Marianne wrote:
Bonjour à toutes ! J' aurais aimé faire ce beau châle , je comprends les diagrammes mais pas la construction, il faut dire que je n' ai jamais fait de châle ajouré . Je vais donc utiliser ma laine pour faire une étole avec un point fantaisie . Merci à DROPS pour nous offrir tant de beaux modèles de pulls et autres . Moi, je continuerai à acheter vos fils même si je dois renoncer à un modèle .
22.09.2018 - 16:27DROPS Design answered:
Bonjour Marianne, le châle se tricote de haut en bas, en augmentant comme indiqué dans les diagrammes pour obtenir l'envergure souhaitée. Suivez attentivement les explications et les diagrammes. Votre magasin DROPS pourra volontiers vous assister si besoin, même par mail ou téléphone. Bon tricot!
24.09.2018 - 11:09Guylaine Reid wrote:
Ce châle semble très beau, sauf que je suis déçue que vous n\\\'ayez pas fait tous les diagrammes des AX car il faut les faire et je ne comprend pas:\\\" tricoter les augmentations en jersey de chaque côté de chaque A-2\\\" comme il y est indiqué dans le patron.Pouvez-vous nous faire les diagrammes pour les 24 AX?. \\r\\nMerci, Guylaine Reid
22.09.2018 - 04:07DROPS Design answered:
Bonjour Mme Reid, placez bien vos marqueurs comme indiqué et répétez les rangs de A.x en hauteur = vous augmentez dans A.1/A.3 et A.4/A.5, ces augmentations se tricotent en jersey. Tricotez toujours A.2 sur les mêmes mailles (délimitez ces mailles avec des marqueurs si besoin = A.2 se tricote toujours sur 5 mailles tout du long). Bon tricot!
24.09.2018 - 11:13Cat23 wrote:
Lorsqu'on a fait une fois l'AX , que fait on? je comprend pas on repart sur la première ligne A1-A5? merci
29.07.2018 - 21:48DROPS Design answered:
Bonjour Cat23, après avoir tricoté 1 fois A.1-A5 jusqu'au dernier rang de A.x, répétez la partie A.X en hauteur seulement (= les 4 derniers rangs des diagrammes). Bon tricot!
31.07.2018 - 09:24Amy wrote:
Ich verstehe nicht, wie nach der 1. Wiederholung von A.1 bis A.5 das Muster wiederholt wird. Eine Wiederholung von A.1 -A.5 benötigt 25 Maschen (24 Maschen im Muster + Mittelmasche zwischen A.3 und A.4) dann müsste 1 Masche folgen (Mittelmasche zwischen 1. Und 2. Musterwiederholung) dann noch einmal 25 Maschen =51. Allerdings fehlen zu diesem Zeitpunkt die Randmaschen? Werden diese also einfach weggelassen oder liegt mein Fehler an anderer Stelle?
21.06.2018 - 13:05DROPS Design answered:
Liebe Amy, nach dem Sie A.1 bis A.5 gestrickt haben, haben Sie 24 M. zugenommen = 27+24=51 M. Dann wiederholen Sie A.1-A.5 aber nur die 4 letzten Reihen = A.x Die Zunahmen werden auf beiden Seiten von A.2 glatt rechts gestrickt. Viel Spaß beim stricken!
21.06.2018 - 15:39Sari wrote:
Mihin on hävinnyt kaaviokuvat tästä ohjeesta?
16.04.2018 - 09:43