DROPS Alaska
DROPS Alaska
100% Wool
from 2.15 € /50g
Get the yarn to make this pattern from 32.25€.

The yarn cost is calculated from the pattern’s smallest size and the yarn’s cheapest product type. Looking for an even better price? You might find it on the DROPS Deals!

DROPS SS24

Vintermys

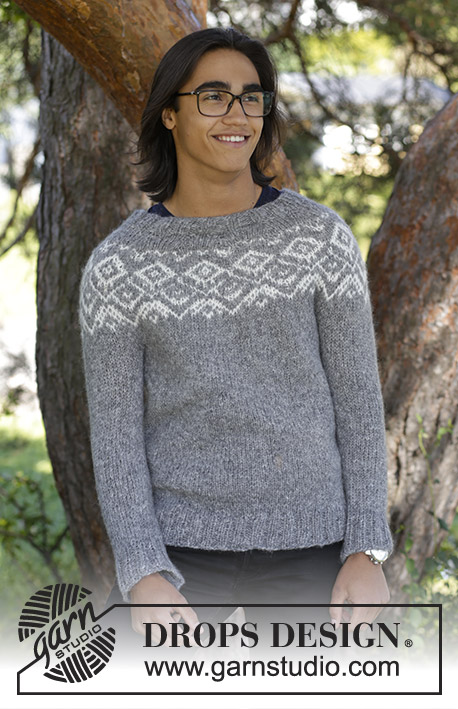
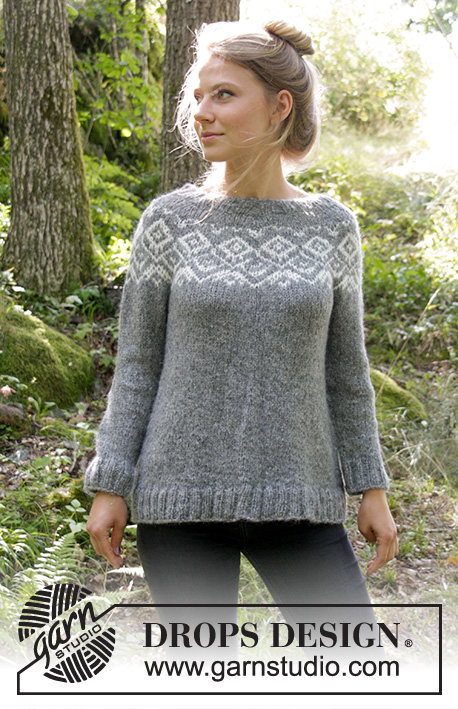
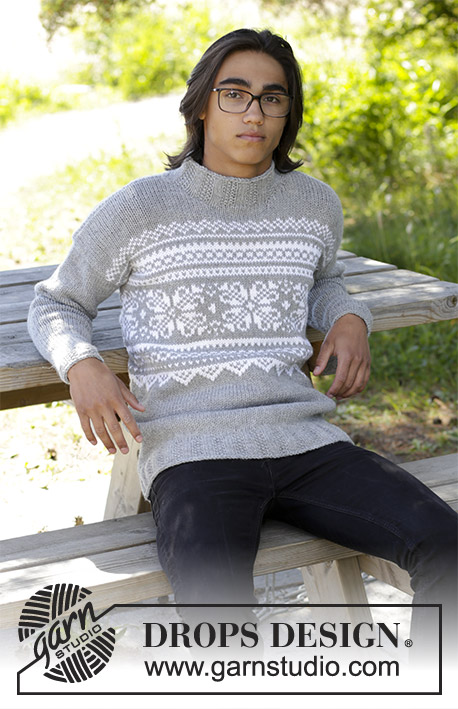
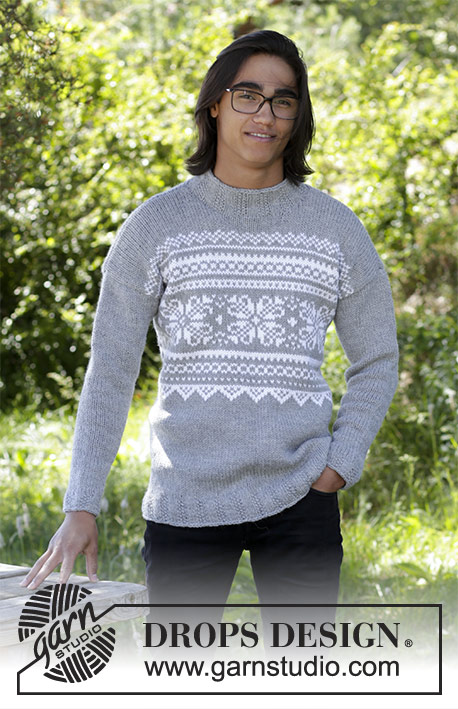
Men’s knitted jumper with multi-coloured Nordic pattern. Sizes S - XXXL. The piece is worked in DROPS Alaska.

DROPS 185-13
DROPS Design: Pattern no x-432
Yarn group C or A + A
-----------------------------------------------------------
Sizes: S - M - L - XL - XXL - XXXL
Materials:
DROPS ALASKA from Garnstudio (belongs to yarn group C)
550-600-650-700-800-850 g colour 03, light grey
200-200-250-250-250-300 g colour 02, off white

The piece can also be knitted with yarn from:
"Alternative yarn (Yarn Group C)" – see link below.

DROPS DOUBLE POINTED NEEDLES AND CIRCULAR NEEDLE (40 and 80 cm) SIZE 5.5 MM – or the size needed to get 16 stitches and 20 rows stocking stitch on 10 cm in width and 10 cm in height.

DROPS DOUBLE POINTED NEEDLES AND CIRCULAR NEEDLE (40 and 80 cm) SIZE 4.5 MM for rib - or the size needed to get 18 stitches and 23 rows stocking stitch on 10 cm in width and 10 cm in height.
----------------------------------------------------------

-------------------------------------------------------

Alternative Yarn – See how to change yarns here
Yarn Groups A to F – Use the same pattern and change the yarn here
Yarn usage using an alternative yarn – Use our yarn converter here

-------------------------------------------------------

DROPS Alaska
DROPS Alaska
100% Wool
from 2.15 € /50g
Get the yarn to make this pattern from 32.25€.

The yarn cost is calculated from the pattern’s smallest size and the yarn’s cheapest product type. Looking for an even better price? You might find it on the DROPS Deals!

Pattern instructions

NOTE: This pattern is written in British English. All measurements in charts are in cm. For conversion from cm to inches - click here. There are different terms for crocheting in British and American English. If this pattern includes crochet, click for "crochet terms" here. For this pattern in American English, please click here.
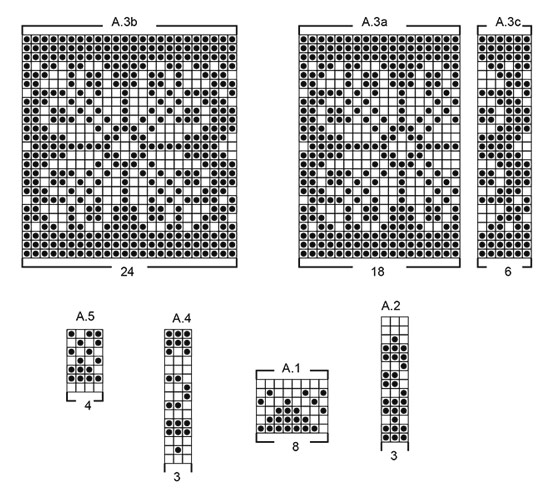
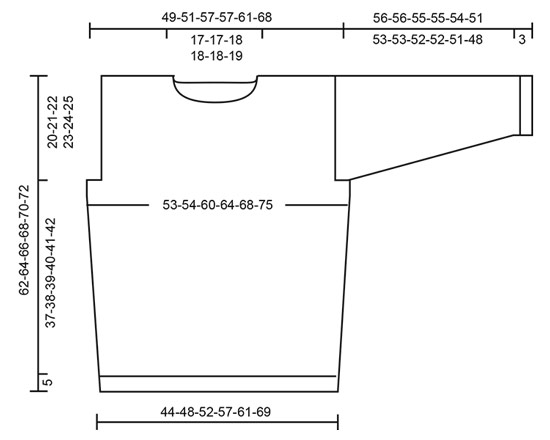
INFORMATION FOR THE PATTERN:

RIDGE/GARTER STITCH (worked back and forth):
1 ridge = Knit 2 rows.

PATTERN:
See diagrams A.1 to A.5. The whole pattern is worked in stocking stitch. The diagrams show all the rows in the pattern seen from the right side.

MOSS STITCH:
ROUND 1: * Knit 1, purl 1 *, repeat from *-*.
ROUND 2: Knit over purl and purl over knit. Repeat round 2.

DECREASE TIP:
To work out how to decrease evenly, count the total number of stitches on the needle (e.g. 312 stitches) and divide by the number of decreases to be made (e.g. 48) = 6.5. In this example, knit together alternately every 5th and 6th stitch and every 6th and 7th stitch.

KNITTING TIP:
To avoid the garment losing its elasticity when working pattern it is important that the strands at the back of the piece are not tight. You can work pattern with a larger needle size if this is a problem.

INCREASE TIP:
Start 1 stitch before the marker, make 1 yarn over, knit 2 (the marker sits in the middle of these 2 stitches), make 1 yarn over. On the next round knit the yarn overs twisted to avoid holes.

CASTING OFF TIP:
To avoid the cast-off edge being tight, you can use a ½ needle size larger when casting off.
----------------------------------------------------------

JUMPER:
The piece is worked in the round with circular needle as far as the armholes, then the front and back pieces are worked separately back and forth. The sleeves are worked in the round with double pointed needles/short circular needle.

BODY:
Cast on 162-180-192-216-234-264 stitches with circular needle size 4.5 mm and light grey. Knit 1 round. Then work as follows: * Knit 3, 3 stitches MOSS STITCH - see description above *, repeat from *-* to end of round. Work like this for 5 cm. Change to circular needle size 5.5 mm and knit 1 round where you decrease 22-26-26-34-38-44 stitches evenly on round - read DECREASE TIP above = 140-154-166-182-196-220 stitches. Insert 1 marker at the beginning of the round and 1 marker after 70-77-83-91-98-110 stitches (= the sides) and allow the markers to follow you work upwards. Continue with stocking stitch. REMEMBER THE KNITTING TENSION! When the piece measures 9 cm increase 1 stitch on each side of the marker threads in both sides (= 4 stitches increased on the round) – read INCREASE TIP. Increase in this way every 8th-9th-10th-10th-8th-9th round a total of 2-2-2-2-3-3 times = 148-162-174-190-208-232 stitches. Work 1 round where you increase 4-6-2-2-0-0 stitches evenly on round = 152-168-176-192-208-232 stitches. When piece measures 18-19-20-21-22-23 cm work pattern as follows:

Work A.1 in the round (= 19-21-22-24-26-29 repeats of 8 stitches) – read PATTERN and KNITTING TIP above. On the last round in A.1 increase 1-0-1-0-2-2 stitches evenly on round = 153-168-177-192-210-234 stitches. When the whole of A.1 has been completed, work A.2 in the round (= 51-56-59-64-70-78 repeats of 3 stitches). On the last round in A.2 increase 15-0-15-0-6-6 stitches evenly on round = 168-168-192-192-216-240 stitches. When the whole of A.2 has been completed in height, work pattern in the different sizes as follows:

Sizes S, M and XXL:
Work A.3a (= 18 stitches) 1 time, work A.3b (= 24 stitches) 6-6-8 times and A.3c (= 6 stitches) 1 time. On the last round in A.3 increase 0-6-0 stitches evenly on round = 168-174-216 stitches.

Sizes L, XL and XXXL:
Work A.3b in the round to end of round (= 8-8-10 repeats of 24 stitches). On the last round in A.3 increase 0-12-0 stitches evenly on round = 192-204-240 stitches.

All sizes:
When the whole of A.3 has been completed in height, work the first 3 rounds in diagram A.4 (= 56-58-64-68-72-80 repeats of 3 stitches). The piece measures approximately 42-43-44-45-46-47cm.
The next round is worked as follows: Work the 4th round in A.4 and cast off 3-3-3-9-9-9 stitches in each side for armhole (= 1-1-1-4-4-4 stitches before/2-2-2-5-5-5 stitches after both markers). The front and back pieces are now worked separately back and forth.

BACK PIECE:
= 81-84-93-93-99-111 stitches (including 1 edge stitch in each side). Work pattern back and forth from the 5th round in A.4 as follows:
1 edge stitch in GARTER STITCH - see description above, A.4 until there are 2 stitches left on the needle, work the first stitch in A.4, 1 edge stitch in garter stitch. Continue like this, back and forth. On the last row in the diagram increase 2-3-2-2-0-0 stitches evenly on row = 83-87-95-95-99-111 stitches. Now work pattern as follows – from the right side: Work 1 edge stitch in garter stitch, A.5 (= 4 stitches) until there are 2 stitches left on the needle, work the first stitch in A.5, 1 edge stitch in garter stitch. When the whole of A.5 has been completed in height, continue with stocking stitch and grey with 1 edge stitch in garter stitch in each side to finished length.
When the piece measures 60-62-64-66-68-70 cm cast off the middle 25-25-27-27-27-29 stitches for the neck and each shoulder is finished separately. Cast off 1 stitch on the next row from neck = 28-30-33-33-35-40 stitches left on shoulder. Continue working until the piece measures 62-64-66-68-70-72 cm and cast off - read CASTING OFF TIP. Work the other shoulder in the same way.

FRONT PIECE:
= 81-84-93-93-99-111 stitches (including 1 edge stitch in each side). Continue in the same way as for the back piece until the piece measures 56-58-60-61-63-65 cm. Now place the middle 13-13-15-15-15-17 stitches on 1 thread for neck and each shoulder is finished separately. Cast off to neck at the beginning of every row from the neck as follows: 2 stitches 2 times and 1 stitch 3 times = 28-30-33-33-35-40 stitches left on shoulder. Continue working until the piece measures 62-64-66-68-70-72 cm and cast off. Work the other shoulder in the same way.

SLEEVE:
The sleeve is worked in the round with double pointed needles/short circular needle.
Cast on 42-42-48-48-48-48 stitches with double pointed needles size 4.5 mm and light grey. Knit 1 round. Then work as follows: * Knit 3, 3 stitches moss stitch *, repeat from *-* to end of round. Work like this for 3 cm. Change to double pointed needles size 5.5 mm and knit 1 round where you decrease 4-2-6-4-4-4 stitches evenly on round = 38-40-42-44-44-44 stitches.
Insert 1 marker at the beginning of the round (= mid under sleeve) and allow the marker to follow your work upwards. Continue with stocking stitch. When the piece measures 7-7-3-5-8-7 cm increase 2 stitches mid under sleeve - read INCREASE TIP. Increase in this way every 8th-8th-8th-7th-6th-5th round a total of 13-13-14-15-16-18 times = 64-66-70-74-76-80 stitches.
When the sleeve measures 54-54-53-53-52-48 cm cast off the middle 4-4-4-10-10-10 stitches (= 2-2-2-5-5-5 stitches on each side of marker) and work a small sleeve cap back and forth on circular needle. Work stocking stitch and cast off at the beginning of each row in each side as follows: Cast off 5-5-6-5-6-6 stitches 2 times and cast off the remaining stitches. The sleeve measures approx. 56-56-55-55-54-51 cm. Work the other sleeve in the same way.

ASSEMBLY:
Sew the shoulder seams inside the cast off edges. Sew in the sleeves inside the 1 edge stitch in garter stitch.

NECK:
Knit up from the right side approx. 66-78 stitches around the neck (including the stitches from the thread in front) with double pointed needles size 4.5 mm and light grey. Knit 1 round where you adjust the number of stitches to 66-66-72-72-78-78 stitches. Then work as follows: * Knit 3, 3 stitches in moss stitch *, repeat from *-* to end of round. Work in this way for 6 cm, cast off with knit over knit and purl over purl.

This pattern has been corrected.

Updated online: 11.12.2018
Correction - BODY:When piece measures 18-19-20-21-22-23 cm work pattern as follows...
ALL SIZES: When the whole of A.3 has been completed in height, work the first 3 rounds in diagram A.4 (= 56-58-64-68-72-80 repeats of 3 stitches). The piece measures approximately 42-43-44-45-46-47cm.

Diagram

symbols = off white
symbols = light grey
diagram
diagram

Each of our patterns has specific tutorial videos to help you.

Do you have a question? See a list of frequently asked questions (FAQ)

Knitting tension is what determines the final measurements of your work, and is usually measured per 10 x 10 cm. It is provided like so: number of stitches in width x number of rows in height - eg: 19 stitches x 26 rows = 10 x 10 cm.

The knitting tension is very individual; some people knit/crochet loosely while others work tightly. You adjust the knitting tension with the needle size, which is why the suggested needle size is only meant as a guide! You need to adjust this (up or down) to ensure that YOUR knitting tension matches the knitting tension provided in the pattern. If you work with a different knitting tension than provided you will have a different yarn consumption, and your work will have different measurements than what the pattern suggests.

The knitting tension also determines which yarns can replace each other. As long as you achieve the same knitting tension you can replace one yarn with another.

See DROPS lesson: How to measure your tension/gauge

See DROPS video: How to make a gauge tension swatch

The required amount of yarn is provided in grams, eg: 450 g. To calculate how many balls you’ll need you first need to know how many grams are in 1 ball (25g, 50g or 100g). This information is available if you click on the individual yarn quality on our pages. Divide the amount required with the amount of each ball. For example, if each ball is 50g (the most common amount), the calculation will be as follows: 450 / 50 = 9 balls.

The important thing when changing from one yarn to another is that the knitting/crochet tension remains the same. This is so that the measurements of the finished piece will be the same as on the sketch provided. It is easier to achieve the same knitting tension using yarns from the same yarn group. It is also possible to work with multiple strands of a thinner yarn to achieve the knitting tension of a thicker one. Please try our yarn converter. We recommend you to always work a test swatch.

Please NOTE: when changing yarn the garment might have a different look and feel to the garment in the photo, due to individual properties and qualities of each yarn.

See DROPS lesson: Can I use a different yarn than the one mentioned in the pattern?

All our yarns are categorised into yarn groups (from A to F) according to thickness and knitting tension – group A contains the thinnest yarns and group F the thickest. This makes it easier for you to find alternative yarns to our patterns, should you wish to switch yarn. All yarns within the same group have a similar knitting tension and can easily replace each other. However, different yarn qualities have different structures and properties which will give the finished work a unique look and feel.

Click here for an overview of the yarns in each yarn group

At the top of all our patterns you’ll find a link to our yarn calculator, which is a helpful tool should you wish to use a different yarn than suggested. By filling in the yarn quality you wish to replace, the amount (in your size) and number of strands, the calculator will present good alternative yarns with the same knitting tension. Additionally it will tell you how much you’ll require in the new qualities and whether you’ll need to work with multiple strands. Most skeins are 50g (some are 25g or 100g).

If the pattern is worked with multiple colours, every colour will have to be calculated separately. Similarly, if the pattern is worked with several strands of different yarns (for example 1 strand Alpaca and 1 strand Kid-Silk) you will have to find alternatives for each, individually.

Click here to see our yarn calculator

Since different yarns have different qualities and textures we have chosen to keep the original yarn in our patterns. However, you can easily find options among our available qualities by using our yarn calculator, or simply pick a yarn from the same yarn group.

It is possible that some retailers still have discontinued yarns in stock, or that someone has a few skeins at home that they would like to find patterns for.

The yarn calculator will provide both alternative yarn as well as required amount in the new quality.

If you think it's hard to decide what size to make, it can be a good idea to measure a garment you own already and like the size of. Then you can pick the size by comparing those measures with the ones available in the pattern's size chart.

You'll find the size chart at the bottom of the pattern.

See DROPS lesson: How to read size chart

The needle size provided in the pattern serves only as a guide, the important thing is to follow the knitting tension. And since knitting tension is very individual, you will have to adjust the needle size to ensure that YOUR tension is the same as in the pattern – maybe you’ll have to adjust 1, or even 2 needle sizes, up or down to achieve the correct tension. For this, we recommend that you work test swatches.

Should you work with a different knitting tension than the one provided, the measurements of the finished garment might deviate from the measurement sketch.

See DROPS lesson: How to measure your tension/gauge

See DROPS video: How to make a tension/gauge swatch

Working a garment top-down provides more flexibility and room for personal adjustment. For example it is easier to try the garment on while working, as well as making adjustments to length of yoke and shoulder caps.

The instructions are carefully explaining every step, in the correct order. Diagrams are adjusted to the knitting direction and are worked as usual.

The diagram depicts all rows/rounds, and every stitch seen from the right side. It is read from bottom to top, from right to left. 1 square = 1 stitch.

When working back and forth, every other row is worked from the right side and every other row is worked from the wrong side. When working from the wrong side, the diagram will have to be worked reversed: from left to right, knit stitches are purled, purl stitches are knit etc.

When working in the round every round is worked from the right side and the diagram are worked from right to left on all rounds.

See DROPS lesson: How to read knitting diagrams

The diagram depicts all rows/rounds, and every stitch seen from the right side. It is worked from bottom to top, from right to left.

When working back and forth every other row is worked from the right side: from right to left and every other row is worked from the wrong side: from left to right.

When working in the round, every row in the diagram are worked from the right side, from right to left.

When working a circular diagram you start in the middle and work your way outwards, counter clockwise, row by row.

The rows usually start with a given number of chain stitches (equivalent to the height of the following stitch), this will either be depicted in the diagram or explained in the pattern.

See DROPS lesson: How to read crochet diagrams

Instructions for working several diagrams after each other on the same row/round, will often be written like so: “work A.1, A.2, A.3 a total of 0-0-2-3-4 times". This means you work A.1 once, then A.2 is worked once, and A.3 is repeated (in width) the number of times provided for your size – in this case like so: S = 0 times, M = 0 times, L=2 times, XL= 3 times and XXL = 4 times.

The diagrams are worked as usual: begin with the first row in A.1, then work the first row in A.2 etc.

See DROPS lesson: How to read knitting diagrams

See DROPS lesson: How to read crochet diagrams

The total width of the garment (from wrist-to-wrist) will be larger in the larger sizes, despite the actual sleeves being shorter. The larger sizes have longer sleeve caps and wider shoulders, so there will be a good fit in all sizes.

The measurement sketch/schematic drawing provides information regarding the full length of the garment. If it’s a jumper or a jacket the length is measured from the highest point on the shoulder closest to the neckline, and straight down to the bottom of the garment. It is NOT measured from the tip of shoulder. Similarly, the length of yoke is measured from the highest point on the shoulder and down to where yoke is split into body and sleeves.

On a jacket measures are never taken along bands, unless specifically stated. Always measure inside band stitches when measuring the length.

See DROPS lesson: How to read a schematic drawing

Diagrams are often repeated on the round or in height. 1 repeat is the diagram the way it appears in the pattern. If it says to work 5 repeats of A.1 in the round, then you work A.1 a total of 5 times after/next to each other in the round. If it says to work 2 repeats of A.1 vertically/in height you work the entire diagram once, then begin again at the start and work the entire diagram one more time.

Chain stitches are slightly narrower than other stitches and to avoid working the cast-on edge too tight, we simply chain more stitches to begin with. The stitch count will be adjusted on the following row to fit the pattern and measurement sketch.

The rib edge is more elastic and will contract slightly compared to, for example, stocking stitch. By increasing before the rib edge, you avoid a visible difference in width between the rib edge and the rest of the body.

It’s very easy to cast off too tightly, and by making yarn overs while casting off (and simultaneously casting these off) you avoid a too tight cast off edge.

See DROPS video: How to bind off with yarn overs (yo)

To achieve an even increase (or decrease) you can increase on, for example: every 3rd and 4th row alternately, like so: work 2 rows and increase on the 3rd row, work 3 rows and increase on the 4th. Repeat this until the increase is complete.

See DROPS lesson: Increase or decrease 1 st on every 3rd and 4th row alternately

Should you prefer to work in the round instead of back and forth, you may of course adjust the pattern. You’ll need to add steeks mid-front (usually 5 stitches), and follow the instructions. When you would normally turn and work from the wrong side, simply work across the steek and continue in the round. At the end you’ll cut the piece open, pick up stitches to work bands, and cover the cut edges.

See DROPS video: How to knit steeks and cut open

Should you prefer to work back and forth instead of in the round, you may of course adjust the pattern so you work the pieces separately and then assemble them at the end. Divide the stitches for the body in 2, add 1 edge stitch in each side (for sewing) and work the front and back pieces separately.

See DROPS lesson: Can I adapt a pattern for circular needles into straight needles?

Pattern repeats can vary slightly in the different sizes, in order to get the correct proportions. If you’re not working the exact same size as the garment in the photo, yours might deviate slightly. This has been carefully developed and adjusted so that the complete impression of the garment is the same in all sizes.

Make sure to follow instructions and diagrams for your size!

If you have found a pattern you like which is available in women’s size it’s not very difficult to convert it to men’s size. The biggest difference will be the length of sleeves and body. Start working on the women size that you think would fit across the chest. The additional length will be worked right before you cast off for the armhole/sleeve cap. If the pattern is worked top-down you can add the length right after the armhole or before the first decrease on sleeve.

Regarding additional yarn amount, this will depend on how much length you add, but it is better with a skein too many than too few.

All yarns will have excess fibres (from production) that might come off as lint or shedding. Brushed yarns (ie hairier yarns) have more of these loose, excess fibres, causing more shedding.

Shedding also depends on what is worn under or over the garment, and whether this pulls at the yarn fibres. It’s therefore not possible to guarantee that there will be no shedding

Below are some tips on how to get the best result when working with hairier yarns:

1. When the garment is finished (before you wash it) shake it vigorously so the looser hairs come off. NOTE: do NOT use a lint roller, brush or any method that pulls at the yarn.

2. Place the garment in a plastic bag and put it in your freezer - the temperature will cause the fibres to become less attached to each other, and excess fibres will come off easier.

3. Leave in the freezer for a few hours before taking it out and shaking it again.

4. Wash the garment according to the instructions on the yarn label.

Pilling is a natural process that happens to even the most exclusive of fibers. It's a natural sign of wear and tear that is hard to avoid, and that is most visible in high friction areas of your garment like a sweater's arms and cuffs.

You can make your garment look as new by removing the pilling, using a fabric comb or a pill/lint remover.

Still can't find the answer you need? Then scroll down and leave your question so one of our experts can try to help you. This will be done normally within 5 to 10 working days.
In the meantime, you can read the questions and answers that others have left to this pattern or join the DROPS Workshop on Facebook to get help from fellow knitters/crocheters!

You might also like...

Post a comment to pattern DROPS 185-13

We would love to hear what you have to say about this pattern!

If you want to leave a question, please make sure you select the correct category in the form below, to speed up the answering process. Required fields are marked *.

Comments / Questions (13)

country flag Rosa wrote:

Al poner 180 puntos al comenzar no queda desbocado el cuello

15.04.2021 - 20:53

DROPS Design answered:

Hola Rosa. El jersey se trabaja de abajo arriba. Los 180 puntos son de la parte inferior del cuerpo.

24.04.2021 - 20:18

country flag Jannie wrote:

Jeg forstår ikke det med mønstrene på a3a, a3b og a3c. Jeg strikker str S. Skal mønstret strikkes fra højre mod venstre?

27.02.2020 - 22:10

DROPS Design answered:

Hej Jannie, har du set vores lektioner som viser hvordan man strikker ifølge diagrammer? Hvordan strikker man efter diagram

28.02.2020 - 11:00

country flag Yvonne Ferdinandsen wrote:

Hej hvad betyder raporter

23.10.2019 - 09:02

DROPS Design answered:

Hej Yvonne, du gentager diagrammet/rapporten et antal gange på pinden. God fornøjelse!

23.10.2019 - 13:42

country flag Rita Sprangers wrote:

Waarom wordt de trui op een rondbreinaald gebreid, ik vind dat zo’n lastig ding, liever op gewone breinaalden, is dat ook mogelijk en zo ja wat is dan de stekenverdeling.

15.08.2019 - 14:01

DROPS Design answered:

Dag Rita,

Omdat het patoon doorloopt in de zijnaden is het voor deze trui niet aan te raden om op rechte naalden te breien, maar we hebben wel een instructie gemaakt om een patroon aan te passen, zodat je hem met rechte naalden kunt breien. Deze kun je hier vinden.

01.09.2019 - 14:30

country flag Theres wrote:

Hej! Nog är väl 54 cm ärmlängd lite mycket? Ca !45 cm borde det vara

13.05.2019 - 14:01

DROPS Design answered:

Hej. Ärmlängden ska vara 54 cm, om du tycker att ärmen blir lite för lång kan du självklart välja att göra den något kortare. Lycka till!

15.05.2019 - 10:55

country flag Luigi wrote:

Domando se il girocollo è rigido o abbastanza elastico. Grazie

10.05.2019 - 22:56

DROPS Design answered:

Buongiorno Luigi. Il girocollo sarà meno elastico che se fosse lavorato a coste diritto / rovescio. Se ha già lavorato il davanti e il dietro e le maniche, può farsi un’idea con i bordi inferiori. Buon lavoro!

11.05.2019 - 07:32

country flag Line wrote:

Hei! Jeg synes denne Vintermys-genseren er veldig flott, men kunne ha lyst til å strikke dette mønsteret i et tynnere garn for at genseren ikke skal bli så varm og tykk - kanskje pinne nr 3! Ja, det er kanskje umulig å få til, men har dere noen forslag til hvordan jeg evt kan løse det??

07.05.2019 - 13:22

DROPS Design answered:

Hei Line. Det du da må gjøre er å endre oppskriften etter strikkefastheten du vil bruke. Det innebærer å regne om alle maskeantall etter den nye strikkefastheten, slik at målene fortsatt blir som på målskissen. Ta da utgangspunkt i ønskede mål og ny strikkefatshet i bredden. For eksempel: si at du vil ha genseren 52 cm vid (=104 cm rundt hele), og at strikkefastheten er 24 masker i bredden = 10 cm. Da tar du 104 x 2,4 = 250 masker. Om du endrer strikkefatsheten må du også tilpasse slik at diagrammene går opp i hele rapporter på omgangen. God fornøyelse

07.05.2019 - 14:00

country flag Becky wrote:

Hello again. The pattern is incorrect. I'm knitting the XL and, when worked in the correct tension (20rws over 10cm), the pattern is at least 8rws short. 5cm (rib) + 4cm + 0.5 (inc rw) +5cm (10rws including inc) + 0.5 (inc rw) + 3cm (A1) + 7cm (A2) + 12.5cm (A3) = 37.5cm At this point, the XL pattern should measure 43cm. That's not possible, so either the length at the end of A3 is wrong or there aren't enough rows before the fair isle starts. Which is it?

10.12.2018 - 20:00

DROPS Design answered:

Dear Becky, thanks for your feedback, our Design Team will check - pattern has been edited on some places on body and back piece - see the correction link at the bottom of the pattern. Happy knitting!

11.12.2018 - 09:41

country flag Becky wrote:

This part of the pattern from the start of the main body is badly worded: "Increase in this way every 10th round a total of 2 times = 190 stitches. Work 1 round where you increase 2 stitches evenly on round = 192 stitches." I'm working the XL and if the pattern is followed as written, you either get 4 too many stitches or the piece is 10 rws too short. Am I correct that it should be inc 4 on 10th rw and then inc 2 on the following 10th rw?

08.12.2018 - 20:50

DROPS Design answered:

Dear Becky, you are increasing 4 sts on each increasing round. When piece measures 4 cm increase 4 sts = 186 sts, then after 10 rows increase 4 sts = 190 sts (= you increase a total of 2 times, ie only one more time after the first increase). Then work 1 row increasing 2 sts evenly = 192 sts. Happy knitting!

10.12.2018 - 09:11

country flag Oddbjorg Monsen wrote:

Hei, har naa strikket ferdig opp blomstermoensteret og arbeidet maaler 5 cm for lite, jeg fulgte oppskriften til str L, der staar det 5 cm bord, saa 4cm glattstrikk oke 2 m pa hver side av markering, 9 omg gjentas 2 ganger, det har jeg gjort men den ensfarvede delen syns jeg ble kort, er dette riktig?????

16.02.2018 - 13:52

DROPS Design answered:

Hej Oddbjorg, det lyder rigtigt men for at få målene i opskriften er det vigtigt at du har 20 pinde glatstrik på 10 cm i højden. God fornøjelse!

21.02.2018 - 15:21