
Popular categories
Looking for a yarn?


|
||||||||||||||||||||||
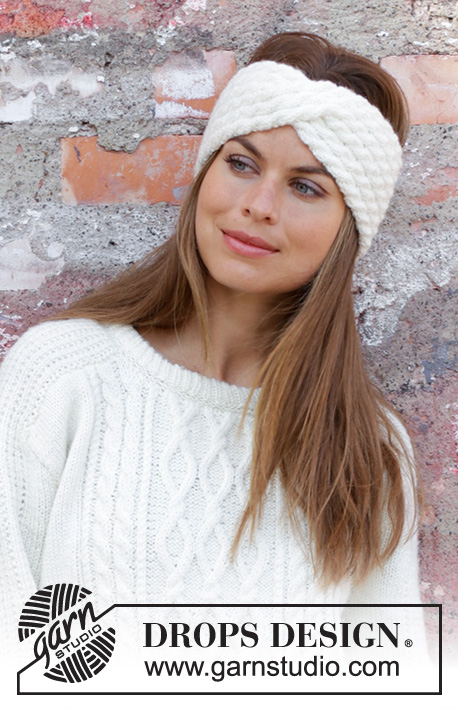
Siberia |
||||||||||||||||||||||
 |
 |
|||||||||||||||||||||
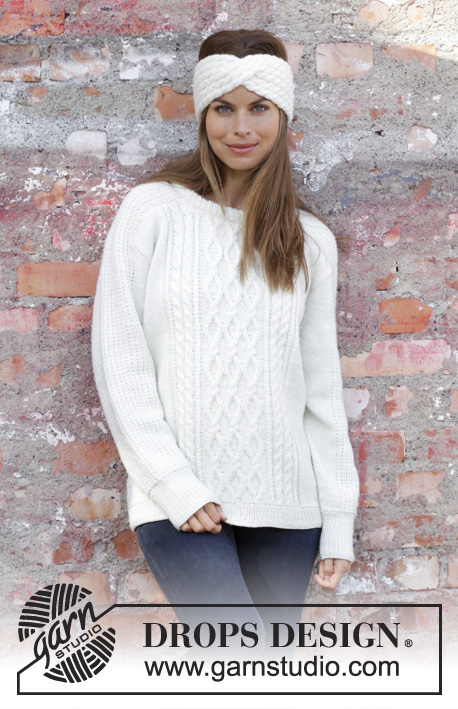
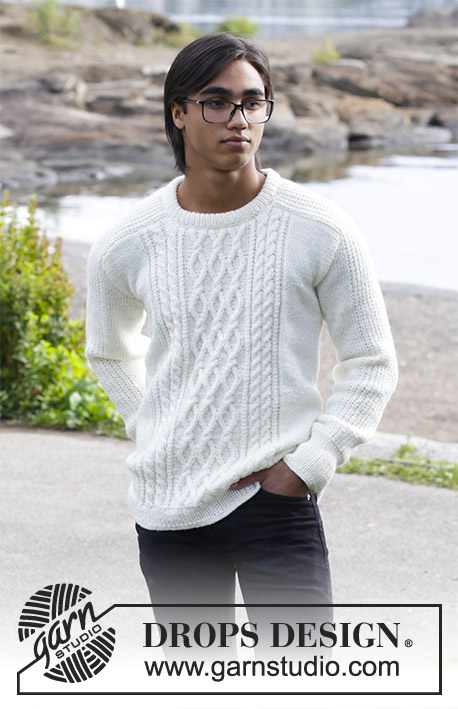
Men’s knitted jumper with cables. Sizes 13/14 years – XXXL. The piece is worked in DROPS Merino Extra Fine.
DROPS 185-2 |
||||||||||||||||||||||
|
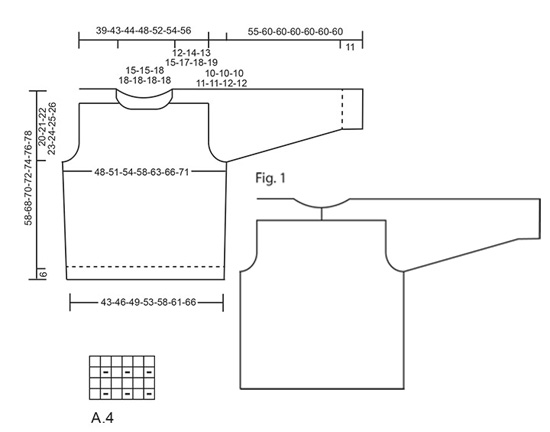
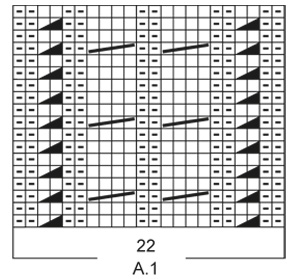
INFORMATION FOR THE PATTERN: RIDGE/GARTER STITCH (worked in the round): 1 ridge = 2 rounds. Knit 1 round and purl 1 round. PATTERN: See diagrams A.1 to A.4. The diagrams show all the rows in the pattern seen from the right side. INCREASE/DECREASE TIP (evenly spaced): To work out how to increase/decrease evenly, count the total number of stitches on the needle (e.g. 218 stitches) and divide by the number of increases/decreases to be made (e.g. 10) = 21.8. In this example, increase alternately after approx. every 21st and 22nd stitch by making 1 yarn over. On the next round, work the yarn overs twisted to avoid holes. If you are decreasing (in this example) knit together alternately approx. every 20th and 21st stitch and every 21st and 22nd stitch. INCREASE TIP (for sides in body and sleeves): Start 1 stitch before the marker, make 1 yarn over, knit 2 (the marker sits in the middle of these two stitches), make 1 yarn over. On the next round knit the yarn overs twisted to avoid holes. The new stitches are subsequently worked in stocking stitch. CASTING OFF TIP: Decrease 1 stitch at the same time as casting off as follows: Knit 2 stitches together, knit 1 stitch, pass over (cast off) (= 1 extra stitch decreased). ---------------------------------------------------------- JUMPER – SHORT OVERVIEW OF THE PIECE: The sleeve is worked upwards, continued onto the shoulder and along the neck, top back. The neck-stitches at the top of the sleeve are decreased towards the front piece and a small section of the sleeve is continued along the top of the back piece and later sewn together mid-back, so the neck is higher at the back than at the front – see Fig.1. ---------------------------------------------------------- JUMPER: The piece is worked in the round with circular needle as far as the armholes, then the front and back pieces are worked back and forth separately. The sleeves are worked in the round with double pointed needles as far as the armholes, then the sleeves are worked back and forth. To finish, the sleeves are sewn into the armhole and shoulders on front and back pieces. BODY: Cast on 218-230-246-264-280-298-314 stitches with circular needle size 3.5 mm and Merino Extra Fine. Work 2 RIDGES – see description above! Then work rib (knit 1 /purl 1). When the piece measures 5 cm work 1 ridge, AT THE SAME TIME as you increase 10-10-10-12-12-14-14 stitches evenly on the first round – read INCREASE/DECREASE TIP= 228-240-256-276-292-312-328 stitches. Insert 2 markers in the piece, one at the beginning of the round and one after 114-120-128-138-146-156-164 stitches (= in each side). Change to circular needle size 4 mm and work PATTERN as follows – see description above: * Work 20-23-27-27-31-31-35 stitches stocking stitch, A.1 (= 22 stitches), A.2 (= 10 stitches) over the next 30-30-30-40-40-50-50 stitches (= 3-3-3-4-4-5-5 repeats in width), A.3 (= 22 stitches), 20-23-27-27-31-31-35 stitches stocking stitch, the marker sits here *, work from *-* 1 more time. REMEMBER THE KNITTING TENSION! Continue the pattern and repeat the charts in height. When the piece measures 9 cm increase 1 stitch on both sides of the markers in each side – read INCREASE TIP (= 4 stitches increased). Increase in this way every 6-8-8-9-9-9-10 cm a total of 5 times = 248-260-276-296-312-332-348 stitches. When the piece measures 38-47-48-49-50-51-52 cm cast off 6 stitches for the armhole in each side (cast off 3 stitches on both side of the markers in each side) and continue each piece separately. BACK PIECE: = 118-124-132-142-150-160-168 stitches. The piece is worked back and forth with circular needle. Continue with pattern, stocking stitch and 1 edge stitch in garter stitch in each side, AT THE SAME TIME continue to cast off for armhole at the beginning of each row in each side as follows: 2 stitches 3-3-4-4-4-4-5 times and 1 stitch 1-0-1-1-2-2-2 times = 104-112-114-124-130-140-144 stitches. When the piece measures 49-59-61-63-65-67-69 cm cast off, AT THE SAME TIME as you decrease 20-20-20-22-18-24-24 stitches evenly over the stitches in diagrams A.1, A.2 and A.3 – read CASTING OFF TIP. FRONT PIECE: = 118-124-132-142-150-160-168 stitches. Continue with pattern, stocking stitch and 1 edge stitch in garter stitch, AT THE SAME TIME as cast off for armhole as for back piece = 104-112-114-124-130-140-144 stitches. When the piece measures 46-56-58-60-62-64-66 cm decrease 10-10-10-12-12-12-12 stitches evenly over the middle 40-40-40-48-48-48-48 stitches before these stitches are placed on a thread for the neck (= 30-30-30-36-36-36-36 stitches on thread). The shoulders are now finished separately. On the next row from the neck cast off 2 stitches = 30-34-35-36-39-44-46 stitches. When the piece measures 49-59-61-63-65-67-69 cm (adjust to match the back piece) cast off, AT THE SAME TIME as you decrease 5-5-4-5-3-6-6 stitches evenly over the 15-15-15-16-16-21-21 stitches towards the neck – remember CASTING OFF TIP. Work the other shoulder in the same way. RIGHT SLEEVE: The piece is worked in the round with double pointed needles. Cast on 56-58-60-62-64-66-68 stitches with double pointed needles size 3.5 mm and Merino Extra Fine. Work 2 ridges. Then work rib (= knit 1 /purl 1) until the piece measures 10 cm. Work 1 ridge, AT THE SAME TIME as you decrease 5 stitches evenly on row = 51-53-55-57-59-61-63 stitches. Insert 1 marker at the beginning of the round. Change to double pointed needles size 4 mm and work pattern on the next round as follows: Stocking stitch over the first 4-5-6-7-8-9-10 stitches, work A.4 over the next 42 stitches, work the first stitch in A.4, 4-5-6-7-8-9-10 stitches stocking stitch. Continue this pattern upwards. AT THE SAME TIME when the piece measures 13-12-13-12-12-14-13 cm increase 1 stitch on each side of the marker – remember INCREASE TIP! Increase in this way every 2-2½-2-2-2-1½-1½ cm a total of 14-15-16-17-18-19-20 times = 79-83-87-91-95-99-103 stitches. When the piece measures 45-50-50-49-49-48-48 cm cast off 6 stitches mid under the sleeve (cast off 3 stitches on each side of the marker). Then work back and forth on the needle AT THE SAME TIME as you cast off for sleeve cap at the beginning of each row in each side as follows: 2 stitches 2-4-6-7-9-10-12 times and 1 stitch 12-10-8-8-6-6-4 times = 41 stitches left in all sizes. The piece measures 55-60-60-60-60-60-60 cm. NOW YOU MEASURE THE PIECE FROM HERE! Continue with pattern over the remaining stitches until the piece measures 12-14-13-15-17-18-19 cm. Then you cast off at the beginning of each row from the right side as follows: 19 stitches 1 time AT THE SAME TIME as 8 of these 19 stitches are knitted together 2 and 2 before they are cast off, 3 stitches 1 time, 2 stitches 1 time. Work 3 rows without decreases. Cast off 1 stitch on the next row = 16 stitches left in all sizes. Continue working until the piece measures 19-21-22-24-26-27-28 cm. The whole sleeve measures approx. 74-81-82-84-86-87-88 cm. LEFT SLEEVE: Worked as for right sleeve, but decreases at top are worked in opposite side, i.e. at the beginning of every row from the wrong side. ASSEMBLY: Sew the sleeves together mid back inside the cast off edge of each sleeve. Sew the sleeves to front and back piece on body in the outermost stitch as follows: Sew from the armhole and up along shoulder on back piece to mid back. Repeat on the other side. Sew in that same way from armhole and up along shoulder to the neck on the front piece. Repeat on the other side. NECKLINE: Knit up 94-94-108-108-108-108-108 stitches around the neck (including the stitches from the thread) with short circular needle size 3.5 mm and Merino Extra Fine. Work 2 ridges, AT THE SAME TIME as you increase on the last round 22-22-26-26-26-26-26 stitches evenly = 116-116-134-134-134-134-134 stitches. Then work rib (= knit 1 /purl 1). When the rib measures 8 cm work 1 ridge. Cast off. Fold the neck double and fasten on the inside, ridge to ridge. |
||||||||||||||||||||||
Diagram explanations |
||||||||||||||||||||||
|
||||||||||||||||||||||
|
||||||||||||||||||||||

|
||||||||||||||||||||||
|
||||||||||||||||||||||
|
Have you made this or any other of our designs? Tag your pictures in social media with #dropsdesign so we can see them! Do you need help with this pattern?You'll find tutorial videos, a Comments/Questions area and more by visiting the pattern on garnstudio.com. © 1982-2024 DROPS Design A/S. We reserve all rights. This document, including all its sub-sections, has copyrights. Read more about what you can do with our patterns at the bottom of each pattern on our site. |
||||||||||||||||||||||


With over 40 years in knitting and crochet design, DROPS Design offers one of the most extensive collections of free patterns on the internet - translated to 17 languages. As of today we count 304 catalogues and 11422 patterns - 11422 of which are translated into English (UK/cm).
We work hard to bring you the best knitting and crochet have to offer, inspiration and advice as well as great quality yarns at incredible prices! Would you like to use our patterns for other than personal use? You can read what you are allowed to do in the Copyright text at the bottom of all our patterns. Happy crafting!
Comments / Questions (144)
Hello, what size would you recommend for a 42 inch chest? A jumper that fits well measures 53cm across the bottom, 63cm across the chest, 69cm from top to bottom, 69cm on the arm and 85cm neck to wrist. Would you suggest going for XL? Thank you
10.10.2018 - 18:25DROPS Design answered:
Hi Amber, All measurements for the different sizes are shown in a sketch at the bottom of the pattern. Happy knitting!
11.10.2018 - 07:56Merci beaucoup de vos explications ;j’ai enfin compris. Je ne connaissais pas la technique qui est intéressante
05.10.2018 - 08:30Bonjour, je ne comprends absolument pas les explications pour le dos à partir du moment où il est écrit de rabattre en même temps . J’ai pourtant essayé de comprendre « astuce pour rabattre ». On ne parle que des mailles centrales Comme il n’y a pas de schéma des différentes parties (hauteur du dos et du devant, manches seules ) ,j’ai du mal à voir comment se terminent les différentes parties
04.10.2018 - 20:27DROPS Design answered:
Bonjour Jackie, pour éviter que l'ouvrage ne soit trop large si on rabat toutes les mailles telles qu'elles se présentent, on va diminuer au-dessus des torsades des diagrammes A.1, A.2 et A.3 en même temps que l'on va rabattre les mailles - cette vidéo montre comment procéder. Le dos et le devant s'arrêtent avant les épaules, les manches continuent au-dessus des épaules et on coudra ensuite le dos et le devant le long de la patte de la fin de la manche - cf schéma. Bon tricot!
05.10.2018 - 07:43Kerstin Storbacka-Kullbäck wrote:
Har frågat tidigare i april i våras om bakstycket endast är 12 cm från avmaskning för ärmhålet upp till sista varvet på bakstycket. Blir ärmarna hopsydda? Tappade lusten då, men har tagit tag i arbetet igen. Min fråga kvarstår, så skulle jag gärna vilja ha en bild av ryggtavlan på killen om det går. Mvh Kerstin
25.09.2018 - 08:55DROPS Design answered:
Hej Kerstin, ja det stemmer, i og med at de midterste 41 masker fortsætter op på skulderen. Når du skal sy stykkerne sammen kan du se at bagstykkes syes til den ene langside af skulderstykket fra ærmet og forstykket til den anden side af skulderstykket på ærmet. Se også gerne måleskitsen. God fornøjelse!
03.10.2018 - 15:50Anna wrote:
Thank you that makes perfect sense now. Your help is much appreciated.
13.09.2018 - 14:23Anna wrote:
Thank you for getting back to me, however, there is no cable on the sleeve. I understand that you knit 2 together over 8 stiches within the 19 stiches that are being cast off. What I am trying to establish is if the is 8 x knit 2 together (i.e. 16 stiches) or 4 x knit 2 together (i.e. 8 stiches). Thank you for your help. Kind regards Anna
13.09.2018 - 12:02DROPS Design answered:
Dear Anna, even if there is no cable in the sleeve, you just have to decrease 8 sts over these 19 sts together 2 by 2 as you will work for a cable, just work K2 tog evenly space over these 19 sts , for ex: K2 tog, K4, K2 tog, K4, K2 tog, K3, K2 tog while casting them off as shown in the video at the same time. Happy knitting!
13.09.2018 - 13:12Anna wrote:
At the shaping for the top of the sleeve, when you say 8 of these stitches are knitted together 2 and 2 before they are cast off, do you mean that you end up with 4 Stiches. If so, I presume that you also use the cast off tip by knitting one stick between each of the knit 2 together to assist with keeping the cast off edge less bulky, is that correct. Thank you for your help. I really love your patterns, this is the 3rd one I have done.
13.09.2018 - 01:28DROPS Design answered:
Dear Anna, you are casting off a total of 19 sts, at the same time within these 19 sts you will K2 tog the sts from cable - see video below how to cast off and decrease at the same time. Happy knitting!
13.09.2018 - 08:46Jeg skjønner virkelig ikke forklaringen på ermene, hvor man skal felle19 masker samtidig som 8 av disse 19 maskene strikkes sammen 2 og 2 før de felles av. Kan jeg først strikke sammen 2 og 2 masker fire ganger (8 masker) for så å felle 15 masker, og disse fordeles jevnt over de 37 maskene som man nå har igjen på ermet? Og deretter felles 3 masker jevnt fordelt, så to og man strikker de 16 gjenstående til hel lengde på ermet er oppnådd?
12.09.2018 - 21:12DROPS Design answered:
Hei Tove. Det felles ikke jevnt fordelt, det felles i dene ene siden. Altså du feller av maskene. Du skal felle av 19 masker, men 8 av dem strikkes sammen 2 og 2 før de felles som vanlig (se avfellingstips). Her er en video som viser hvordan dette gjøres. God fornøyelse.
13.09.2018 - 09:51Hei, noen av forklaringene i denne oppskriften er virkelig vanskelige å skjønne. Det gjelder alle de gangene det står noe om felling og at man SAMTIDIG skal strikke masker sammen. Forklaringen på ermene, hvor man skal felle19 masker samtidig som 8 av disse 19 maskene strikkes sammen 2 og 2 før de felles av er for eksempel vanskelig å skjønne. Skal man strikke 2 og 2 masker sammen fire ganger jevnt fordelt på de 19 maskene, samtidig som de felles av?
09.09.2018 - 18:05Bonjour je suis aux emmanchures à commencer le dos en aller retour. Mon soucis est que en suivant le schémas je devrais faire ma torsadé sur l arrière donc dois je faire un rang retour qui va décalé mes torsades ou ya til une astuce pour qu au moment de la séparation je retombe sur le devant pour faire mes croisements ? Cordialement roxane
31.07.2018 - 23:57DROPS Design answered:
Bonjour Mme Reveillaud, quand on divise un ouvrage pour le continuer en allers et retours, il faut toujours bien veiller à la continuité du motif, plutôt que de faire un rang en trop entre 2 torsades, vous pouvez couper le fil et reprendre l'ouvrage pour que les torsades soient toujours sur l'endroit. Bon tricot!
01.08.2018 - 08:57