DROPS Lima
DROPS Lima
65% Wool, 35% Alpaca
from 2.60 € /50g
Get the yarn to make this pattern from 36.40€.

The yarn cost is calculated from the pattern’s smallest size and the yarn’s cheapest product type. Looking for an even better price? You might find it on the DROPS Deals!

DROPS SS24

Lofoten

Men’s knitted jumper with round yoke and multi-coloured Nordic pattern, worked top down. Sizes S - XXXL. The piece is worked in DROPS Lima.

DROPS 185-3
DROPS Design: Pattern no li-091
Yarn group B
-----------------------------------------------------------
Sizes: S - M - L - XL - XXL - XXXL
Materials:
DROPS LIMA from Garnstudio (belongs to yarn group B)
650-750-750-800-900-1000 g colour 4305, dark blue
150-150-150-200-200-200 g colour 0100, off white

The piece can also be knitted with yarn from:
"Alternative yarn (Yarn Group B)" – see link below.

DROPS DOUBLE POINTED NEEDLES AND CIRCULAR NEEDLE (40 + 80 cm) SIZE 4 MM – or the size needed to get 21 stitches and 28 rows stocking stitch on 10 cm in width and 10 cm in height.

DROPS DOUBLE POINTED NEEDLES AND CIRCULAR NEEDLE (40 + 80 cm) SIZE 3 MM for rib - or the size needed to get 23 stitches and 32 rows stocking stitch on 10 cm in width and 10 cm in height.
----------------------------------------------------------

-------------------------------------------------------

Alternative Yarn – See how to change yarns here
Yarn Groups A to F – Use the same pattern and change the yarn here
Yarn usage using an alternative yarn – Use our yarn converter here

-------------------------------------------------------

DROPS Lima
DROPS Lima
65% Wool, 35% Alpaca
from 2.60 € /50g
Get the yarn to make this pattern from 36.40€.

The yarn cost is calculated from the pattern’s smallest size and the yarn’s cheapest product type. Looking for an even better price? You might find it on the DROPS Deals!

Pattern instructions

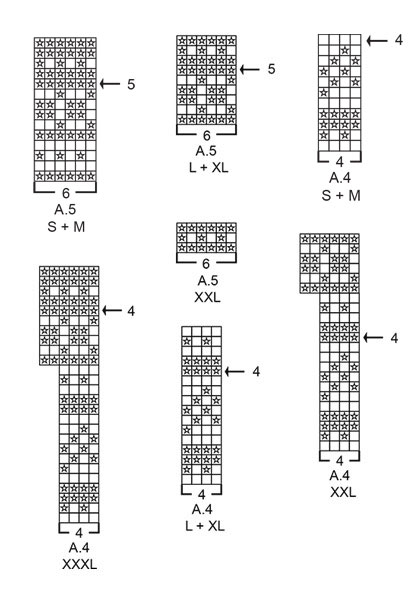
INFORMATION FOR THE PATTERN:

DECREASE/INCREASE TIP:
To work out how to decrease/increase evenly, count the total number of stitches on the needle (e.g. 104 stitches) and divide by the number of decreases/increases to be made (e.g. 12) = 8.6.
In this example, knit alternately every 7th and 8th stitch and every 8th and 9th stitch together when decreasing.
If increasing, make 1 yarn over after alternately every 8th and 9th stitch, on the next round knit the yarn overs twisted to prevent holes.

KNITTING TIP-1:
To avoid the knitting tension becoming tighter when working pattern, it is important that the strands at the back of the piece are not tight. You can increase a needle size when working pattern if this is a problem.

KNITTING TIP-2 (for yoke):
If the knitting tension is not correct in height and you work more rows on 10 cm than suggested in the text, the yoke will be too short and the armholes too small. This can be compensated for by working regularly on the yoke an extra round of stocking stitch, on the rounds with 1 colour.

PATTERN:
See diagrams A.1 to A.6. Choose diagram for your size (applies to A.4, A.5 and A.6). The whole pattern is worked in stocking stitch.

DECREASE TIP (for the sides of body and mid under sleeve):
Start 2 stitches before the marker thread, knit 2 together, marker thread, slip 1 stitch as if to knit, knit 1, pass the slipped stitch over the knitted stitch (= 2 stitches decreased).
----------------------------------------------------------

JUMPER:
The piece is worked in the round with circular needle, top down.
You can work an elevation in the back of the neck for a better fit so that the yoke is a bit higher at the back. This elevation can be left out; the neck will then be the same front and back – see description for elevation further down. After the yoke, the body is worked in the round with circular needle. The sleeves are worked in the round with double pointed needles, top down.

NECKLINE:
Cast on 104-108-112-120-124-132 stitches with circular needle size 3 mm and dark blue. Knit 1 round. Then work rib (= knit 2 / purl 2). When the rib measures 2-2-2-3-3-3 cm knit 1 round where you decrease 12-12-12-12-12-12 stitches evenly on round – read DECREASE/INCREASE TIP = 92-96-100-108-112-120 stitches.
Now you can work an elevation mid back of neck or go straight to working the yoke if you do not want an elevation.

ELEVATION:
Skip this section if you do not want an elevation.
Insert 1 marker thread at the beginning of the round = mid back. Start from the right side with dark blue and knit 11-11-12-13-13-14 stitches beyond the marker, turn, tighten the strand and purl 22-22-24-26-26-28 stitches. Turn, tighten the strand and knit 33-33-36-39-39-42 stitches, turn, tighten the strand and purl 44-44-48-52-52-56 stitches. Turn, tighten the strand and knit 55-55-60-65-65-70 stitches, turn, tighten the strand and purl 66-66-72-78-78-84 stitches. Turn, tighten the strand and knit to mid back. Continue by working yoke as described below.

YOKE:
Change to circular needle size 4 mm. Knit 1 round. Now work A.1 in the round (= 23-24-25-27-28-30 repeats of 4 stitches). Continue the pattern and increase as shown in the diagram. Read KNITTING TIP-1 and KNITTING TIP-2. REMEMBER THE KNITTING TENSION!
When A.1 has been completed, there are 161-168-175-189-196-210 stitches on the needle.
Continue by working A.2 – AT THE SAME TIME on the first round increase 31-36-47-51-56-60 stitches evenly on round (marked with arrow-1 in A.2) = 192-204-222-240-252-270 stitches on the needle. Continue the pattern. On the round marked with arrow-2 in A.2 increase 28-36-38-40-48-50 stitches evenly on round = 220-240-260-280-300-320 stitches.
When A.2 has been completed, work A.3 in the round (= 11-12-13-14-15-16 repeats of 20 stitches). Continue the pattern and increase as shown in the diagram. After the last increase in A.3 there are 275-300-325-350-375-400 stitches on the needle. On the round marked with arrow-3 in A.3 increase 1-8-11-10-9-8 stitches evenly on round = 276-308-336-360-384-408 stitches.
When A.3 has been completed, work A.4 in the round (choose diagram for your size = 69-77-84-90-96-102 repeats of 4 stitches). On the round marked with arrow-4 in A.4 increase 22-20-26-26-24-34 stitches evenly on round = 298-328-362-386-408-442 stitches. When A.4 has been completed the piece measures approx. 25-25-26-27-29-31 cm from the cast on edge mid front.
The next round is worked as follows with dark blue: Knit 45-50-53-59-63-69 stitches (= ½ back piece), place the next 58-64-74-74-78-82 stitches on a thread for sleeve, cast on 8-8-10-10-12-14 new stitches on the needle (= in the side under the sleeve), knit 91-100-107-119-126-139 stitches (= front piece), place the next 58-64-74-74-78-82 stitches on a thread for sleeve, cast on 8-8-10-10-12-14 new stitches on the needle (= in the side under the sleeve) and knit the remaining 46-50-54-60-63-70 stitches (= ½ back piece). Cut the strand. Body and sleeves are finished separately. THE PIECE IS NOW MEASURED FROM HERE!

BODY:
= 198-216-234-258-276-306 stitches. Insert 1 marker thread in the middle of the 8-8-10-10-12-14 stitches cast on under the sleeve in each side and start the round by one of the marker threads.
SIZES S, M, L, XL and XXL:
Work A.5 (choose diagram for your size) in the round (= 33-36-39-43-46-51 repeats of 6 stitches). On the round marked with arrow-5 in A.5 adjust the number of stitches to = 200-216-232-256-280 stitches on the round (applies to S, L, XL and XXL - make sure you increase/decrease the same number of stitches on the front and back piece) (= 100-108-116-128-140 stitches on front and back piece).
When A.5 has been completed, work A.6 in the round (= 25-27-29-32-35 repeats of 8 stitches). Continue until A.6 has been completed. Then continue as described under ALL SIZES.
SIZE XXXL = 306 stitches. Work A.6 in the round AT THE SAME TIME on the first round decrease 2 stitches evenly on round = 304 stitches (= 38 repeats of 8 stitches – NOTE: in this size, you do not work A.5 because the repeat is worked in A.4). Continue the pattern until A.6 has been completed.

ALL SIZES:
= 200-216-232-256-280-304 stitches on the needle and the piece measures approx. 8-8-6-6-4-3 cm from the separation by the armholes. Continue working stocking stitch in dark blue.
AT THE SAME TIME on the first round after A.6 decrease 1 stitch on each side of both marker threads – read DECREASE TIP (= 4 stitches decreased). Decrease in this way every 6-11-12-8-9-14 cm a total of 4-3-3-4-4-3 times in each side = 184-204-220-240-264-292 stitches.
When the piece measures 29-31-32-33-33-33 cm from the separation increase 36-40-44-48-52-56 stitches evenly on round = 220-244-264-288-316-348 stitches. Change to circular needle size 3 mm. Work rib (= knit 2 /purl 2) for 8 cm. Cast off with knit over knit and purl over purl - but to avoid the cast off edge being tight, make 1 yarn over after every 8th stitch at the same time as casting off (the yarn overs are cast off as normal stitches). The whole jumper measures approx. 62-64-66-68-70-72 cm from the shoulder down.

SLEEVE:
Place the 58-64-74-74-78-82 stitches from the thread in one side of the piece on double pointed needles size 4 mm. In addition, knit up 1 stitch in each of the 8-8-10-10-12-14 stitches cast on under the sleeve = 66-72-84-84-90-96 stitches. Insert 1 marker thread in the middle of the 8-8-10-10-12-14 stitches and start the round by the marker thread (= mid under the sleeve).
SIZES S, M, L, XL and XXL:
Work A.5 in the round (= 11-12-14-14-15 repeats of 6 stitches). On the last round in A.5 decrease 2-0-4-4-2 stitches evenly on round = 64-72-80-80-88 stitches. When A.5 has been completed, work A.6 in the round.
SIZE XXXL: Work A.6 in the round (= 12 repeats of 8 stitches – NOTE: in this size you do not work A.5 because the repeat is worked in A.4).

ALL SIZES:
When A.6 has been completed, continue with stocking stitch and dark blue.
AT THE SAME TIME on the next round decrease 2 stitches mid under sleeve. Decrease in this way every 10th-7th-6th-6th-5th-4th round a total of 9-12-15-15-17-20 times = 46-48-50-50-54-56 stitches.
Continue working until the sleeve measures 38-38-39-38-36-35 cm from the separation (shorter lengths in larger sizes because of longer yoke). Knit 1 round where you increase 10-8-10-10-10-12 stitches evenly on round = 56-56-60-60-64-68 stitches. Change to double pointed needles size 3 mm and work rib (= knit 2 / purl 2) for 8 cm. Cast off with knit over knit and purl over purl - but to avoid the cast off edge being tight, make 1 yarn over after every 8th stitch at the same time as casting off (the yarn overs are cast off as normal stitches). The sleeve measures approx. 46-46-47-46-44-43 cm from the separation. Work the other sleeve in the same way.

This pattern has been corrected.

Updated online: 08.02.2019
New yarn amount:
DROPS LIMA from Garnstudio (belongs to yarn group B)
650-750-750-800-900-1000 g colour 4305, dark blue

Diagram

symbols = dark blue
symbols = off white
symbols = between 2 stitches make 1 yarn over with background colour (dark blue) in the pattern stripes, on the next round knit the yarn overs twisted to prevent holes
symbols = increase round - see description in text!
diagram
diagram
diagram

Each of our patterns has specific tutorial videos to help you.

Do you have a question? See a list of frequently asked questions (FAQ)

Knitting tension is what determines the final measurements of your work, and is usually measured per 10 x 10 cm. It is provided like so: number of stitches in width x number of rows in height - eg: 19 stitches x 26 rows = 10 x 10 cm.

The knitting tension is very individual; some people knit/crochet loosely while others work tightly. You adjust the knitting tension with the needle size, which is why the suggested needle size is only meant as a guide! You need to adjust this (up or down) to ensure that YOUR knitting tension matches the knitting tension provided in the pattern. If you work with a different knitting tension than provided you will have a different yarn consumption, and your work will have different measurements than what the pattern suggests.

The knitting tension also determines which yarns can replace each other. As long as you achieve the same knitting tension you can replace one yarn with another.

See DROPS lesson: How to measure your tension/gauge

See DROPS video: How to make a gauge tension swatch

The required amount of yarn is provided in grams, eg: 450 g. To calculate how many balls you’ll need you first need to know how many grams are in 1 ball (25g, 50g or 100g). This information is available if you click on the individual yarn quality on our pages. Divide the amount required with the amount of each ball. For example, if each ball is 50g (the most common amount), the calculation will be as follows: 450 / 50 = 9 balls.

The important thing when changing from one yarn to another is that the knitting/crochet tension remains the same. This is so that the measurements of the finished piece will be the same as on the sketch provided. It is easier to achieve the same knitting tension using yarns from the same yarn group. It is also possible to work with multiple strands of a thinner yarn to achieve the knitting tension of a thicker one. Please try our yarn converter. We recommend you to always work a test swatch.

Please NOTE: when changing yarn the garment might have a different look and feel to the garment in the photo, due to individual properties and qualities of each yarn.

See DROPS lesson: Can I use a different yarn than the one mentioned in the pattern?

All our yarns are categorised into yarn groups (from A to F) according to thickness and knitting tension – group A contains the thinnest yarns and group F the thickest. This makes it easier for you to find alternative yarns to our patterns, should you wish to switch yarn. All yarns within the same group have a similar knitting tension and can easily replace each other. However, different yarn qualities have different structures and properties which will give the finished work a unique look and feel.

Click here for an overview of the yarns in each yarn group

At the top of all our patterns you’ll find a link to our yarn calculator, which is a helpful tool should you wish to use a different yarn than suggested. By filling in the yarn quality you wish to replace, the amount (in your size) and number of strands, the calculator will present good alternative yarns with the same knitting tension. Additionally it will tell you how much you’ll require in the new qualities and whether you’ll need to work with multiple strands. Most skeins are 50g (some are 25g or 100g).

If the pattern is worked with multiple colours, every colour will have to be calculated separately. Similarly, if the pattern is worked with several strands of different yarns (for example 1 strand Alpaca and 1 strand Kid-Silk) you will have to find alternatives for each, individually.

Click here to see our yarn calculator

Since different yarns have different qualities and textures we have chosen to keep the original yarn in our patterns. However, you can easily find options among our available qualities by using our yarn calculator, or simply pick a yarn from the same yarn group.

It is possible that some retailers still have discontinued yarns in stock, or that someone has a few skeins at home that they would like to find patterns for.

The yarn calculator will provide both alternative yarn as well as required amount in the new quality.

If you think it's hard to decide what size to make, it can be a good idea to measure a garment you own already and like the size of. Then you can pick the size by comparing those measures with the ones available in the pattern's size chart.

You'll find the size chart at the bottom of the pattern.

See DROPS lesson: How to read size chart

The needle size provided in the pattern serves only as a guide, the important thing is to follow the knitting tension. And since knitting tension is very individual, you will have to adjust the needle size to ensure that YOUR tension is the same as in the pattern – maybe you’ll have to adjust 1, or even 2 needle sizes, up or down to achieve the correct tension. For this, we recommend that you work test swatches.

Should you work with a different knitting tension than the one provided, the measurements of the finished garment might deviate from the measurement sketch.

See DROPS lesson: How to measure your tension/gauge

See DROPS video: How to make a tension/gauge swatch

Working a garment top-down provides more flexibility and room for personal adjustment. For example it is easier to try the garment on while working, as well as making adjustments to length of yoke and shoulder caps.

The instructions are carefully explaining every step, in the correct order. Diagrams are adjusted to the knitting direction and are worked as usual.

The diagram depicts all rows/rounds, and every stitch seen from the right side. It is read from bottom to top, from right to left. 1 square = 1 stitch.

When working back and forth, every other row is worked from the right side and every other row is worked from the wrong side. When working from the wrong side, the diagram will have to be worked reversed: from left to right, knit stitches are purled, purl stitches are knit etc.

When working in the round every round is worked from the right side and the diagram are worked from right to left on all rounds.

See DROPS lesson: How to read knitting diagrams

The diagram depicts all rows/rounds, and every stitch seen from the right side. It is worked from bottom to top, from right to left.

When working back and forth every other row is worked from the right side: from right to left and every other row is worked from the wrong side: from left to right.

When working in the round, every row in the diagram are worked from the right side, from right to left.

When working a circular diagram you start in the middle and work your way outwards, counter clockwise, row by row.

The rows usually start with a given number of chain stitches (equivalent to the height of the following stitch), this will either be depicted in the diagram or explained in the pattern.

See DROPS lesson: How to read crochet diagrams

Instructions for working several diagrams after each other on the same row/round, will often be written like so: “work A.1, A.2, A.3 a total of 0-0-2-3-4 times". This means you work A.1 once, then A.2 is worked once, and A.3 is repeated (in width) the number of times provided for your size – in this case like so: S = 0 times, M = 0 times, L=2 times, XL= 3 times and XXL = 4 times.

The diagrams are worked as usual: begin with the first row in A.1, then work the first row in A.2 etc.

See DROPS lesson: How to read knitting diagrams

See DROPS lesson: How to read crochet diagrams

The total width of the garment (from wrist-to-wrist) will be larger in the larger sizes, despite the actual sleeves being shorter. The larger sizes have longer sleeve caps and wider shoulders, so there will be a good fit in all sizes.

The measurement sketch/schematic drawing provides information regarding the full length of the garment. If it’s a jumper or a jacket the length is measured from the highest point on the shoulder closest to the neckline, and straight down to the bottom of the garment. It is NOT measured from the tip of shoulder. Similarly, the length of yoke is measured from the highest point on the shoulder and down to where yoke is split into body and sleeves.

On a jacket measures are never taken along bands, unless specifically stated. Always measure inside band stitches when measuring the length.

See DROPS lesson: How to read a schematic drawing

Diagrams are often repeated on the round or in height. 1 repeat is the diagram the way it appears in the pattern. If it says to work 5 repeats of A.1 in the round, then you work A.1 a total of 5 times after/next to each other in the round. If it says to work 2 repeats of A.1 vertically/in height you work the entire diagram once, then begin again at the start and work the entire diagram one more time.

Chain stitches are slightly narrower than other stitches and to avoid working the cast-on edge too tight, we simply chain more stitches to begin with. The stitch count will be adjusted on the following row to fit the pattern and measurement sketch.

The rib edge is more elastic and will contract slightly compared to, for example, stocking stitch. By increasing before the rib edge, you avoid a visible difference in width between the rib edge and the rest of the body.

It’s very easy to cast off too tightly, and by making yarn overs while casting off (and simultaneously casting these off) you avoid a too tight cast off edge.

See DROPS video: How to bind off with yarn overs (yo)

To achieve an even increase (or decrease) you can increase on, for example: every 3rd and 4th row alternately, like so: work 2 rows and increase on the 3rd row, work 3 rows and increase on the 4th. Repeat this until the increase is complete.

See DROPS lesson: Increase or decrease 1 st on every 3rd and 4th row alternately

Should you prefer to work in the round instead of back and forth, you may of course adjust the pattern. You’ll need to add steeks mid-front (usually 5 stitches), and follow the instructions. When you would normally turn and work from the wrong side, simply work across the steek and continue in the round. At the end you’ll cut the piece open, pick up stitches to work bands, and cover the cut edges.

See DROPS video: How to knit steeks and cut open

Should you prefer to work back and forth instead of in the round, you may of course adjust the pattern so you work the pieces separately and then assemble them at the end. Divide the stitches for the body in 2, add 1 edge stitch in each side (for sewing) and work the front and back pieces separately.

See DROPS lesson: Can I adapt a pattern for circular needles into straight needles?

Pattern repeats can vary slightly in the different sizes, in order to get the correct proportions. If you’re not working the exact same size as the garment in the photo, yours might deviate slightly. This has been carefully developed and adjusted so that the complete impression of the garment is the same in all sizes.

Make sure to follow instructions and diagrams for your size!

If you have found a pattern you like which is available in women’s size it’s not very difficult to convert it to men’s size. The biggest difference will be the length of sleeves and body. Start working on the women size that you think would fit across the chest. The additional length will be worked right before you cast off for the armhole/sleeve cap. If the pattern is worked top-down you can add the length right after the armhole or before the first decrease on sleeve.

Regarding additional yarn amount, this will depend on how much length you add, but it is better with a skein too many than too few.

All yarns will have excess fibres (from production) that might come off as lint or shedding. Brushed yarns (ie hairier yarns) have more of these loose, excess fibres, causing more shedding.

Shedding also depends on what is worn under or over the garment, and whether this pulls at the yarn fibres. It’s therefore not possible to guarantee that there will be no shedding

Below are some tips on how to get the best result when working with hairier yarns:

1. When the garment is finished (before you wash it) shake it vigorously so the looser hairs come off. NOTE: do NOT use a lint roller, brush or any method that pulls at the yarn.

2. Place the garment in a plastic bag and put it in your freezer - the temperature will cause the fibres to become less attached to each other, and excess fibres will come off easier.

3. Leave in the freezer for a few hours before taking it out and shaking it again.

4. Wash the garment according to the instructions on the yarn label.

Pilling is a natural process that happens to even the most exclusive of fibers. It's a natural sign of wear and tear that is hard to avoid, and that is most visible in high friction areas of your garment like a sweater's arms and cuffs.

You can make your garment look as new by removing the pilling, using a fabric comb or a pill/lint remover.

Still can't find the answer you need? Then scroll down and leave your question so one of our experts can try to help you. This will be done normally within 5 to 10 working days.
In the meantime, you can read the questions and answers that others have left to this pattern or join the DROPS Workshop on Facebook to get help from fellow knitters/crocheters!

You might also like...

Post a comment to pattern DROPS 185-3

We would love to hear what you have to say about this pattern!

If you want to leave a question, please make sure you select the correct category in the form below, to speed up the answering process. Required fields are marked *.

Comments / Questions (9)

country flag Marit Furuseth wrote:

Hvor mange nøster av lima garn medium størrelse trenger jeg til en enkel langermet genser?

15.08.2023 - 16:21

DROPS Design answered:

Hej Marit, Du kan søge på herre - genser - Lima og vælge hvilken model. Garnforbruget er afhængig af hvilken model du vælger :)

16.08.2023 - 11:25

country flag Ingegerd Mattsson wrote:

Jag fattar inte. Diagram A1 ska jag öka 25 maskor på först varvet., 25 maskor på 2:a varvet . 25 maskor på 3:e varvet ELLER Ska jag sticka hela diagramet A1 12 varv med 3 st ökningar på 5:e,9:e, 11:e varvet 25gånger

10.02.2023 - 18:05

DROPS Design answered:

Hei Ingegerd. Om du strikker i str. L skal A.1 strikkes 25 ganger = 100 masker. På 5. omgang øker du med 1 maske hver gang A.1 strikkes = 25 økte masker = 100 + 25 = 125 masker. På 9. omgang skal det igjen økes med 1 maske hver gang A.1 strikkes = 125 + 25 = 150 masker og på 11. omgang økes det også 1 maske hver gang A.1 strikkes = 150 + 25 = 175 masker. Så når A.1 er ferdigstrikket i høyden skal du ha 175 masker. mvh DROPS Design

13.02.2023 - 10:51

country flag Ingegerd wrote:

Drops mönster185-3 Large. oket diagram A.1 ska jag sticka hela diagramet 25ggr för att få rätt antal maskor eller vad

10.02.2023 - 06:41

DROPS Design answered:

Hej Ingegerd, ja du har 100 masker, gentager A.1 som består af 4 masker 25 gange på omgangen = 100 masker. Husk at tage ud på 5.omgang i A.1 :)

10.02.2023 - 11:56

country flag Marianne wrote:

Bonjour ! Je voudrais tricoter ce beau modèle mais je lis dans les commentaires que certaines tricoteuses ont 7 pelotes en trop . Qu' en est-il ? Merci de votre réponse .

17.06.2021 - 08:51

DROPS Design answered:

Bonjour Marianne, la quantité a été corrigée depuis à 750 g en taille L (au lieu des 850 à l'époque). Pensez à toujours bien vérifier votre échantillon en largeur et en hauteur - cette quantité correspond à l'échantillon et aux mesures du schéma. Bon tricot!

17.06.2021 - 13:13

country flag Chiara wrote:

Hi, I started to knit it a few times but everytime the neck curls up and folds out (like pointing towards the shoulders) I get to the A.3. Schemes, the husband tries it around is neck, stretches It but it doesn't straighten up. I am following the pattern to the dot, using lima yarn, right needles, knitting not too tight... is it normal? What can I do? It doesnt look like the one in the picture at all...

21.10.2019 - 22:41

DROPS Design answered:

Dear Chiara, it's a bit tricky to have an idea without seing your work, please show it to your store (even per mail), it might be just a matter of length (when you will have finished yoke and divide piece for sleeve, this may disappear), but your DROPS store should be able to help you when seing it. Happy knitting!

22.10.2019 - 10:50

country flag FOUERE Christiane wrote:

Je viens de terminer ce pull en taille L = 850 g coloris 4305 soit 17 pelotes. Rien à dire sur le pull qui est de taille impeccable et qui est Magnifique mais...... j'ai 7 pelotes en trop !!! Comment cela se fait il ? Il faut rectifier les quantités sur les explications.

25.01.2019 - 15:04

country flag Judi wrote:

I usually wear a female sweater size large. What size would I knit this sweater for me??

19.07.2018 - 18:49

DROPS Design answered:

Hi Judy, The diagram right at the bottom of the pattern gives you the measurements for each size. Happy knitting!

20.07.2018 - 08:01

country flag Wally wrote:

Bei mir sind auch 7 Knäuel Blau übrig, bei Größe L. (Bei 850 gr. Blau)

28.03.2018 - 17:14

country flag Annette Tünker wrote:

Ich habe dieses Model in Gr. M genau nach Anleitung gestrickt. Alles passte genau und der Pullover ist sehr schön. Aber ich habe 7 (!) Knäuel dunkelblau übrig. Kann es sein, dass die Mengenangabe nicht stimmt?

08.02.2018 - 15:03