DROPS Karisma
DROPS Karisma
100% Wool
from 3.00 $ /50g
Get the yarn to make this pattern from 42.00$.

The yarn cost is calculated from the pattern’s smallest size and the yarn’s cheapest product type. Looking for an even better price? You might find it on the DROPS Deals!

DROPS SS24

Dalvik

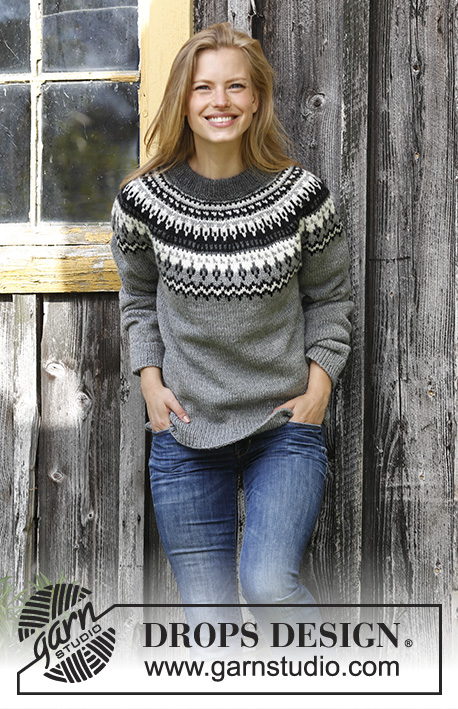
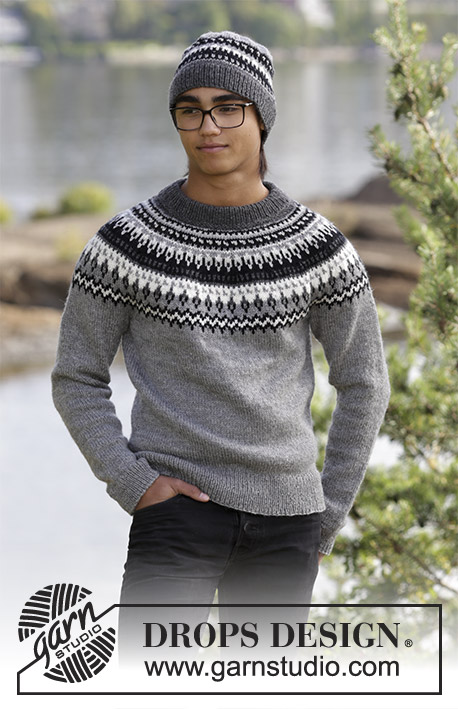
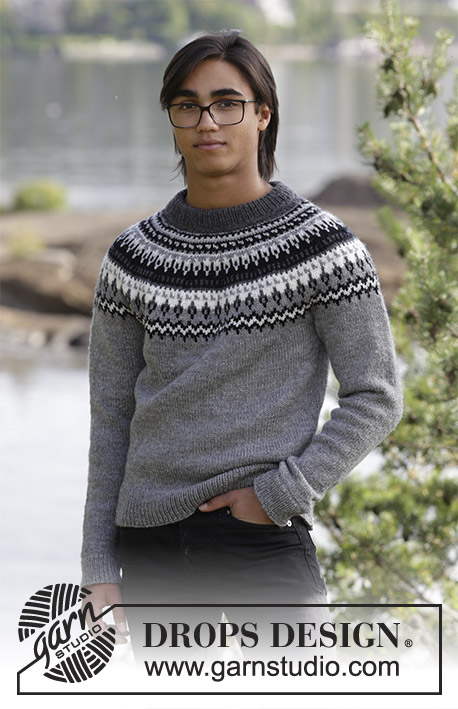
The set consists of: Men’s knitted sweater with raglan, round yoke and multi-colored Nordic pattern and knitted hat with multi-colored Nordic pattern. Sizes S - XXXL. The piece is worked in DROPS Karisma.

DROPS 185-1
DROPS Design: Pattern no u-845
Yarn group B
-----------------------------------------------------------
For the whole set there will be enough with:
450-500-550-600-650-700 g color 21, medium gray,
100-150-150-150-150-150 g color 16, dark gray,
50-100-100-100-100-100 g color 05, black,
50 g for all sizes in color 01, off white,
50 g for all sizes in color 72, light pearl gray.
-----------------------------------------------------------

SWEATER:
Sizes: S - M - L - XL - XXL - XXXL
Materials:
DROPS KARISMA from Garnstudio (belongs to yarn group B)
400-450-500-550-600-650 g color 21, medium gray
50-100-100-100-100-100 g color 16, dark gray
50-100-100-100-100-100 g color 05, black
50-50-50-50-50-50 g color 01, off white
50-50-50-50-50-50 g color 72, light pearl gray

The piece can also be knitted with yarn from:
"Alternative yarn (Yarn Group B)" – see link below.

DROPS DOUBLE POINTED NEEDLES AND CIRCULAR NEEDLE (40 and 80 cm / 16" and 32") SIZE 4 mm/US 6 – or the size needed to get 21 stitches and 28 rows stockinette stitch on 10 cm / 4" in width and 10 cm / 4" in height.

DROPS DOUBLE POINTED NEEDLES AND CIRCULAR NEEDLE (40 and 80 cm / 16" and 32") SIZE 3 mm/US 2.5 for rib - or the size needed to get 23 stitches and 32 rows stockinette stitch on 10 cm / 4" in width and 10 cm / 4" in height.
----------------------------------------------------------

HAT:
Sizes: S/M – L/XL
Fits head size: 57/59 - 59/61 cm / 22¾" - 23½"
Materials:
DROPS KARISMA from Garnstudio (belongs to yarn group B)
50 g for both sizes in all colors:
color 01, off white
color 72, light pearl gray
color 21, medium gray
color 16, dark gray
color 05, black

You can replace the DROPS Karisma colours used in this pattern with many other colour combinations. Check the pattern pictures for inspiration and the Comments section to find out the exact colour numbers in the samples.
The piece can also be knitted with yarn from:
"Alternative yarn (Yarn Group B)" – see link below.

DROPS DOUBLE POINTED NEEDLES AND CIRCULAR NEEDLE (40 cm / 16") SIZE 4 mm/US 6 - or the size needed to get 21 stitches and 28 rows stockinette stitch on 10 cm / 4" in width and 10 cm / 4" in height.

DROPS CIRCULAR NEEDLE (40 cm / 16") SIZE 3 mm/US 2.5 for rib - or the size needed to get 23 stitches and 32 rows stockinette stitch on 10 cm / 4" in width and 10 cm / 4" in height.

----------------------------------------------------------

Color combinations shown are:
A) DROPS Karisma 69, 50, 56, 01, 55.
B) DROPS Karisma 55, 52, 56, 01, 77.
-------------------------------------------------------

-------------------------------------------------------

Alternative Yarn – See how to change yarns here
Yarn Groups A to F – Use the same pattern and change the yarn here
Yarn usage using an alternative yarn – Use our yarn converter here

-------------------------------------------------------

DROPS Karisma
DROPS Karisma
100% Wool
from 3.00 $ /50g
Get the yarn to make this pattern from 42.00$.

The yarn cost is calculated from the pattern’s smallest size and the yarn’s cheapest product type. Looking for an even better price? You might find it on the DROPS Deals!

Pattern instructions

NOTE: This pattern is written in American English. All measurements in charts are in cm. For conversion from inches to cm - click here. There are different terms for crocheting in American and British English. If this pattern includes crochet, click for "crochet terms" here. For this pattern in British English, please click here.
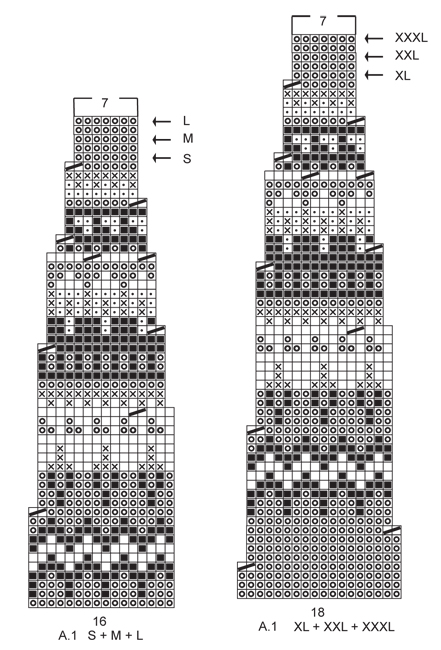
INFORMATION FOR THE PATTERN:

RIDGE/GARTER STITCH (worked in the round):
1 ridge = 2 rounds. Knit 1 round and purl 1 round.

INCREASE TIP (for sides of body and mid under sleeves):
Start 1 stitch before the marker, make 1 yarn over, knit 2 (the marker sits in the middle of these 2 stitches), make 1 yarn over (= 2 stitches increased). On the next round knit the yarn overs twisted to avoid holes.

DECREASE/INCREASE TIP:
To work out how to decrease/increase evenly, count the total number of stitches on the needle (e.g. 230 stitches), and divide by the number of decreases/increase to be made (e.g. 46) = 5. In this example, when decreasing knit every 4th and 5th stitch together. If you are increasing, make 1 yarn over after every 5th stitch, on the next round knit the yarn overs twisted to avoid holes.

RAGLAN:
Decrease to raglan on each side of the marker in each transition between body and sleeves. Start 2 stitches before the marker, knit 2 together, marker sits here, slip 1 stitch as if to knit, knit 1, pass the slipped stitch over the knitted stitch (= 2 stitches decreased).

PATTERN:
Sweater: See diagram A.1. Choose diagram for your size.
Hat: See diagram A.2.
The diagrams show all the rows in the pattern seen from the right side.
The whole pattern is worked in stockinette stitch.

KNITTING TIP:
To avoid the knitting gauge becoming tighter when working pattern with more than one color, it is important that the strands at the back of the piece do not pull. You can increase a needle size when working pattern if this is a problem.
----------------------------------------------------------

SWEATER:
The piece is worked in the round with circular needle, bottom up. The sleeves are worked in the round with double pointed needles.

BODY:
Cast on 230-252-270-300-332-362 stitches with circular needle size 3 mm / US 2.5 and medium gray. Work rib (knit 1 / purl 1) for 7 cm / 2¾". Knit 1 round where you decrease 46-50-50-60-70-72 stitches evenly on round – read DECREASE/INCREASE TIP = 184-202-220-240-262-290 stitches. Change to circular needle size 4 mm / US 6. Continue with stockinette stitch. REMEMBER THE GAUGE! On the next round, insert 1 marker at the beginning of the round and 1 marker after 92-101-110-120-131-145 stitches (= in the sides). Now increase 1 stitch on each side of both markers – read INCREASE TIP (= 4 stitches increased on the round). Increase in each side every 22nd-23rd-24th-24th-28th-28th round a total of 4 times = 200-218-236-256-278-306 stitches. When the piece measures 35-36-37-37-39-40 cm / 13¾"-14¼"-14½"-14½"-15¼"-15¾", bind off 8-8-10-10-12-14 stitches in each side for the armholes (i.e. Bind off 4-4-5-5-6-7 stitches on each side of both markers) = 92-101-108-118-127-139 stitches left on the front and back pieces. Lay the piece to one side and work sleeves.

SLEEVE:
Cast on 66-66-76-76-76-84 stitches with double pointed needles size 3 mm / US 2.5 and medium gray. Work rib (knit 1 /purl 1) for 5 cm / 2". Knit 1 round where you decrease 18-18-22-22-22-24 stitches evenly on round = 48-48-54-54-54-60 stitches. Insert 1 marker at the beginning of the round (= mid under sleeve). Change to double pointed needles size 4 mm / US 6 and work stockinette stitch in the round. When the piece measures 6-7-9-7-6-10 cm / 4" increase 2 stitches mid under the sleeve – read INCREASE TIP. Increase in this way every10th-8th-9th-8th-7th-6th round a total of 12-14-12-14-16-16 times = 72-76-78-82-86-92 stitches. When the piece measures 49-48-48-46-47-46 cm / 19¼"-19"-19"-18"-18½"-18" (NOTE: Shorter measurements in the larger sizes because of broader shoulder measurements), bind off the middle 8-8-10-10-12-14 stitches under the sleeve = 64-68-68-72-74-78 stitches left on the needle. Lay the piece to one side and work one more sleeve.

YOKE:
Place the sleeves on the same circular needle as the body where you bind off stitches for the armholes = 312-338-352-380-402-434 stitches on the needle. Insert 1 marker in each transition between body and sleeves (= 4 markers). Work stockinette stitch with medium gray. AT THE SAME TIME on the first round decrease to RAGLAN – see description above (= 8 stitches decreased). Decrease in this way every 2nd round a total of 2-2-3-3-3-3 times = 296-322-328-356-378-410 stitches. After the last round of decreases, knit 1 round where you decrease 24-34-24-32-36-32 stitches evenly on round = 272-288-304-324-342-378 stitches left on needle. Continue by working pattern according to diagram A.1 (choose diagram for your size = 17-18-19-18-19-21 repeats on the round). Read KNITTING TIP! Continue pattern in this way and decrease as shown in the diagram. When A.1 has been completed (finish after a round marked with an arrow in the diagram for your size) there are 119-126-133-126-133-147 stitches left on the needle and the piece measures approx. 54-56-58-60-62-64 cm / 21¼"-22"-22¾"-23⅝"-24⅜"-25¼". Now you can work an elevation in the back of the neck or go straight to working neckline if you do not want an elevation.

ELEVATION IN BACK OF NECK:
For a better fit you can work an elevation in the back of the neck with dark gray. Insert 1 marker mid back of neck. Knit 14-15-16-15-16-18 stitches past the marker, turn, tighten strand and purl 28-30-32-30-32-36 stitches back. Turn and knit 42-45-48-45-48-54 stitches, turn, tighten strand and purl 56-60-64-60-64-72 stitches back. Turn and knit 70-75-80-75-80-90 stitches, turn, tighten strand and purl 84-90-96-90-96-108 stitches back. Turn, tighten strand and knit to mid back.

NECKLINE:
Knit 1 round with dark gray where you decrease 25-30-35-26-29-39 stitches evenly on round = 94-96-98-100-104-108 stitches around the neck. Change to short circular needle size 3 mm / US 2.5. Work 2 RIDGES – see description above, AT THE SAME TIME on the last round, increase 22-22-24-26-26-26 stitches evenly on round = 116-118-122-126-130-134 stitches. Continue working rib (knit 1 /purl 1). When the rib measures 8 cm / 3⅛" work 1 ridge. Loosely bind off – Make sure the bind-off edge is not tight! Fold the collar double and fasten on the inside, ridge to ridge.

ASSEMBLY:
Sew the openings under the sleeves
----------------------------------------------------------

HAT:
The hat is worked in the round with circular needle. Change to double pointed needles when necessary.
Cast on 132-154 stitches with circular needle size 3 mm / US 2.5 and dark gray. Work rib (knit 1 /purl 1) for 4 cm / 1½". Change to circular needle size 4 mm / US 6. Knit 1 round AT THE SAME TIME as you decrease 24-34 stitches evenly on round – read DECREASE/INCREASE TIP = 108-120 stitches. Work A.2 (= 9-10 repeats of 12 stitches) – read KNITTING TIP! REMEMBER THE GAUGE!
When A.2 has been completed continue working with medium gray to finished length. When the piece measures 17-18 cm / 6 3/4-7" decrease 8-0 stitches evenly on round and at the same time insert 10 markers in the piece with 10-12 stitches between each marker = 100-120 stitches. On the next round decrease 1 stitch after each marker by knitting 2 stitches together (= 10 stitches decreased). Decrease in this way every 2nd round a total of 9-11 times = 10-10 stitches. On the next round knit all stitches together 2 and 2 = 5 stitches. Cut the strand, pull it through the remaining stitches and fasten well. The hat measures approx. 24-26 cm / 9½"-10¼" in height.

This pattern has been corrected.

Updated online: 04.06.2018
the first and last round of diagram A.2 has been corrected to dark grey
Updated online: 05.12.2019
A.1 S + M + L: row 39, 53, 54. A.1 XL + XXL + XXXL: row 47, 61, 62.

Diagram

All measurements in charts are in cm.

symbols = off white
symbols = light pearl grey
symbols = medium grey
symbols = dark grey
symbols = black
symbols = knit 2 together
diagram
diagram

Each of our patterns has specific tutorial videos to help you.

Do you have a question? See a list of frequently asked questions (FAQ)

Knitting tension is what determines the final measurements of your work, and is usually measured per 10 x 10 cm. It is provided like so: number of stitches in width x number of rows in height - eg: 19 stitches x 26 rows = 10 x 10 cm.

The knitting tension is very individual; some people knit/crochet loosely while others work tightly. You adjust the knitting tension with the needle size, which is why the suggested needle size only serve as a guide! You need to adjust this (up or down) to ensure that YOUR knitting tension matches the knitting tension provided in the pattern. If you work with a different knitting tension than provided you will have a different yarn consumption, and your work will have different measurements than what the pattern suggests.

The knitting tension also determines which yarns can replace each other. As long as you achieve the same knitting tension you can replace one yarn with another.

See DROPS lesson: How to measure your tension/gauge

See DROPS video: How to make a gauge tension swatch

The required amount of yarn is provided in grams, eg: 450 g. To calculate how many balls you’ll need you first need to know how many grams are in 1 ball (25g, 50g or 100g). This information is available if you click on the individual yarn quality on our pages. Divide the amount required with the amount of each ball. For example, if each ball is 50g (the most common amount), the calculation will be as follows: 450 / 50 = 9 balls.

The important thing when changing from one yarn to another is that the knitting/crochet tension remains the same. This is so that the measurements of the finished piece will be the same as on the sketch provided. It is easier to achieve the same knitting tension using yarns from the same yarn group. It is also possible to work with multiple strands of a thinner yarn to achieve the knitting tension of a thicker one. Please try our yarn converter. We recommend you to always work a test swatch.

Please NOTE: when changing yarn the garment might have a different look and feel to the garment in the photo, due to individual properties and qualities of each yarn.

See DROPS lesson: Can I use a different yarn than the one mentioned in the pattern?

All our yarns are categorised into yarn groups (from A to F) according to thickness and knitting tension – group A contains the thinnest yarns and group F the thickest. This makes it easier for you to find alternative yarns to our patterns, should you wish to switch yarn. All yarns within the same group have a similar knitting tension and can easily replace each other. However, different yarn qualities have different structures and properties which will give the finished work a unique look and feel.

Click here for an overview of the yarns in each yarn group

At the top of all our patterns you’ll find a link to our yarn converter, which is a helpful tool should you wish to use a different yarn than suggested. By filling in the yarn quality you wish to replace, the amount (in your size) and number of strands, the converter will present good alternative yarns with the same knitting tension. Additionally it will tell you how much you’ll require in the new qualities and whether you’ll need to work with multiple strands. Most skeins are 50g (some are 25g or 100g).

If the pattern is worked with multiple colours, every colour will have to be converted separately. Similarly, if the pattern is worked with several strands of different yarns (for example 1 strand Alpaca and 1 strand Kid-Silk) you will have to find alternatives for each, individually.

Click here to see our yarn converter

Since different yarns have different qualities and textures we have chosen to keep the original yarn in our patterns. However, you can easily find options among our available qualities by using our yarn converter, or simply pick a yarn from the same yarn group.

It is possible that some retailers still have discontinued yarns in stock, or that someone has a few skeins at home that they would like to find patterns for.

The yarn converter will provide both alternative yarn as well as required amount in the new quality.

If you think it's hard to decide what size to make, it can be a good idea to measure a garment you own already and like the size of. Then you can pick the size by comparing those measures with the ones available in the pattern's size chart.

You'll find the size chart at the bottom of the pattern.

See DROPS lesson: How to read size chart

The needle size provided in the pattern serves only as a guide, the important thing is to follow the knitting tension. And since knitting tension is very individual, you will have to adjust the needle size to ensure that YOUR tension is the same as in the pattern – maybe you’ll have to adjust 1, or even 2 needle sizes, up or down to achieve the correct tension. For this, we recommend that you work test swatches.

Should you work with a different knitting tension than the one provided, the measurements of the finished garment might deviate from the measurement sketch.

See DROPS lesson: How to measure your tension/gauge

See DROPS video: How to make a gauge tension swatch

Working a garment top-down provides more flexibility and room for personal adjustment. For example it is easier to try the garment on while working, as well as making adjustments to length of yoke and shoulder caps.

The instructions are carefully explaining every step, in the correct order. Diagrams are adjusted to the knitting direction and are worked as usual.

The diagram depicts all rows/rounds, and every stitch seen from the right side. It is read from bottom to top, from right to left. 1 square = 1 stitch.

When working back and forth, every other row is worked from the right side and every other row is worked from the wrong side. When working from the wrong side, the diagram will have to be worked reversed: from left to right, knit stitches are purled, purl stitches are knit etc.

When working in the round every round is worked from the right side and the diagram are worked from right to left on all rounds.

See DROPS lesson: How to read knitting diagrams

The diagram depicts all rows/rounds, and every stitch seen from the right side. It is worked from bottom to top, from right to left.

When working back and forth every other row is worked from the right side: from right to left and every other row is worked from the wrong side: from left to right.

When working in the round, every row in the diagram are worked from the right side, from right to left.

When working a circular diagram you start in the middle and work your way outwards, counter clockwise, row by row.

The rows usually start with a given number of chain stitches (equivalent to the height of the following stitch), this will either be depicted in the diagram or explained in the pattern.

See DROPS lesson: How to read crochet diagrams

Instructions for working several diagrams after each other on the same row/round, will often be written like so: “work A.1, A.2, A.3 a total of 0-0-2-3-4 times". This means you work A.1 once, then A.2 is worked once, and A.3 is repeated (in width) the number of times provided for your size – in this case like so: S = 0 times, M = 0 times, L=2 times, XL= 3 times and XXL = 4 times.

The diagrams are worked as usual: begin with the first row in A.1, then work the first row in A.2 etc.

See DROPS lesson: How to read knitting diagrams

See DROPS lesson: How to read crochet diagrams

The total width of the garment (from wrist-to-wrist) will be larger in the larger sizes, despite the actual sleeves being shorter. The larger sizes have longer sleeve caps and wider shoulders, so there will be a good fit in all sizes.

The measurement sketch/schematic drawing provides information regarding the full length of the garment. If it’s a jumper or a jacket the length is measured from the highest point on the shoulder (usually closest to the neckline), and straight down to the bottom of the garment. It is NOT measured from the tip of shoulder. Similarly, the length of yoke is measured from the highest point on the shoulder and down to where yoke is split into body and sleeves.

See DROPS lesson: How to read a schematic drawing

Diagrams are often repeated on the round or in height. 1 repeat is the diagram the way it appears in the pattern. If it says to work 5 repeats of A.1 in the round, then you work A.1 a total of 5 times after/next to each other in the round. If it says to work 2 repeats of A.1 vertically/in height you work the entire diagram once, then begin again at the start and work the entire diagram one more time.

Chain stitches are slightly narrower than other stitches and to avoid working the cast-on edge too tight, we simply chain more stitches to begin with. The stitch count will be adjusted on the following row to fit the pattern and measurement sketch.

The rib edge is more elastic and will contract slightly compared to, for example, stocking stitch. By increasing before the rib edge, you avoid a visible difference in width between the rib edge and the rest of the body.

It’s very easy to cast off too tightly, and by making yarn overs while casting off (and simultaneously casting these off) you avoid a too tight cast off edge.

See DROPS video: How to bind off with yarn overs (yo)

To achieve an even increase (or decrease) you can increase on, for example: every 3rd and 4th row alternately, like so: work 2 rows and increase on the 3rd row, work 3 rows and increase on the 4th. Repeat this until the increase is complete.

See DROPS lesson: Increase or decrease 1 st on every 3rd and 4th row alternately

Should you prefer to work in the round instead of back and forth, you may of course adjust the pattern. You’ll need to add steeks mid-front (usually 5 stitches), and follow the instructions. When you would normally turn and work from the wrong side, simply work across the steek and continue in the round. At the end you’ll cut the piece open, pick up stitches to work bands, and cover the cut edges.

See DROPS video: How to knit steeks and cut open

Should you prefer to work back and forth instead of in the round, you may of course adjust the pattern so you work the pieces separately and then assemble them at the end. Divide the stitches for the body in 2, add 1 edge stitch in each side (for sewing) and work the front and back pieces separately.

See DROPS lesson: Can I adapt a pattern for circular needles into straight needles?

Pattern repeats can vary slightly in the different sizes, in order to get the correct proportions. If you’re not working the exact same size as the garment in the photo, yours might deviate slightly. This has been carefully developed and adjusted so that the complete impression of the garment is the same in all sizes.

Make sure to follow instructions and diagrams for your size!

If you have found a pattern you like which is available in women’s size it’s not very difficult to convert it to men’s size. The biggest difference will be the length of sleeves and body. Start working on the women size that you think would fit across the chest. The additional length will be worked right before you cast off for the armhole/sleeve cap. If the pattern is worked top-down you can add the length right after the armhole or before the first decrease on sleeve.

Regarding additional yarn amount, this will depend on how much length you add, but it is better with a skein too many than too few.

All yarns will have excess fibres (from production) that might come off as lint or shedding. Brushed yarns (ie hairier yarns) have more of these loose, excess fibres, causing more shedding.

Shedding also depends on what is worn under or over the garment, and whether this pulls at the yarn fibres. It’s therefore not possible to guarantee that there will be no shedding

Below are some tips on how to get the best result when working with hairier yarns:

1. When the garment is finished (before you wash it) shake it vigorously so the looser hairs come off. NOTE: do NOT use a lint roller, brush or any method that pulls at the yarn.

2. Place the garment in a plastic bag and put it in your freezer - the temperature will cause the fibres to become less attached to each other, and excess fibres will come off easier.

3. Leave in the freezer for a few hours before taking it out and shaking it again.

4. Wash the garment according to the instructions on the yarn label.

Pilling is a natural process that happens to even the most exclusive of fibers. It's a natural sign of wear and tear that is hard to avoid, and that is most visible in high friction areas of your garment like a sweater's arms and cuffs.

You can make your garment look as new by removing the pilling, using a fabric comb or a pill/lint remover.

Still can't find the answer you need? Then scroll down and leave your question so one of our experts can try to help you. This will be done normally within 5 to 10 working days.
In the meantime, you can read the questions and answers that others have left to this pattern or join the DROPS Workshop on Facebook to get help from fellow knitters/crocheters!

You might also like...

Dalvik

Justyna, Poland

Dalvik

Andreas Spiliotopoulos, Greece

Dalvik

Mari, Finland

Dalvik

Katie, United States

Pullover Dalvik sweater

Sonja, Germany

Post a comment to pattern DROPS 185-1

We would love to hear what you have to say about this pattern!

If you want to leave a question, please make sure you select the correct category in the form below, to speed up the answering process. Required fields are marked *.

Comments / Questions (87)

country flag Ann Reynders wrote:

Ik wil deze trui graag breien voor mijn echtgenoot maar in ander garen nl. Drops Soft Tweed. Hoeveel heb ik dan nodig voor XL? Kan deze ook gebreid worden met gewone naalden. Ik heb nog nooit met een ronde naald gebreid.

10.11.2022 - 10:51

DROPS Design answered:

Dag Ann,

DROPS Soft Tweed valt in dezelfde garengroep, dus deze is geschikt om te gebruiken. Je kunt de garenvervanger (zie link onderaan de materialenlijst bij het patroon) gebruiken om uit te rekenen hoeveel je dan nodig hebt.

Helaas is dit patroon niet geschikt om met rechte naalden te breien vanwege de ronde pas.

10.11.2022 - 16:55

country flag Heidi Strotkamp wrote:

Hallöchen, ich stricke diesen wundervollen Pullover. In der Anleitung für das Rumpfteil steht, das nach der Zunahme an einer gewissen Länge die Armausschnitte gemacht werden sollen. Bezieht sich die Länge ab Bündchen oder komplett? Viele Grüße Heidi Strotkamp

04.03.2022 - 19:10

DROPS Design answered:

Liebe Heidi. Es ist die Gesamtlänge. Viel Spaß beim stricken!

06.03.2022 - 15:08

country flag Renata wrote:

Buongiorno, come da modello L ho 133 maglie sul ferro e devo iniziare l'alzata sul dietro. Non ho capito quante maglie si trova il centro del collo, dove devo posizionarmi per iniziare alzata su dietro. grazie

14.02.2022 - 17:29

DROPS Design answered:

Buonasera Renata, per posizionare il segnapunti sul dietro del collo deve far riferimento ai segnapunti che ha posizionato in precedenza per dividere le maniche dal davanti e dietro. Buon lavoro!

14.02.2022 - 19:24

country flag Heidi Strotkamp wrote:

Hallöchen, ich möchte sehr gerne diesen Pullover stricken. Es ist geschrieben dass die Anleitung aktualisiert wurde. Wo sehr ich denn was aktualisiert wurde? Ist das Diagramm richtig? Ich bitte um baldige Antwort weil ich die Wolle bestellen muss. Viele Grüße Heidi Strotkamp

14.01.2022 - 07:56

DROPS Design answered:

Liebe Frau Strotkamp, wenn Sie dieses Modell noch nicht gedruckt hatten, dann können Sie es einfach so drucken, die Korrekturen wurden schon gemacht. Viel Spaß beim stricken!

14.01.2022 - 08:57

country flag Sophia wrote:

Liebes Team, ich stricke gerade diesen tollen Pulli und komme gut zurecht, vielen Dank für diese schöne Anleitung! Ich habe Rumpteil und beide Ärmel soweit und möchte sie nun zusammen fügen. Jetzt die Frage: wo beginn ich die Runde? logisch wäre für mich die hintere Mitte, liege ich da falsch? oder spielt es (insbesondere für das Muster später) keine Rolle, wo ich starte? Liebe Grüße, Sophia

14.12.2021 - 12:52

DROPS Design answered:

Liebe Sophia, also Runden bei der Passe können Sie in die hintere Mitte anfangen, oder zwischen Rückenteil und Ärmel. So wichtig ist es aber nicht, nur der hintere Mitte werden Sie später markieren (für die Erhöhung), so können Sie in der hintere Mittte anfangen. Viel Spaß beim stricken!

14.12.2021 - 17:04

country flag Agnes wrote:

Hej När det står att mönstret är uppdaterat Betyder det bara det? För ni har väl ändrat i texten Eller 🤔

28.11.2021 - 17:51

DROPS Design answered:

Hej Agnes. Ja när vi skriver att mönstret har uppdaterats så betyder det att vi har ändrat i texten sedan det publicerades första gången. Det är alltså bara att följa mönstret så blir det rätt. Mvh DROPS Design

29.11.2021 - 07:43

country flag Tina wrote:

Aus welchem Grund kann ich beim Ausdrucken der Anleitungen (nicht nur bei dieser) die Diagramme und die Maßzeichnung nicht mehr ausdrucken, es ist auch egal welches Endgerät ich dafür benutze. Es ist schon nervig jedesmal Screenshots davon machen zu müssen

19.09.2021 - 13:03

DROPS Design answered:

Liebe Tina, es sollte klappen... prüfen Sie, daß Ihr Drucker nicht ehemalige/ältere Einstellungen gespeichert hatte, und seien Sie sicher, daß "alle Seiten" ausgedruckt werden. Viel Spaß beim stricken!

20.09.2021 - 11:02

country flag Rosemary wrote:

Love this pattern. It was my first Fair Isle project.

12.09.2021 - 18:29

country flag Rosemary wrote:

I have finished my Dalvik sweater for my husband. It was my first Fair Isle knitting project. Your instructions are excellent but I am having trouble joining my yarn on a new ball. I usually overlapped 3stitches and threaded the tails on the end but I tried to do the Russian spliced joining and it was very noticeable in the finish. What is your recommended joining method please? Also, there was no mention whether one can 'float' yarn from say row one to row 6. ??

12.09.2021 - 18:28

country flag Marianne Bergkvist wrote:

Ni måste titta över garn-åtgången på mönstret. Jag behövde 11 nystan av grundfärgen i storlek large. Ni har uppgett att det räcker med 10 nystan. 50 gram för färg 16 och 50 gram för färg nummer 05 istället för 100 gram av varje.

07.09.2021 - 20:30