DROPS Baby Merino
DROPS Baby Merino
100% Wool
from 3.75 € /50g
Get the yarn to make this pattern from 15.00€.

The yarn cost is calculated from the pattern’s smallest size and the yarn’s cheapest product type. Looking for an even better price? You might find it on the DROPS Deals!

DROPS SS24

Very Berry

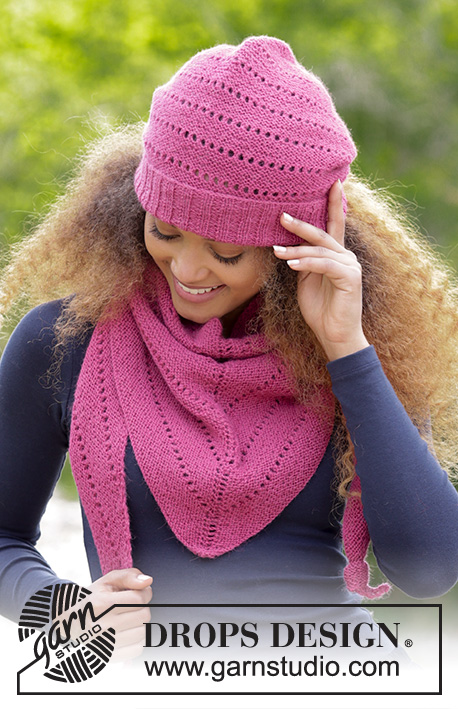
The set consists of: Knitted hat and shawl with garter stitch and lace pattern. The set is worked in DROPS BabyMerino.

DROPS 182-1
DROPS Design: Pattern no bm-043
Yarn group A
-----------------------------------------------------------
For the whole set there will be enough with aprox. 200-250 g DROPS Baby Merino.
-----------------------------------------------------------

HAT:
Sizes: S/M - L/XL
Fits head size: approx. 54/56 - 58/60 cm
Materials:
DROPS BABY MERINO from Garnstudio (belongs to Yarn Group A)
100 g for both sizes in colour 41, plum

The piece can also be knitted with yarn from:
"Alternative yarn (Yarn Group A)" – see link below.

DROPS DOUBLE POINTED NEEDLES AND CIRCULAR NEEDLE (40 cm) SIZE 3.5 MM – or the size needed to get 23 stitches and 45 rows garter stitch on 10 cm in width and 10 cm in height.

DROPS CIRCULAR NEEDLE SIZE 2.5 MM for rib - or the size needed to get 26 stitches and 34 rows stocking stitch on 10 cm in width and 10 cm in height.
-----------------------------------------------------------

SHAWL:
Measurements: Height: approx. 40 cm. Width: approx. 160 cm.
Materials:
DROPS BABY MERINO from Garnstudio (belongs to yarn group A)
150 g colour 41, plum

The piece can also be knitted with yarn from:
"Alternative yarn (Yarn Group A)" – see link below.

DROPS CIRCULAR NEEDLE (80 cm) SIZE 3.5 MM – or the size needed to get 23 stitches and 45 rows garter stitch on 10 cm in width and 10 cm in height.
----------------------------------------------------------

-------------------------------------------------------

Alternative Yarn – See how to change yarns here
Yarn Groups A to F – Use the same pattern and change the yarn here
Yarn usage using an alternative yarn – Use our yarn converter here

-------------------------------------------------------

DROPS Baby Merino
DROPS Baby Merino
100% Wool
from 3.75 € /50g
Get the yarn to make this pattern from 15.00€.

The yarn cost is calculated from the pattern’s smallest size and the yarn’s cheapest product type. Looking for an even better price? You might find it on the DROPS Deals!

Pattern instructions

NOTE: This pattern is written in British English. All measurements in charts are in cm. For conversion from cm to inches - click here. There are different terms for crocheting in British and American English. If this pattern includes crochet, click for "crochet terms" here. For this pattern in American English, please click here.
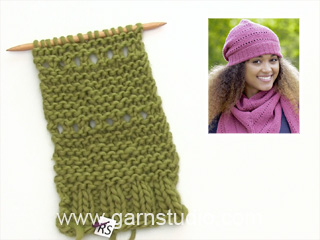
INFORMATION FOR THE PATTERN:

RIDGE/GARTER STITCH (worked back and forth):
1 ridge = Knit 2 rows.

PATTERN (for hat):
ROWS 1-12: Knit from right side, knit from wrong side.
ROW 13 (from right side): Knit 1, * knit 2 together, make 1 yarn over *, repeat from *-* until there is 1 stitch left, knit 1.
ROW 14 (from wrong side): Knit.
Repeat these 14 rows upwards.

CASTING OFF TIP:
To avoid the cast-off edge being tight, you can cast off with a ½ needle size larger.
----------------------------------------------------------

HAT:
The piece is worked back and forth with circular needle. Then you sew the hat together, mid back and fold the edge up.
Cast on 130-134 stitches with circular needle size 2.5 mm and Baby Merino. Purl 1 row from the wrong side. Work rib (= knit 2 / purl 2) with 1 stitch GARTER STITCH- see description above, in each side. Work until the piece measures 10 cm. Change to circular needle size 3.5 mm and knit 1 row while decreasing 16-14 stitches evenly on row = 114-120 stitches.
Now work PATTERN, see description above. REMEMBER THE KNITTING TENSION! When the piece measures 22-24 cm (adjust so that you have finished a row of holes, you can continue with garter stitch if necessary) continue with garter stitch to finished length. Now work 1 row where you decrease 2-8 stitches evenly on row = 112-112 stitches. Insert 10 markers in the piece without working the stitches as follows: Insert 1 marker after the first stitch, then insert 9 more markers with 11-11 stitches between them (there is 12 stitches after the last marker), 1 stitch. On the next row, decrease 1 stitch after each marker by knitting 2 stitches together (= 10 stitches decreased). Decrease in this way every 4th row (i.e. every other row from the right side) a total of 9-9 times = 22-22 stitches. On the next row knit all stitches together, 2 and 2 = 11-11 stitches. Cut the strand, pull it through the remaining stitches, pull tight and fasten well. The hat measures approx. 30-32 cm including the folding edge. Sew the hat together in the outermost loop of the outermost stitch so that the seam is not thick.
----------------------------------------------------------

SHAWL:
The piece is worked back and forth with circular needle, top down towards the tip mid front.
Cast on 9 stitches with circular needle size 3.5 mm and Baby Merino. Work and increase as follows:
ROW 1 (= right side): Knit 1, make 1 yarn over, knit 3, make 1 yarn over, knit 1 (= mid stitch), make 1 yarn over, knit 3, make 1 yarn over and knit 1 = 13 stitches. Insert a marker in the mid stitch and allow the marker to follow your work upwards to finished length.
ROW 2 (= wrong side): Knit 1, make 1 yarn over, knit until there is 1 stitch left on the row, make 1 yarn over, knit 1 = 15 stitches. REMEMBER THE KNITTING TENSION!
ROW 3 (= right side): Knit 1, make 1 yarn over, knit to mid stitch, make 1 yarn over, knit 1 (= mid stitch), make 1 yarn over, knit until there is 1 stitch left, make 1 yarn over, knit 1 = 4 stitches increased.
ROW 4 (= wrong side): Knit 1, make 1 yarn over, knit until there is 1 stitch left on the row, make 1 yarn over, knit 1 = 2 stitches increased.
ROWS 5-20: Repeat rows 3 and 4 (= a total of 6 stitches increased after every 2nd row). When these 20 rows have been worked there is 69 stitches on row.
ROW 21 (= right side): Knit 1, make 1 yarn over, * knit 2 together, 1 yarn over *, repeat from *-* as far as the mid stitch (NOTE: stitches that do not fit the pattern are knitted), make 1 yarn over, knit 1 (= mid stitch), make 1 yarn over, * Knit 2 together, 1 yarn over *, repeat from *-* until there is 1 stitch left, make 1 yarn over, knit 1 = 4 stitches increased.
ROW 22 (= wrong side): Knit 1, make 1 yarn over, knit until there is 1 stitch left on row, make 1 yarn over, knit 1 = 2 stitches increased.
ROWS 23-24: Repeat rows 3 and 4.
Repeat rows 3-24 downwards.
When the piece measures approx. 40 cm measured along the mid stitch, finish after the 20th row in the pattern (or continue in the same way to desired length and finish after the 20th row). Cast off - read CASTING OFF TIP above. Tie a knot in each end.
Do you have a question? See a list of frequently asked questions (FAQ)

Knitting tension is what determines the final measurements of your work, and is usually measured per 10 x 10 cm. It is provided like so: number of stitches in width x number of rows in height - eg: 19 stitches x 26 rows = 10 x 10 cm.

The knitting tension is very individual; some people knit/crochet loosely while others work tightly. You adjust the knitting tension with the needle size, which is why the suggested needle size is only meant as a guide! You need to adjust this (up or down) to ensure that YOUR knitting tension matches the knitting tension provided in the pattern. If you work with a different knitting tension than provided you will have a different yarn consumption, and your work will have different measurements than what the pattern suggests.

The knitting tension also determines which yarns can replace each other. As long as you achieve the same knitting tension you can replace one yarn with another.

See DROPS lesson: How to measure your tension/gauge

See DROPS video: How to make a gauge tension swatch

The required amount of yarn is provided in grams, eg: 450 g. To calculate how many balls you’ll need you first need to know how many grams are in 1 ball (25g, 50g or 100g). This information is available if you click on the individual yarn quality on our pages. Divide the amount required with the amount of each ball. For example, if each ball is 50g (the most common amount), the calculation will be as follows: 450 / 50 = 9 balls.

The important thing when changing from one yarn to another is that the knitting/crochet tension remains the same. This is so that the measurements of the finished piece will be the same as on the sketch provided. It is easier to achieve the same knitting tension using yarns from the same yarn group. It is also possible to work with multiple strands of a thinner yarn to achieve the knitting tension of a thicker one. Please try our yarn converter. We recommend you to always work a test swatch.

Please NOTE: when changing yarn the garment might have a different look and feel to the garment in the photo, due to individual properties and qualities of each yarn.

See DROPS lesson: Can I use a different yarn than the one mentioned in the pattern?

All our yarns are categorised into yarn groups (from A to F) according to thickness and knitting tension – group A contains the thinnest yarns and group F the thickest. This makes it easier for you to find alternative yarns to our patterns, should you wish to switch yarn. All yarns within the same group have a similar knitting tension and can easily replace each other. However, different yarn qualities have different structures and properties which will give the finished work a unique look and feel.

Click here for an overview of the yarns in each yarn group

At the top of all our patterns you’ll find a link to our yarn calculator, which is a helpful tool should you wish to use a different yarn than suggested. By filling in the yarn quality you wish to replace, the amount (in your size) and number of strands, the calculator will present good alternative yarns with the same knitting tension. Additionally it will tell you how much you’ll require in the new qualities and whether you’ll need to work with multiple strands. Most skeins are 50g (some are 25g or 100g).

If the pattern is worked with multiple colours, every colour will have to be calculated separately. Similarly, if the pattern is worked with several strands of different yarns (for example 1 strand Alpaca and 1 strand Kid-Silk) you will have to find alternatives for each, individually.

Click here to see our yarn calculator

Since different yarns have different qualities and textures we have chosen to keep the original yarn in our patterns. However, you can easily find options among our available qualities by using our yarn calculator, or simply pick a yarn from the same yarn group.

It is possible that some retailers still have discontinued yarns in stock, or that someone has a few skeins at home that they would like to find patterns for.

The yarn calculator will provide both alternative yarn as well as required amount in the new quality.

If you think it's hard to decide what size to make, it can be a good idea to measure a garment you own already and like the size of. Then you can pick the size by comparing those measures with the ones available in the pattern's size chart.

You'll find the size chart at the bottom of the pattern.

See DROPS lesson: How to read size chart

The needle size provided in the pattern serves only as a guide, the important thing is to follow the knitting tension. And since knitting tension is very individual, you will have to adjust the needle size to ensure that YOUR tension is the same as in the pattern – maybe you’ll have to adjust 1, or even 2 needle sizes, up or down to achieve the correct tension. For this, we recommend that you work test swatches.

Should you work with a different knitting tension than the one provided, the measurements of the finished garment might deviate from the measurement sketch.

See DROPS lesson: How to measure your tension/gauge

See DROPS video: How to make a tension/gauge swatch

Working a garment top-down provides more flexibility and room for personal adjustment. For example it is easier to try the garment on while working, as well as making adjustments to length of yoke and shoulder caps.

The instructions are carefully explaining every step, in the correct order. Diagrams are adjusted to the knitting direction and are worked as usual.

The diagram depicts all rows/rounds, and every stitch seen from the right side. It is read from bottom to top, from right to left. 1 square = 1 stitch.

When working back and forth, every other row is worked from the right side and every other row is worked from the wrong side. When working from the wrong side, the diagram will have to be worked reversed: from left to right, knit stitches are purled, purl stitches are knit etc.

When working in the round every round is worked from the right side and the diagram are worked from right to left on all rounds.

See DROPS lesson: How to read knitting diagrams

The diagram depicts all rows/rounds, and every stitch seen from the right side. It is worked from bottom to top, from right to left.

When working back and forth every other row is worked from the right side: from right to left and every other row is worked from the wrong side: from left to right.

When working in the round, every row in the diagram are worked from the right side, from right to left.

When working a circular diagram you start in the middle and work your way outwards, counter clockwise, row by row.

The rows usually start with a given number of chain stitches (equivalent to the height of the following stitch), this will either be depicted in the diagram or explained in the pattern.

See DROPS lesson: How to read crochet diagrams

Instructions for working several diagrams after each other on the same row/round, will often be written like so: “work A.1, A.2, A.3 a total of 0-0-2-3-4 times". This means you work A.1 once, then A.2 is worked once, and A.3 is repeated (in width) the number of times provided for your size – in this case like so: S = 0 times, M = 0 times, L=2 times, XL= 3 times and XXL = 4 times.

The diagrams are worked as usual: begin with the first row in A.1, then work the first row in A.2 etc.

See DROPS lesson: How to read knitting diagrams

See DROPS lesson: How to read crochet diagrams

The total width of the garment (from wrist-to-wrist) will be larger in the larger sizes, despite the actual sleeves being shorter. The larger sizes have longer sleeve caps and wider shoulders, so there will be a good fit in all sizes.

The measurement sketch/schematic drawing provides information regarding the full length of the garment. If it’s a jumper or a jacket the length is measured from the highest point on the shoulder closest to the neckline, and straight down to the bottom of the garment. It is NOT measured from the tip of shoulder. Similarly, the length of yoke is measured from the highest point on the shoulder and down to where yoke is split into body and sleeves.

On a jacket measures are never taken along bands, unless specifically stated. Always measure inside band stitches when measuring the length.

See DROPS lesson: How to read a schematic drawing

Diagrams are often repeated on the round or in height. 1 repeat is the diagram the way it appears in the pattern. If it says to work 5 repeats of A.1 in the round, then you work A.1 a total of 5 times after/next to each other in the round. If it says to work 2 repeats of A.1 vertically/in height you work the entire diagram once, then begin again at the start and work the entire diagram one more time.

Chain stitches are slightly narrower than other stitches and to avoid working the cast-on edge too tight, we simply chain more stitches to begin with. The stitch count will be adjusted on the following row to fit the pattern and measurement sketch.

The rib edge is more elastic and will contract slightly compared to, for example, stocking stitch. By increasing before the rib edge, you avoid a visible difference in width between the rib edge and the rest of the body.

It’s very easy to cast off too tightly, and by making yarn overs while casting off (and simultaneously casting these off) you avoid a too tight cast off edge.

See DROPS video: How to bind off with yarn overs (yo)

To achieve an even increase (or decrease) you can increase on, for example: every 3rd and 4th row alternately, like so: work 2 rows and increase on the 3rd row, work 3 rows and increase on the 4th. Repeat this until the increase is complete.

See DROPS lesson: Increase or decrease 1 st on every 3rd and 4th row alternately

Should you prefer to work in the round instead of back and forth, you may of course adjust the pattern. You’ll need to add steeks mid-front (usually 5 stitches), and follow the instructions. When you would normally turn and work from the wrong side, simply work across the steek and continue in the round. At the end you’ll cut the piece open, pick up stitches to work bands, and cover the cut edges.

See DROPS video: How to knit steeks and cut open

Should you prefer to work back and forth instead of in the round, you may of course adjust the pattern so you work the pieces separately and then assemble them at the end. Divide the stitches for the body in 2, add 1 edge stitch in each side (for sewing) and work the front and back pieces separately.

See DROPS lesson: Can I adapt a pattern for circular needles into straight needles?

Pattern repeats can vary slightly in the different sizes, in order to get the correct proportions. If you’re not working the exact same size as the garment in the photo, yours might deviate slightly. This has been carefully developed and adjusted so that the complete impression of the garment is the same in all sizes.

Make sure to follow instructions and diagrams for your size!

If you have found a pattern you like which is available in women’s size it’s not very difficult to convert it to men’s size. The biggest difference will be the length of sleeves and body. Start working on the women size that you think would fit across the chest. The additional length will be worked right before you cast off for the armhole/sleeve cap. If the pattern is worked top-down you can add the length right after the armhole or before the first decrease on sleeve.

Regarding additional yarn amount, this will depend on how much length you add, but it is better with a skein too many than too few.

All yarns will have excess fibres (from production) that might come off as lint or shedding. Brushed yarns (ie hairier yarns) have more of these loose, excess fibres, causing more shedding.

Shedding also depends on what is worn under or over the garment, and whether this pulls at the yarn fibres. It’s therefore not possible to guarantee that there will be no shedding

Below are some tips on how to get the best result when working with hairier yarns:

1. When the garment is finished (before you wash it) shake it vigorously so the looser hairs come off. NOTE: do NOT use a lint roller, brush or any method that pulls at the yarn.

2. Place the garment in a plastic bag and put it in your freezer - the temperature will cause the fibres to become less attached to each other, and excess fibres will come off easier.

3. Leave in the freezer for a few hours before taking it out and shaking it again.

4. Wash the garment according to the instructions on the yarn label.

Pilling is a natural process that happens to even the most exclusive of fibers. It's a natural sign of wear and tear that is hard to avoid, and that is most visible in high friction areas of your garment like a sweater's arms and cuffs.

You can make your garment look as new by removing the pilling, using a fabric comb or a pill/lint remover.

Still can't find the answer you need? Then scroll down and leave your question so one of our experts can try to help you. This will be done normally within 5 to 10 working days.
In the meantime, you can read the questions and answers that others have left to this pattern or join the DROPS Workshop on Facebook to get help from fellow knitters/crocheters!

You might also like...

Post a comment to pattern DROPS 182-1

We would love to hear what you have to say about this pattern!

If you want to leave a question, please make sure you select the correct category in the form below, to speed up the answering process. Required fields are marked *.

Comments / Questions (10)

country flag Marianne wrote:

Hei, I oppskriften til luen står det at man skal strikke mønster til arbeidet måler 22-24 cm. Det må da bli en alt for kort lue? Siden vrangborden er 10 cm, skal man altså strikke 12-14 cm mønster før «strikkes det videre i riller til ferdig mål. Nå strikkes det 1 pinne der det felles 2-8 masker jevnt fordelt = 112-112 masker…» ?

22.10.2023 - 00:43

DROPS Design answered:

Hei Marianne, Du skal strikke mønster i 22 - 24 cm, etter vrangborden. God fornøyelse!

23.10.2023 - 07:33

country flag Linda wrote:

What does knit rows 24 - 3 downwards, does is mean start from row 24 then 23 etc until row 3

25.05.2022 - 05:28

DROPS Design answered:

Dear Linda, it means you now work again from row 3 to row 24 and repeat these 22 rows until piece measures approx. 40 cm along the middle stitch. Happy knitting!

25.05.2022 - 07:36

country flag Ricarda wrote:

Sorry, ich hatte wirklich einen Denkfehler und danke für die super schnelle Stellungnahme. 👍😊

03.12.2020 - 11:30

country flag Ricarda wrote:

Das Tuch wird nicht von oben nach unten sondern von unten nach oben gestrickt !!

03.12.2020 - 08:40

DROPS Design answered:

Liebe Ricarda, das Tuch wird von oben nach unten gestrickt, um das 3-Eck zu bekommen, soll mann dann am Anfang/am Ende jeder Reihe 2 Maschen zunehmen und gleichzeitig werden 2 Maschen in der Mitte (beidseitig von der mittleren Maschen) zugenommen (= es werden abwechslungsweise 4 und 2 M zugenommen). Viel Spaß beim stricken!

03.12.2020 - 09:12

country flag Tanja wrote:

Hallo, Kann ich die Mütze auch in Runden Stricken? Denke das würde dann vlt schöner aussehen ohne Naht ...? LG Tanja

26.01.2020 - 20:32

DROPS Design answered:

Liebe Tanja, um die Mütze in Runden zu stricken, sollen Sie dann das Muster bzw die Anleitung so anpassen. Viel Spaß beim stricken!

27.01.2020 - 10:00

country flag Loredana wrote:

Buongiorno, volendo realizzare uno dei lavori da voi proposti ( ad esempio lo scialle) , mi chiedevo dove posso sapere quanti gomitoli di lana occorrono ( dimensione è quella da voi proposta). grazie tante per la disponibilità. Loredana

19.01.2019 - 16:42

DROPS Design answered:

Buongiorno Loredana. Trova l’indicazione del filato occorrente nella prima parte delle spiegazioni. Nel caso dello scialle servono 150 g (corrispondenti a 3 gomitoli) di Baby Merino. Buon lavoro!

19.01.2019 - 18:37

country flag AnneChapman wrote:

Hej igen, Jeg skrev, at det var samme problem som Hege - altsâ pind 21. Har löst problemet ved at "tälle" *2 ret sammen* fra midtermasken og ud til pindens start, sâ kan man se, hvad der skal startes med :) Jeg er meget glad for jeres sider !

30.08.2018 - 12:41

country flag AnneChapman wrote:

Oplever samme problem som Hege, man kan da ikke slâ om to gange i träk. Jeg hâber, at I kan hjälper mig !

28.08.2018 - 14:54

DROPS Design answered:

Hej Anne, på pind 21 strikker du "2 ret sammen, slå om", så længe du kan frem til omslaget før midterste maske, (OBS: masker som ikke går op i mønsteret strikkes ret) det betyder at når du ikke længere får plads før omslaget, strikker du sidste maske ret. God fornøjelse!

29.08.2018 - 15:55

country flag HEGE JØRGENSEN wrote:

Er der feil på oppskriften? På pinne 21 står det at det skal økes med 4 masker. Men om må følger oppskriften, så blir det kun 2 masker som øker. Har også snakket med en annen som opplever det samme.

20.08.2018 - 01:07

DROPS Design answered:

Hei Hege, På pinne 21, man skal lage en kast på begynnelse av pinnen og en på slutten i tillegg til kastene i midten. Da blir det 4 masker økt på pinnen. God fornøyelse!

21.08.2018 - 07:29

country flag Sacré Jaël wrote:

Je suis très conte de votre site, les explications sont magnifiques. En plus on a la chance d'avoir des tutoriels. Un très grand merci.

05.03.2018 - 17:01