DROPS Karisma
DROPS Karisma
100% Wool
from 3.00 $ /50g
Get the yarn to make this pattern from 36.00$.

The yarn cost is calculated from the pattern’s smallest size and the yarn’s cheapest product type. Looking for an even better price? You might find it on the DROPS Deals!

DROPS SS24

Polar Days

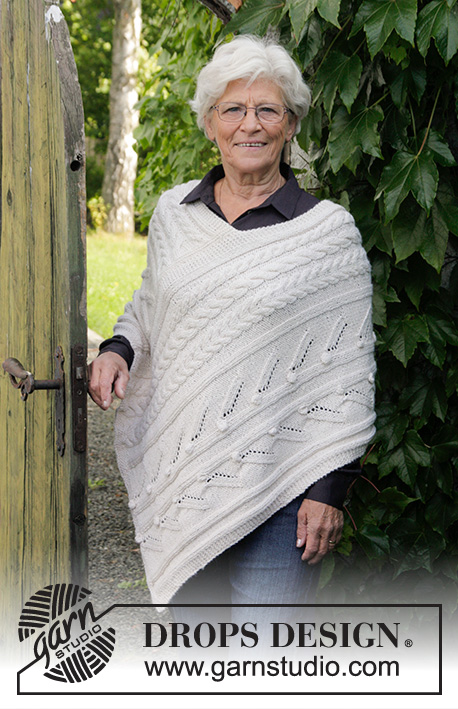
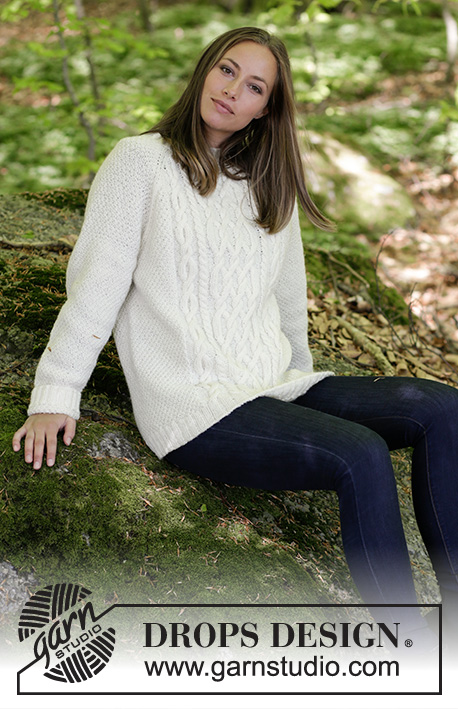
Knitted sweater with cables and raglan. Sizes S - XXXL. The piece is worked in DROPS Karisma.

DROPS 184-7
DROPS Design: Pattern no u-820
Yarn group B
-----------------------------------------------------------
Sizes: S - M - L - XL - XXL - XXXL
Materials:
DROPS KARISMA from Garnstudio (belongs to yarn group B)
600-650-750-800-900-1000 g color 01, off white

The piece can also be knitted with yarn from:
"Alternative yarn (Yarn Group B)" – see the link below.

DROPS DOUBLE POINTED NEEDLES AND CIRCULAR NEEDLE (40 and 80 cm / 16" and 32") SIZE 4.5 mm/US 7 – or the size needed to get 20 stitches and 26 rows stockinette stitch on 10 cm / 4" in width and 10 cm / 4" in height.

DROPS DOUBLE POINTED NEEDLES AND CIRCULAR NEEDLE (40 and 80 cm / 16" and 32") SIZE 3.5 mm/US 4 for rib - or the size needed to get 22 stitches and 30 rows stockinette stitch on 10 cm / 4" in width and 10 cm / 4" in height.

DROPS CABLE NEEDLE – for cables.

-------------------------------------------------------

Alternative Yarn – See how to change yarns here
Yarn Groups A to F – Use the same pattern and change the yarn here
Yarn usage using an alternative yarn – Use our yarn converter here

-------------------------------------------------------

DROPS Karisma
DROPS Karisma
100% Wool
from 3.00 $ /50g
Get the yarn to make this pattern from 36.00$.

The yarn cost is calculated from the pattern’s smallest size and the yarn’s cheapest product type. Looking for an even better price? You might find it on the DROPS Deals!

Pattern instructions

NOTE: This pattern is written in American English. All measurements in charts are in cm. For conversion from inches to cm - click here. There are different terms for crocheting in American and British English. If this pattern includes crochet, click for "crochet terms" here. For this pattern in British English, please click here.
INFORMATION FOR THE PATTERN:

PATTERN:
See diagrams A.1 to A.6 (diagrams A.2 and A.6 are for sizes XL, XXL and XXXL). The diagrams show all the rows in the pattern seen from the right side.

INCREASE TIP (for under sleeves):
Work until there is 1 stitch left before the marker thread, 1 yarn over, work 2 stitches in pattern A.1 as before (the marker thread sits in the middle of these 2 stitches), 1 yarn over. On the next round the yarn overs are knitted/purled twisted and then worked into pattern A.1.

RAGLAN:
Work until there are 3 stitches left before the marker thread. Purl 2 stitches together, knit 2 (the marker thread sits in the middle of these 2 stitches), purl 2 stitches together. Repeat the decreases at each of the remaining marker threads (= 8 stitches decreased on the round).

DECREASE/INCREASE TIP (evenly spaced):
To work out how to decrease/increase evenly, count the number of stitches to be decrease/increase over (e.g. 26 stitches) and divide the stitches with the number of decreases/increases to be made (e.g. 6) = 4.3. In this example, knit approx. every 3rd and 4th stitch together.
If you are increasing (in this example) make 1 yarn over after approx. every 4th stitch. On the next round, work the yarn overs twisted to prevent holes.
----------------------------------------------------------

SWEATER:
The body is worked in the round with circular needle, bottom up. You will work cables on the front piece and seed stitch in the sides, on the back piece and sleeves. The sleeves are worked in the round with double pointed needles. NOTE: Sizes XL, XXL and XXXL have a small cable (= A.2/A.6) further towards each side than shown in the picture.

BODY:
Cast on 218-234-254-276-304-328 stitches with circular needle size 3.5 mm / US 4 and Karisma. Knit 1 round. Insert 1 marker thread at the beginning of the round (= the side). Now work rib in the different sizes as follows:
SIZES S, M AND L:
Work rib (knit 2, purl 2) over the first 24-28-32 stitches, knit 2, A.3a (= 10 stitches), A.4a (= 3 stitches), A.5a (= 26 stitches), A.4a, A.3a, work rib (knit 2, purl 2) over the remaining 140-152-168 stitches.
SIZES XL, XXL AND XXXL:
Work rib (knit 2 / purl 2) over the first 32-40-44 stitches, knit 2, work A.2a (= 5 stitches), A.3a (= 10 stitches), A.4a (= 3 stitches), A.5a (= 26 stitches), A.4a, A.3a, A.6a (= 5 stitches), work rib (knit 2 / purl 2) over the remaining 180-200-220 stitches.
Continue in the round in this way and repeat the first 3 rounds in the diagrams until the rib measures 5 cm / 2". The next round is worked as follows: Knit the first 26-30-34-34-42-46 stitches and decrease, at the same time, 6-6-6-8-8-8 stitches evenly over these stitches – read DECREASE TIP, work the last row in the diagrams over the next 52-52-52-62-62-62 stitches, knit the next 26-30-34-34-42-46 stitches and decrease, at the same time, 6-6-6-8-8-8 stitches evenly over these stitches, knit the remaining stitches on the round and decrease, at the same time, 26-26-30-32-32-36 stitches evenly over these stitches = 198-214-230-248-276-296 stitches.

Change to circular needle size 4.5 mm / US 7. Now work pattern in the different sizes as follows:
SIZES S, M AND L:
(the marker in the side sits here = start of the round), work A.1 (= 2 stitches) over the first 20-24-28 stitches, A.3b (= 14 stitches), A.4b (= 4 stitches), A.5b (= 34 stitches), A.4b, A.3b, A.1 over the next 20-24-28 stitches, insert a marker thread here (= the other side), work A.1 over the next 88-96-104 stitches.
SIZES XL, XXL AND XXXL:
(the marker in the side sits here = start of the round), work A.1 (= 2 stitches) over the first 26-34-38 stitches, A.2b (= 6 stitches), A.3b (= 14 stitches), A.4b (= 4 stitches), A.5b (= 34 stitches), A.4b, A.3b, A.6b (= 6 stitches), A.1 over the next 26-34-38 stitches, insert a marker thread here (= the other side), work A.1 over the next 114-126-138 stitches.
Continue the pattern in the round in this way. REMEMBER THE GAUGE!

When the piece measures 34-34-35-35-35-35 cm / 13½"-13½"-13¾"-13¾"-13¾"-13¾" work a round where you bind off 10-10-12-12-14-16 stitches under each sleeve for the armholes (= 5-5-6-6-7-8 stitches on each side of the marker threads in each side = 178-194-206-224-248-264 stitches on the round. Cut the strand. Lay the piece to one side and work the sleeves.

SLEEVES:
The sleeves are worked in the round with double pointed needles.
Cast on 56-60-60-64-64-68 stitches with double pointed needles size 3.5 mm / US 4 and Karisma. Work rib (knit 2 / purl 2) for 5 cm / 2". Knit 1 round where you decrease 14-16-14-16-14-16 stitches evenly on round = 42-44-46-48-50-52 stitches. Change to double pointed needles size 4.5 mm / US 7. Insert a marker thread at the beginning of the round. Work pattern A.1 in the round. When the sleeve measures 14-11-11-8-6-5 cm / 5½"-4½"-4½"-3"-2¼"-2" increase 1 stitch on each side of the marker thread mid under sleeve (= 2 stitches increased) – read INCREASE TIP. Increase in this way every 6th-5th-4th-4th-4th-4th round a total of 12-15-18-19-20-21 times = 66-74-82-86-90-94 stitches. When the sleeve measures 43-42-41-40-39-39 cm / 17"-16½"-16"-15¾"-15¼"-15¼" (NOTE: Shorter measurements in larger sizes due to longer yoke) bind off the middle 10-10-12-12-14-16 stitches under the sleeve (i.e. 5-5-6-6-7-8 stitches on each side of the marker thread) = 56-64-70-74-76-78 stitches.
Lay the piece to one side and work 1 more sleeve.

YOKE:
Place the sleeves on the same circular needle as the body where you bind off stitches for the armholes = 290-322-346-372-400-420 stitches. THE PIECE IS NOW MEASURED FROM HERE.
Start in the transition after the sleeve and before the body on the back piece and work pattern as before as follows: Work 2-2-2-1-2-6 stitches, insert a marker thread here (NOTE: this becomes the start of the round), work 74-82-88-100-108-110 stitches (= back piece), insert a marker thread here, work 64-72-78-82-88-94 stitches (= sleeve), insert a marker thread here, work 88-96-102-108-116-122 stitches (= front piece), insert a marker thread here, work 64-72-78-82-88-94 stitches (= sleeve). Continue the pattern as before and knit 1 stitch on each side of the 4 marker threads in the piece. On the next round, start the decreases to RAGLAN – see description above. Decrease in this way every 4th round a total of 3-2-0-0-0-0 times and every 2nd round 19-24-29-31-34-37 times = 114-114-114-124-128-124 stitches. After a while as you decrease to raglan and there are not enough stitches left to work the cables on the front piece, you knit over knit and purl over purl. When all the decreases are finished, the piece measures approx. 20-22-23-25-27-29 cm / 8"-8¾"-9"-9¾"-10½"-11½". Knit as far as the first marker thread on the front piece, work to the next marker thread and decrease at the same time 14-14-14-8-8-4 stitches evenly over these stitches, knit the remaining stitches on the round = 100-100-100-116-120-120 stitches

NECKLINE:
Change to circular needle size 3.5 mm / US 4. Purl 1 round. Knit 1 round where you increase 8-8-12-8-8-8 stitches evenly on round – Remember INCREASE TIP = 108-108-112-124-128-128 stitches. Purl 1 round and knit 1 round. Work rib (knit 2 / purl 2) for 3 cm / 1". Bind off with knit over knit and purl over purl. Cut and fasten the strand.

ASSEMBLY:
Sew the openings under the sleeves.

This pattern has been corrected.

Updated online: 13.05.2022
New diagram A.5.

Diagram

All measurements in charts are in cm.

symbols = knit
symbols = purl
symbols = place 2 stitches on cable needle in front of piece, knit 2, knit 2 from cable needle
symbols = place 3 stitches on cable needle in front of piece, purl 1, knit 3 from cable needle
symbols = place 1 stitch on cable needle behind piece, knit 3, purl 1 from cable needle
symbols = place 3 stitches on cable needle behind piece, knit 3, knit 3 from cable needle
symbols = knit 2 in same stitch (i.e. knit 1 in back loop and knit 1 in front loop)
symbols = purl 2 in same stitch (i.e purl 1 in back loop and purl 1 in front loop)
diagram
diagram
diagram

Each of our patterns has specific tutorial videos to help you.

Do you have a question? See a list of frequently asked questions (FAQ)

Knitting tension is what determines the final measurements of your work, and is usually measured per 10 x 10 cm. It is provided like so: number of stitches in width x number of rows in height - eg: 19 stitches x 26 rows = 10 x 10 cm.

The knitting tension is very individual; some people knit/crochet loosely while others work tightly. You adjust the knitting tension with the needle size, which is why the suggested needle size only serve as a guide! You need to adjust this (up or down) to ensure that YOUR knitting tension matches the knitting tension provided in the pattern. If you work with a different knitting tension than provided you will have a different yarn consumption, and your work will have different measurements than what the pattern suggests.

The knitting tension also determines which yarns can replace each other. As long as you achieve the same knitting tension you can replace one yarn with another.

See DROPS lesson: How to measure your tension/gauge

See DROPS video: How to make a gauge tension swatch

The required amount of yarn is provided in grams, eg: 450 g. To calculate how many balls you’ll need you first need to know how many grams are in 1 ball (25g, 50g or 100g). This information is available if you click on the individual yarn quality on our pages. Divide the amount required with the amount of each ball. For example, if each ball is 50g (the most common amount), the calculation will be as follows: 450 / 50 = 9 balls.

The important thing when changing from one yarn to another is that the knitting/crochet tension remains the same. This is so that the measurements of the finished piece will be the same as on the sketch provided. It is easier to achieve the same knitting tension using yarns from the same yarn group. It is also possible to work with multiple strands of a thinner yarn to achieve the knitting tension of a thicker one. Please try our yarn converter. We recommend you to always work a test swatch.

Please NOTE: when changing yarn the garment might have a different look and feel to the garment in the photo, due to individual properties and qualities of each yarn.

See DROPS lesson: Can I use a different yarn than the one mentioned in the pattern?

All our yarns are categorised into yarn groups (from A to F) according to thickness and knitting tension – group A contains the thinnest yarns and group F the thickest. This makes it easier for you to find alternative yarns to our patterns, should you wish to switch yarn. All yarns within the same group have a similar knitting tension and can easily replace each other. However, different yarn qualities have different structures and properties which will give the finished work a unique look and feel.

Click here for an overview of the yarns in each yarn group

At the top of all our patterns you’ll find a link to our yarn converter, which is a helpful tool should you wish to use a different yarn than suggested. By filling in the yarn quality you wish to replace, the amount (in your size) and number of strands, the converter will present good alternative yarns with the same knitting tension. Additionally it will tell you how much you’ll require in the new qualities and whether you’ll need to work with multiple strands. Most skeins are 50g (some are 25g or 100g).

If the pattern is worked with multiple colours, every colour will have to be converted separately. Similarly, if the pattern is worked with several strands of different yarns (for example 1 strand Alpaca and 1 strand Kid-Silk) you will have to find alternatives for each, individually.

Click here to see our yarn converter

Since different yarns have different qualities and textures we have chosen to keep the original yarn in our patterns. However, you can easily find options among our available qualities by using our yarn converter, or simply pick a yarn from the same yarn group.

It is possible that some retailers still have discontinued yarns in stock, or that someone has a few skeins at home that they would like to find patterns for.

The yarn converter will provide both alternative yarn as well as required amount in the new quality.

If you think it's hard to decide what size to make, it can be a good idea to measure a garment you own already and like the size of. Then you can pick the size by comparing those measures with the ones available in the pattern's size chart.

You'll find the size chart at the bottom of the pattern.

See DROPS lesson: How to read size chart

The needle size provided in the pattern serves only as a guide, the important thing is to follow the knitting tension. And since knitting tension is very individual, you will have to adjust the needle size to ensure that YOUR tension is the same as in the pattern – maybe you’ll have to adjust 1, or even 2 needle sizes, up or down to achieve the correct tension. For this, we recommend that you work test swatches.

Should you work with a different knitting tension than the one provided, the measurements of the finished garment might deviate from the measurement sketch.

See DROPS lesson: How to measure your tension/gauge

See DROPS video: How to make a gauge tension swatch

Working a garment top-down provides more flexibility and room for personal adjustment. For example it is easier to try the garment on while working, as well as making adjustments to length of yoke and shoulder caps.

The instructions are carefully explaining every step, in the correct order. Diagrams are adjusted to the knitting direction and are worked as usual.

The diagram depicts all rows/rounds, and every stitch seen from the right side. It is read from bottom to top, from right to left. 1 square = 1 stitch.

When working back and forth, every other row is worked from the right side and every other row is worked from the wrong side. When working from the wrong side, the diagram will have to be worked reversed: from left to right, knit stitches are purled, purl stitches are knit etc.

When working in the round every round is worked from the right side and the diagram are worked from right to left on all rounds.

See DROPS lesson: How to read knitting diagrams

The diagram depicts all rows/rounds, and every stitch seen from the right side. It is worked from bottom to top, from right to left.

When working back and forth every other row is worked from the right side: from right to left and every other row is worked from the wrong side: from left to right.

When working in the round, every row in the diagram are worked from the right side, from right to left.

When working a circular diagram you start in the middle and work your way outwards, counter clockwise, row by row.

The rows usually start with a given number of chain stitches (equivalent to the height of the following stitch), this will either be depicted in the diagram or explained in the pattern.

See DROPS lesson: How to read crochet diagrams

Instructions for working several diagrams after each other on the same row/round, will often be written like so: “work A.1, A.2, A.3 a total of 0-0-2-3-4 times". This means you work A.1 once, then A.2 is worked once, and A.3 is repeated (in width) the number of times provided for your size – in this case like so: S = 0 times, M = 0 times, L=2 times, XL= 3 times and XXL = 4 times.

The diagrams are worked as usual: begin with the first row in A.1, then work the first row in A.2 etc.

See DROPS lesson: How to read knitting diagrams

See DROPS lesson: How to read crochet diagrams

The total width of the garment (from wrist-to-wrist) will be larger in the larger sizes, despite the actual sleeves being shorter. The larger sizes have longer sleeve caps and wider shoulders, so there will be a good fit in all sizes.

The measurement sketch/schematic drawing provides information regarding the full length of the garment. If it’s a jumper or a jacket the length is measured from the highest point on the shoulder (usually closest to the neckline), and straight down to the bottom of the garment. It is NOT measured from the tip of shoulder. Similarly, the length of yoke is measured from the highest point on the shoulder and down to where yoke is split into body and sleeves.

See DROPS lesson: How to read a schematic drawing

Diagrams are often repeated on the round or in height. 1 repeat is the diagram the way it appears in the pattern. If it says to work 5 repeats of A.1 in the round, then you work A.1 a total of 5 times after/next to each other in the round. If it says to work 2 repeats of A.1 vertically/in height you work the entire diagram once, then begin again at the start and work the entire diagram one more time.

Chain stitches are slightly narrower than other stitches and to avoid working the cast-on edge too tight, we simply chain more stitches to begin with. The stitch count will be adjusted on the following row to fit the pattern and measurement sketch.

The rib edge is more elastic and will contract slightly compared to, for example, stocking stitch. By increasing before the rib edge, you avoid a visible difference in width between the rib edge and the rest of the body.

It’s very easy to cast off too tightly, and by making yarn overs while casting off (and simultaneously casting these off) you avoid a too tight cast off edge.

See DROPS video: How to bind off with yarn overs (yo)

To achieve an even increase (or decrease) you can increase on, for example: every 3rd and 4th row alternately, like so: work 2 rows and increase on the 3rd row, work 3 rows and increase on the 4th. Repeat this until the increase is complete.

See DROPS lesson: Increase or decrease 1 st on every 3rd and 4th row alternately

Should you prefer to work in the round instead of back and forth, you may of course adjust the pattern. You’ll need to add steeks mid-front (usually 5 stitches), and follow the instructions. When you would normally turn and work from the wrong side, simply work across the steek and continue in the round. At the end you’ll cut the piece open, pick up stitches to work bands, and cover the cut edges.

See DROPS video: How to knit steeks and cut open

Should you prefer to work back and forth instead of in the round, you may of course adjust the pattern so you work the pieces separately and then assemble them at the end. Divide the stitches for the body in 2, add 1 edge stitch in each side (for sewing) and work the front and back pieces separately.

See DROPS lesson: Can I adapt a pattern for circular needles into straight needles?

Pattern repeats can vary slightly in the different sizes, in order to get the correct proportions. If you’re not working the exact same size as the garment in the photo, yours might deviate slightly. This has been carefully developed and adjusted so that the complete impression of the garment is the same in all sizes.

Make sure to follow instructions and diagrams for your size!

If you have found a pattern you like which is available in women’s size it’s not very difficult to convert it to men’s size. The biggest difference will be the length of sleeves and body. Start working on the women size that you think would fit across the chest. The additional length will be worked right before you cast off for the armhole/sleeve cap. If the pattern is worked top-down you can add the length right after the armhole or before the first decrease on sleeve.

Regarding additional yarn amount, this will depend on how much length you add, but it is better with a skein too many than too few.

All yarns will have excess fibres (from production) that might come off as lint or shedding. Brushed yarns (ie hairier yarns) have more of these loose, excess fibres, causing more shedding.

Shedding also depends on what is worn under or over the garment, and whether this pulls at the yarn fibres. It’s therefore not possible to guarantee that there will be no shedding

Below are some tips on how to get the best result when working with hairier yarns:

1. When the garment is finished (before you wash it) shake it vigorously so the looser hairs come off. NOTE: do NOT use a lint roller, brush or any method that pulls at the yarn.

2. Place the garment in a plastic bag and put it in your freezer - the temperature will cause the fibres to become less attached to each other, and excess fibres will come off easier.

3. Leave in the freezer for a few hours before taking it out and shaking it again.

4. Wash the garment according to the instructions on the yarn label.

Pilling is a natural process that happens to even the most exclusive of fibers. It's a natural sign of wear and tear that is hard to avoid, and that is most visible in high friction areas of your garment like a sweater's arms and cuffs.

You can make your garment look as new by removing the pilling, using a fabric comb or a pill/lint remover.

Still can't find the answer you need? Then scroll down and leave your question so one of our experts can try to help you. This will be done normally within 5 to 10 working days.
In the meantime, you can read the questions and answers that others have left to this pattern or join the DROPS Workshop on Facebook to get help from fellow knitters/crocheters!

You might also like...

Polar Days

Denielle Widener, United States

Làithean Polar

Rose, Canada

Post a comment to pattern DROPS 184-7

We would love to hear what you have to say about this pattern!

If you want to leave a question, please make sure you select the correct category in the form below, to speed up the answering process. Required fields are marked *.

Comments / Questions (32)

country flag Joanna wrote:

I’m knitting the polar days jumper, and I have reached the yolk. I don’t understand the sentence ‘ continue the pattern as before and knit 1 stitch each side of the 4 marker threads in the piece ‘ . How does this decrease to a raglan? Do you mean knit 2 tog each side of the marker threads? I don’t understand what ‘ decreases to raglan see description above ‘ means. Thank you for your help.

07.01.2019 - 15:04

DROPS Design answered:

Dear Joanna, on first round on Yoke, you first work at the transition between sleeve and back piece 1 round without any decreases, just in pattern as before. Then, on next round, you start to dec for raglan - see RAGLAN at the beg of the pattern where you will read how you have to decrease for raglan. Happy knitting!

07.01.2019 - 15:53

country flag Dorthe Aachmann wrote:

Kan det passe at raglan indtagningerne ikke er i der hvor ærmer og for/ bagstykke samles men er længere inde

09.07.2018 - 23:57

Elena wrote:

Buongiorno, ho della lana Drops Merino Extra Fine con cui mi piacerebbe realizzare questo modello, non c'è la possibilità che venga tradotto in italiano?

30.06.2018 - 22:30

DROPS Design answered:

Buongiorno Elena. Trova il testo italiano al seguente link Buon lavoro!

01.07.2018 - 11:37

country flag Karin wrote:

Er det riktig at det skal være flere masker på forstykket enn på ryggen ? Og hvorfor ?

28.04.2018 - 14:27

DROPS Design answered:

Hej Karin, Det stemmer da der skal være snoninger på forstykket og ikke på bagstykket. Snoningerne trækker maskerne sammen i bredden og man behøver derfor flere masker. God fornøjelse!

07.05.2018 - 15:22

country flag Ulla Persson wrote:

Hej igen! Nu har jag hittat felet. På storlek XL ska man minska med 12 maskor inte 32 som det står i mönstret. Nu stickar jag glad vidare med detta härliga garn! Vänligen Ulla

03.03.2018 - 11:34

country flag Ulla Persson wrote:

Hej! När jag ska minska på sista varvet på resåren får jag det inte att stämma. Jag stickar i storlek XL. Har lagt upp 276 maskor. Ska ha kvar 248 maskor innan jag övergår till stickor 4,5. Skillnaden mellan 276 och 248 är är 28 maskor. Jag minskar först 8, sen 8 till. hur ska jag då kunna minska ytterligare 32? Vänligen Ulla

25.02.2018 - 20:46

DROPS Design answered:

Hejsan, du ska minska ytterligare 32 m över de sista m på varvet. Det står så här i mönstret: Sticka rätmaskor över de första 26-30-34-34-42-46 maskorna och minska samtidigt 6-6-6-8-8-8 maskor jämnt fördelat – läs MINSKNINGSTIPS, sticka sista varvet i diagrammen över de nästa 52-52-52-62-62-62 maskorna, sticka rätmaskor över de nästa 26-30-34-34-42-46 maskorna och minska samtidigt 6-6-6-8-8-8 maskor jämnt fördelat, sticka rätmaskor över de resterande maskorna på varvet och minska samtidigt 26-26-30-32-32-36 maskor jämnt fördelat = 198-214-230-248-276-296 maskor.

26.02.2018 - 14:34

country flag Sara Enbom wrote:

Hej! I mönstret står att man ska minska med 12 maskor, 6 på var sida mitten. För att göra ärmhålen på fram och bakstycke. Stämmer det att det ska vara minskning? På filmen ser det ut dom om det är avmaskningar gjorda både på ärm och fram-bakstycke. Tycker avmaskning ser mindre ”ihopdraget” ut.. Tack för hjälpen! Mvh Sara

04.01.2018 - 15:05

DROPS Design answered:

Hej, jo dessa maskor ska maskas av, inte minskas som det står i beskrivningen.

05.01.2018 - 14:09

country flag Anne Oldfield wrote:

How do I know how much yarn is required. I cannot see it but this is the first pattern of yours I have looked at seriously.

28.11.2017 - 16:20

DROPS Design answered:

Dear Mrs Oldfield, you will find total weight of yarn required in each size under tab "Materials", ie 600 g Karisma in size S / 50 g a ball Karisma = 12 balls Karisma are required in size S. Happy knitting!

29.11.2017 - 08:17

country flag Philippe Molle wrote:

Bonjour Je pense qu'il y a une erreur dans l'explication du point ci-dessous. Pour moi la maille à reprendre est à tricoter à l'envers et non pas à l'endroit.Déjà deux erreurs dans les explications (voir commentaire précédent ) !!!! Cordialement Philippe = placer 1 maille sur l'aiguille auxiliaire derrière l'ouvrage, tricoter 3 mailles endroit, reprendre la maille en attente et la tricoter à l'endroit

23.10.2017 - 10:02

DROPS Design answered:

Bonjour Philippe, vous avez raison, la correction du 5ème symbole a été faite, merci pour votre aide. Bon tricot!

23.10.2017 - 12:11

country flag Molle Philippe wrote:

Bonjour La troisième ligne du chapitre Diagramme ne correspond à aucun point du tricot. N'y a t il pas une erreur? Merci de vérifier. Cordialement Philippe

19.10.2017 - 14:23

DROPS Design answered:

Bonjour Philippe, il semble que vous avez raison, le diagramme et la légende vont être vérifiés, merci pour votre retour.

19.10.2017 - 16:56