
Popular categories
Looking for a yarn?


|
||||||||||||||||||||||||||||||||||
Ornella |
||||||||||||||||||||||||||||||||||
 |
 |
|||||||||||||||||||||||||||||||||
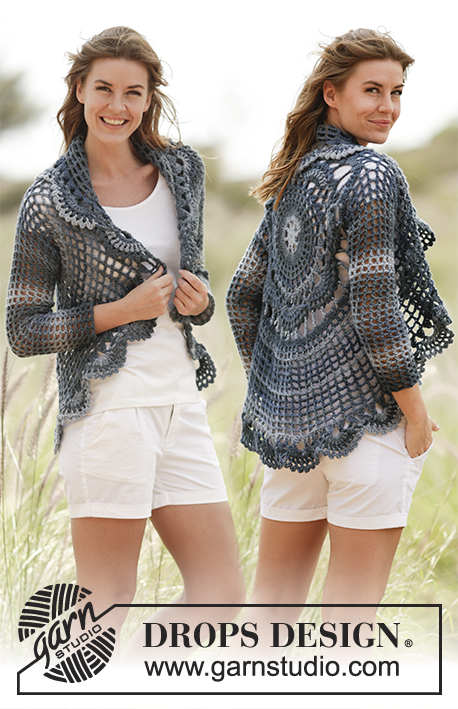
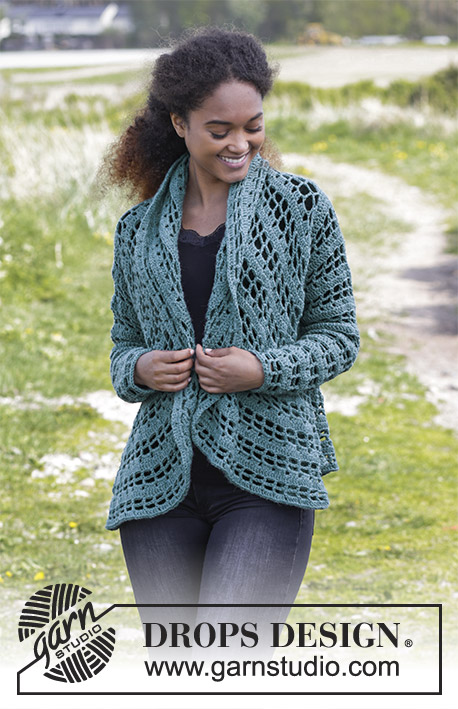
Crochet circle jacket with double crochets and chain-spaces. Sizes S - XXXL. The piece is worked in DROPS Lima.
DROPS 184-9 |
||||||||||||||||||||||||||||||||||
|
INFORMATION FOR THE PATTERN: CROCHET INFORMATION: Every round of double crochets begins with 3 chain stitches and finishes with 1 slip stitch in the 3rd chain stitch at the beginning of the round (worked in addition to diagrams A.1 – A.5). INCREASE TIP (evenly spaced): To work out how to increase evenly, count the total number of stitches (e.g. 28 stitches) and divide by the number of increases to be made (e.g. 2) = 14. In this example, increase by working 2 double crochets in every 14th stitch. DECREASE TIP (evenly spaced): To work out how to decrease evenly, count the total number of stitches (e.g. 64 stitches) and divide by the number of decreases to be made (e.g. 4) = 16. In this example, work every 15th and 16th stitch together. Decrease 1 double crochet by crocheting 2 double crochets together as follows: work 1 double crochet, but wait with the last yarn over and pull through (= 2 loops on the hook), then work the next double crochet but when working the last pull-through, pull the strand through all 3 loops on the hook (= 1 double crochet decreased). PATTERN: See diagrams A.1 to A.8. ---------------------------------------------------------- CIRCLE JACKET: The piece is worked in the round in a circle and armholes are worked on the circle. Then the sleeves are worked in the round and the front pieces are worked back and forth. Finally, you work a finishing edge around the whole circle and front pieces. The start of the round = mid back/neck. CIRCLE: Work 6 chain stitches with hook size 5 mm / H/8 and Lima and form them into a ring with 1 slip stitch in the first chain stitch. Work A.1 a total of 13 repeats on the round - read CROCHET INFORMATION! REMEMBER THE CROCHET GAUGE! When you have finished the next to last round in diagram A.1, continue as follows in the various sizes: SIZES S/M AND L There are now 182 stitches on the round and the piece measures approx. 36 cm / 14¼" in diameter. Now work the armholes and increase stitches evenly on round as follows: Work 1 double crochet in each double crochet/around each chain stitch over the first 28-28 stitches and increase 2-2 double crochets evenly – read INCREASE TIP (evenly spaced). Work 32-36 chain stitches, skip the next 32-36 stitches. Work 1 double crochet in each double crochet/around each chain stitch in the next 62-54 stitches and increase 9-9 double crochets evenly. Work 32-36 loose chain stitches and skip 32-36 stitches. Work 1 double crochet in each double crochet/around each chain stitch over the remaining 28-28 stitches and increase 2-2 double crochets evenly = 195-195 double crochets. Now work A.2 (= 13 repeats on the round), BUT over the 32-36 new chain stitches, replace the double crochet on round 2 in diagram A.2 with 1 single crochet around the chain-stitch row. On the round after you have worked the armholes, there are a total of 52-52 chain-spaces on the round and 9-10 chain-spaces and 8-9 single crochets around the 32-36 chain stitches for the armholes. When the whole of A.2 has been completed in height, there are 78 chain-spaces on the round. The piece measures approx. 63 cm / 24¾" in diameter. SIZE XXL/XXXL Work the last round in diagram A.1. Then work A.2 (= 13 repeats on the round). When you have completed the first 3 rounds, there are 234 stitches on the round and the piece measures approx. 45 cm / 17 3/4'. Now work the armholes and increase stitches evenly as follows: Work 1 double crochet in each double crochet/around each chain stitch over the first 36 stitches and increase 2 double crochets evenly – read INCREASE TIP evenly spaced). Work 40 chain stitches, skip the next 40 stitches. Work 1 double crochet in each double crochet/around each chain stitch in the next 82 stitches and increase 9 double crochets evenly. Work 40 chain stitches and skip 40 stitches. Work 1 double crochet in each double crochet/around each chain stitch over the remaining 36 stitches and increase 2 double crochets evenly = 247 double crochets. Continue with A.2, BUT over the 40 new chain stitches, replace the double crochet on the 5th round in diagram A.2 with 1 single crochet around the chain-stitch row. On the round after you have worked armholes, there are a total of 65 chain-spaces on the round and 11 chain-spaces and 10 single crochets around the 40 chain stitches for the armholes. When the whole of A.2 has been completed in height, there are 78 chain-spaces on the round. The piece measures approx. 63 cm / 24¾" in diameter. ALL SIZES: Start on the 3rd round in the diagrams and work pattern as follows: Work * A.3, A.4 *, work from *-* a total of 13 times on the round. When A.4 has been completed in height, repeat the last 4 rounds in the diagram to finished length. When the round marked with a star in diagram A.3 has been completed, sizes S/M and L are finished. For size XXL/XXXL continue until the whole of diagram A.3 has been completed in height. There are now 117-117-130 chain-spaces on the round. The piece measures approx. 91-91-101 cm / 35¾"-35¾"-39¾" in diameter. SLEEVES: The sleeves are worked in the round. Start mid under the armhole and work 3 chain stitches (= 1 double crochet), work 64-72-80 double crochets evenly spaced in the double crochets/around the chain-spaces in the one armhole (= 32-36-40 double crochets along each side of the armhole). Now work from round 2 in diagram A.5 (a total of 16-18-20 repeats on the round), AT THE SAME TIME on the round with a black spot in the diagram, decrease 4 double crochets evenly along the round. Repeat the last 4 rounds in the diagram and decrease on the round with the black spot a total of 7-8-10 times in height = 36-40-40 double crochets on the round. Then work 3-3-1 more repeats of A.5 in height without decreasing double crochets. The sleeve measures approx. 51-56-56 cm / 20"-22"-22". Cut and fasten the strand. RIGHT SIDE PIECE: Work short rows back and forth on the right front piece. Start in the first double crochet after the 16th-16th-18th chain-space from the beginning of the round and work from the right side. NOTE: In diagram A.6, A.7 and A.8 you work from the row with the arrow and in diagram A.3 you work from the row with the black square! Work A.6 over the first 10 chain-spaces, work A.3 over 3 chain-spaces, work A.7 over the next 2-2-4 chain-spaces (= 2-2-4 repeats), work A.3 over the next 3 chain-spaces, work A.8 over the next 10 chain-spaces. Continue in this way, back and forth. When A.7 has been completed in height, repeat the last 4 rows in the diagram in height. When A.6 and A.8 have been completed in height and the row with the star in diagram A.3 has been completed, cut and fasten the strand. LEFT SIDE PIECE: Skip 29-29-34 chain-spaces along the bottom edge of the jacket and fasten the strand with 1 single crochet in the next double crochet. Then work the left front piece in the same way as the right front piece. There should be 29-29-34 chain-spaces between the front pieces along the bottom edge and 32-32-36 chain-spaces between the front pieces on the neck (= 16-16-18 chain-spaces on each side of the start of the round). EDGE: Now work a finishing edge around the whole circle as follows: ROUND 1: Start at the beginning of the round (= at back of neck), work 3 chain stitches (= 1 double crochet), * 3 chain stitches, skip 3 chain stitches, 1 double crochet in the next double crochet *, repeat from *-* to end of round, but along the edge of diagrams A.6 and A.8 skip approx. 2 cm / ¾". Finish the round with 1 slip stitch in the 3rd chain stitch at the beginning of the round. ROUND 2: Work 3 chain stitches (= 1 double crochet), * work 4 double crochets around the next chain-space, 1 chain stitch *, repeat from *-* to end of round. Finish with 1 slip stitch in the 3rd chain stitch at the beginning of the round. Cut and fasten the strand. |
||||||||||||||||||||||||||||||||||
Diagram explanations |
||||||||||||||||||||||||||||||||||
|
||||||||||||||||||||||||||||||||||

|
||||||||||||||||||||||||||||||||||

|
||||||||||||||||||||||||||||||||||

|
||||||||||||||||||||||||||||||||||

|
||||||||||||||||||||||||||||||||||

|
||||||||||||||||||||||||||||||||||
|
Have you made this or any other of our designs? Tag your pictures in social media with #dropsdesign so we can see them! Do you need help with this pattern?You'll find tutorial videos, a Comments/Questions area and more by visiting the pattern on garnstudio.com. © 1982-2024 DROPS Design A/S. We reserve all rights. This document, including all its sub-sections, has copyrights. Read more about what you can do with our patterns at the bottom of each pattern on our site. |
||||||||||||||||||||||||||||||||||


With over 40 years in knitting and crochet design, DROPS Design offers one of the most extensive collections of free patterns on the internet - translated to 17 languages. As of today we count 304 catalogs and 11422 patterns - 11417 of which are translated into English (US/in).
We work hard to bring you the best knitting and crochet have to offer, inspiration and advice as well as great quality yarns at incredible prices! Would you like to use our patterns for other than personal use? You can read what you are allowed to do in the Copyright text at the bottom of all our patterns. Happy crafting!
Comments / Questions (29)
Ich habe die Seitenteile angefertigt und bin nun beim Rand. Ich verstehe nicht was ich am Rand der Seitenteile machen muss und was es mit den 2 cm auf sich hat. Bei mir stehen die Seitenteile ab und passen sich trotz des Randes nicht an.
13.08.2020 - 15:21DROPS Design answered:
Liebe Anja, bei der 1. Runde vom Rand häkeln Sie 1 Stäbchen in jedem Stäbchen und 3 Luftmaschen zwischen den Stäbchen - wenn Sie aber an Seiten von rechten und linken Vorderteil häkeln, dann überspringen Sie ca 2 cm anstatt 1 Stb in jedem Stb. Viel Spaß beim häkeln!
13.08.2020 - 15:50Op de foto bij het model is de kraag in de nek maar kort. Bij mij wordt de kraag in de nek veel langer. Ik volg het patroon, wat doe ik fout?
03.09.2019 - 20:29DROPS Design answered:
Dag Manuela,
De kraag in de nek aan de achterkant is vrij hoog, maar op de foto zit hij a.h.w. in elkaar gerold, waardoor het een korte nek lijkt. In werkelijkheid gaat hij mee met de ronding vanaf het voorpand. Dit kun je een beetje zien op de foto aan de voorkant.
08.09.2019 - 18:02RECHTER KANT VAN HET WERK: Haak verkorte toeren heen en weer gehaakt op het rechter voorpand. Begin in het eerste stokje na de 16e-16e-18e lossenlus vanaf het begin van de toer en haak aan de goede kant. VRAAG: als je aan de goede kant van het werk door haakt dan is dit toch het linker voorpand en niet rechts?
03.09.2019 - 20:25DROPS Design answered:
Dag Manuela,
,Met de rechter kant van het werk, wordt de kant van het werk bedoeld, wanneer je het kledingstuk draagt. (Dus aan de kant van je rechter arm.)
08.09.2019 - 18:08Después de terminar A.3 para la talla S/M, no hay 117 arcos, hay 156. Leyendo el patrón no dice en ningún momento que se tengan que hacer disminuciones. ¿Hay alguna corrección del patrón? O ¿Qué fue lo que hice mal?
21.08.2019 - 20:48DROPS Design answered:
Hola Marcela. A.2 se termina con 78 arcos ( 13 repeticiones de 6 arcos), después trabajamos A.3 y A.4 y para la talla S/M terminamos con 117 arcos ( 13 repeticiones de 9 arcos de A.3 +A.4).
17.10.2019 - 20:30I tried to send a Q but got a weird - you are a spammer - response when I hit send. My Q is to check I understand the first 3 rounds of the pattern - I should be able to follow it from there if I am right. Begin with 6 chain circle, row 1 is 6 DC into circle and Row 2 is a DC and chain for each DC in previous round for total of 12 stitches. Is this correct?
14.08.2019 - 17:48DROPS Design answered:
Dear Mary, A.1 should be repeated 13 times in widht, so that you should have a total of 13 dc at the end of 1st round, and a total of 26 sts (= 13 dc + 13 chains) at the end of 2nd round. Happy crocheting!
15.08.2019 - 09:31Bonjour, je fais ce gilet en taille L mais à la fin de A2 je me retrouve avec 94 arceaux...alors qu au niveau des emmenchures j ai bien les 52 arceaux + 10 arceaux et 9mailles serrees...je suis perdue...j ai vérifié et je ne trouve pas où j ai pu me tromper...merci
20.02.2019 - 10:52DROPS Design answered:
Bonjour Caro, il est difficile de dire où vous avez pu vous tromper, vous devez répéter 13 fois A.2 au total tout le tour pour avoir 13 fois 6 arceaux au dernier tour de A.2 = 78 arceaux. Vérifiez après le tour des emmanchures que vous avez bien vos 13 répétitions en largeur en plaçant des marqueurs si besoin. Bon crochet!
20.02.2019 - 13:57Efter A1 i str L står der man har 182 masker. Men med A1’s sidste udtagninger er der 15x13 masker = 195 masker. Havde man ikke hæklet dobbelt i en maske i hver rapport på sidste omgang, var der 182. Så skal man ikke hækle den sidste omgang i A1 eller hvordan?
28.01.2019 - 10:41DROPS Design answered:
Hei Charlotte. Det står i oppskriften: Når NÆST sidste omg i diagram A.1 er hæklet færdig, fortsættes der i de forskellige størrelser således.. Så du har altså ikke heklet siste omgang i A.1 enda, og har 182 staver på omgangen. God fornøyelse.
30.01.2019 - 14:25Hallo, muss bei den Seitenteilen in A3 auch die Zunahme gearbeitet werden? Wenn ja müssen die Zunahme lt Abbildung im Diagramm gehäkelt werden? Also z.B. die erste Zunahme in A3 über die drei stäbchen der Vorreihe oder muss das Muster pro Reihe gehäkelt werden? Dies würde ja bedeuten, dass die erste zunehme sich verschiebt auf die letzten 4 Stäbchen der Vorreihe.
13.12.2018 - 22:10DROPS Design answered:
Liebe Jessica, für die Vorderteile sollen Sie wie im Diagram gezeigt häkeln, dh in A.6 wird es abgenommen (verkürzte Reihen), dann in A.3 wird es zugenommen (A.3 ist zuerst über 3 Lm-Bögen gehäkelt aber die Maschenanzahl in A.3 wird zunehmen = 6 Lm-Bögen bei der Reihe mit dem Sternchen, mit A.7 häkeln Sie "gerade" (= Keine Zunahme), und dann in A.8 häkeln Sie verkürzte Reihen. Viel Spaß beim häkeln!
14.12.2018 - 09:04Hallo, ich frage mich wie ich nach den 36LM weiterarbeiten soll? Muss ich die lm dann durch feste Maschen statt luftmaschenbögen ersetzen in A2? Und dann die nächste Runde auch mit fm statt Bögen? Muss in der ersten Bogenrunde 52 luftmaschenbögen entstehen?
22.10.2018 - 21:29DROPS Design answered:
Liebe Anne, nach der Runde mit den 36 Lm für die Armlöcher häkeln Sie die 1. Reihe in A.2 insgesamt 13 x in der Runde, aber wenn sie A.2 um den Armlöcher häkeln, häkeln Sie 1 feste Masche anstatt 1 Stäbchen = in jedem 36-Lmbogen haben Sie je 10 Bögen und 9 feste Maschen (zwischen den Luftmaschenbogen häkeln Sie 1 Stäbchen wie im A.2 gezeigt = 52 Lmbögen) = 62 Luftmaschenbögen insgesamt am Ende der 1. Reihe in A.2. Viel Spaß beim häkeln!
23.10.2018 - 09:37Shalini wrote:
Can you tell how many rounds are there in A 1, A2, A3 and so on ? What stitch to do in each round.
26.08.2018 - 15:17DROPS Design answered:
Dear Shalini, there are 15 rows in A.1: count from the row with the arrow to the last row in diagram - so that there are 10 rows in A.2, 15 rows in A.3 etc.. Happy crocheting!
05.09.2018 - 13:22