
Popular categories
Looking for a yarn?


|
||||||||||||||||||||||||||||||||||
Midnight Cables |
||||||||||||||||||||||||||||||||||
 |
 |
|||||||||||||||||||||||||||||||||
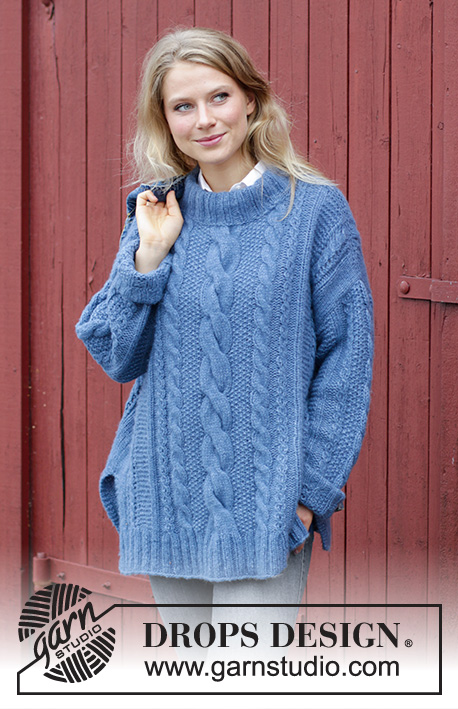
Knitted jumper with cables, lace pattern and split. Sizes S - XXXL. The piece is worked in DROPS Air.
DROPS 184-12 |
||||||||||||||||||||||||||||||||||
|
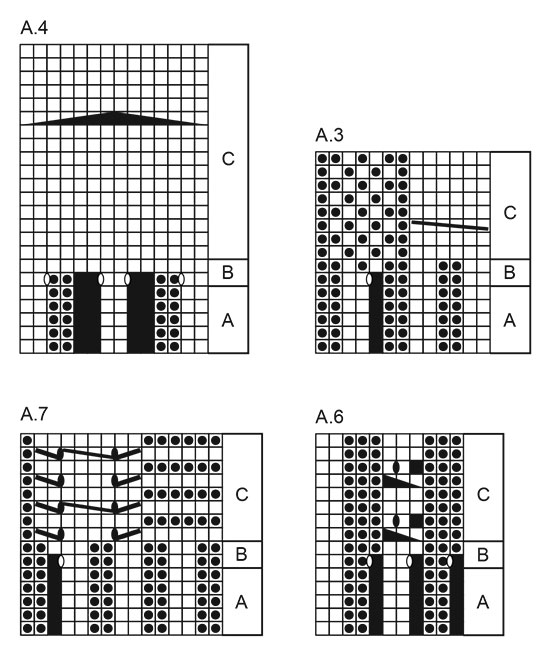
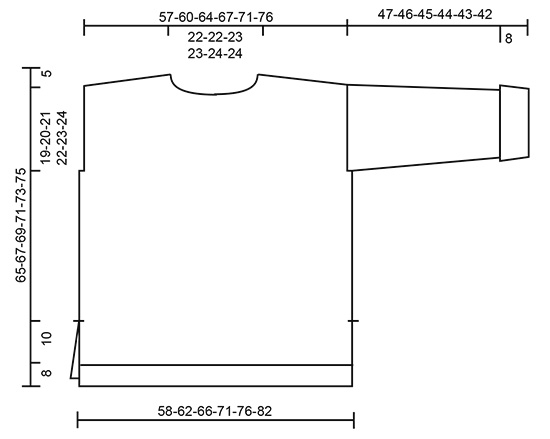
INFORMATION FOR THE PATTERN: RIDGE/GARTER STITCH (worked back and forth): 1 ridge = Knit 2 rows. PATTERN: See diagrams A.1 to A.10. The diagrams show all the rows in the pattern seen from the right side. INCREASE INFORMATION (for sleeve): Increase 1 stitch by making 1 yarn over, on the next row work the yarn overs twisted to prevent holes. Sizes S, M, L: The increased stitches are worked garter stitch as you go, until there are a total of 6 stitches garter stitch before A.8 and a total of 6 stitches garter stitch after A.10, then work these stitches stockinette stitch. Sizes XL,XXL and XXXL: The increased stitches are worked stockinette stitch as you go. ---------------------------------------------------------- JUMPER: The front and back pieces are worked back and forth with circular needle up to the split. Then the body is worked in the round as far as the armholes, when the front and back pieces are worked back and forth separately. The sleeves are worked back and forth with circular needle. BACK PIECE: Cast on 88-92-104-112-116-124 stitches with circular needle size 5 mm / US 8. Purl 1 row from the wrong side. The next row is worked as follows from the right side: Work 3 stitches GARTER STITCH - see description above, knit 2-0-2-2-0-0, * purl 2, knit 2 *, work from *-* a total of 0-1-2-3-4-5 times, A.1A (= 14 stitches), A.2A (= 8 stitches), A.3A (= 12 stitches), A.4A (= 10 stitches), A.5A (= 12 stitches), A.6A (= 8 stitches), A.7A (= 14 stitches), * knit 2, purl 2 *, work from *-* a total of 0-1-2-3-4-5 times, knit 2-0-2-2-0-0, 3 stitches garter stitch. Continue this pattern until the piece measures 8 cm / 3⅛". Change to circular needle size 6 mm / US 10. REMEMBER THE GAUGE! Now work as follows in the different sizes: SIZES S-M-L-XL: The next row is worked as follows from the right side: Work 3 stitches garter stitch, 2-4-10-14 stitches rib as before and decrease 0-0-2-3 stitches over these, work A.1B over A.1A, A.2B over A.2A, A.3B over A.3A, A.4B over A.4A, A.5B over A.5A, A.6B over A.6A, A.7B over A.7A, work 2-4-10-14 stitches rib as before and decrease 0-0-2-3 stitches over these and 3 stitches garter stitch. When A.1B-A.7B have been completed there are 102-106-114-120 stitches on the needle. The next row is worked as follows from the right side: Work 3 stitches garter stitch, 2-4-8-11 stitches stockinette stitch, A.1C over A.1B, A.2C over A.2B, A.3C over A.3B, A.4C over A.4B, A.5C over A.5B, A.6C over A.6B, A.7C over A.7B, work 2-4-8-11 stitches stockinette stitch and 3 stitches garter stitch. There are now 102-106-114-120 stitches on the needle. Continue this pattern until the piece measures 18 cm / 7" in all these sizes. Lay the piece to one side. SIZES XXL-XXXL: The next row is worked as follows from the right side: Work 3 stitches garter stitch, work 5-9 stitches rib as before and decrease 1-0 stitches over these, work A.6C (= 11 stitches), work A.1B over A.1A, A.2B over A.2A, A.3B over A.3A, A.4B over A.4A, A.5B over A.5A, A.6B over A.6A, A.7B over A.7A, work A.2C (= 11 stitches), work 5-9 stitches rib as before and decrease 1-0 stitches over these, 3 stitches garter stitch. When A.1B-A.7B have been completed there are 128-138 stitches on the needle. The next row is worked as follows from the right side: Work 3 stitches garter stitch, work 4-9 stitches stockinette stitch, continue A.6C (= 11 stitches), A.1C over A.1B, A.2C over A.2B, A.3C over A.3B, A.4C over A.4B, A.5C over A.5B, A.6C over A.6B, A.7C over A.7B, continue A.2C (= 11 stitches), work 4-9 stitches stockinette stitch and 3 stitches garter stitch. There are now 128-138 stitches on the needle. Continue this pattern until the piece measures 18 cm / 7" in both sizes. Lay the piece to one side. FRONT PIECE: Cast on and work as for the back piece. BODY: Place the 2 pieces together on the same circular needle size 6 mm / US 10 = 204-212-228-240-256-276 stitches. Insert 1 marker in each side and allow the markers to follow your work upwards. Continue by working in the round over all stitches as before, but the garter stitches in each side are worked in stockinette stitch from here. When the piece measures 41-42-43-44-45-46 cm / 16⅛"-16½"-17"-17¼"-17¾"-18" - adjust so that the next round is a round without yarn overs in the diagrams, decrease 2-2-4-6-8-10 stitches in each side (= 1-1-2-3-4-5 stitches on each side of each marker). Front and back pieces are now continued separately. BACK PIECE: = 100-104-110-114-120-128 stitches (including 1 edge stitch in each side). Start from the right side and continue the pattern back and forth as before but with 1 edge stitch in garter stitch in each side. When the piece measures 60-62-64-66-68-70 cm / 23⅝"-24⅜"-25¼"-26"-26¾"-27½" start the diagonal shoulder AT THE SAME TIME as, when the piece measures 63-65-67-69-71-73 cm / 24¾"-25½"-26⅜"-27⅛"-28"-28¾", you bind off for the neck. Work as follows: DIAGONAL SHOULDERS: ROW 1 (= from right side): Work until there are 6-6-6-7-7-8 stitches left on the needle (towards shoulder), turn and tighten the strand. ROW 2 (= from wrong side): Work until there are 6-6-6-7-7-8 stitches left on the needle (towards shoulder), turn and tighten the strand. Repeat rows 1 and 2 three more times: work until 6-6-6-7-7-8 stitches more remain on the needle than on previous row from the same side, turn (= 6-8-10-8-10-10 stitches left on the shoulder). Work 1 ridge over all the 30-32-34-36-38-42 stitches, bind off. NECK: When the piece measures 62-64-66-68-70-72 cm / 24⅜"-25¼"-26"-26¾"-27½"-28⅜" decrease 3 stitches over each cable of 6 stitches and decrease 7 stitches over the cable of 14 stitches. When the piece measures 63-65-67-69-71-73 cm / 24¾"-25½"-26⅜"-27⅛"-28"-28¾" bind off the middle 25-25-27-27-29-29 stitches for neck and each shoulder is finished separately. Bind off 1 stitch on the next row from the neck = 30-32-34-36-38-42 stitches left on the shoulder. Work the other shoulder in the same way. FRONT PIECE: = 100-104-110-114-120-128 stitches. Continue in the same way as the back piece until the piece measures 59-61-63-65-67-69 cm / 23¼"-24"-24¾"-25½"-26⅜"-27⅛". Now decrease 3 stitches over each cable of 6 stitches and decrease 7 stitches over the cable of 14 stitches. When the piece measures 60-62-64-66-68-70 cm / 23⅝"-24⅜"-25¼"-26"-26¾"-27½" place the middle 21-21-23-23-25-25 stitches on 1 thread for neck and each shoulder is finished separately AT THE SAME TIME as you work diagonal shoulders as for the back piece. Continue to bind off for the neck at the beginning of each row from the neck as follows: 2 stitches 1 time and 1 stitch 1 time = 30-32-34-36-38-42 stitches left on the shoulder. Work 1 ridge and bind off. Work the other shoulder in the same way. SLEEVE: The piece is worked back and forth with circular needle. Cast on 42-42-42-50-50-50 stitches (including 1 edge stitch in each side) with circular needle size 5 mm / US 8. Purl 1 row from the wrong side. The next row is worked as follows from the right side: Work 1 edge stitch in garter stitch, purl 1, * knit 2, purl 2 *, work from *-* a total of 1-1-1-2-2-2 times, work A.8A (= 12 stitches), A.9A (= 6 stitches), A.10A (= 12 stitches), * purl 2, knit 2 * work from *-* a total of 1-1-1-2-2-2 times, purl 1 and 1 edge stitch in garter stitch. Continue this pattern until the piece measures 8 cm / 3⅛". Change to circular needle size 6 mm / US 10. The next row is worked as follows from the right side: Work A.8B over A.8A, A.9B over A.9A, A.10B over A.10A, the remaining stitches are worked as before. When A.8B-A.10B have been completed there are 46-46-46-54-54-54 stitches on the needle. The next row is worked as follows from the right side: Work 1 edge stitch in garter stitch, 0-0-0-3-3-3 stitches stockinette stitch, 5-5-5-6-6-6 stitches garter stitch, work A.8C over A.8B, A.9C over A.9B and A.10C over A.10B, work 5-5-5-6-6-6 stitches garter stitch, 0-0-0-3-3-3 stitches stockinette stitch and 1 edge stitch in garter stitch. Continue this pattern. When the piece measures 13-15-14-12-15-13 cm / 5"-6"-5½"-4¾"-6"-5" increase 1 stitch in each side - read INCREASE INFORMATION above. Increase in this way every 4½-3½-2½-3-2½-2½ cm / 1¾"-1¼"-⅞"-1⅛"-⅞"-⅞" a total of 9-11-12-10-11-13 times = 64-68-70-74-76-80 stitches. Continue working until the piece measures 53-52-51-50-49-48 cm / 21"-20½"-20"-19¾"-19¼"-19" (shorter measurements in larger sizes because of broader shoulders). Now bind off for a small sleeve cap in each side as follows: bind off 7-7-8-8-9-9 stitches 2 times and bind off 6-8-7-9-8-10 stitches 1 time - decrease 1 stitch over each cable with holes and decrease 3 stitches over the cable of 6 stitches on the last bind off row. Bind off the remaining stitches. The piece measures approx. 55-54-53-52-51-50 cm / 21½"-21¼"-21"-20½"-20"-19¾" with the cuff turned up. Work another sleeve in the same way. ASSEMBLY: Sew the shoulder seams inside the bind-off edge so that you get 2 ridges on top of the shoulder. Sew in the sleeves inside the 1 edge stitch in garter stitch. Turn the cuffs up on the right side. NECKLINE: Knit up from the right side approx. 74-80 stitches around the neck (including the stitches from the thread in front) with short circular needle size 5 mm / US 8. Purl 1 round and adjust the number of stitches to 72-72-76-76-80-80 stitches. Then work rib in the round (= knit 2 / purl 2) for 10 cm / 4", bind off with knit over knit and purl over purl. Fold the neck double in towards the wrong side and fasten with small neat stitches - make sure the seam is not tight. |
||||||||||||||||||||||||||||||||||
Diagram explanations |
||||||||||||||||||||||||||||||||||
|
||||||||||||||||||||||||||||||||||
|
||||||||||||||||||||||||||||||||||

|
||||||||||||||||||||||||||||||||||
|
||||||||||||||||||||||||||||||||||
|
Have you made this or any other of our designs? Tag your pictures in social media with #dropsdesign so we can see them! Do you need help with this pattern?You'll find tutorial videos, a Comments/Questions area and more by visiting the pattern on garnstudio.com. © 1982-2024 DROPS Design A/S. We reserve all rights. This document, including all its sub-sections, has copyrights. Read more about what you can do with our patterns at the bottom of each pattern on our site. |
||||||||||||||||||||||||||||||||||


With over 40 years in knitting and crochet design, DROPS Design offers one of the most extensive collections of free patterns on the internet - translated to 17 languages. As of today we count 304 catalogs and 11422 patterns - 11417 of which are translated into English (US/in).
We work hard to bring you the best knitting and crochet have to offer, inspiration and advice as well as great quality yarns at incredible prices! Would you like to use our patterns for other than personal use? You can read what you are allowed to do in the Copyright text at the bottom of all our patterns. Happy crafting!
Comments / Questions (25)
Hej, Jeg forstår ikke afsnittet omkring skrå skulder: der står, at man skal strikke frem til der er 6 m tilbage på p, og derefter vende og gøre det samme på næste p, men hvis man så skal gentage disse to pinde 3 gange, vil man så ikke vende det samme sted hver gang, altså med de 6 m tilbage på pinden? Det giver vel et stort hul, når man så strikke en p vrang til sidst? Håber, I kan hjælpe.
27.11.2018 - 11:42DROPS Design answered:
Hei Ditte. Du strikker til det gjenstår 6 masker mer enn på forrige pinne, altså du strikker over 6 masker mindre hver gang. Vi har nå lagt dette til i oppskriften. God fornøyelse.
03.12.2018 - 08:39Hei! Har et spørsmål ift diagrammet. Siden det strikkes frem og tilbake, viser F. Eks andre og siste rekke i B diagrammene hvordan en skal strikke vrangsiden? Eller viser den neste pinne som skal strikkes fra rettsiden?
16.09.2018 - 20:12DROPS Design answered:
Hei Stina. Diagrammene viser hver pinne i mønsteret, men sett fra rettsiden. Det vil si at når du strikker fra vrangsiden må du strikke omvendt av det som står. Altså du strikker fra venstre mot høyre, i tillegg til at rett strikkes vrang og vrang strikkes rett (dette står også forklart i symbolforklaringen). God fornøyelse.
17.09.2018 - 07:53Jeg kan slet ikke finde ud af jeres afsnit med hals og skulder. Begge steder står der, at skal lukkes af. Det ene sted står det at der skal strikkes en pind vrang fra retsiden. Det andet sted skal man strikke to pinde retstrik og så lukke af? Jeg er forvirret. Kan forklare det?
20.06.2018 - 21:40DROPS Design answered:
Hei Connie. Her var det visst kommet dobbelt opp med instruksjoner. Dette har nå blitt rettet, du skal felle av etter en pinne vrang fra retten. Takk for beskjed og god fornøyelse.
25.06.2018 - 14:07Hei Det står henvist til diagram A1 - A10? men det er bare 6 diagrammer? Jeg ser det står at diagrammer er oppdatert, men jeg kan ikke finne disse?
13.02.2018 - 16:48DROPS Design answered:
Hei Linda. Alle 10 diagrammer finner du nederst i oppskriften. Har du er treigt nettverk kan det hende det er grunnen til at ikke alle diagrammene er lastet ned. Men når jeg sjekker hos oss er alle på nett. Så prøv igjen :) mvh Drops design
14.02.2018 - 14:13Åh ja nu ser jeg det. Sorry, men billedet har mange flere rækker en i opskriftens 5 rækker. Det kan man jo selv rette. Mvh Berit
31.01.2018 - 16:02Jeg kan altså ikke se hvor der står noget om ribkanten forneden af blusen. Billedet viser ikke noget mønster i de første 8 cm. ? Mvh Berit
31.01.2018 - 14:41DROPS Design answered:
Hei Berit. Under BAGSTYKKE, står hele forklaringe på hvordan vrangborden/de første 8 cm skal strikkes. F.esk i str S. Slå 88 masker op på rundpind 5. Strik 1 pind vrang fra vrangen. Næste pind strikkes således fra retsiden: Strik 3 masker RETSTRIK - se forklaring over i oppskriften, strik 2 ret, * 2 vrang, 2 ret *, strik fra *-* totalt 0 gange, A.1A, A.2A, A.3A, A.4A, A.5A, A.6A, A.7A, * 2 ret, 2 vrang *, strik fra *-* totalt 0 gange, strik 2 ret, 3 masker retstrik. Fortsæt dette mønster til arbejdet måler 8 cm. God Fornøyelse!
01.02.2018 - 07:50Bonjour, Dans les explications il est marqué qu'il faut rabattre 2-2-4-6-8-10 mailles de chaque côté du marqueur à 41-42-43-44-45-46 cm . Mais on commence le biais des épaules à 60-62-64-66-68-70cm. Ca veut dire qu'on doit tricoter pendant 19 cm en aller retour et on fait la couture des 2 pièces ? Et en plus sur le diagramme les manches sont à 65-67-69-71-73-75 cm.
28.01.2018 - 14:15DROPS Design answered:
Bonjour Mme Lirzin, le biais des épaules commence à 19 cm (comme dans le schéma) et les rangs raccourcis du biais des épaules se font sur 5 cm (comme indiqué dans le schéma), la hauteur totale du pull à partir du bas jusqu'au côté le plus haut de l'épaule sera donc de 65 cm en taille S. Bon tricot!
29.01.2018 - 09:50Hoe moet ik de tellpattonen breien? Aan de goede kant van rechts naar links en aan de verkeerde kant andersom?
19.01.2018 - 21:53DROPS Design answered:
Hoi Mariska, Ja, dat klopt. De eerste naald aan de goede kant begin je vanaf rechts onder naar links te lezen en de teruggaande naald andersom, van links naar rechts.
20.01.2018 - 12:13Jeg er forvirret over starten på blusen. På billedet ser det ud til de først ca 8 cm er rib 2r og 2v men når jeg læser opskriften er det med a1-7. Hvad er korrekt?
30.12.2017 - 13:59DROPS Design answered:
Hei Pia. Om du ser på diagrammene er det 2 rett og 2 vrang, men når du kommer til 6. rad er det en økning (husk å lese diagramforklaringene). Da vil det blir en fin overgang mellom vrangboden og alle flettene. God Fornøyelse!
03.01.2018 - 14:34Hej Jeg vil høre ang diagram med snoning, der er forskel på hvilken vej stregen går over de 4 masker, er det fordi at det viser om snoningen skal være foran eller bagved, jeg syntes kun at symbolerne viser den ene streg og det er foran maskerne. Det er lidt svært at forklare, håber at I forstår
20.11.2017 - 22:43DROPS Design answered:
Hej, jo men det er fordi at alle snoninger i denne opskrift vender samme vej. God fornøjelse!
22.11.2017 - 14:36