
Popular categories
Looking for a yarn?


|
||||||||||||||||
Gioia |
||||||||||||||||
 |
 |
|||||||||||||||
DROPS jacket and top in Safran with lace pattern and crochet edges.
DROPS 65-21 |
||||||||||||||||
|
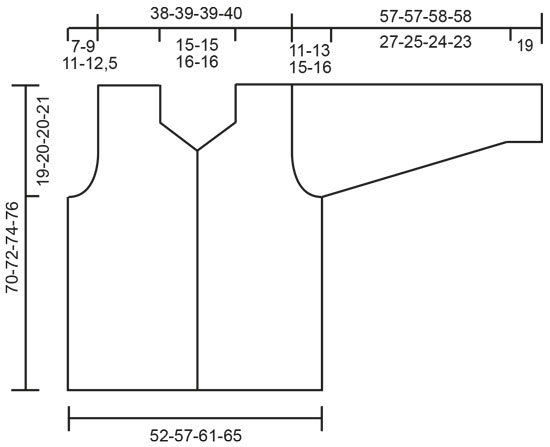
Knitting tension: 23 stitches x 30 rows with needle size 3.5 mm and stocking stitch = 10 x 10 cm. Remember needle size is only a guide! Pattern: See diagram - M.1, 1 diagram = 1 repeat. Pattern in diagram is seen from the right side. Ridge/Garter stitch (in the round): 1 ridge = 2 rounds. Knit 1 round and purl 1 round. Ridge/Garter stitch (back and forth on needle): 1 ridge = Knit 2 rows. Decrease tip: All decreases are worked from the right side. Decrease as follows after the 2 edge stitches: Slip 1 stitch, K 1, pass slipped stitch over. Decrease as follows before 2 edge stitches: K2 together. Buttonhole: 1 buttonhole = Cast off third and fourth band stitch on right front piece, cast on 2 new stitches over the cast off stitches on next row. Work buttonholes when piece measures: 26-27-28-29 cm, 33-34-35-36 cm, 39-40-42-43 cm, 46-47-49-50 cm and 52-53-55-56 cm. Crochet edge: Work with hook size 3 mm inside the 1 garter stitch edge stitch as follows: 1 double crochet, * 3 chain stitches, skip 2 stitches/rows, 1 double crochet *, repeat from *-*. ----------------------------------------------------------- Body: Jacket is worked back and forth with circular needle from mid front. Cast on 251-271-291-311 stitches (incl. 5 band stitches in each side towards mid front) with circular needle size 3 mm and beige tweed, work 2 ridges. Change to circular needle size 3.5 mm and work M.1 two times in height, but the bands are worked in garter stitch upwards. Remember the knitting tension! Continue with stocking stitch (band stitches continued in garter stitch). When piece measures 26-27-28-29 cm work M.1 four times in height - at the same time work buttonholes on right band - see description above. After M.1 continue with stocking stitch. When piece measures 51-52-54-55 cm work next row as follows: 61-66-71-76 stitches front piece, cast off 8 stitches for armhole, 113-123-133-143 stitches back piece, cast off 8 stitches for armhole, 61-66-71-76 stitches front piece. Each piece is finished separately. Left front piece: = 61-66-71-76 stitches. Continue to decrease for armholes every 2nd row: 4 stitches x 0-0-1-1, 3 stitches x 2-2-3-3, 2 stitches x 2-4-3-5, 1 stitch x 3-3-3-3. At the same time when piece measures 53-54-56-57 cm cast off the 5 band stitches for neckline. Continue decreasing to neck every 2nd row inside the 2 edge stitches worked in garter stitch - see Decrease tip: 1 stitch x 17-17-18-18. After all decreases for armholes and neck, there are 26-27-26-27 stitches left on shoulder. Right front piece: Worked as left, but remember buttonhole on right band. Back piece: = 113-123-133-143 stitches. Continue to decrease for armholes in each side as for front piece = 87-89-89-91 stitches. When piece measures 68-70-72-74 cm work 1 ridge over the middle 35-35-37-37 stitches. On next row cast off the middle 33-33-35-35 stitches for neck. Continue to decrease inside the 2 edge stitches worked in garter stitch - see Decrease tip: 1 stitch on next row towards neck = 26-27-26-27 stitches left on shoulder. Cast off when piece measures 70-72-74-76 cm. Sleeve: Cast on 60-60-60-60 stitches with double pointed needles size 3 mm and beige tweed, work 2 ridges. Change to double pointed needles size 3.5 mm and work M.1 four times in height. Then continue with stocking stitch - at the same time after M.1 increase mid under sleeve: 2 stitches x 9-12-12-15 for: Size S: Every 9th round. Sizes M + L: Every 6th round. Size XL: Alternately every 4th and 5th round = 78-84-84-90 stitches. When piece measures 46-44-43-42 cm cast off 6 stitches mid under sleeve and finish working back and forth on needle. Continue to decrease to sleeve cap every 2nd row: 2 stitches x 3-3-2-2, 1 stitch x 8-11-16-18, 2 stitches x 3-3-2-2, 3 stitches x 1-1-1-1. Cast off, sleeve measures approx. 57-57-58-58 cm. Assembly: Sew shoulder seams. Work Crochet edge - see description above - along bands and around neck. Sew in sleeves and sew on buttons. DROPS Top in Safran with lace pattern and crochet edges. Sizes: S - M - L - XL Materials: DROPS Safran Moulinè from Garnstudio 200-200-250-250 g colour no 44, beige tweed. DROPS Circular needle sizes 3 and 3.5 mm DROPS Crochet hook size 3 mm ------------------------------------------------------------ Knitting tension: 23 stitches x 30 rows with needle size 3.5 mm and stocking stitch = 10 x 10 cm. Remember needle size is only a guide! Pattern: See diagram - M.1, 1 diagram = 1 repeat. Pattern in diagram is seen from the right side. Ridge/Garter stitch (in the round): 1 ridge = 2 rounds. Knit 1 round and purl 1 round. Ridge/Garter stitch (back and forth on needle): 1 ridge = Knit 2 rows. Decrease tip: All decreases are worked from the right side. Decrease as follows after the 2 edge stitches: Slip 1 stitch, K 1, pass slipped stitch over. Decrease as follows before the 2 edge stitches: K2 together. Crochet edge: Work with hook size 3 mm inside the 1 garter stitch edge stitch as follows: 1 double crochet, * 3 chain stitches, skip 2 stitches/rows, 1 double crochet *, repeat from *-*. --------------------------------------------------------- Body: Cast on 200-210-220-230 stitches with circular needle size 3 mm and beige tweed and work 2 ridges. Change to circular needle size 3.5 mm and work M.1 four times in height. Remember the knitting tension! Continue with stocking stitch. When piece measures 33-34-35-36 cm, work next round as follows: Purl 16-16-18-20 stitches (= under sleeve), knit 84-89-92-95 stitches, purl 16-16-18-20 stitches (= under sleeve), knit 84-89-92-95 stitches. On next round cast off the 12-12-14-16 purl stitches in each side for armholes. Front and back pieces are now finished separately. Front piece: = 88-93-96-99 stitches. Continue to decrease for armholes inside the 2 edge stitches - which are worked in garter stitch - every 2nd row - see Decrease tip: 1 stitch x 10-11-12-13 = 68-71-72-73 stitches. When piece measures 41-42-43-44 cm, purl 1 row (seen from right side) over the middle 42-43-42-43 stitches. On next row cast off the middle 38-39-38-39 stitches for neck. Continue decreasing to neck inside the 2 edge stitches - worked in garter stitch - every 2nd row - see Decrease tip: 1 stitch x 6-7-8-8. There are now 9-9-9-9 stitches left on each shoulder, these are worked in stocking stitch with 2 stitches garter stitch in each side until piece measures 51-53-55-57 cm, cast off. Back piece: = 88-93-96-99 stitches. Finished as for front piece. Assembly: Sew shoulder seams. Work Crochet edge - see description above - around armholes and neck. |
||||||||||||||||
Diagram explanations |
||||||||||||||||
|
||||||||||||||||

|
||||||||||||||||
|
||||||||||||||||

|
||||||||||||||||
|
Have you made this or any other of our designs? Tag your pictures in social media with #dropsdesign so we can see them! Do you need help with this pattern?You'll find tutorial videos, a Comments/Questions area and more by visiting the pattern on garnstudio.com. © 1982-2024 DROPS Design A/S. We reserve all rights. This document, including all its sub-sections, has copyrights. Read more about what you can do with our patterns at the bottom of each pattern on our site. |
||||||||||||||||


With over 40 years in knitting and crochet design, DROPS Design offers one of the most extensive collections of free patterns on the internet - translated to 17 languages. As of today we count 304 catalogues and 11422 patterns - 11422 of which are translated into English (UK/cm).
We work hard to bring you the best knitting and crochet have to offer, inspiration and advice as well as great quality yarns at incredible prices! Would you like to use our patterns for other than personal use? You can read what you are allowed to do in the Copyright text at the bottom of all our patterns. Happy crafting!
Comments / Questions (40)
Concernant le top, on le tricote bien en rond ? Il est question de rangs, dans les explications, et non de tours...
29.06.2023 - 14:19DROPS Design answered:
Bonjour Mme Bourgeois, effectivement le top se tricote en rond jusqu'aux emmanchures, puis on termine le devant et le dos séparément, en allers et retours. Bon tricot!
29.06.2023 - 15:40Why is the cast on 291 sts when the repeat pattern is 10 sts each repeat plus the edge stitches totalling 5+5 =10 sts for a total of 290 - not 291
09.06.2023 - 20:27DROPS Design answered:
Dear Nelma, to get the pattern symmetrical on each side towards mid front you will end M.1 with the first stitch in diagram, so that you will work: 5 front band stitches, repeat the 10 sts in M.1 a total of 28 times, work the first stitch in M.1 and 5 front band stitches = 5+280+1+5=291 sts. Happy knitting!
12.06.2023 - 08:13Ik heb bovenwijdte 110 cm. Volgens het diagram zou ik van de vest dan maat M moeten maken en voor het topje maat XL. Klopt dit?
14.04.2023 - 12:50DROPS Design answered:
Dag Myriam,
Het beste kun je even vergelijken met een bestaand (gebreid) kledingstuk dat je goed zit. Het topje rekt ook een beetje op met het dragen.
14.04.2023 - 21:14Bonjour, Les boutons conseillés pour ce modèle n’hexistent plus. Et je ne trouve pas leur diamètre dans les explications. Pouvez vous me dire de quel diamètre ils étaient pour que je puisses commander une équivalences. Merci d’avance
13.05.2022 - 11:26DROPS Design answered:
Bonjour Mme Gaubicher, des boutons de 20 mm de diamètre iront parfaitement. Bon tricot!
13.05.2022 - 13:34Hi there. Maybe I am missing something (it\'s been a while since I\'ve knit) but I am doing the tank top part of pattern only and it states for largest size to cast on 230 st which if 23 st=10cm would be 40 inches correct? But the diagram of the tank top states the largest finished measurement is 50 inches?
07.05.2021 - 22:04DROPS Design answered:
Dear Andrea, all the measurements on the schematic drawing is given in cm. The finished wudth of the thank to is 50cm (and not 50 inch). So 230 stitch according to the gauge swatch is 100 cm wide, divide it to front and back is 50 cm X 2. I hope this helps. Happy Knitting!
07.05.2021 - 22:53Bonjour, dans ma dernière question. Je vous demandais si je rabat après les diminutions des devants. Lorsque je lis pour le dos il est écrit ceci: À 70-72-74-76 cm de hauteur totale, rabattre toutes les mailles. En ce moment j’ai 66 cm de hauteur total pour les devants, donc j’en déduis que je dois faire la même chose. Ce n’est pas mentionné pour les devants. Merci à l’avance
14.08.2020 - 15:11DROPS Design answered:
Bonjour France, vous devez effectivement continuer pour rabattre comme pour le dos (mais avec 26 mailles pour chaque épaule en taille S), autrement dit, vous rabattez à 70 cm en S - ajustez sur le dos. Bon tricot!
14.08.2020 - 15:47Bonjour, je viens de terminer les deux devants avec 29 m au lieu de 26, je les ai recommencer et je reste toujours avec 29 m. . Est ce que je rabat après avoir terminer les diminutions il y a rien d’écrit après. Merci à l’avance
14.08.2020 - 01:33DROPS Design answered:
Bonjour France, en taille S vous avez 61 m pour chaque devant, vous rabattez pour l'emmanchure: 2 x 3 m + 2 x 2 m + 3x1 m = 13 m au total - Pour l'encolure, vous rabattez 5 m et diminuez 17 x 1 m = 22 m au total. Il va vous rester: 61-13-22= 26 m. Bon tricot!
14.08.2020 - 07:30Je n’ai pas terminé de tricoter pour faire la 5e boutonnière à 55cm et je dois du côté encolure rabattre 5 m.. est ce que je rabats les 5 m. point mousse et je fais sur les autres rgs du coté encolure 2 m point mousse end et env. ? J’espère que je me suis bien exprimé. Merci à l’avance.
05.08.2020 - 18:23DROPS Design answered:
Bonjour France, la dernière boutonnière se trouve à 52-53-55-56 cm et on rabat les 5 m de l'encolure à 53-54-56-57 cm, autrement dit 1 cm après la dernière boutonnière. Après avoir rabattu ces 5 m, vous continuez avec 2 m point mousse côté encolure en diminuant 17-18 fois (cf taille) 1 m tous les 2 rangs après ces 2 m point mousse (= devant droit, sur l'endroit). Bon tricot!
06.08.2020 - 09:02Ik zou graag willen weten of de mouw in de rondte wordt gebreid of van links naar rechts dus averechts aan de verkeerde kant
28.07.2020 - 13:23DROPS Design answered:
Dag Marga,
De mouwen worden in de rondte gebreid in tricotsteek (dus steeds recht aan de goede kant).
28.07.2020 - 20:05Je viens de faire mes 4 rangs endroit, je commence M1, j’ai 291 mailles, 5 m end, groupes de 10mailles et je termine avec 6 m end est ce normale? Merci à l’avance
02.07.2020 - 20:51DROPS Design answered:
Bonjour France, tout à fait, pour que le motif soit symétrique des 2 côtés, on va terminer par la 1ère m de M.1 (= 1 m jersey endroit). Bon tricot!
03.07.2020 - 08:31