DROPS Nepal
DROPS Nepal
65% Wool, 35% Alpaca
from 2.60 € /50g
Get the yarn to make this pattern from 13.00€.

The yarn cost is calculated from the pattern’s smallest size and the yarn’s cheapest product type. Looking for an even better price? You might find it on the DROPS Deals!

DROPS SS24

Warm Snap

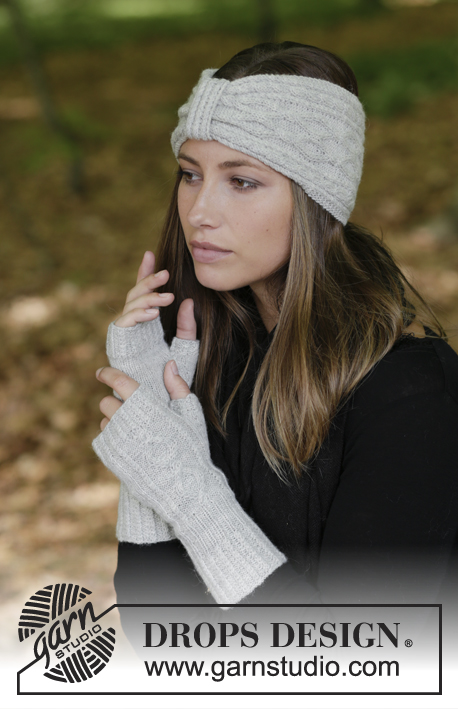
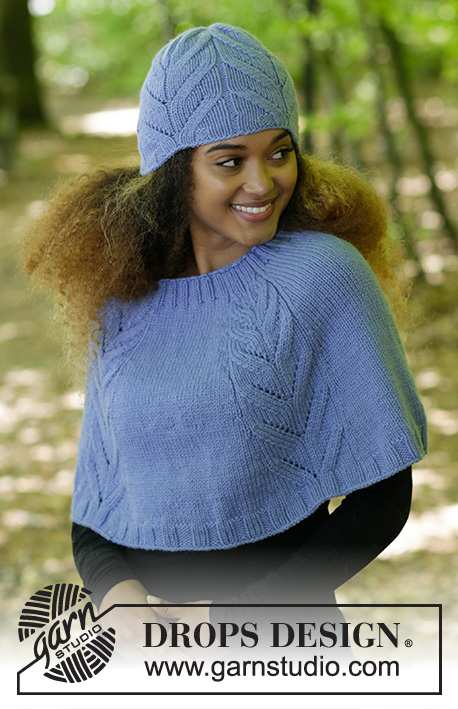
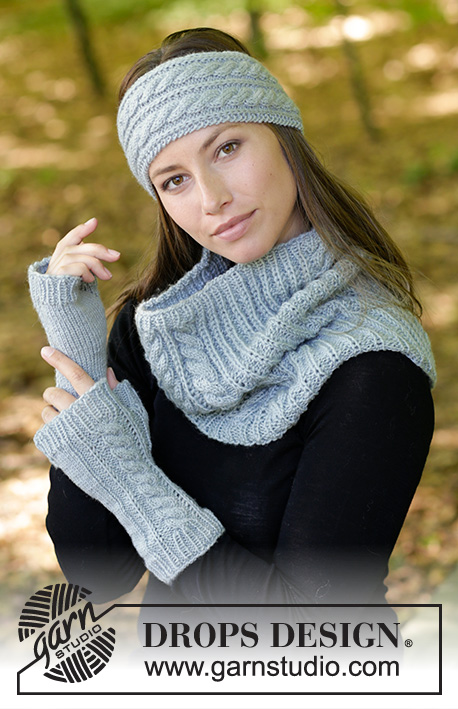
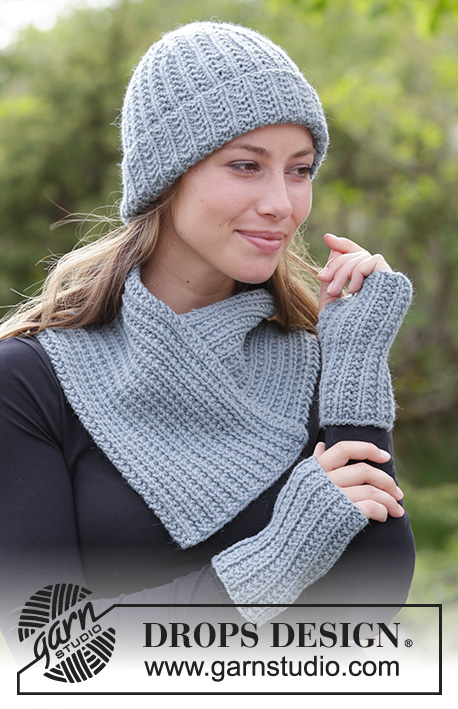
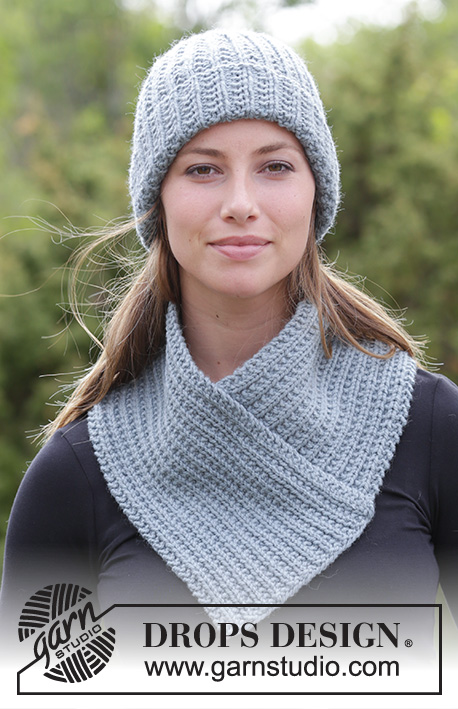
The set consists of: Knitted hipster hat, neck warmer and wrist warmers with textured pattern. The set is knitted in DROPS Nepal.

DROPS 182-17
DROPS Design: Pattern no ne-255
Yarn group C or A + A
-----------------------------------------------------------
For the complete set, there will be enough with approx. 250 g DROPS Nepal.
-----------------------------------------------------------
HAT:
Size: One size
Fits head size: 54/56 cm
Materials:
DROPS NEPAL from Garnstudio (belongs to yarn group C)
100 g colour 7139, grey green

The piece can also be knitted with yarn from:
"Alternative yarn (Yarn Group C)" – see the link below.

DROPS DOUBLE POINTED NEEDLES AND CIRCULAR NEEDLE (40 cm) SIZE 5 MM – or the size needed to get 17 stitches and 22 rows stocking stitch on 10 cm in width and 10 cm in height.
-----------------------------------------------------------
NECK WARMER:
Size: One size
Length before assembly: 90 cm. Width before assembly: 21 cm
Materials:
DROPS NEPAL from Garnstudio (belongs to yarn group C)
150 g colour 7139, grey green

The piece can also be knitted with yarn from:
"Alternative yarn (Yarn Group C)" – see the link below.

DROPS NEEDLE SIZE 5 MM – or the size needed to get 17 stitches and 22 rows stocking stitch on 10 cm in width and 10 cm in height.
----------------------------------------------------------
WRIST WARMERS:
Sizes: S/M – L/XL
Circumference: 19-21 cm
Height: 16-17 cm
Materials:
DROPS NEPAL from Garnstudio (belongs to yarn group C)
50 g for both sizes in colour 7139, grey green

The piece can also be knitted with yarn from:
"Alternative yarn (Yarn Group C)" – see the link below.
DROPS NEEDLE SIZE 5 MM – or the size needed to get 17 stitches and 22 rows stocking stitch on 10 cm in width and 10 cm in height.
-----------------------------------------------------------

-------------------------------------------------------

Alternative Yarn – See how to change yarns here
Yarn Groups A to F – Use the same pattern and change the yarn here
Yarn usage using an alternative yarn – Use our yarn converter here

-------------------------------------------------------

DROPS Nepal
DROPS Nepal
65% Wool, 35% Alpaca
from 2.60 € /50g
Get the yarn to make this pattern from 13.00€.

The yarn cost is calculated from the pattern’s smallest size and the yarn’s cheapest product type. Looking for an even better price? You might find it on the DROPS Deals!

Pattern instructions

NOTE: This pattern is written in British English. All measurements in charts are in cm. For conversion from cm to inches - click here. There are different terms for crocheting in British and American English. If this pattern includes crochet, click for "crochet terms" here. For this pattern in American English, please click here.
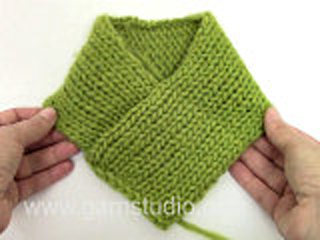
INFORMATION FOR THE PATTERN:
RIDGE/GARTER STITCH (worked back and forth):
1 ridge = Knit 2 rows.

PATTERN:
See diagram A.1. The diagram shows all the rows in the pattern seen from the right side.
----------------------------------------------------------
HAT:
The piece is worked in the round with circular needle. Change to double pointed needles when necessary.
Cast on 84 stitches with circular needle size 5 mm and Nepal. Work PATTERN according to diagram A.1 in the round (= 28 repeats of 3 stitches). REMEMBER THE KNITTING TENSION! When the piece measures 20 cm insert 7 marker threads in the piece as follows: The first marker thread is inserted after the first 3 stitches on the round (i.e. after 1 knitted stitch), then insert the next 6 with 12 stitches between each. When the last marker thread has been inserted, there are 9 stitches left on the round. Now start the decreases. Continue A.1 upwards, but on the first round, decrease 1 stitch after each marker thread by purling 2 stitches together (= 7 stitches decreased). Decrease in this way every 2nd round a total of 9 times = 21 stitches left. Work 1 round without decreases. On the next round knit all stitches twisted together, two and two = 11 stitches left. Cut the strand, pull it through the remaining stitches, tighten and fasten well. The hat measures approx. 29 cm from the top down. Turn up an edge of approx. 5-6 cm at the bottom of the hat.
----------------------------------------------------------
NECK WARMER:
The piece is worked back and forth on the needle and is sewn together at the end.
Cast on 35 stitches with needle size 5 mm and Nepal. Work 1 RIDGE – see description above. Work pattern from the right side as follows: 2 edge stitches in garter stitch, knit 1, work PATTERN according to diagram A.1 (= 10 repeats of 3 stitches), 2 edge stitches in garter stitch. REMEMBER THE KNITTING TENSION! When the piece measures 21 cm insert a marker at the beginning of the next row from the right side (= marker for assembly). When the piece measures 89 cm work 1 ridge over all stitches. Cast off.
To avoid getting a tight cast-off edge, you can use a larger needle size or make a yarn over after approx. every 4th stitch, which is then cast off.

ASSEMBLY:
Sew the cast-off edge to the one long-side (between the cast-on edge and the marker inserted after 21 cm). Sew inside the cast-off edge and in the outermost stitch along the edge so that the seam is not thick. Cut and fasten the strand.
----------------------------------------------------------
WRIST WARMERS:
The piece is worked back and forth on the needle and is sewn together at the end.
Cast on 32-35 stitches with needle size 5 mm and Nepal. Work pattern from the right side as follows:
2 edge stitches in GARTER STITCH - see description above, knit 1, work PATTERN according to diagram A.1 (= 9-10 repeats of 3 stitches), 2 edge stitches in garter stitch. Continue the pattern back and forth in this way. REMEMBER THE KNITTING TENSION! When the piece measures 16-17 cm cast off. To avoid getting a tight cast-off edge you can use a larger needle or make a yarn over after approx. every 4th stitch which is then cast off. Cut and fasten the strand.

ASSEMBLY:
Sew together the sides of the wrist warmer as follows:
Sew in the outermost loop of the outermost stitch, in every stitch upwards so that the seam is not thick: Start at the bottom of the wrist warmer and sew the seam 9-10 cm upwards, Cut and fasten the strand. Skip 5 cm (= hole for the thumb) and sew the last 2 cm together.
Work 1 more wrist warmer in the same way.

Diagram

symbols = knit from right side, purl from wrong side
symbols = purl from right side, knit from wrong side
diagram

Each of our patterns has specific tutorial videos to help you.

Do you have a question? See a list of frequently asked questions (FAQ)

Knitting tension is what determines the final measurements of your work, and is usually measured per 10 x 10 cm. It is provided like so: number of stitches in width x number of rows in height - eg: 19 stitches x 26 rows = 10 x 10 cm.

The knitting tension is very individual; some people knit/crochet loosely while others work tightly. You adjust the knitting tension with the needle size, which is why the suggested needle size is only meant as a guide! You need to adjust this (up or down) to ensure that YOUR knitting tension matches the knitting tension provided in the pattern. If you work with a different knitting tension than provided you will have a different yarn consumption, and your work will have different measurements than what the pattern suggests.

The knitting tension also determines which yarns can replace each other. As long as you achieve the same knitting tension you can replace one yarn with another.

See DROPS lesson: How to measure your tension/gauge

See DROPS video: How to make a gauge tension swatch

The required amount of yarn is provided in grams, eg: 450 g. To calculate how many balls you’ll need you first need to know how many grams are in 1 ball (25g, 50g or 100g). This information is available if you click on the individual yarn quality on our pages. Divide the amount required with the amount of each ball. For example, if each ball is 50g (the most common amount), the calculation will be as follows: 450 / 50 = 9 balls.

The important thing when changing from one yarn to another is that the knitting/crochet tension remains the same. This is so that the measurements of the finished piece will be the same as on the sketch provided. It is easier to achieve the same knitting tension using yarns from the same yarn group. It is also possible to work with multiple strands of a thinner yarn to achieve the knitting tension of a thicker one. Please try our yarn converter. We recommend you to always work a test swatch.

Please NOTE: when changing yarn the garment might have a different look and feel to the garment in the photo, due to individual properties and qualities of each yarn.

See DROPS lesson: Can I use a different yarn than the one mentioned in the pattern?

All our yarns are categorised into yarn groups (from A to F) according to thickness and knitting tension – group A contains the thinnest yarns and group F the thickest. This makes it easier for you to find alternative yarns to our patterns, should you wish to switch yarn. All yarns within the same group have a similar knitting tension and can easily replace each other. However, different yarn qualities have different structures and properties which will give the finished work a unique look and feel.

Click here for an overview of the yarns in each yarn group

At the top of all our patterns you’ll find a link to our yarn calculator, which is a helpful tool should you wish to use a different yarn than suggested. By filling in the yarn quality you wish to replace, the amount (in your size) and number of strands, the calculator will present good alternative yarns with the same knitting tension. Additionally it will tell you how much you’ll require in the new qualities and whether you’ll need to work with multiple strands. Most skeins are 50g (some are 25g or 100g).

If the pattern is worked with multiple colours, every colour will have to be calculated separately. Similarly, if the pattern is worked with several strands of different yarns (for example 1 strand Alpaca and 1 strand Kid-Silk) you will have to find alternatives for each, individually.

Click here to see our yarn calculator

Since different yarns have different qualities and textures we have chosen to keep the original yarn in our patterns. However, you can easily find options among our available qualities by using our yarn calculator, or simply pick a yarn from the same yarn group.

It is possible that some retailers still have discontinued yarns in stock, or that someone has a few skeins at home that they would like to find patterns for.

The yarn calculator will provide both alternative yarn as well as required amount in the new quality.

If you think it's hard to decide what size to make, it can be a good idea to measure a garment you own already and like the size of. Then you can pick the size by comparing those measures with the ones available in the pattern's size chart.

You'll find the size chart at the bottom of the pattern.

See DROPS lesson: How to read size chart

The needle size provided in the pattern serves only as a guide, the important thing is to follow the knitting tension. And since knitting tension is very individual, you will have to adjust the needle size to ensure that YOUR tension is the same as in the pattern – maybe you’ll have to adjust 1, or even 2 needle sizes, up or down to achieve the correct tension. For this, we recommend that you work test swatches.

Should you work with a different knitting tension than the one provided, the measurements of the finished garment might deviate from the measurement sketch.

See DROPS lesson: How to measure your tension/gauge

See DROPS video: How to make a tension/gauge swatch

Working a garment top-down provides more flexibility and room for personal adjustment. For example it is easier to try the garment on while working, as well as making adjustments to length of yoke and shoulder caps.

The instructions are carefully explaining every step, in the correct order. Diagrams are adjusted to the knitting direction and are worked as usual.

The diagram depicts all rows/rounds, and every stitch seen from the right side. It is read from bottom to top, from right to left. 1 square = 1 stitch.

When working back and forth, every other row is worked from the right side and every other row is worked from the wrong side. When working from the wrong side, the diagram will have to be worked reversed: from left to right, knit stitches are purled, purl stitches are knit etc.

When working in the round every round is worked from the right side and the diagram are worked from right to left on all rounds.

See DROPS lesson: How to read knitting diagrams

The diagram depicts all rows/rounds, and every stitch seen from the right side. It is worked from bottom to top, from right to left.

When working back and forth every other row is worked from the right side: from right to left and every other row is worked from the wrong side: from left to right.

When working in the round, every row in the diagram are worked from the right side, from right to left.

When working a circular diagram you start in the middle and work your way outwards, counter clockwise, row by row.

The rows usually start with a given number of chain stitches (equivalent to the height of the following stitch), this will either be depicted in the diagram or explained in the pattern.

See DROPS lesson: How to read crochet diagrams

Instructions for working several diagrams after each other on the same row/round, will often be written like so: “work A.1, A.2, A.3 a total of 0-0-2-3-4 times". This means you work A.1 once, then A.2 is worked once, and A.3 is repeated (in width) the number of times provided for your size – in this case like so: S = 0 times, M = 0 times, L=2 times, XL= 3 times and XXL = 4 times.

The diagrams are worked as usual: begin with the first row in A.1, then work the first row in A.2 etc.

See DROPS lesson: How to read knitting diagrams

See DROPS lesson: How to read crochet diagrams

The total width of the garment (from wrist-to-wrist) will be larger in the larger sizes, despite the actual sleeves being shorter. The larger sizes have longer sleeve caps and wider shoulders, so there will be a good fit in all sizes.

The measurement sketch/schematic drawing provides information regarding the full length of the garment. If it’s a jumper or a jacket the length is measured from the highest point on the shoulder closest to the neckline, and straight down to the bottom of the garment. It is NOT measured from the tip of shoulder. Similarly, the length of yoke is measured from the highest point on the shoulder and down to where yoke is split into body and sleeves.

On a jacket measures are never taken along bands, unless specifically stated. Always measure inside band stitches when measuring the length.

See DROPS lesson: How to read a schematic drawing

Diagrams are often repeated on the round or in height. 1 repeat is the diagram the way it appears in the pattern. If it says to work 5 repeats of A.1 in the round, then you work A.1 a total of 5 times after/next to each other in the round. If it says to work 2 repeats of A.1 vertically/in height you work the entire diagram once, then begin again at the start and work the entire diagram one more time.

Chain stitches are slightly narrower than other stitches and to avoid working the cast-on edge too tight, we simply chain more stitches to begin with. The stitch count will be adjusted on the following row to fit the pattern and measurement sketch.

The rib edge is more elastic and will contract slightly compared to, for example, stocking stitch. By increasing before the rib edge, you avoid a visible difference in width between the rib edge and the rest of the body.

It’s very easy to cast off too tightly, and by making yarn overs while casting off (and simultaneously casting these off) you avoid a too tight cast off edge.

See DROPS video: How to bind off with yarn overs (yo)

To achieve an even increase (or decrease) you can increase on, for example: every 3rd and 4th row alternately, like so: work 2 rows and increase on the 3rd row, work 3 rows and increase on the 4th. Repeat this until the increase is complete.

See DROPS lesson: Increase or decrease 1 st on every 3rd and 4th row alternately

Should you prefer to work in the round instead of back and forth, you may of course adjust the pattern. You’ll need to add steeks mid-front (usually 5 stitches), and follow the instructions. When you would normally turn and work from the wrong side, simply work across the steek and continue in the round. At the end you’ll cut the piece open, pick up stitches to work bands, and cover the cut edges.

See DROPS video: How to knit steeks and cut open

Should you prefer to work back and forth instead of in the round, you may of course adjust the pattern so you work the pieces separately and then assemble them at the end. Divide the stitches for the body in 2, add 1 edge stitch in each side (for sewing) and work the front and back pieces separately.

See DROPS lesson: Can I adapt a pattern for circular needles into straight needles?

Pattern repeats can vary slightly in the different sizes, in order to get the correct proportions. If you’re not working the exact same size as the garment in the photo, yours might deviate slightly. This has been carefully developed and adjusted so that the complete impression of the garment is the same in all sizes.

Make sure to follow instructions and diagrams for your size!

If you have found a pattern you like which is available in women’s size it’s not very difficult to convert it to men’s size. The biggest difference will be the length of sleeves and body. Start working on the women size that you think would fit across the chest. The additional length will be worked right before you cast off for the armhole/sleeve cap. If the pattern is worked top-down you can add the length right after the armhole or before the first decrease on sleeve.

Regarding additional yarn amount, this will depend on how much length you add, but it is better with a skein too many than too few.

All yarns will have excess fibres (from production) that might come off as lint or shedding. Brushed yarns (ie hairier yarns) have more of these loose, excess fibres, causing more shedding.

Shedding also depends on what is worn under or over the garment, and whether this pulls at the yarn fibres. It’s therefore not possible to guarantee that there will be no shedding

Below are some tips on how to get the best result when working with hairier yarns:

1. When the garment is finished (before you wash it) shake it vigorously so the looser hairs come off. NOTE: do NOT use a lint roller, brush or any method that pulls at the yarn.

2. Place the garment in a plastic bag and put it in your freezer - the temperature will cause the fibres to become less attached to each other, and excess fibres will come off easier.

3. Leave in the freezer for a few hours before taking it out and shaking it again.

4. Wash the garment according to the instructions on the yarn label.

Pilling is a natural process that happens to even the most exclusive of fibers. It's a natural sign of wear and tear that is hard to avoid, and that is most visible in high friction areas of your garment like a sweater's arms and cuffs.

You can make your garment look as new by removing the pilling, using a fabric comb or a pill/lint remover.

Still can't find the answer you need? Then scroll down and leave your question so one of our experts can try to help you. This will be done normally within 5 to 10 working days.
In the meantime, you can read the questions and answers that others have left to this pattern or join the DROPS Workshop on Facebook to get help from fellow knitters/crocheters!

You might also like...

nepal grønn lue

kristine, Norway

Warm Snap Neck Warmer

Sonja, Germany

Snap Hat

Päivi, Finland

Post a comment to pattern DROPS 182-17

We would love to hear what you have to say about this pattern!

If you want to leave a question, please make sure you select the correct category in the form below, to speed up the answering process. Required fields are marked *.

Comments / Questions (25)

country flag GM wrote:

Absolutně nechápu ten popis. V nákresu jsou jen lícové řady, nebo i rubové?

07.02.2024 - 06:21

DROPS Design answered:

Dobrý den, ve schématu jsou zobrazeny jsou všechny řady vzoru nahlížené z lícové strany, tj. tak, jak oka vypadají na lícové straně. Ve vysvětlivkách je upřesněno, jak plést danou značku v rubové řadě. Hodně zdaru!

16.02.2024 - 20:46

country flag Simonne Lisell wrote:

Hur stickar jag mönster på pulsvärmare. Har 35 maskor, skall jag börja med att sticka 3 räta maskor i början av v fr rätsidan o sedan diagram a1, 1:a varvet rätsidan stickas 1 avig,2 r,,2:a v avigan, st 2 räta kantm,, 1 a, avsluta m 2 r kantmaskor varje varv och i början av vvarv börja med 3 räta kantmaskor

20.01.2022 - 19:50

country flag Annette wrote:

Liebes Drops-Team, ich habe eine allgemeine Frage zu dem tollen Muster. Eigentlich wollte ich einen Pullunder mit Drops Nepal im Vollpatent stricken. Allerdings gefällt mir dieses Muster auch sehr gut. Eignet es sich auch zum Stricken eines Pullunder s mit Drops Nepal? Beim Stricken eines Probestückes fand ich es nämlich sehr "kompakt" und elastisch, für eine Mütze ideal, aber auch für einen Pullunder? Ich freue mich auf eure fachkundige Meinung. Ganz liebe Grüße, Annette

12.04.2021 - 13:16

DROPS Design answered:

Liebe Annette, hier finden Sie einige unsere Modelle mit so einen Struktur-Muster; je nach dem Sie möchten, kann es Ihnen etwas helfen. Viel Spaß beim stricken!

12.04.2021 - 15:43

country flag Anke wrote:

Liebes Team, das Diagramm soll ich in der Mütze in Runden stricken. Es sind aber Hin- und Rückreihen abgebildet. Wie funktioniert das? Besten Dank vorab...

18.01.2021 - 09:43

DROPS Design answered:

Liebe Anke, das Diagram wird entweder in Reihen oder in Runden gestrickt, wenn Sie es in Runden stricken, lesen Sie jede Runde rechts nach links (z.B. 1. Reihe = 1 M li, 2 M re - 2. Reihe: 2 M li, 1 M re). Viel Spaß beim stricken!

18.01.2021 - 10:55

country flag Bhawana Jha wrote:

Hi, what is the dimension of the knitted hat in the end. I would like to compare? is the pattern as much stretchy as a simple 2X2 rib or less? Thanks

15.12.2020 - 17:31

DROPS Design answered:

Dear Bhawana, pattern is stretchy but will contract less than rib 2x2 - make a small swatch will let you get an idea of the result and let you decide if this is the texture you are looking for. Happy knitting!

16.12.2020 - 06:46

country flag Pia Möller wrote:

Hej jag garn Drop air och vill sticka torgvantar gärna släta med en mudd men hittar inget mönster som passar. Kan ni vänligen ge mig tips. Mvh Pia Möller

26.10.2020 - 14:20

DROPS Design answered:

Hei Pia. Bruk vår søkemotor og søk på pulsvärmare i garngruppe C. Da kommer det opp mange pulsvärmare, forhåpentligvis noen du liker. mvh DROPS design

26.10.2020 - 15:37

country flag Isambre wrote:

Bonjour, comme tous j'ai de la difficulté à comprendre les diminutions. Ce n'est pas clair. Par contre, ma question est: Est-ce que le motif est le même sur l'endroit et l'envers de la tuque. Car sur la photo on voit que lorsque le bord est replié le motif se continu, ca doit donc être le même motif des deux cotés ?

31.12.2019 - 17:14

DROPS Design answered:

Bonjour! Le motif sera le meme sur l'endroit et sur l'envers de l'ouvrage. Bon tricot!

31.12.2019 - 21:22

country flag Monica wrote:

Hej! Pulsvärmaren: " 2 kantmaskor i RÄTSTICKNING - se förklaring ovan, 1 rätmaska," Ska denna sista räta maska stickas rät på både avigt och rätt varv och ska varven börjas med 3 räta maskor och sluta med 2 kantmaskor?

03.12.2019 - 05:03

DROPS Design answered:

Hei Monica! De 2 første og siste maskene på omgangen skal strikkes i rille (rätstickning) 1 maske skal strikkes rett (den strikkes vrang på vrangsiden) før mønsteret strikkes. Se gjerne også denne videoen. Lykke til!

03.12.2019 - 09:06

country flag Simonne Lisell wrote:

Om jag lägger upp 35 m. Hur läser jag mönstret. Jag fattar inte. Hur jag skall börja. Skall man börja med 4 r maskor.

30.10.2019 - 17:53

DROPS Design answered:

Hej. Är det halsvärmare eller pulsvärmare du ska sticka? På halsvärmaren börjar du att sticka 2 varv rätstickning (dvs räta maskor på varje varv). Efter det stickar du från rätsidan: 2 kantmaskor i rätstickning, 1 rätmaska och sedan stickar du de nästa 30 m enligt diagram A.1. (dvs 1 avigmaska, 2 rätmaskor, 1 avigmaska, 2 rätmaskor osv) och avslutar med 2 kantmaskor i rätstickning. Mvh DROPS Design

31.10.2019 - 07:06

country flag Inga wrote:

Hallo, gerne würde ich die Mütze von anfang an auf einem Nadelspiel stricken um eine Naht zu vermeiden. Können Sie mir sagen, wie ich das Muster dann umsetzen muss? Vielen Dank!

30.10.2019 - 17:04

DROPS Design answered:

Liebe Inga, die Mütze wird laut Anleitung in Runden gestrickt, Sie haben also keine Naht. Nur der Kragenschal wird in Hin- und Rück-Reihen gestrickt. Die Mütze stricken Sie zuerst auf der Rundnadel, dann wechseln Sie zum Nadelspiel, wenn es durch die Abnahmen immer weniger Maschen werden. Viel Spaß beim Stricken!

30.10.2019 - 20:56