
Popular categories
Looking for a yarn?


|
|||||||||||||||||||||||||||||||
Morgan's Daughter Vest |
|||||||||||||||||||||||||||||||
 |
 |
||||||||||||||||||||||||||||||
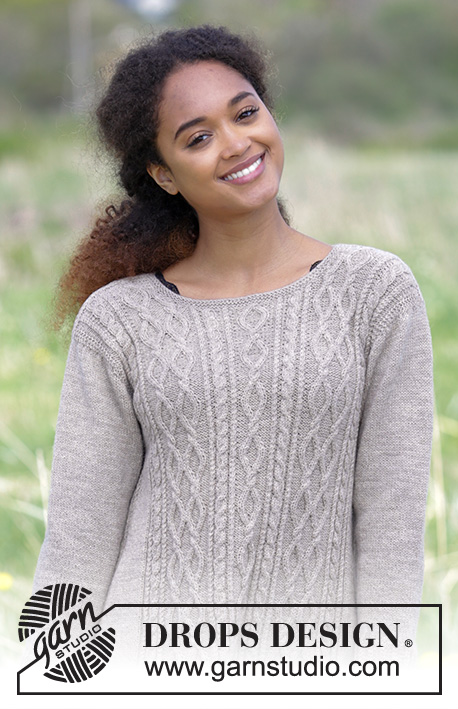
Knitted vest with shawl collar, cables and A-shape, worked top down. Sizes S - XXXL. The piece is worked in DROPS Flora.
DROPS 179-13 |
|||||||||||||||||||||||||||||||
|
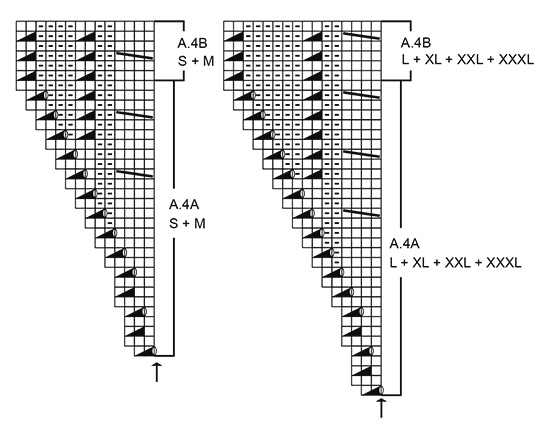
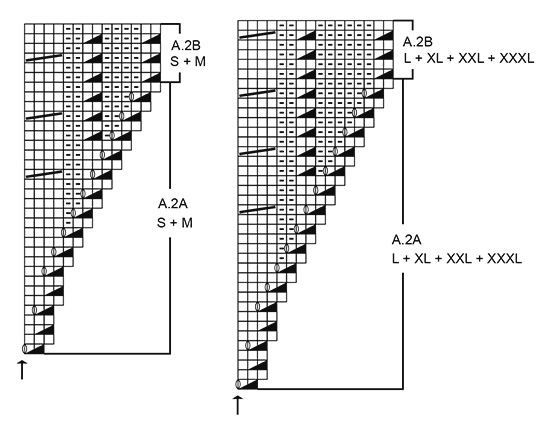
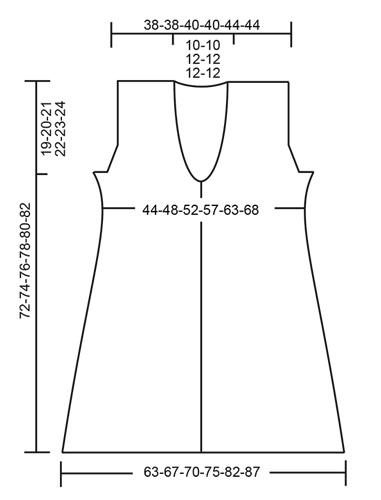
INFORMATION FOR THE PATTERN: RIDGE/GARTER STITCH (worked back and forth): 1 ridge = Knit 2 rows. PATTERN: See diagrams A.1 to A.6. Choose diagram for your size. The diagrams show all the rows in the pattern seen from the right side. KNITTING TIP (for the band): To prevent the band contracting in height, you can regularly work an extra ridge over just the band stitches (the other stitches remain on the needle while you work the ridge over the band). Repeat this every 5 cm / 2" to finished length. INCREASE TIP-1: To work out how to increase evenly, count the total number of stitches the increases are to be made over (e.g. 34 stitches) and divide by the number of increases to be made (e.g. 13) = 2.6. In this example, increase alternately after every 2nd and 3rd stitch. Increase 1 stitch by making 1 yarn over, on the next row work the yarn overs twisted to prevent holes. INCREASE TIP-2 (for the armhole): All increases are made from the right side! Increase 1 stitch by making 1 yarn over, on the next row (wrong side) purl the yarn over twisted to prevent a hole. INCREASE TIP-3 (for sides in body): All increases are made from the right side! Start 4 stitches before the marker thread, make 1 yarn over, work 1 stitch stockinette stitch, work A.6 (= 6 stitches, the marker thread sits in the middle of A.6), work 1 stitch stockinette stitch, make 1 yarn over (= 2 stitches increased). On the next row (wrong side) purl the yarn overs twisted to prevent holes. BUTTONHOLE: bind off for the buttonholes in the right band (when the garment is worn). In other words, work from the right side until there are 4 stitches left at the end of the row, bind off 2 stitches and knit the last stitch. On the next row cast on 2 new stitches over the bind-off stitches from the previous row (= hole). The first buttonhole is worked when the piece measures 30-30-32-32-34-34 cm / 11¾"-11¾"-12½"-12½"-13½"-13½"" from the shoulder (i.e. when the decreases outermost on the shawl collar have been completed). Then work the 3-3-3-4-4-4 next buttonholes with approx. 8-8-8-7-7-7 cm / 3"-3"-3"-2¾"-2¾"-2¾" between each. ---------------------------------------------------------- VEST: The front and back pieces are worked separately back and forth with circular needle, top down. When the increases for the armholes have been completed, put the parts together and the body is worked back and forth with circular needle from mid front to finished length. SHAWL COLLAR ON LEFT FRONT PIECE (when the garment is worn): Cast on 26-26-28-28-30-30 stitches with circular needle size 3 mm / US 2.5 and Flora. Work GARTER STITCH – see description above, as follows: * 1 ridge back and forth over all the stitches, 1 ridge back and forth over the first 20-20-22-22-24-24 stitches towards mid front *, repeat from *-* until the shawl collar measures 7-7-8-8-8-8 cm / 2¾"-2¾"-3"-3"-3"-3"" along the shortest side. Knit 1 row from the right side and cast on 34-34-34-34-38-38 stitches for the shoulder at the end of this row (where the shawl collar is shortest) = 60-60-62-62-68-68 stitches. THE PIECE IS NOW MEASURED FROM HERE! Knit 1 row from the wrong side, knit 1 row from the right side and knit 1 row from the wrong side (over all the stitches). Now work the left front piece as described below. LEFT FRONT PIECE WITH SHAWL COLLAR: = 60-60-62-62-68-68 stitches on the needle. The first row is worked as follows from the right side: Work 26-26-28-28-30-30 stitches in garter stitch over the shawl collar, knit the remaining 34-34-34-34-38-38 stitches and, at the same time. increase 13 stitches in all sizes evenly over these stitches - read INCREASE TIP-1 = 73-73-75-75-81-81 stitches. Work back from the wrong side with 3 edge stitches in garter stitch, purl 44-44-44-44-48-48 stitches and knit 26-26-28-28-30-30 stitches. Continue as follows from the right side: 26-26-28-28-30-30 stitches in garter stitch over the shawl collar, work A.1 (= 44-44-44-44-48-48 stitches) and finish with 3 edge stitches in garter stitch. Insert 1 marker thread after the 2 first stitches in A.1 (seen from the right side – i.e. just after a small cable) – allow the marker thread to follow your work. Continue the pattern in this way, at the same time decrease the shawl collar to a band, increase to armhole and increase to neckline as described below. REMEMBER THE KNITTING GAUGE: When the piece measures 11-11-12-12-11-11 cm / 4½"-4½"-4¾"-4¾"-4½"-4½" from the shoulder, decrease 1 stitch outermost on the shawl collar by knitting together the second and third stitch at the beginning of the row from the right side. Decrease in this way every 6th row a total of 3-3-3-3-4-4 times, every 4th row a total of 7-7-7-7-8-8 times and then every 2nd row a total of 10-10-12-12-12-12 times. After the last decrease to the band, there are 6 band stitches in garter stitch towards mid front and the piece measures approx.30-30-32-32-34-34 cm / 11¾"-11¾"-12½"-12½"-13½"-13½"' from the shoulder down. ARMHOLE: AT THE SAME TIME when the piece measures 16-15-16-13-13-11 cm / 6¼"-6"-6¼"-5"-5"-4½" increase 1 stitch to armhole before the 3 edge stitches in garter stitch at the end of the row from the right side – read INCREASE TIP-2 (i.e. the increased stitches are worked in stockinette stitch). Increase in this way every 2nd row a total of 4-8-8-14-16-20 times, then cast on 3-4-6-6-8-10 new stitches towards armhole at the end of the next row from the right side = 7-12-14-20-24-30 stitches increased to armhole. The piece now measures approx. 19-20-21-22-23-24 cm / 7½"-8"-8¼"-8¾"-9"-9½" from the shoulder down. Work back from the wrong side with knit 6-7-9-9-11-13 stitches, purl 4-8-8-14-16-20 stitches, A.1, A.2 as described under NECKLINE and knit over the shawl collar as before. Lay the piece to one side and continue with SHAWL COLLAR ON RIGHT FRONT PIECE and RIGHT FRONT PIECE WITH SHAWL COLLAR, but be aware that the increase to NECKLINE which is described below, starts at the same time or before the piece is lain to one side. NECKLINE: AT THE SAME TIME when the piece measures 19-19-20-20-22-22 cm / 7½"-7½"-8"-8"-8¾"-8¾" from the shoulder, increase to neckline after the marker thread as shown in A.2A, i.e. the next row from the right side is worked as follows: work garter stitch over the shawl collar as before, work A.2A and increase as shown in the diagram, continue A.1, continue the increases to armhole as described above and finish with 3 edge stitches in garter stitch. The first two stitches in A.1 now become A.2A. NOTE: Work the cable on the same row in A.2A as in A.1. After the last increase to neckline, the piece measures approx. 28-28-30-30-32-32 cm / 11"-11"-11¾"-11¾"-12½"-12½" from the shoulder down and you have increased 12-12-14-14-14-14 stitches to neckline. The next row is worked as follows from the right side: Work garter stitch over shawl collar/band, continue A.2B over A.2A (= 14-14-16-16-16-16 stitches), continue A.1 (the 2 first stitches in A.1 are the same as the 2 first stitches in A.2 and have already been worked), work stockinette stitch over the increased stitches by the armhole and finish with 3 edge stitches in garter stitch. SHAWL COLLAR ON RIGHT FRONT PIECE (when the piece is worn): Cast on 26-26-28-28-30-30 stitches with circular needle size 3 mm / US 2.5. Knit 1 row. Then work garter stitch as follows: * work 1 ridge back and forth over all stitches, 1 ridge back and forth over the first 20-20-22-22-24-24 stitches towards mid front *, repeat from *-* until the shawl collar measures 7-7-8-8-8-8 cm / 2¾"-2¾"-3"-3"-3"-3" along the shortest side. Knit 1 row from the wrong side and cast on 34-34-34-34-38-38 stitches to shoulder at the end of this row (where the shawl collar is shortest) = 60-60-62-62-68-68 stitches. THE PIECE IS NOW MEASURED FROM HERE! Knit 1 row from the right side and knit 1 row from the wrong side (over all stitches). Then work right front piece with shawl collar as described below. RIGHT FRONT PIECE WITH SHAWL COLLAR: = 60-60-62-62-68-68 stitches on the row. The first row is worked as follows from the right side: Knit the first 34-34-34-34-38-38 stitches and at the same time increase 13 stitches in all sizes evenly over these stitches, work 26-26-28-28-30-30 stitches garter stitch over the shawl collar = 73-73-75-75-81-81 stitches. Work back from the wrong side with knit 26-26-28-28-30-30 stitches, purl 44-44-44-44-48-48 stitches and knit 3 edge stitches. Continue as follows from the right side: 3 edge stitches in garter stitch, work A.3 (= 44-44-44-44-48-48 stitches) and finish with 26-26-28-28-30-30 stitches in garter stitch over the shawl collar. Insert 1 marker thread before the 2 last stitches in A.3 (seen from the right side – i.e. just before a small cable) – allow the marker thread to follow your work. Continue the pattern in this way, at the same time decrease the shawl collar to a band, increase to armhole and increase to neckline as described below. BAND: When the piece measures 11-11-12-12-11-11 cm / 4½"-4½"-4¾"-4¾"-4½"-4½" from the shoulder, decrease 1 stitch outermost on the shawl collar by knitting together the last third and second stitches at the end of the row from the right side. Decrease in this way every 6th row a total of 3-3-3-3-4-4 times, every 4th row a total of 7-7-7-7-8-8 times and then every 2nd row a total of 10-10-12-12-12-12 times. After the last decrease to the band, there are 6 band stitches in garter stitch towards mid front and the piece measures approx. 30-30-32-32-34-34 cm / 11¾"-11¾"-12½"-12½"-13½"-13½" from the shoulder down. ARMHOLE: AT THE SAME TIME when the piece measures 16-15-16-13-13-11 cm / 6¼"-6"-6¼"-5"-5"-4½" increase 1 stitch to armhole after the 3 edge stitches in garter stitch at the beginning of the next row from the right side – read INCREASE TIP-2. Increase in this way every 2nd row a total of 4-8-8-14-16-20 times, then cast on 3-4-6-6-8-10 new stitches towards armhole at the end of the next row from the wrong side = 7-12-14-20-24-30 stitches increased to armhole. The piece now measures approx. 19-20-21-22-23-24 cm / 7½"-8"-8¼"-8¾"-9"-9½" from the shoulder down. Lay the piece to one side and continue with RIGHT SHOULDER BACK, but be aware that the increases to NECKLINE as described below, starts at the same time or before the piece is lain to one side. NECKLINE: AT THE SAME TIME when the piece measures approx. 19-19-20-20-22-22 cm / 7½"-7½"-8"-8"-8¾"-8¾" from the shoulder, increase to neckline before the marker thread as shown in A.4A, i.e. the next row from the right side is worked as follows: Work 3 edge stitches in garter stitch, continue the increase to armhole as described above, continue A.3 to the marker thread, work A.4A and increase as shown in the diagram and finish with garter stitch over the shawl collar as before. The 2 last stitches in A.3 are now part of A.4A. NOTE: Work the cable on the same row in A.4A as in A.3. After the last increase to neckline, the piece measures approx. 28-28-30-30-32-32 cm / 11"-11"-11¾"-11¾"-12½"-12½" from the shoulder down. The next row is worked as follows from the right side: 3 edge stitches in garter stitch, work stockinette stitch over the increased stitches by the armhole, continue A.3 (the last 2 stitches in A.3 are the same as the last 2 stitches in A.4B and are worked when A.4B is worked), continue A.4B over A.4A (= 14-14-16-16-16-16 stitches) and finish with garter stitch over the shawl collar/band. RIGHT SHOULDER BACK (when the garment is worn): Cast 34-34-34-34-38-38 stitches with circular needle size 3 mm / US 2.5. Knit 1 row from the wrong side, knit 1 row from the right side and knit 1 row from the wrong side. Knit 1 row from the right side where you increase 13 stitches in all sizes evenly on row = 47-47-47-47-51-51 stitches. Work back from the wrong side with knit 3 edge stitches and purl 44-44-44-44-48-48 stitches. The next row is worked as follows from the right side: work A.1 (= 44-44-44-44-48-48 stitches) and finish with 3 edge stitches in garter stitch. When you have worked 2 rows in A.1 cast on 2 stitches at the end of the last row to the neck (the new stitches are purled from the right side and knitted from the wrong side). Work 2 more rows in A.1 and AT THE SAME TIME cast on 24-24-28-28-28-28 new stitches at the end of the last row to the neck = 73-73-77-77-81-81 stitches on the row. Lay the piece to one side and work left shoulder back as described below. LEFT SHOULDER BACK (when the piece is worn): Cast on 34-34-34-34-38-38 stitches with circular needle size 3 mm / US 2.5. Knit 1 row from the wrong side, knit 1 row from the right side and knit 1 row from the wrong side. Knit 1 row from the right side where you increase 13 stitches in all sizes evenly on row = 47-47-47-47-51-51 stitches. Purl 44-44-44-44-48-48 stitches back from the wrong side and knit 3 edge stitches. The next row is worked as follows from the right side: Work 3 edge stitches in garter stitch, then work A.3 (= 44-44-44-44-48-48 stitches). When you have worked 3 rows in A.3 cast on 2 stitches at the end of the last row to neck = 49-49-49-49-53-53 stitches. Work back from the wrong side with knit 2, A.3 and knit 3 edge stitches. Now work the left and right shoulders together to the back piece as described below. BACK PIECE: Place the stitches from the two shoulders on the same circular needle size 3 mm / US 2.5 (the 24-24-28-28-28-28 stitches which were cast on to the neck on the right shoulder back = mid back of neck) = 122-122-126-126-134-134 stitches on the row. The first row from the right side is worked as follows: 3 edge stitches in garter stitch, continue A.3 over the next 44-44-44-44-48-48 stitches, work A.5 over the next 28-28-32-32-32-32 stitches, continue A.1 over the next 44-44-44-44-48-48 stitches and finish with 3 edge stitches in garter stitch. Continue pattern in this way and increase to armhole as described below. ARMHOLE: When the piece measures 16-15-16-13-13-11 cm / 6¼"-6"-6¼"-5"-5"-4½" increase 1 stitch in each side to armhole as on the front pieces, i.e. increase from the right side after the 3 edge stitches in garter stitch at the beginning of the row and before the 3 edge stitches in garter stitch at the end of the row. Increase in this way every 2nd row (i.e. every row from the right side) a total of 4-8-8-14-16-20 times, then cast on 3-4-6-6-8-10 new stitches at the end of the 2 next rows = 136-146-154-166-182-194 stitches and the piece measures approx. 19-20-21-22-23-24 cm / 7½"-8"-8¼"-8¾"-9"-9½" from the shoulder down. Now work the front and back pieces together as described below. BODY: Place the stitches from the left front piece (seen from the right side) on the needle without working the stitches, insert 1 marker thread (= in the side), place the stitches from the back piece on the needle, insert 1 marker thread (= in the side) and place the stitches from the right front piece on the needle. Continue pattern as before, Continue the increases to neckline as before and continue the decreases to the bands as before. In other words, the first row is worked as follows from the right side: Work garter stitch over the shawl collar/band with decreases, if necessary, as before, continue A.2 and A.1, work 4-8-8-14-16-20 stitches stockinette stitch, 12-14-18-18-22-26 stitches garter stitch (the marker thread in the side sits in the middle of these 12-14-18-18-22-26 stitches), work 4-8-8-14-16-20 stitches stockinette stitch, continue A.3, A.5 and A.1 over the back piece, work 4-8-8-14-16-20 stitches stockinette stitch, 12-14-18-18-22-26 stitches garter stitch (the marker thread in the side sits in the middle of these 12-14-18-18-22-26 stitches), work 4-8-8-14-16-20 stitches stockinette stitch, continue A.3 and A.4 as before and finish with garter stitch over the shawl collar/band with decreases, if necessary, as before. Continue the pattern in this way, but when you have worked 2 ridges over the middle 12-14-18-18-22-26 stitches in each side, work as follows from the right side: Work garter stitch over the shawl collar/band with decreases, if necessary, as before, continue A.2 and A.1 as before, work 7-12-14-20-24-30 stitches stockinette stitch, work A.6 (= 6 stitches, the marker thread sits in the middle of A.6), work 7-12-14-20-24-30 stitches stockinette stitch, continue A.3, A.5 and A.1 as before, work 7-12-14-20-24-30 stitches stockinette stitch, work A.6 (the marker thread sits in the middle of A.6), work 7-12-14-20-24-30 stitches stockinette stitch, continue A.3 and A.4 as before and finish with garter stitch over the shawl collar/band with decreases if necessary as before. After all the increases to neckline and decreases to the bands have been completed, there are 280-300-316-340-372-396 stitches on the row. Read KNITTING TIP and continue working until the piece measures 30-32-34-36-38-40 cm / 11¾"-12½"-13⅜"-14¼"-15"-15¾ from the shoulder. On the next row from the right side increase 2 stitches in each side – read INCREASE TIP-3 (= 4 stitches increased). Increase in this way every 6th row (approx. every 2 cm / ¾") until finished length (if the knitting gauge is correct in height, this is equivalent to 21 increases in each side). When the piece measures 71-73-75-77-79-81 cm / 28"-28¾"-29½"-30⅜"-31"-32" there are approx. 364-384-400-424-456-480 stitches on the row. On the next row from the right side, knit the stitches in each cable together 2 and 2 (only on the cables, not the purled or stockinette stitch sections) = approx. 312-332-348-372-404-428 stitches. Work 3 ridges back and forth over all stitches and loosely bind off with knit from the right side, but to prevent the bind-off edge being tight, you can make 1 yarn over after every 8th stitch at the same time as binding off (the yarn overs are bind off as normal stitches). The whole vest measures approx. 72-74-76-78-80-82 cm / 28⅜"-29⅛"-30"-30¾"-31½"-32¼" from the shoulder down. ASSEMBLY: Sew the shoulder seams inside the cast-on edge. Sew the shawl collar together mid back and make sure the seam turns in to the wrong side, when the collar is turned down. Sew the shawl collar to the neckline back of neck. Sew on the buttons. |
|||||||||||||||||||||||||||||||
Diagram explanations |
|||||||||||||||||||||||||||||||
|
|||||||||||||||||||||||||||||||

|
|||||||||||||||||||||||||||||||
|
|||||||||||||||||||||||||||||||
|
|||||||||||||||||||||||||||||||

|
|||||||||||||||||||||||||||||||
|
|||||||||||||||||||||||||||||||
|
Have you made this or any other of our designs? Tag your pictures in social media with #dropsdesign so we can see them! Do you need help with this pattern?You'll find tutorial videos, a Comments/Questions area and more by visiting the pattern on garnstudio.com. © 1982-2024 DROPS Design A/S. We reserve all rights. This document, including all its sub-sections, has copyrights. Read more about what you can do with our patterns at the bottom of each pattern on our site. |
|||||||||||||||||||||||||||||||


With over 40 years in knitting and crochet design, DROPS Design offers one of the most extensive collections of free patterns on the internet - translated to 17 languages. As of today we count 304 catalogs and 11422 patterns - 11417 of which are translated into English (US/in).
We work hard to bring you the best knitting and crochet have to offer, inspiration and advice as well as great quality yarns at incredible prices! Would you like to use our patterns for other than personal use? You can read what you are allowed to do in the Copyright text at the bottom of all our patterns. Happy crafting!
Comments / Questions (26)
Ærmegab: jeg strikker str. L. Når jeg har taget ud ialt 8 gange indenfor de 3 kantmasker, så står der, at jeg skal slå ialt 6 nye masker op i slutningen af næste pind. Men er det også indenfor de 3 kantmasker?
30.03.2020 - 11:24DROPS Design answered:
Hej Liane, Nej de nye masker slår du op sidst på pinden (ikke inden for kantmaskerne) God fornøjelse!
16.04.2020 - 15:30I’m sorry, that wasn’t my question, I understand that. It’s how the short row section works as a part of the collar. It is above the shoulder seam and it seems like it is incorrect. 3 inches of knitting before the cast on gives me a flap that feels wrong.
15.02.2018 - 22:23DROPS Design answered:
Dear Carol, after you have been worked the shawl collar you will have 3 " on the left side (towards the shoulder) and approx. double length on the right side (towards outside of collar), on next row from right side cast on the new sts for shoulder after the collar sts and continue as explained. The 3" side will be then later sewn along neckline on back piece (the left collar will reach middle on neckline + right collar on the other half = collar will match the neckline on back piece). The longer side of this small piece (on the right hand side seen from RS) will be the front band, the short rows allow the collar to fold nicely. Happy knitting!
16.02.2018 - 09:46Starting the pattern, I don’t understand the collar part (3 inches befor casting on for the shoulder. I have followed the directions and it doesn’t make any sense when I look at it. The part before I casted on it a square. Can you please explain how it should look? Thank you
15.02.2018 - 02:19DROPS Design answered:
Dear Carol, you start casting on 28-30 sts (see size) and work short rows (= 2 rows over all sts, 2 rows over fist 22-24 sts only) so that the right side of piece from RS will have more rows than then left side of piece when collar measures 3". Happy knitting!
15.02.2018 - 09:32Miranda wrote:
When it says 'Lay the piece to one side and continue with SHAWL COLLAR ON RIGHT FRONT PIECE', do I need to cut the yarn for the left front piece with shawl collar?
11.01.2018 - 06:46DROPS Design answered:
Dear Miranda, yes you will have to cut the yarn from left front piece with shawl collar to work the right shoulder. Happy knitting!
11.01.2018 - 08:45Danke für die Antwort, wenn ich so zunehme stimmt aber die Maschenzahl am Ende nicht. Ich soll 21x zunehmen x 2 Maschen ergibt 42, die Endmaschenzahl sind aber eine Differenz von 84 Maschen zur vorherigen Maschenzahl. Deshalb hat mich das irritiert. Danke
30.11.2017 - 09:41DROPS Design answered:
Liebe Frau Kastner, Sie werden 4 M insgesamt (2 M auf beiden Seiten) x 21 zunehmen = 84 M; Es waren 340 M + 84 M = 424 M. Viel Spaß beim stricken!
30.11.2017 - 10:21Hallo, wenn ich am Rumpf zunehme heißt es im Zunahmetip 3 an beiden Seiten je 1 Masche zunehmen, in der Beschreibung wird aber von 2 Maschen je vor und nach A6 geschrieben. Wie sollen da die Maschen zugenommen werden?
30.11.2017 - 07:53DROPS Design answered:
Liebe Frau Kastner, auf beiden Seiten werden Sie so stricken (siehe auch ZUNAHMETIPP-2): 4 Maschen vor dem Markierungsfaden beginnen, 1 Umschlag, 1 Masche glatt rechts, A.6 (= 6 Maschen, der Markierungsfaden sitzt in der Mitte von A.6), 1 Masche glatt rechts, 1 Umschlag (= 2 Maschen zugenommen), so nehmen Sie 2 Maschen auf beiden Seiten zu. Viel Spaß beim stricken!
30.11.2017 - 08:46Hallo, ich hab mir jetzt diese tolle Weste vorgenommen. Meine Frage, diese zusätzliche Reihe an der Blende sollte sie von Beginn an gestrickt werden oder erst wenn die Blende schmaler ist? Danke
22.11.2017 - 17:11DROPS Design answered:
Liebe Frau Kastner, diese zusätzliche Reihe stricken Sie nicht beim Kragen aber wenn Sie das Vorderteil anfangen (beim Kragen stricken Sie verkürzte Reihe wegen Schalkragen. Viel Spaß beim stricken!
22.11.2017 - 17:44Another quick question the increases for armhole are made from right side.. the tip says to yo and purl twisted on wrong side. This means it will be knit stitches on the right side and purl stitches on wrong side. However the pattern has purl or reverse stockinette stitches on right side around the cables. Can’t tell from the picture if these new or increase stitches are stockinette or reverse stockinette on right side. Please clarify.
30.09.2017 - 04:21DROPS Design answered:
Dear Nyllie, the increased sts are workind in stockinette, ie the yo's will be P twisted from WS and the new sts will be then K from RS and P from WS. Happy knitting!
02.10.2017 - 09:30Thanks so much for your quick response. As always I find this site and the people helpful and pleasant. I must apologize for my mistake. I was working on too many projects at once and did not catch my sorrow in this pattern. I was not doing the last small cable so I had 6 stitches to purl instead of 2p cable 2p. Just a quick question off topic ( hope it is not too inconvenient) do the drops pro ic knitting kneedles fit the knitters pride cables?
17.09.2017 - 22:30DROPS Design answered:
Dear Nyllie, you are welcome to contact your DROPS Store for any further informations about the needle, they will help you even per mail or telephone. Happy knitting!
18.09.2017 - 09:24For charts.... I am making size medium...in chart A.1 where the line shows chart ends on first row of chart for my size I still have 4 stitches left before the 3 stitches in garter. Do I go back to beginning of line one of chart and do another small cable and 2 purl stitches before the three garter? Thanks for help
17.09.2017 - 03:25DROPS Design answered:
Hi Nyllie, When you start A1 on the left front piece with collar, you should have 73 stitches on needle. You work 26 stitches in garter stitch, A! over 44 stitches and finish with 3 edge stitches in garter stitch =73 stitches. So you shouldn't have any stitches left after A1. Hope this helps and happy knitting!
17.09.2017 - 12:28