
Popular categories
Looking for a yarn?


|
|||||||||||||||||||||||||||||||
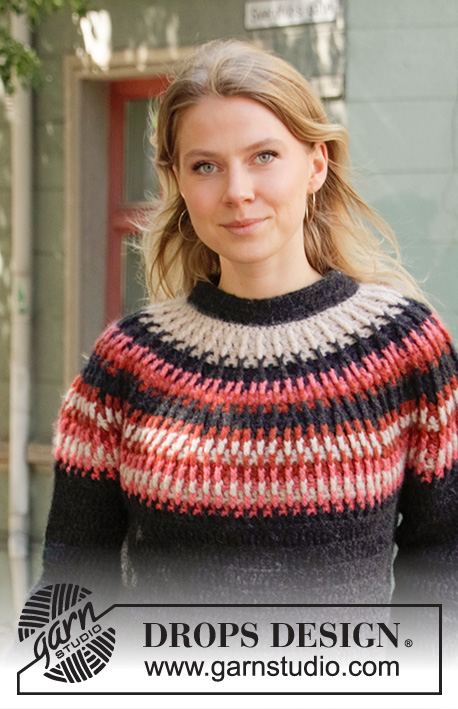
Winter Sunshine |
|||||||||||||||||||||||||||||||
 |
 |
||||||||||||||||||||||||||||||
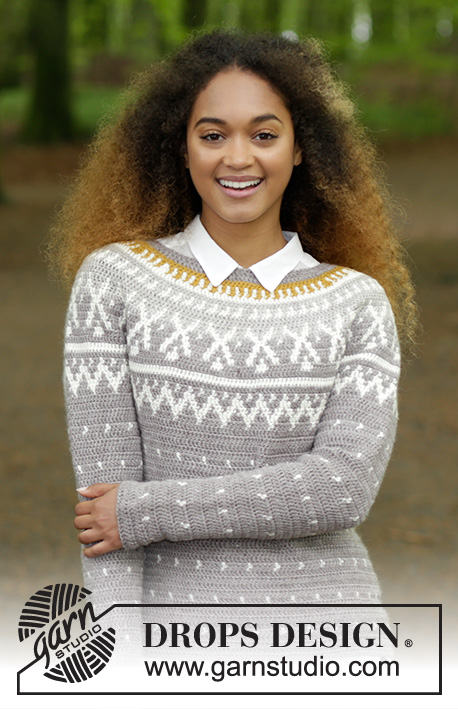
Jumper with round yoke and Norwegian multi-coloured pattern, crocheted top down. Size: S - XXXL Piece is crocheted in DROPS Karisma.
DROPS 180-15 |
|||||||||||||||||||||||||||||||
|
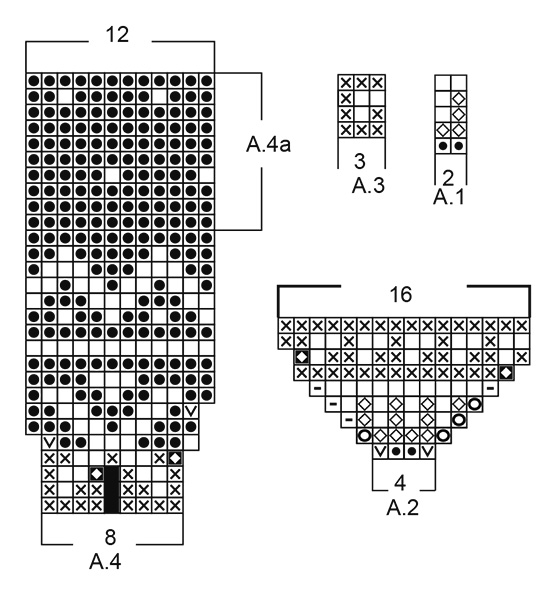
INFORMATION FOR PATTERN: PATTERN: See diagrams A.1 to A.4. When A.4 has been worked 1 time vertically, repeat A.4a until finished measurements. CROCHET INFO: Piece is worked both in the round and back and forth. Work alternately from right side and wrong side, and finish every row with 1 slip stitch in 3rd chain stitch at the beginning of row. Beginning every row with treble crochets with 3 chain stitches (= first treble crochet) and finish with 1 slip stitch in 3rd chain stitch at beginning of row, turn piece. On every round with double crochets replace first double crochet with 1 chain stitch. Finish round with 1 slip stitch in 1st chain stitch at beginning of round. COLOUR PATTERN: When changing colour at the beginning of a new row work as follows: Work last treble crochet with first colour but wait with last pull through. Switch to new colour, work last pull through and 1 slip stitch in 3rd chain stitch at beginning of row. turn piece and work 3 chain stitches (= beginning of new row). When changing colour in a row work as follows: Work 1 treble crochet with first colour but wait with last pull through. Switch to new colour, work last pull through with new colour. When working with two colours place strand for the colour not worked over stitches from previous row, work around the strand so that it is hidden and follows in the round. Make sure to avoid tights yarn and not to tighten yarn when picking it up from previous row. INCREASE TIP-1 (applies to yoke): Work 2 treble crochets in same colour in 1 treble crochet on previous row. INCREASE TIP-2 (applies to body): Work until 3 treble crochets remain before marker thread, work 2 treble crochets in next treble crochet, 1 treble crochet in each of the next 4 treble crochets (marker thread is in the middle of these stitches) and 2 treble crochets in next treble crochet (= 2 treble crochets increased). Repeat at next marker thread (= 4 treble crochets increased in total on row). DECREASE TIP (applies to sleeves): Work until 4 treble crochets remain before marker thread, work 1 treble crochet but wait with last yarn over and pull through (= 2 loops on hook), then work next treble crochet, but on last pull through pull through all 3 loops on hook (= 1 treble crochet decreased), work 1 treble crochet in each of the next 4 treble crochets (marker thread is in the middle of these stitches), work the next 2 treble crochets together the same way (= 1 treble crochet decreased = 2 treble crochets decreased on row). ---------------------------------------------------------- JUMPER: Worked top down, in the round and back and forth. Work together at the end of every row. Worked from mid back. YOKE: Work 106-110-115-120-124-129 chain stitches on hook size 4.5 mm with light beige brown with and form a ring with 1 slip stitch in first chain stitch. Work 3 chain stitches (= 1 treble crochet) - READ CROCHET INFO, 1 treble crochet in each of the next 0-4-2-0-4-2 chain stitches, * skip 1 chain stitch, 1 treble crochet in each of the next 6 chain stitches *, repeat from *-* = 92-96-100-104-108-112 treble crochets. Work A.1 and A.2 as follows: Work pattern, increase in pattern (see increase in diagram) and increase evenly - READ INCREASE TIP-1. ROW 1 (= right side): Work A.1 (= 2 treble crochets) over the first 14-14-16-17-18-18 treble crochets and increase 2-2-2-3-4-4 treble crochets evenly (= half back piece). Work A.2 (= 4 treble crochets), A.1 over the next 10 treble crochets and increase 2-4-4-4-4-6 treble crochets evenly, A.2 over the next 4 treble crochets (= right sleeve). Work A.1 over the next 28-30-32-34-36-38 treble crochets and increase 4-4-4-6-8-8 treble crochets evenly (= half back piece). Work A.2 over the next 4 treble crochets, A.1 over the next 10 treble crochets and increase 2-4-4-4-4-6 treble crochets evenly, A.2 over the next 4 treble crochets (= left sleeve). Work A.1 over the last 14-16-16-17-18-20 treble crochets and increase 2-2-2-3-4-4 treble crochets evenly (= half back piece) = 112-120-124-132-140-148 treble crochets (including increase in A.2) – READ COLOUR PATTERN! ROW 2 (= wrong side): Work A.1 over the first 16-18-18-20-22-24 treble crochets, A.2, repeat A.1 over the next 12-14-14-14-14-16 treble crochets, A.2, repeat A.1 over the next 32-34-36-40-44-46 treble crochets, A.2, repeat A.1 over the next 12-14-14-14-14-16 treble crochets, A.2, repeat A.1 over the last 16-16-18-20-22-22 treble crochets = 120-128-132-140-148-156 treble crochets (including increase in A.2). REMEMBER THE CROCHET TENSION! ROW 3 (= right side): Work pattern = 8 treble crochets increased in A.2 = 128-136-140-148-156-164 treble crochets. ROW 4 (= wrong side): Work A.1 over the first 16-18-18-20-22-24 treble crochets and increase 2-0-0-3-4-4 treble crochets evenly, A.2, work A.1 over the next 12-14-14-14-14-16 treble crochets and increase 0-4-4-4-4-6 treble crochets evenly, A.2, work A.1 over the next 32-34-36-40-44-46 treble crochets and increase 4-2-4-6-8-8 treble crochets evenly, A.2, work A.1 over the next 12-14-14-14-14-16 treble crochets and increase 0-4-4-4-4-6 treble crochets evenly, A.2, work A.1 over the last 16-16-18-20-22-22 treble crochets and increase 2-2-2-3-4-4 treble crochets evenly = 144-156-162-176-188-200 treble crochets (including increase in A.2). ROW 5 (= right side): Work A.1 over the first 18-18-20-23-26-26 treble crochets, A.2, work A.1 over the next 12-18-18-18-18-22 treble crochets, A.2, work A.1 over the next 36-36-40-46-52-54 treble crochets, A.2, work A.1 over the next 12-18-18-18-18-22 treble crochets, A.2, work A.1 over the last 18-18-18-23-26-28 treble crochets = 152-164-170-184-196-208 treble crochets (including increase in A.2). Piece now measures approx. 7 cm. Now work A.2 as before and A.3 is worked over A.1 as follows: ROW 6 (= wrong side): Work A.3 over the first 18-18-18-23-26-28 treble crochets and increase 3-3-3-4-4-2 treble crochets evenly, A.2, work A.3 over the next 12-18-18-18-18-22 treble crochets and increase 0-0-3-3-3-5 treble crochets evenly, A.2, work A.3 over the next 36-36-40-46-52-54 treble crochets and increase 3-6-5-5-8-9 treble crochets evenly, A.2, work A.3 over the next 12-18-18-18-18-22 treble crochets and increase 0-0-3-3-3-5 treble crochets evenly, A.2, work A.3 over the last 18-18-20-23-26-26 treble crochets and increase 0-3-4-4-4-4 treble crochets evenly = 162-180-192-207-222-237 treble crochets (including increase in A.2). ROW 7 (= right side): Work A.3 over the first 18-21-24-27-30-30 treble crochets, A.2, work A.3 over the next 12-18-21-21-21-27 treble crochets, A.2, work A.3 over the next 39-42-45-51-60-63 treble crochets, A.2, work A.3 over the next 12-18-21-21-21-27 treble crochets, A.2, work A.3 over the last 21-21-21-27-30-30 treble crochets = 166-184-196-211-226-241 treble crochets (including increase in A.2). ROW 8 (= wrong side): Work pattern as before. ROW 9 (= right side): Work pattern as before and increase 2-0-4-5-6-7 treble crochets evenly on row = 168-184-200-216-232-248 treble crochets. Piece measures approx. 11 cm. Then work according to diagram A.4 (= 8 treble crochets) – see increase in diagram, 21-23-25-27-29-31 times in total in width until piece measures 25-26-28-30-32-34 cm. When all increases are done there are 252-276-300-324-348-372 treble crochets on row. Now work body and sleeves as follows: Work A.4 over the first 36-41-45-49-54-57 treble crochets (= half back piece), 8-8-8-10-10-10 chain stitches, insert 1 marker thread in the middle of these stitches, skip the next 53-56-60-63-65-71 treble crochets (= sleeve), work A.4 over the next 73-82-90-99-109-115 treble crochets (= front piece), 8-8-8-10-10-10 chain stitches, insert 1 marker thread in the middle of these stitches, skip the next 53-56-60-63-65-71 treble crochets (= sleeve), work A.4 over the last 37-41-45-50-55-58 treble crochets (= half back piece). Cut the yarn. BODY: = 146-164-180-198-218-230 treble crochets and 16-16-16-20-20-20 chain stitches (= 162-180-196-218-238-250 stitches in total). Now work piece with beginning from marker thread in the side. Insert 1 marker in the piece. NOW MEASURE THE PIECE FROM HERE! Leave marker in piece, move marker thread when working. Continue with A.4 The treble crochets that do not fit pattern in each side are worked in light beige brown. When piece measures 4 cm, increase 2 treble crochets at each marker thread - READ INCREASE TIP-2! Increase like this every 5-9-9-9-9-9 cm 4-3-3-3-3-3 times in total = 178-192-208-230-250-262 treble crochets. When increasing, work the treble crochets in pattern, treble crochets that do not fit the pattern in the side is worked in light beige brown. Continue until piece measures 29-30-30-30-30-30 cm from marker (= 54-56-58-60-62-64 cm from neck edge), finish after 4 rows with light beige brown. Fasten off. SLEEVE: = 53-56-60-63-65-71 treble crochets. Continue with A.4 Begin by working in the 5th-5th-5th-6th-6th-6th chain stitch of the 8-8-8-10-10-10 chain stitches worked in armhole on body as follows: Work 1 slip stitch, 3 chain stitches (= 1 treble crochet), work 1 treble crochet in each of the next 3-3-3-4-4-4 chain stitches, 1 treble crochet in every treble crochet over sleeve, 1 treble crochet in each of the last 4-4-4-5-5-5 chain stitches under sleeve = 61-64-68-73-75-81 treble crochets. The treble crochets that do not fit pattern under sleeve are worked in light beige brown. Insert 1 marker thread mid under sleeve. Insert 1 marker in the piece. NOW MEASURE THE PIECE FROM HERE! Leave marker in piece, move marker thread when working. When piece measures 4 cm, decrease 2 treble crochets on each side of marker thread - READ DECREASE TIP. Decrease like this every 2½-2-2-1½-1½-1 cm 10-12-12-14-13-16 times in total = 41-40-44-45-49-49 treble crochets. Continue until piece measures 36-36-34-33-31-30 cm from marker (61-62-62-63-63-64 cm from neck edge), finish after 4 rows with light beige brown. Fasten off. Work the other sleeve the same way. NECK EDGE: Worked in the round from mid back. Work chain stitch where 1st row with treble crochets was worked (i.e. the chain stitches skipped are not worked = 92-96-100-104-108-112 stitches). Work with light beige brown as follows: ROUND 1: Work an elevation in the back of neck as follows: Fasten yarn with 1 slip stitch and work 3 chain stitches that replace first treble crochet, work 1 treble crochet in each of the first 18-19-20-21-22-23 stitches, 1 half treble crochet in each of the next 10 stitches, 1 double crochet in each of the next 34-36-38-40-42-44 stitches, 1 half treble crochet in each of the next 10 stitches, 1 treble crochet in each of the last 19-20-21-22-23-24 stitches. ROUND 2: Work 1 double crochet in every stitch and decrease 12 stitches evenly = 80-84-88-92-96-100 double crochets. Fasten off. |
|||||||||||||||||||||||||||||||
Diagram explanations |
|||||||||||||||||||||||||||||||
|
|||||||||||||||||||||||||||||||
|
|||||||||||||||||||||||||||||||

|
|||||||||||||||||||||||||||||||
|
Have you made this or any other of our designs? Tag your pictures in social media with #dropsdesign so we can see them! Do you need help with this pattern?You'll find tutorial videos, a Comments/Questions area and more by visiting the pattern on garnstudio.com. © 1982-2024 DROPS Design A/S. We reserve all rights. This document, including all its sub-sections, has copyrights. Read more about what you can do with our patterns at the bottom of each pattern on our site. |
|||||||||||||||||||||||||||||||


With over 40 years in knitting and crochet design, DROPS Design offers one of the most extensive collections of free patterns on the internet - translated to 17 languages. As of today we count 304 catalogues and 11422 patterns - 11422 of which are translated into English (UK/cm).
We work hard to bring you the best knitting and crochet have to offer, inspiration and advice as well as great quality yarns at incredible prices! Would you like to use our patterns for other than personal use? You can read what you are allowed to do in the Copyright text at the bottom of all our patterns. Happy crafting!
Comments / Questions (87)
Pilar wrote:
Hola ! Tengo una duda, En la vuelta numero 3 dice que hay que trabajar segun el patron , y hacer 8 aumentos segun A2. El resto, que se hace, A1? Donde se encaja A2? Y otra pregunta, en esta vuelta para la talla s acabaremos con 128 puntos. Para hacer la vuelta 4, en lugar de 128 puntos me harian falta 132. No me cuadran las cuentas... Si me lo podeis aclarar os lo agradezco! :) saludos
12.12.2017 - 19:02DROPS Design answered:
Hola Pilar, en cuanto a tu primera pregunta, la fila 3 se trabaja que la fila 2 y los 8 puntos aumentados en A.2 se trabajan de la misma manera que en la fila 2. En cuanto a la segunda pregunta, las cuentas me dan 128: 16 + 12+ 32 + 12 + 16 + 10*4 (A.2) = 128.
17.12.2017 - 18:33Buongiorno Intanto grazie per il vostro bel sito e per i filati Sto facendo questo maglione ma mi sono bloccata al inizio dello schema A4 Non capisco cosa devo fare al posto del quadratino tutto nero La didascalia dice nessuna maglia Cioè? Salto una maglia sotto lasciando un piccolo spazio ? Grazie mille Attendo una vostra cortese risposta per proseguire nel lavoro
26.11.2017 - 00:23DROPS Design answered:
Buongiorno Silvia. È come se il quadrato nero non ci fosse nel diagramma. Lavora le maglie una di seguito all'altra, senza creare spazi. Il quadrato nero serve per inserire l'aumento che viene fatto al terzo giro. Buon lavoro!
26.11.2017 - 08:43Buenos días me encanta el jersey. Quiero hacerlo pero ya en la fila tres me he perdido. dice q hay q trabajar A2 aumentando 8 puntos. no se donde tengo q aumentar,ya q en la fila tres del diagrama me dice q son 10 puntos para hacerlos en 8 puntos de la fila anterior. otra pregunta: cuando se acaba la vuelta hay q dar la vuelta a la labor o se trabaja en círculos? Muchas gracias
12.11.2017 - 11:40DROPS Design answered:
Hola Helga. Los aumentos están incluidos en el diagrama. En cada repetición de A.4 aumentamos 1 punto trabajando 2 puntos altos en 1 punto alto. Si repetimos A.4 8 veces = 8 puntos aumentados. En las filas marcadas (lado derecho/lado revés) se trabaja de ida y vuelta, el resto de las filas se trabajan en redondo, si no se dice lo contrario en el patrón.
29.11.2017 - 13:07Mary wrote:
Hi This is my first pattern that I am working on. Can you please help me with Row 3. Do I start the pattern that is used in the beginning? Thank you Mary
31.10.2017 - 15:13DROPS Design answered:
Dear Mary, work diagrams as previously on row 1 and 2, and increase in A.2 as shown in diagram (you will incrase a total of 8 sts in A.2). Happy crocheting!
31.10.2017 - 16:10Hola ! He empezado el patrón para la talla S, y al hacer la segunda vuelta, en lugar de 112 puntos me quedan 104. He calculado varias veces y me sigue saliendo lo mismo! No sé que puedo estar haciendo mal...
27.10.2017 - 23:06DROPS Design answered:
Hola Pilar. En la 2ª fila que trabajamos (1ª fila del patrón) hay un total de 20 puntos aumentados, es decir, aumentamos 8 puntos según el diagrama A.2 y 12 puntos entre los diagramas.
30.10.2017 - 08:26In toer 3 van de pas staat het volgende: haak in patroon =8 stokjes gemeerderd in A2. Toer 2 eindigde met 128 stokjes. Dat betekent dat ik over de voorgaande 120 stokjes van iedere 8 stokjes 10 stokjes in patroon heb gehaakt in de hele toer. Dus totaal zo'n 15x gemeerderd. Daardoor heb ik geen 8 stokjes gemeerderd, maar per keer A2, 2 meerderingen, wat resulteert tot een meerdering van ongeveer 30 stokjes in plaats van de beschreven 8. Wat gaat er fout?
30.09.2017 - 15:23Bij het telpatroon staat bij A4 dat een donker hokje 2 steken licht eiken in 1 steek. Dit staat ook bij het bovenstaande hokje. Wat hoort het te zijn? Bij de Duitse vertaling staat een hokje overslaan.
29.09.2017 - 22:25DROPS Design answered:
Hallo Jenneke, Het stond er inderdaad fout in bij de Nederlandse versie. Het is nu aangepast. :) Veel haakplezier!
30.09.2017 - 09:28Jeg er i gang med at hækle denne fine sweater i str. L, og jeg vil bare gøre opmærksom på, at jeg desværre ikke havde nok i farven lys eg - jeg har altså brug for en ekstra nøgle (100 g i alt). Måske har andre samme problem som mig.
27.09.2017 - 11:26Ich komme in der 1. Runde bei Größe M mit allen Zunahmen nur auf 112 Maschen/Stäbchen statt auf 120. Ich habe immer wieder nachgerechnet, ich komme einfach nicht auf 120 Stäbchen. Ich habe jeweils 22 St. für die Ärmel und 34 St. für Vorder-und und Rückenteil.
26.09.2017 - 15:07DROPS Design answered:
Liebe Antje, es wird in jedem A.1 (+2 +4 +4 +4 +4 +2 M = 16 M) zugenommen, und auch in A.2 (+ 2 M in jeder Rapport A.2 = 2 M x 4 = 8 M) zugenommen. Es gab 96 M + 16 M (Zunahmen in A.1) + 8 M (Zunahmen in A.2) = 120 M. Viel Spaß beim stricken!
26.09.2017 - 15:56In Tour 3 van de pas staat:haak in patroon =8 stokjes gemeerderd in A2. Ik heb de Tour gehaakt (A1 en A2) afgewisseld. Tour 2 eindigde met 128 stokjes. Dat betekent dat ik 12 of 13 X A2 heb gehaakt in de hele Tour. Daardoor heb ik geen 8 stokjes gemeerderd, maar per keer A2, 2 meerderingen, wat leidt tot een meerdering van 24 tot 26 stokjes ipv de beschreven 8. Wat heb ik niet goed gedaan?
13.09.2017 - 10:29DROPS Design answered:
Hallo Margriet, In toer 3 haak je alleen in telpatroon A.2 bij de overgangen van de mouw naar de panden en andersom, dus je haakt op toer 3 nog steeds afwisselend in A.1 en A.2 waardoor je in totaal op 8 meerderingen uitkomt (Je breit op 4 plekken op de toer A.2 en per keer meerder je 2 steken)
06.11.2017 - 13:25