
Popular categories
Looking for a yarn?


|
|||||||||||||||||||||||||||||||
Winter Sunshine |
|||||||||||||||||||||||||||||||
 |
 |
||||||||||||||||||||||||||||||
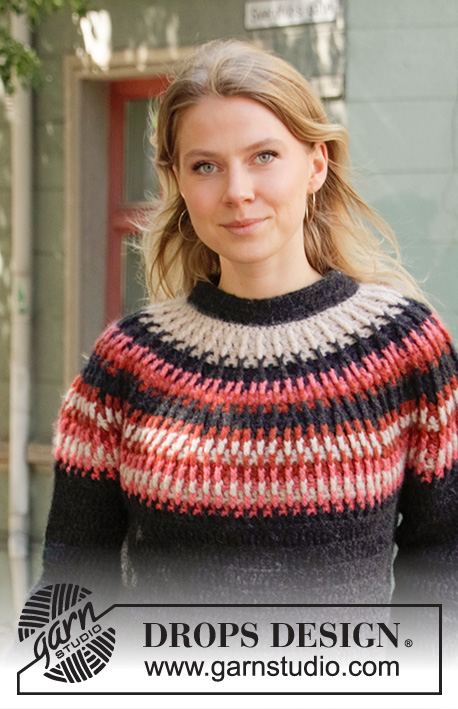
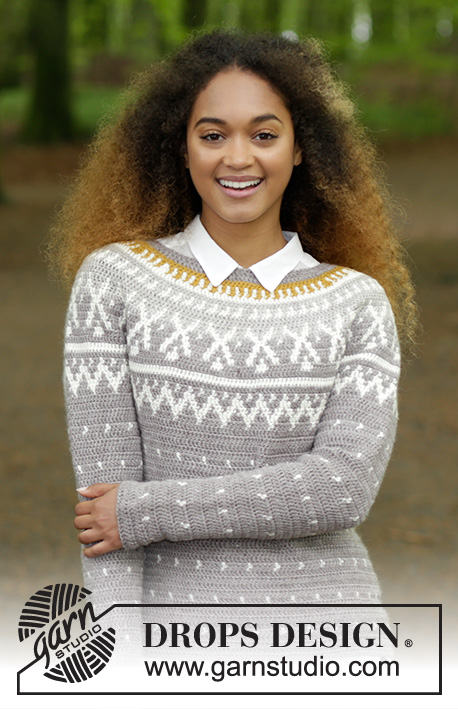
Jumper with round yoke and Norwegian multi-coloured pattern, crocheted top down. Size: S - XXXL Piece is crocheted in DROPS Karisma.
DROPS 180-15 |
|||||||||||||||||||||||||||||||
|
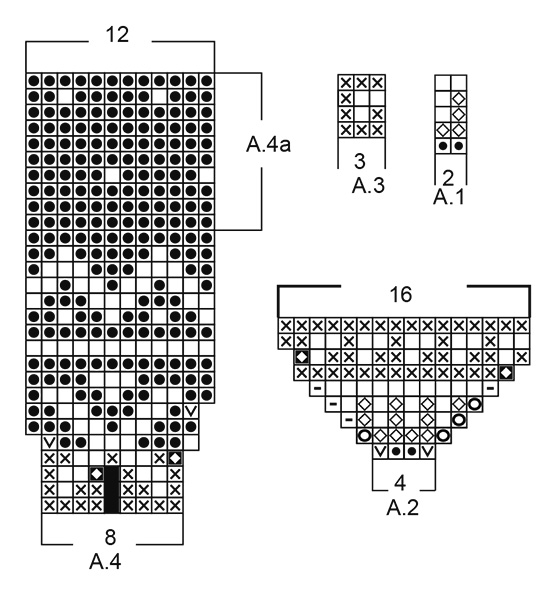
INFORMATION FOR PATTERN: PATTERN: See diagrams A.1 to A.4. When A.4 has been worked 1 time vertically, repeat A.4a until finished measurements. CROCHET INFO: Piece is worked both in the round and back and forth. Work alternately from right side and wrong side, and finish every row with 1 slip stitch in 3rd chain stitch at the beginning of row. Beginning every row with treble crochets with 3 chain stitches (= first treble crochet) and finish with 1 slip stitch in 3rd chain stitch at beginning of row, turn piece. On every round with double crochets replace first double crochet with 1 chain stitch. Finish round with 1 slip stitch in 1st chain stitch at beginning of round. COLOUR PATTERN: When changing colour at the beginning of a new row work as follows: Work last treble crochet with first colour but wait with last pull through. Switch to new colour, work last pull through and 1 slip stitch in 3rd chain stitch at beginning of row. turn piece and work 3 chain stitches (= beginning of new row). When changing colour in a row work as follows: Work 1 treble crochet with first colour but wait with last pull through. Switch to new colour, work last pull through with new colour. When working with two colours place strand for the colour not worked over stitches from previous row, work around the strand so that it is hidden and follows in the round. Make sure to avoid tights yarn and not to tighten yarn when picking it up from previous row. INCREASE TIP-1 (applies to yoke): Work 2 treble crochets in same colour in 1 treble crochet on previous row. INCREASE TIP-2 (applies to body): Work until 3 treble crochets remain before marker thread, work 2 treble crochets in next treble crochet, 1 treble crochet in each of the next 4 treble crochets (marker thread is in the middle of these stitches) and 2 treble crochets in next treble crochet (= 2 treble crochets increased). Repeat at next marker thread (= 4 treble crochets increased in total on row). DECREASE TIP (applies to sleeves): Work until 4 treble crochets remain before marker thread, work 1 treble crochet but wait with last yarn over and pull through (= 2 loops on hook), then work next treble crochet, but on last pull through pull through all 3 loops on hook (= 1 treble crochet decreased), work 1 treble crochet in each of the next 4 treble crochets (marker thread is in the middle of these stitches), work the next 2 treble crochets together the same way (= 1 treble crochet decreased = 2 treble crochets decreased on row). ---------------------------------------------------------- JUMPER: Worked top down, in the round and back and forth. Work together at the end of every row. Worked from mid back. YOKE: Work 106-110-115-120-124-129 chain stitches on hook size 4.5 mm with light beige brown with and form a ring with 1 slip stitch in first chain stitch. Work 3 chain stitches (= 1 treble crochet) - READ CROCHET INFO, 1 treble crochet in each of the next 0-4-2-0-4-2 chain stitches, * skip 1 chain stitch, 1 treble crochet in each of the next 6 chain stitches *, repeat from *-* = 92-96-100-104-108-112 treble crochets. Work A.1 and A.2 as follows: Work pattern, increase in pattern (see increase in diagram) and increase evenly - READ INCREASE TIP-1. ROW 1 (= right side): Work A.1 (= 2 treble crochets) over the first 14-14-16-17-18-18 treble crochets and increase 2-2-2-3-4-4 treble crochets evenly (= half back piece). Work A.2 (= 4 treble crochets), A.1 over the next 10 treble crochets and increase 2-4-4-4-4-6 treble crochets evenly, A.2 over the next 4 treble crochets (= right sleeve). Work A.1 over the next 28-30-32-34-36-38 treble crochets and increase 4-4-4-6-8-8 treble crochets evenly (= half back piece). Work A.2 over the next 4 treble crochets, A.1 over the next 10 treble crochets and increase 2-4-4-4-4-6 treble crochets evenly, A.2 over the next 4 treble crochets (= left sleeve). Work A.1 over the last 14-16-16-17-18-20 treble crochets and increase 2-2-2-3-4-4 treble crochets evenly (= half back piece) = 112-120-124-132-140-148 treble crochets (including increase in A.2) – READ COLOUR PATTERN! ROW 2 (= wrong side): Work A.1 over the first 16-18-18-20-22-24 treble crochets, A.2, repeat A.1 over the next 12-14-14-14-14-16 treble crochets, A.2, repeat A.1 over the next 32-34-36-40-44-46 treble crochets, A.2, repeat A.1 over the next 12-14-14-14-14-16 treble crochets, A.2, repeat A.1 over the last 16-16-18-20-22-22 treble crochets = 120-128-132-140-148-156 treble crochets (including increase in A.2). REMEMBER THE CROCHET TENSION! ROW 3 (= right side): Work pattern = 8 treble crochets increased in A.2 = 128-136-140-148-156-164 treble crochets. ROW 4 (= wrong side): Work A.1 over the first 16-18-18-20-22-24 treble crochets and increase 2-0-0-3-4-4 treble crochets evenly, A.2, work A.1 over the next 12-14-14-14-14-16 treble crochets and increase 0-4-4-4-4-6 treble crochets evenly, A.2, work A.1 over the next 32-34-36-40-44-46 treble crochets and increase 4-2-4-6-8-8 treble crochets evenly, A.2, work A.1 over the next 12-14-14-14-14-16 treble crochets and increase 0-4-4-4-4-6 treble crochets evenly, A.2, work A.1 over the last 16-16-18-20-22-22 treble crochets and increase 2-2-2-3-4-4 treble crochets evenly = 144-156-162-176-188-200 treble crochets (including increase in A.2). ROW 5 (= right side): Work A.1 over the first 18-18-20-23-26-26 treble crochets, A.2, work A.1 over the next 12-18-18-18-18-22 treble crochets, A.2, work A.1 over the next 36-36-40-46-52-54 treble crochets, A.2, work A.1 over the next 12-18-18-18-18-22 treble crochets, A.2, work A.1 over the last 18-18-18-23-26-28 treble crochets = 152-164-170-184-196-208 treble crochets (including increase in A.2). Piece now measures approx. 7 cm. Now work A.2 as before and A.3 is worked over A.1 as follows: ROW 6 (= wrong side): Work A.3 over the first 18-18-18-23-26-28 treble crochets and increase 3-3-3-4-4-2 treble crochets evenly, A.2, work A.3 over the next 12-18-18-18-18-22 treble crochets and increase 0-0-3-3-3-5 treble crochets evenly, A.2, work A.3 over the next 36-36-40-46-52-54 treble crochets and increase 3-6-5-5-8-9 treble crochets evenly, A.2, work A.3 over the next 12-18-18-18-18-22 treble crochets and increase 0-0-3-3-3-5 treble crochets evenly, A.2, work A.3 over the last 18-18-20-23-26-26 treble crochets and increase 0-3-4-4-4-4 treble crochets evenly = 162-180-192-207-222-237 treble crochets (including increase in A.2). ROW 7 (= right side): Work A.3 over the first 18-21-24-27-30-30 treble crochets, A.2, work A.3 over the next 12-18-21-21-21-27 treble crochets, A.2, work A.3 over the next 39-42-45-51-60-63 treble crochets, A.2, work A.3 over the next 12-18-21-21-21-27 treble crochets, A.2, work A.3 over the last 21-21-21-27-30-30 treble crochets = 166-184-196-211-226-241 treble crochets (including increase in A.2). ROW 8 (= wrong side): Work pattern as before. ROW 9 (= right side): Work pattern as before and increase 2-0-4-5-6-7 treble crochets evenly on row = 168-184-200-216-232-248 treble crochets. Piece measures approx. 11 cm. Then work according to diagram A.4 (= 8 treble crochets) – see increase in diagram, 21-23-25-27-29-31 times in total in width until piece measures 25-26-28-30-32-34 cm. When all increases are done there are 252-276-300-324-348-372 treble crochets on row. Now work body and sleeves as follows: Work A.4 over the first 36-41-45-49-54-57 treble crochets (= half back piece), 8-8-8-10-10-10 chain stitches, insert 1 marker thread in the middle of these stitches, skip the next 53-56-60-63-65-71 treble crochets (= sleeve), work A.4 over the next 73-82-90-99-109-115 treble crochets (= front piece), 8-8-8-10-10-10 chain stitches, insert 1 marker thread in the middle of these stitches, skip the next 53-56-60-63-65-71 treble crochets (= sleeve), work A.4 over the last 37-41-45-50-55-58 treble crochets (= half back piece). Cut the yarn. BODY: = 146-164-180-198-218-230 treble crochets and 16-16-16-20-20-20 chain stitches (= 162-180-196-218-238-250 stitches in total). Now work piece with beginning from marker thread in the side. Insert 1 marker in the piece. NOW MEASURE THE PIECE FROM HERE! Leave marker in piece, move marker thread when working. Continue with A.4 The treble crochets that do not fit pattern in each side are worked in light beige brown. When piece measures 4 cm, increase 2 treble crochets at each marker thread - READ INCREASE TIP-2! Increase like this every 5-9-9-9-9-9 cm 4-3-3-3-3-3 times in total = 178-192-208-230-250-262 treble crochets. When increasing, work the treble crochets in pattern, treble crochets that do not fit the pattern in the side is worked in light beige brown. Continue until piece measures 29-30-30-30-30-30 cm from marker (= 54-56-58-60-62-64 cm from neck edge), finish after 4 rows with light beige brown. Fasten off. SLEEVE: = 53-56-60-63-65-71 treble crochets. Continue with A.4 Begin by working in the 5th-5th-5th-6th-6th-6th chain stitch of the 8-8-8-10-10-10 chain stitches worked in armhole on body as follows: Work 1 slip stitch, 3 chain stitches (= 1 treble crochet), work 1 treble crochet in each of the next 3-3-3-4-4-4 chain stitches, 1 treble crochet in every treble crochet over sleeve, 1 treble crochet in each of the last 4-4-4-5-5-5 chain stitches under sleeve = 61-64-68-73-75-81 treble crochets. The treble crochets that do not fit pattern under sleeve are worked in light beige brown. Insert 1 marker thread mid under sleeve. Insert 1 marker in the piece. NOW MEASURE THE PIECE FROM HERE! Leave marker in piece, move marker thread when working. When piece measures 4 cm, decrease 2 treble crochets on each side of marker thread - READ DECREASE TIP. Decrease like this every 2½-2-2-1½-1½-1 cm 10-12-12-14-13-16 times in total = 41-40-44-45-49-49 treble crochets. Continue until piece measures 36-36-34-33-31-30 cm from marker (61-62-62-63-63-64 cm from neck edge), finish after 4 rows with light beige brown. Fasten off. Work the other sleeve the same way. NECK EDGE: Worked in the round from mid back. Work chain stitch where 1st row with treble crochets was worked (i.e. the chain stitches skipped are not worked = 92-96-100-104-108-112 stitches). Work with light beige brown as follows: ROUND 1: Work an elevation in the back of neck as follows: Fasten yarn with 1 slip stitch and work 3 chain stitches that replace first treble crochet, work 1 treble crochet in each of the first 18-19-20-21-22-23 stitches, 1 half treble crochet in each of the next 10 stitches, 1 double crochet in each of the next 34-36-38-40-42-44 stitches, 1 half treble crochet in each of the next 10 stitches, 1 treble crochet in each of the last 19-20-21-22-23-24 stitches. ROUND 2: Work 1 double crochet in every stitch and decrease 12 stitches evenly = 80-84-88-92-96-100 double crochets. Fasten off. |
|||||||||||||||||||||||||||||||
Diagram explanations |
|||||||||||||||||||||||||||||||
|
|||||||||||||||||||||||||||||||
|
|||||||||||||||||||||||||||||||

|
|||||||||||||||||||||||||||||||
|
Have you made this or any other of our designs? Tag your pictures in social media with #dropsdesign so we can see them! Do you need help with this pattern?You'll find tutorial videos, a Comments/Questions area and more by visiting the pattern on garnstudio.com. © 1982-2024 DROPS Design A/S. We reserve all rights. This document, including all its sub-sections, has copyrights. Read more about what you can do with our patterns at the bottom of each pattern on our site. |
|||||||||||||||||||||||||||||||


With over 40 years in knitting and crochet design, DROPS Design offers one of the most extensive collections of free patterns on the internet - translated to 17 languages. As of today we count 304 catalogues and 11422 patterns - 11422 of which are translated into English (UK/cm).
We work hard to bring you the best knitting and crochet have to offer, inspiration and advice as well as great quality yarns at incredible prices! Would you like to use our patterns for other than personal use? You can read what you are allowed to do in the Copyright text at the bottom of all our patterns. Happy crafting!
Comments / Questions (87)
Jeg skal til række 4 men kan ikke få mønstret til at passe. Når jeg hækler 18 masker efter diagram A1 og skal til at hækle A2 passer farverne ikke over hinanden når jeg skal hækle 2 stangmasker i en maske ( naturhvid) og derefter 1 maske mere i naturhvid så kommer jeg til stangmaske i sennepsfarvet De 3 luftmasker jeg starter rækken med skal jo tælles som første stangmaske eller ????? Hvad gør jeg forkert?
14.07.2020 - 13:59DROPS Design answered:
Hej Ulla, det er så svært at regne ud hvor det går galt for dig... du tager jo ud i mønsteret, kan du feks tage en ekstra eller en mindre maske ud for at få mønsteret til at passe?
30.07.2020 - 14:15Jeg er igang med at hækle Drops 180-15 Jeg kan ikke forstå 3. Række hvor der står man skal hækle mønster Hvis jeg skal tage 8 masker ud med A2 hvodan skal jeg hækle resten Jeg hækler efter str M Hvis jeg har forstået det rigtig skal jeg læse diagrammet fra højre når det er retsiden og fra venstre når det er vrang siden Mvh Ulla From
09.07.2020 - 14:37DROPS Design answered:
Hei Ulla. I 3.rad hekler du mønster, A.1 over A.1 og A.2 over A.2, men de gangene når du hekler A.2 skal du øke i første og siste maske, slik du også gjorde i 2.rad. God Fornøyelse!
13.07.2020 - 09:19Drops Nr, 180-15. Patroon u-812 Trui in Noors patroon. \\r\\nAls ik de 1e toer tel kom ik op 120 steken maar het moeten er 132 zijn. Maat XL. Dit zijn mijn meerderingen: 17+3, 4 , 10+4, 4, 34+6, 4, 10+4, 4, 17+3 Wat doe ik fout?
02.02.2020 - 14:54When working with A4, do we need continue to alternate rows RS/WS?
25.01.2020 - 20:58DROPS Design answered:
Dear Kristin, correct, you continue working alternately from RS and from WS. Happy crocheting!
27.01.2020 - 08:46Hejsa! Når man når til at lave luftmaske til ærmerne, skal det så følge A4 eller skal de alle sammen være i den samme farve? Vh Freja
05.11.2019 - 19:30DROPS Design answered:
HeiFreja. Luftmaskene til ermene hekles i sammen farge. God Fornøyelse!
11.11.2019 - 09:44Hej igen igen, hvis jeg skal springe 1 maske over og derefter lave 8 masker har jeg brugt 9 masker og ikke 8, derfor passer det ikke med de 23 gange rundt
03.10.2019 - 11:09DROPS Design answered:
Hej Freja, nej du springer ingen maske over. Du springer over den sorte firkant i selve diagrammet. Du hækler 8 masker over 8 masker ifølge diagrammet og det gør du 23 gange rundt. :)
03.10.2019 - 11:38Hej igen igen, hvis jeg skal springe 1 maske over og derefter lave 8 masker har jeg brugt 9 masker og ikke 8, derfor passer det ikke med de 23 gange rundt.
03.10.2019 - 11:06Hej igen. Hvis jeg springer en maske over passer det ikke med at jeg gentager A.4 23 gange og det passer ikke samlet når jeg hækler videre. Hvad gør jeg galt?
02.10.2019 - 15:40DROPS Design answered:
Hej Freja, jo mønsteret stemmer når du følger diagrammet. Du har 184 masker, hækler over 8 masker ifølge diagrammet x 23 = 184 masker. God fornøjelse!
03.10.2019 - 10:45Tak for svar. A2 er det så 4. række nedefra i diagrammet, fordi jeg er i række 4? Først der kan jeg læse mig til 12 masker i A2.
16.09.2019 - 10:54DROPS Design answered:
Hej Heidi, du starter alle diagrammerne på nederste række og hækler dig opad maske for maske ifølge diagrammerne, i samme rækkefølge som de hækles. God fornøjelse!
17.09.2019 - 14:33Er ved række 4 i str. M. Når jeg lægger antal masker sammen får jeg 146 hvor opskriften siger 156, så jeg må gøre noget forkert med A2. Hvordan kan jeg se hvad linje jeg skal bruge? Jeg synes jeg er nået til tredje hvilket svarer til 10 færdige masker. Kan I hjælpe?
15.09.2019 - 19:05DROPS Design answered:
Hei Heidi. Litt usikker på det kan ha gått galt for deg, men har du husket alle økningene i A.2? Det hekles A.1 over 96 staver (18+14+34+14+16). A.2 (=12 staver) hekles 4 ganger = 48 staver. Det økes 12 masker (0+4+2+4+2) jevnt fordelt på denne raden. Til sammen blir dette = 96 + 48 + 12 = 156 staver på 4. rad. God Fornøyelse!
16.09.2019 - 10:39