
Popular categories
Looking for a yarn?


|
|||||||||||||||||||||||||||||||
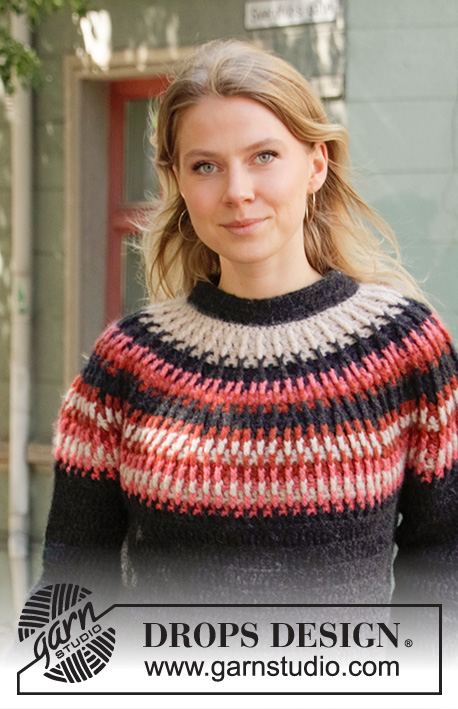
Winter Sunshine |
|||||||||||||||||||||||||||||||
 |
 |
||||||||||||||||||||||||||||||
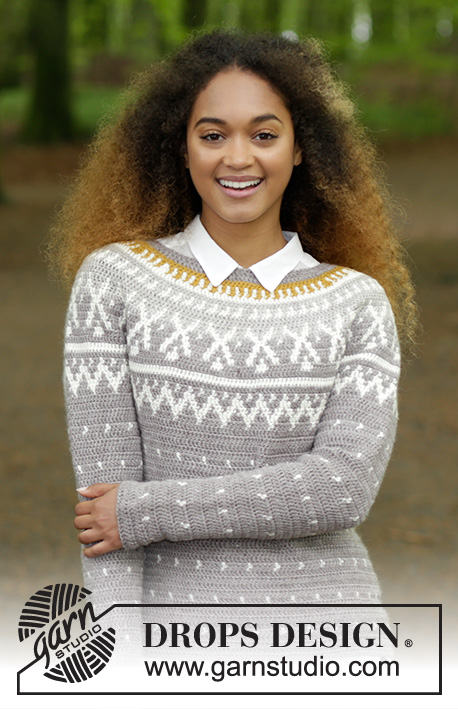
Jumper with round yoke and Norwegian multi-colored pattern, crocheted top down. Size: S - XXXL Piece is crocheted in DROPS Karisma.
DROPS 180-15 |
|||||||||||||||||||||||||||||||
|
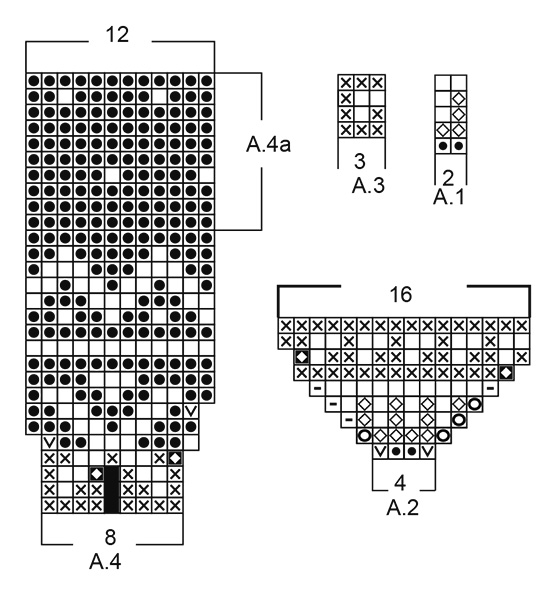
INFORMATION FOR PATTERN: PATTERN: See diagrams A.1 to A.4. When A.4 has been worked 1 time vertically, repeat A.4a until finished measurements. CROCHET INFO: Piece is worked both in the round and back and forth. Work alternately from right side and wrong side, and finish every row with 1 slip stitch in 3rd chain stitch at the beginning of row. Beginning every row with double crochets with 3 chain stitches (= first double crochet) and finish with 1 slip stitch in 3rd chain stitch at beginning of row, turn piece. On every round with single crochets replace first single crochet with 1 chain stitch. Finish round with 1 slip stitch in 1st chain stitch at beginning of round. COLOR PATTERN: When changing color at the beginning of a new row work as follows: Work last double crochet with first color but wait with last pull through. Switch to new color, work last pull through and 1 slip stitch in 3rd chain stitch at beginning of row. turn piece and work 3 chain stitches (= beginning of new row). When changing color in a row work as follows: Work 1 double crochet with first color but wait with last pull through. Switch to new color, work last pull through with new color. When working with two colors place strand for the color not worked over stitches from previous row, work around the strand so that it is hidden and follows in the round. Make sure to avoid tights yarn and not to tighten yarn when picking it up from previous row. INCREASE TIP-1 (applies to yoke): Work 2 double crochets in same color in 1 double crochet on previous row. INCREASE TIP-2 (applies to body): Work until 3 double crochets remain before marker thread, work 2 double crochets in next double crochet, 1 double crochet in each of the next 4 double crochets (marker thread is in the middle of these stitches) and 2 double crochets in next double crochet (= 2 double crochets increased). Repeat at next marker thread (= 4 double crochets increased in total on row). DECREASE TIP (applies to sleeves): Work until 4 double crochets remain before marker thread, work 1 double crochet but wait with last yarn over and pull through (= 2 loops on hook), then work next double crochet, but on last pull through pull through all 3 loops on hook (= 1 double crochet decreased), work 1 double crochet in each of the next 4 double crochets (marker thread is in the middle of these stitches), work the next 2 double crochets together the same way (= 1 double crochet decreased = 2 double crochets decreased on row). ---------------------------------------------------------- JUMPER: Worked top down, in the round and back and forth. Work together at the end of every row. Worked from mid back. YOKE: Work 106-110-115-120-124-129 chain stitches on hook size 4.5 mm/US 7 with light beige brown with and form a ring with 1 slip stitch in first chain stitch. Work 3 chain stitches (= 1 double crochet) - READ CROCHET INFO, 1 double crochet in each of the next 0-4-2-0-4-2 chain stitches, * skip 1 chain stitch, 1 double crochet in each of the next 6 chain stitches *, repeat from *-* = 92-96-100-104-108-112 double crochets. Work A.1 and A.2 as follows: Work pattern, increase in pattern (see increase in diagram) and increase evenly - READ INCREASE TIP-1. ROW 1 (= right side): Work A.1 (= 2 double crochets) over the first 14-14-16-17-18-18 double crochets and increase 2-2-2-3-4-4 double crochets evenly (= half back piece). Work A.2 (= 4 double crochets), A.1 over the next 10 double crochets and increase 2-4-4-4-4-6 double crochets evenly, A.2 over the next 4 double crochets (= right sleeve). Work A.1 over the next 28-30-32-34-36-38 double crochets and increase 4-4-4-6-8-8 double crochets evenly (= half back piece). Work A.2 over the next 4 double crochets, A.1 over the next 10 double crochets and increase 2-4-4-4-4-6 double crochets evenly, A.2 over the next 4 double crochets (= left sleeve). Work A.1 over the last 14-16-16-17-18-20 double crochets and increase 2-2-2-3-4-4 double crochets evenly (= half back piece) = 112-120-124-132-140-148 double crochets (including increase in A.2) – READ COLOR PATTERN! ROW 2 (= wrong side): Work A.1 over the first 16-18-18-20-22-24 double crochets, A.2, repeat A.1 over the next 12-14-14-14-14-16 double crochets, A.2, repeat A.1 over the next 32-34-36-40-44-46 double crochets, A.2, repeat A.1 over the next 12-14-14-14-14-16 double crochets, A.2, repeat A.1 over the last 16-16-18-20-22-22 double crochets = 120-128-132-140-148-156 double crochets (including increase in A.2). REMEMBER THE CROCHET GAUGE! ROW 3 (= right side): Work pattern = 8 double crochets increased in A.2 = 128-136-140-148-156-164 double crochets. ROW 4 (= wrong side): Work A.1 over the first 16-18-18-20-22-24 double crochets and increase 2-0-0-3-4-4 double crochets evenly, A.2, work A.1 over the next 12-14-14-14-14-16 double crochets and increase 0-4-4-4-4-6 double crochets evenly, A.2, work A.1 over the next 32-34-36-40-44-46 double crochets and increase 4-2-4-6-8-8 double crochets evenly, A.2, work A.1 over the next 12-14-14-14-14-16 double crochets and increase 0-4-4-4-4-6 double crochets evenly, A.2, work A.1 over the last 16-16-18-20-22-22 double crochets and increase 2-2-2-3-4-4 double crochets evenly = 144-156-162-176-188-200 double crochets (including increase in A.2). ROW 5 (= right side): Work A.1 over the first 18-18-20-23-26-26 double crochets, A.2, work A.1 over the next 12-18-18-18-18-22 double crochets, A.2, work A.1 over the next 36-36-40-46-52-54 double crochets, A.2, work A.1 over the next 12-18-18-18-18-22 double crochets, A.2, work A.1 over the last 18-18-18-23-26-28 double crochets = 152-164-170-184-196-208 double crochets (including increase in A.2). Piece now measures approx. 7 cm / 2¾". Now work A.2 as before and A.3 is worked over A.1 as follows: ROW 6 (= wrong side): Work A.3 over the first 18-18-18-23-26-28 double crochets and increase 3-3-3-4-4-2 double crochets evenly, A.2, work A.3 over the next 12-18-18-18-18-22 double crochets and increase 0-0-3-3-3-5 double crochets evenly, A.2, work A.3 over the next 36-36-40-46-52-54 double crochets and increase 3-6-5-5-8-9 double crochets evenly, A.2, work A.3 over the next 12-18-18-18-18-22 double crochets and increase 0-0-3-3-3-5 double crochets evenly, A.2, work A.3 over the last 18-18-20-23-26-26 double crochets and increase 0-3-4-4-4-4 double crochets evenly = 162-180-192-207-222-237 double crochets (including increase in A.2). ROW 7 (= right side): Work A.3 over the first 18-21-24-27-30-30 double crochets, A.2, work A.3 over the next 12-18-21-21-21-27 double crochets, A.2, work A.3 over the next 39-42-45-51-60-63 double crochets, A.2, work A.3 over the next 12-18-21-21-21-27 double crochets, A.2, work A.3 over the last 21-21-21-27-30-30 double crochets = 166-184-196-211-226-241 double crochets (including increase in A.2). ROW 8 (= wrong side): Work pattern as before. ROW 9 (= right side): Work pattern as before and increase 2-0-4-5-6-7 double crochets evenly on row = 168-184-200-216-232-248 double crochets. Piece measures approx. 11 cm / 4½". Then work according to diagram A.4 (= 8 double crochets) – see increase in diagram, 21-23-25-27-29-31 times in total in width until piece measures 25-26-28-30-32-34 cm / 9¾"-10¼"-11"-11¾"-12½"-13½". When all increases are done there are 252-276-300-324-348-372 double crochets on row. Now work body and sleeves as follows: Work A.4 over the first 36-41-45-49-54-57 double crochets (= half back piece), 8-8-8-10-10-10 chain stitches, insert 1 marker thread in the middle of these stitches, skip the next 53-56-60-63-65-71 double crochets (= sleeve), work A.4 over the next 73-82-90-99-109-115 double crochets (= front piece), 8-8-8-10-10-10 chain stitches, insert 1 marker thread in the middle of these stitches, skip the next 53-56-60-63-65-71 double crochets (= sleeve), work A.4 over the last 37-41-45-50-55-58 double crochets (= half back piece). Cut the yarn. BODY: = 146-164-180-198-218-230 double crochets and 16-16-16-20-20-20 chain stitches (= 162-180-196-218-238-250 stitches in total). Now work piece with beginning from marker thread in the side. Insert 1 marker in the piece. NOW MEASURE THE PIECE FROM HERE! Leave marker in piece, move marker thread when working. Continue with A.4 The double crochets that do not fit pattern in each side are worked in light beige brown. When piece measures 4 cm / 1½", increase 2 double crochets at each marker thread - READ INCREASE TIP-2! Increase like this every 5-9-9-9-9-9 cm / 2"-3½"-3½"-3½"-3½"-3½" 4-3-3-3-3-3 times in total = 178-192-208-230-250-262 double crochets. When increasing, work the double crochets in pattern, double crochets that do not fit the pattern in the side is worked in light beige brown. Continue until piece measures 29-30-30-30-30-30 cm / 11½"-11¾"-11¾"-11¾"-11¾"-11¾" from marker (= 54-56-58-60-62-64 cm / 21¼"-22"-22¾"-23⅝"-24⅜"-25¼" from neck edge), finish after 4 rows with light beige brown. Fasten off. SLEEVE: = 53-56-60-63-65-71 double crochets. Continue with A.4 Begin by working in the 5th-5th-5th-6th-6th-6th chain stitch of the 8-8-8-10-10-10 chain stitches worked in armhole on body as follows: Work 1 slip stitch, 3 chain stitches (= 1 double crochet), work 1 double crochet in each of the next 3-3-3-4-4-4 chain stitches, 1 double crochet in every double crochet over sleeve, 1 double crochet in each of the last 4-4-4-5-5-5 chain stitches under sleeve = 61-64-68-73-75-81 double crochets. The double crochets that do not fit pattern under sleeve are worked in light beige brown. Insert 1 marker thread mid under sleeve. Insert 1 marker in the piece. NOW MEASURE THE PIECE FROM HERE! Leave marker in piece, move marker thread when working. When piece measures 4 cm / 1½", decrease 2 double crochets on each side of marker thread - READ DECREASE TIP. Decrease like this every 2½-2-2-1½-1½-1 cm / ⅞"-¾"-¾"-½"-½"-⅜" 10-12-12-14-13-16 times in total = 41-40-44-45-49-49 double crochets. Continue until piece measures 36-36-34-33-31-30 cm / 14¼"-14¼"-13½"-13"-12¼"-11¾" from marker (61-62-62-63-63-64 cm / 242-24½"-24½"-24¾"-24¾"-25¼" from neck edge), finish after 4 rows with light beige brown. Fasten off. Work the other sleeve the same way. NECK EDGE: Worked in the round from mid back. Work chain stitch where 1st row with double crochets was worked (i.e. the chain stitches skipped are not worked = 92-96-100-104-108-112 stitches). Work with light beige brown as follows: ROUND 1: Work an elevation in the back of neck as follows: Fasten yarn with 1 slip stitch and work 3 chain stitches that replace first double crochet, work 1 double crochet in each of the first 18-19-20-21-22-23 stitches, 1 half double crochet in each of the next 10 stitches, 1 single crochet in each of the next 34-36-38-40-42-44 stitches, 1 half double crochet in each of the next 10 stitches, 1 double crochet in each of the last 19-20-21-22-23-24 stitches. ROUND 2: Work 1 single crochet in every stitch and decrease 12 stitches evenly = 80-84-88-92-96-100 single crochets. Fasten off. |
|||||||||||||||||||||||||||||||
Diagram explanations |
|||||||||||||||||||||||||||||||
|
|||||||||||||||||||||||||||||||
|
|||||||||||||||||||||||||||||||

|
|||||||||||||||||||||||||||||||
|
Have you made this or any other of our designs? Tag your pictures in social media with #dropsdesign so we can see them! Do you need help with this pattern?You'll find tutorial videos, a Comments/Questions area and more by visiting the pattern on garnstudio.com. © 1982-2024 DROPS Design A/S. We reserve all rights. This document, including all its sub-sections, has copyrights. Read more about what you can do with our patterns at the bottom of each pattern on our site. |
|||||||||||||||||||||||||||||||


With over 40 years in knitting and crochet design, DROPS Design offers one of the most extensive collections of free patterns on the internet - translated to 17 languages. As of today we count 304 catalogs and 11422 patterns - 11417 of which are translated into English (US/in).
We work hard to bring you the best knitting and crochet have to offer, inspiration and advice as well as great quality yarns at incredible prices! Would you like to use our patterns for other than personal use? You can read what you are allowed to do in the Copyright text at the bottom of all our patterns. Happy crafting!
Comments / Questions (87)
Hallo ich hänge bei Reihe 9. Ich verstehe nicht,wann der Ärmel getrennt wird. Ich habe A4 gehäkelt bis i A4a beginnt in der Häkelschrift...ist das zuweist? Viele Grüße
05.03.2021 - 20:28DROPS Design answered:
Liebe Charly, nach der 9. Reihe häkeln Sie A.4 bis die Arbeit 25-26-28-30-32-34 cm misst (= es sind 252-276-300-324-348-372 Stäbchen nach allen Zunahmen). Dann, wenn die Arbeit die richtige Höhe hat, häkeln Sie die Verteilungsrunde. Viel Spaß beim häkeln!
08.03.2021 - 10:10Tengo problemas para seguir con la fila 9. Entiendo los 8 puntos del diagrama A4, pero no lo de un total de 21 veces en el ancho. Gracias!
01.02.2021 - 22:02DROPS Design answered:
Hola Carolina, 21 veces en el ancho significa que tienes que trabajar el diagrama A4 21 veces en la fila.
30.04.2021 - 22:29Jeg laver trøjen i XXXL og er startet på 4.række. Jeg kan ikke få mønsteret til at passe med alle udtagningerne. Skal jeg selv tilpasse mønster, så det passer?
07.01.2021 - 17:50DROPS Design answered:
Hei Helle. Husk, der det økes jevnt fordelt i A.1, les ØKETIPS-1 i oppskriften. God Fornøyelse!
18.01.2021 - 11:55Hello. I am trying for the first time to crochet a sweater and I find it difficult on the beginning. I make XL. I chain 120 and form a ring. I do a ch3 ( first dc) . What does the "0" stand for? dc in the same first ch with ch3 ? Because if I do ch3 and the repeat "skip 1 make 6" I keep ending with 103 dc (ch3 incl), not 104.
03.01.2021 - 18:12Bonjour, je ne comprends pas à quoi servent les 16 mailles en l'air au début du dos devant. J'ai commencé les brides à partir du marqueur ce qui fait que ces 16 mailles sont sur la manche ai-je manqué quelque chose ?
28.12.2020 - 21:30DROPS Design answered:
Bonjour Marie, ces 16 mailles en l'air correspondent aux 2 chaînettes de 8 mailles en l'air que vous avez monté sous chacune des 2 manches. Vous avez au total 146-164-180 brides pour le dos et le devant + 2 x 8 mailles en l'air soit 16 mailles en l'air sous les manches. Bon crochet!
04.01.2021 - 11:27Jeg skal til at hækle ryg og forstykke men forstår ikke opskriften. Der står man skal starte fra mærketråden i siden men de luftmasker skal jo bruges til ærmerne ???
25.09.2020 - 23:46DROPS Design answered:
Hei Ulla. Nei, merket du har satt i midten av de nye luftmaskene er under ermet og da i siden på genseren. De maskene du hoppet over er ermet og skal hekles senere. God Fornøyelse!
28.09.2020 - 11:31Hi, I am having great difficulty understanding row 1 ( I am making size M). I cannot make the stitches equal 120.....I work 14 st and incr 2, 4, 10 then incr 4, 4, 30 then incr 4, 4, 10 then incr 4, 4, then 16 incr 2. This totals 112. Where am I missing 8 stitches? Thank you in advance.
07.09.2020 - 21:23DROPS Design answered:
Dear Maria,in each A.2 you will increase 2 sts (= 2 sts in first stitch + 2 sts in last stitch in A.2 - see diagram), so that you will have 2 sts x 4 repeats on A.2 = 8 sts, these should be your 8 missing stitches. Happy knitting!
08.09.2020 - 09:57Jeg har stadig ikke fået svar på mit spørgsmål fra d 14.7.20 😏😏😏😏
28.07.2020 - 14:32DROPS Design answered:
Hej Ulla, vi har haft en lille ferie - vi skal svare så hurtigt som muligt ;) ;) ;)
28.07.2020 - 15:33Respecto a mi comentario anterior, quizá no haya entendido bien cómo hacer la fila 3. ¿Podrían darme más detalles? ¿Cómo hacer exactamente los aumentos? Porque si seguimos el patrón A2 en la fila 3, salen más de 8 aumentos.
19.07.2020 - 16:43DROPS Design answered:
Hola Victoria. La base del patrón la puedes ver en la fila 2: durante la vuelta tenemos 4 repeticiones del diagrama A.2. Cada repetición del diagrama incluye 2 aumentos. Es decir, después de trabajar una vuelta completa hay 8 puntos aumentados
20.07.2020 - 20:44Hola! Creo que hay un error en la fila 4 del canesú (talla M). Si sigo el patrón como se indica, me faltan puntos por tejer. La única manera en que me cuadra todo es tejiendo de esta manera: - 18 pa de A1 - A2 -16 pa + 4 aumentos - A2 -36 pa + 2 aumentos - A 2 - 16 pa + 4 aumentos - A2 -16 pa + 2 aumentos Gracias por vuestro trabajo y vuestros patrones :)
19.07.2020 - 15:02