
Popular categories
Looking for a yarn?


|
|||||||||||||||||||||||||||||||
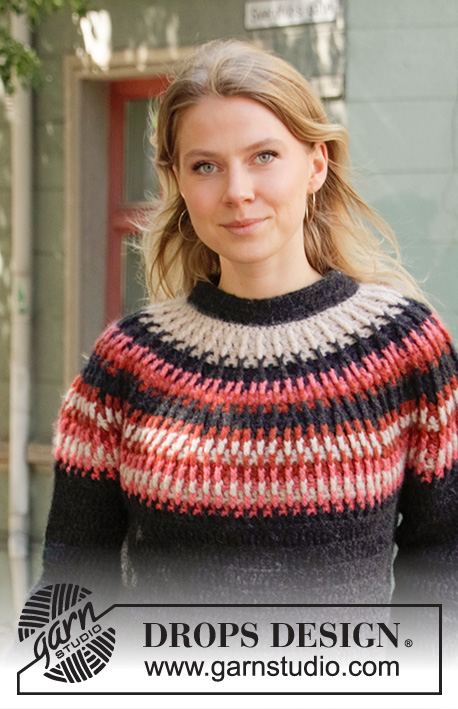
Winter Sunshine |
|||||||||||||||||||||||||||||||
 |
 |
||||||||||||||||||||||||||||||
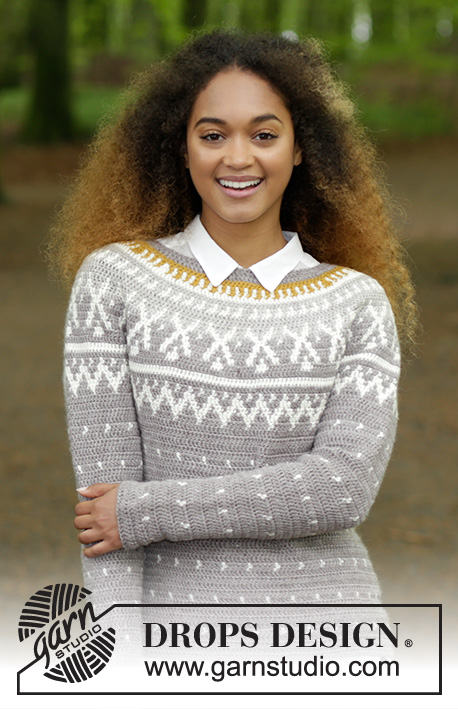
Jumper with round yoke and Norwegian multi-colored pattern, crocheted top down. Size: S - XXXL Piece is crocheted in DROPS Karisma.
DROPS 180-15 |
|||||||||||||||||||||||||||||||
|
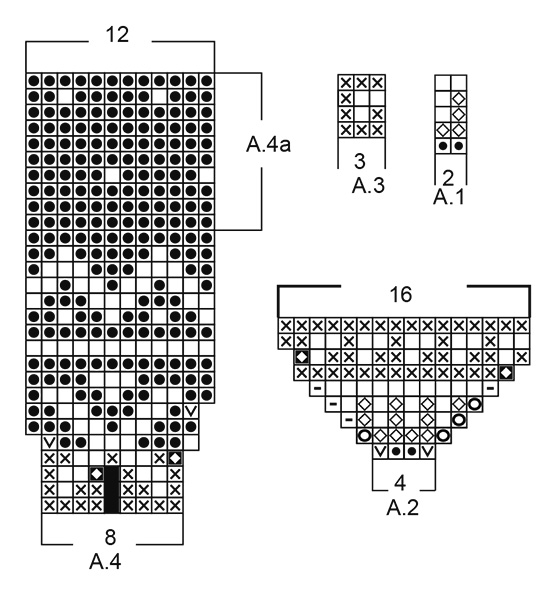
INFORMATION FOR PATTERN: PATTERN: See diagrams A.1 to A.4. When A.4 has been worked 1 time vertically, repeat A.4a until finished measurements. CROCHET INFO: Piece is worked both in the round and back and forth. Work alternately from right side and wrong side, and finish every row with 1 slip stitch in 3rd chain stitch at the beginning of row. Beginning every row with double crochets with 3 chain stitches (= first double crochet) and finish with 1 slip stitch in 3rd chain stitch at beginning of row, turn piece. On every round with single crochets replace first single crochet with 1 chain stitch. Finish round with 1 slip stitch in 1st chain stitch at beginning of round. COLOR PATTERN: When changing color at the beginning of a new row work as follows: Work last double crochet with first color but wait with last pull through. Switch to new color, work last pull through and 1 slip stitch in 3rd chain stitch at beginning of row. turn piece and work 3 chain stitches (= beginning of new row). When changing color in a row work as follows: Work 1 double crochet with first color but wait with last pull through. Switch to new color, work last pull through with new color. When working with two colors place strand for the color not worked over stitches from previous row, work around the strand so that it is hidden and follows in the round. Make sure to avoid tights yarn and not to tighten yarn when picking it up from previous row. INCREASE TIP-1 (applies to yoke): Work 2 double crochets in same color in 1 double crochet on previous row. INCREASE TIP-2 (applies to body): Work until 3 double crochets remain before marker thread, work 2 double crochets in next double crochet, 1 double crochet in each of the next 4 double crochets (marker thread is in the middle of these stitches) and 2 double crochets in next double crochet (= 2 double crochets increased). Repeat at next marker thread (= 4 double crochets increased in total on row). DECREASE TIP (applies to sleeves): Work until 4 double crochets remain before marker thread, work 1 double crochet but wait with last yarn over and pull through (= 2 loops on hook), then work next double crochet, but on last pull through pull through all 3 loops on hook (= 1 double crochet decreased), work 1 double crochet in each of the next 4 double crochets (marker thread is in the middle of these stitches), work the next 2 double crochets together the same way (= 1 double crochet decreased = 2 double crochets decreased on row). ---------------------------------------------------------- JUMPER: Worked top down, in the round and back and forth. Work together at the end of every row. Worked from mid back. YOKE: Work 106-110-115-120-124-129 chain stitches on hook size 4.5 mm/US 7 with light beige brown with and form a ring with 1 slip stitch in first chain stitch. Work 3 chain stitches (= 1 double crochet) - READ CROCHET INFO, 1 double crochet in each of the next 0-4-2-0-4-2 chain stitches, * skip 1 chain stitch, 1 double crochet in each of the next 6 chain stitches *, repeat from *-* = 92-96-100-104-108-112 double crochets. Work A.1 and A.2 as follows: Work pattern, increase in pattern (see increase in diagram) and increase evenly - READ INCREASE TIP-1. ROW 1 (= right side): Work A.1 (= 2 double crochets) over the first 14-14-16-17-18-18 double crochets and increase 2-2-2-3-4-4 double crochets evenly (= half back piece). Work A.2 (= 4 double crochets), A.1 over the next 10 double crochets and increase 2-4-4-4-4-6 double crochets evenly, A.2 over the next 4 double crochets (= right sleeve). Work A.1 over the next 28-30-32-34-36-38 double crochets and increase 4-4-4-6-8-8 double crochets evenly (= half back piece). Work A.2 over the next 4 double crochets, A.1 over the next 10 double crochets and increase 2-4-4-4-4-6 double crochets evenly, A.2 over the next 4 double crochets (= left sleeve). Work A.1 over the last 14-16-16-17-18-20 double crochets and increase 2-2-2-3-4-4 double crochets evenly (= half back piece) = 112-120-124-132-140-148 double crochets (including increase in A.2) – READ COLOR PATTERN! ROW 2 (= wrong side): Work A.1 over the first 16-18-18-20-22-24 double crochets, A.2, repeat A.1 over the next 12-14-14-14-14-16 double crochets, A.2, repeat A.1 over the next 32-34-36-40-44-46 double crochets, A.2, repeat A.1 over the next 12-14-14-14-14-16 double crochets, A.2, repeat A.1 over the last 16-16-18-20-22-22 double crochets = 120-128-132-140-148-156 double crochets (including increase in A.2). REMEMBER THE CROCHET GAUGE! ROW 3 (= right side): Work pattern = 8 double crochets increased in A.2 = 128-136-140-148-156-164 double crochets. ROW 4 (= wrong side): Work A.1 over the first 16-18-18-20-22-24 double crochets and increase 2-0-0-3-4-4 double crochets evenly, A.2, work A.1 over the next 12-14-14-14-14-16 double crochets and increase 0-4-4-4-4-6 double crochets evenly, A.2, work A.1 over the next 32-34-36-40-44-46 double crochets and increase 4-2-4-6-8-8 double crochets evenly, A.2, work A.1 over the next 12-14-14-14-14-16 double crochets and increase 0-4-4-4-4-6 double crochets evenly, A.2, work A.1 over the last 16-16-18-20-22-22 double crochets and increase 2-2-2-3-4-4 double crochets evenly = 144-156-162-176-188-200 double crochets (including increase in A.2). ROW 5 (= right side): Work A.1 over the first 18-18-20-23-26-26 double crochets, A.2, work A.1 over the next 12-18-18-18-18-22 double crochets, A.2, work A.1 over the next 36-36-40-46-52-54 double crochets, A.2, work A.1 over the next 12-18-18-18-18-22 double crochets, A.2, work A.1 over the last 18-18-18-23-26-28 double crochets = 152-164-170-184-196-208 double crochets (including increase in A.2). Piece now measures approx. 7 cm / 2¾". Now work A.2 as before and A.3 is worked over A.1 as follows: ROW 6 (= wrong side): Work A.3 over the first 18-18-18-23-26-28 double crochets and increase 3-3-3-4-4-2 double crochets evenly, A.2, work A.3 over the next 12-18-18-18-18-22 double crochets and increase 0-0-3-3-3-5 double crochets evenly, A.2, work A.3 over the next 36-36-40-46-52-54 double crochets and increase 3-6-5-5-8-9 double crochets evenly, A.2, work A.3 over the next 12-18-18-18-18-22 double crochets and increase 0-0-3-3-3-5 double crochets evenly, A.2, work A.3 over the last 18-18-20-23-26-26 double crochets and increase 0-3-4-4-4-4 double crochets evenly = 162-180-192-207-222-237 double crochets (including increase in A.2). ROW 7 (= right side): Work A.3 over the first 18-21-24-27-30-30 double crochets, A.2, work A.3 over the next 12-18-21-21-21-27 double crochets, A.2, work A.3 over the next 39-42-45-51-60-63 double crochets, A.2, work A.3 over the next 12-18-21-21-21-27 double crochets, A.2, work A.3 over the last 21-21-21-27-30-30 double crochets = 166-184-196-211-226-241 double crochets (including increase in A.2). ROW 8 (= wrong side): Work pattern as before. ROW 9 (= right side): Work pattern as before and increase 2-0-4-5-6-7 double crochets evenly on row = 168-184-200-216-232-248 double crochets. Piece measures approx. 11 cm / 4½". Then work according to diagram A.4 (= 8 double crochets) – see increase in diagram, 21-23-25-27-29-31 times in total in width until piece measures 25-26-28-30-32-34 cm / 9¾"-10¼"-11"-11¾"-12½"-13½". When all increases are done there are 252-276-300-324-348-372 double crochets on row. Now work body and sleeves as follows: Work A.4 over the first 36-41-45-49-54-57 double crochets (= half back piece), 8-8-8-10-10-10 chain stitches, insert 1 marker thread in the middle of these stitches, skip the next 53-56-60-63-65-71 double crochets (= sleeve), work A.4 over the next 73-82-90-99-109-115 double crochets (= front piece), 8-8-8-10-10-10 chain stitches, insert 1 marker thread in the middle of these stitches, skip the next 53-56-60-63-65-71 double crochets (= sleeve), work A.4 over the last 37-41-45-50-55-58 double crochets (= half back piece). Cut the yarn. BODY: = 146-164-180-198-218-230 double crochets and 16-16-16-20-20-20 chain stitches (= 162-180-196-218-238-250 stitches in total). Now work piece with beginning from marker thread in the side. Insert 1 marker in the piece. NOW MEASURE THE PIECE FROM HERE! Leave marker in piece, move marker thread when working. Continue with A.4 The double crochets that do not fit pattern in each side are worked in light beige brown. When piece measures 4 cm / 1½", increase 2 double crochets at each marker thread - READ INCREASE TIP-2! Increase like this every 5-9-9-9-9-9 cm / 2"-3½"-3½"-3½"-3½"-3½" 4-3-3-3-3-3 times in total = 178-192-208-230-250-262 double crochets. When increasing, work the double crochets in pattern, double crochets that do not fit the pattern in the side is worked in light beige brown. Continue until piece measures 29-30-30-30-30-30 cm / 11½"-11¾"-11¾"-11¾"-11¾"-11¾" from marker (= 54-56-58-60-62-64 cm / 21¼"-22"-22¾"-23⅝"-24⅜"-25¼" from neck edge), finish after 4 rows with light beige brown. Fasten off. SLEEVE: = 53-56-60-63-65-71 double crochets. Continue with A.4 Begin by working in the 5th-5th-5th-6th-6th-6th chain stitch of the 8-8-8-10-10-10 chain stitches worked in armhole on body as follows: Work 1 slip stitch, 3 chain stitches (= 1 double crochet), work 1 double crochet in each of the next 3-3-3-4-4-4 chain stitches, 1 double crochet in every double crochet over sleeve, 1 double crochet in each of the last 4-4-4-5-5-5 chain stitches under sleeve = 61-64-68-73-75-81 double crochets. The double crochets that do not fit pattern under sleeve are worked in light beige brown. Insert 1 marker thread mid under sleeve. Insert 1 marker in the piece. NOW MEASURE THE PIECE FROM HERE! Leave marker in piece, move marker thread when working. When piece measures 4 cm / 1½", decrease 2 double crochets on each side of marker thread - READ DECREASE TIP. Decrease like this every 2½-2-2-1½-1½-1 cm / ⅞"-¾"-¾"-½"-½"-⅜" 10-12-12-14-13-16 times in total = 41-40-44-45-49-49 double crochets. Continue until piece measures 36-36-34-33-31-30 cm / 14¼"-14¼"-13½"-13"-12¼"-11¾" from marker (61-62-62-63-63-64 cm / 242-24½"-24½"-24¾"-24¾"-25¼" from neck edge), finish after 4 rows with light beige brown. Fasten off. Work the other sleeve the same way. NECK EDGE: Worked in the round from mid back. Work chain stitch where 1st row with double crochets was worked (i.e. the chain stitches skipped are not worked = 92-96-100-104-108-112 stitches). Work with light beige brown as follows: ROUND 1: Work an elevation in the back of neck as follows: Fasten yarn with 1 slip stitch and work 3 chain stitches that replace first double crochet, work 1 double crochet in each of the first 18-19-20-21-22-23 stitches, 1 half double crochet in each of the next 10 stitches, 1 single crochet in each of the next 34-36-38-40-42-44 stitches, 1 half double crochet in each of the next 10 stitches, 1 double crochet in each of the last 19-20-21-22-23-24 stitches. ROUND 2: Work 1 single crochet in every stitch and decrease 12 stitches evenly = 80-84-88-92-96-100 single crochets. Fasten off. |
|||||||||||||||||||||||||||||||
Diagram explanations |
|||||||||||||||||||||||||||||||
|
|||||||||||||||||||||||||||||||
|
|||||||||||||||||||||||||||||||

|
|||||||||||||||||||||||||||||||
|
Have you made this or any other of our designs? Tag your pictures in social media with #dropsdesign so we can see them! Do you need help with this pattern?You'll find tutorial videos, a Comments/Questions area and more by visiting the pattern on garnstudio.com. © 1982-2024 DROPS Design A/S. We reserve all rights. This document, including all its sub-sections, has copyrights. Read more about what you can do with our patterns at the bottom of each pattern on our site. |
|||||||||||||||||||||||||||||||


With over 40 years in knitting and crochet design, DROPS Design offers one of the most extensive collections of free patterns on the internet - translated to 17 languages. As of today we count 304 catalogs and 11422 patterns - 11417 of which are translated into English (US/in).
We work hard to bring you the best knitting and crochet have to offer, inspiration and advice as well as great quality yarns at incredible prices! Would you like to use our patterns for other than personal use? You can read what you are allowed to do in the Copyright text at the bottom of all our patterns. Happy crafting!
Comments / Questions (87)
EMPIÈCEMENT: Crocheter -110- mailles en l'air (pour le modèle M) et fermer en rond avec 1 maille coulée dans la 1ère maille en l'air. Crocheter 3 mailles en l'air (= 1 bride) 1 bride dans chacune des 0-4-2-0-4-2 mailles en l'air suivantes, *sauter 1 maille en l'air, 1 bride dans chacune des 6 mailles en l'air suivantes*, répéter de *-* = 96- brides. Que signifie crocheter 1 bride dans la maille 0 puis 4 puis 2 puis 0 ?
30.04.2022 - 22:28DROPS Design answered:
Bonjour Magali, chaque chiffre correspond à la taille, autrement dit, en fonction de la taille vous devrez crocheter soit 0 brides (taille S et XL) ou bien 4 brides (taille M et XXL) ou 2 brides (taille L et XXXL). Bon crochet!
02.05.2022 - 08:37Hei igjen. Har for så vidt kommet meg gjennom mønsteret. Å får det til. Men valgte å rekke opp å prøve på nytt da jeg ikke ble fornøyd med overgangene bake på genseren( begynnelsen av omgangen) og under armen (begynnelsen på omgangen etter armhull) Noen som har tips til videoer som viser hvordan du går fra å helle rundt, til fram og tilbake? Eller hvordan få «pene» skjøter/overganger/begynnelse på omgang. Takknemlig for alle tips dere kan gi meg.
19.04.2022 - 20:20DROPS Design answered:
Hej Lisbeth, vi har videoer hvor vi viser hvordan man hækler rundt. Her er feks en hvor vi viser start og slut på hver omgang: Hækle rundt det kan være at den kan hjælpe dig videre :)
22.04.2022 - 13:47Hei. Prøver å lage str Xl. Har kommet til 3.rad. Men her stopper det opp å jeg forstår ikke hvordan jeg skal gjøre det videre. Jeg har 140 staver. Men hvis jeg hekler A.2, rad3 får jeg ikke 148 som det står i oppskriften. Hva er det jeg gjør galt?
03.03.2022 - 10:06DROPS Design answered:
Hei Lisbeth. Du hekler fremdeles etter mønster (som er både A.1 og A.2) I rad 1 og 2 økte du jevnt fordelt i A.1 og i A.2 økte du etter diagram. Når du skal hekle 3. rad er det kun i A.2 det skal økes (8 økte staver), og du hekler A.1 over A.1. Når du skal hekle 4. rad er det beskrevet i oppskriften hvordan du skal øke jevnt fordelt i A.1. mvh DROPS Design
07.03.2022 - 13:52Hallo.Lese ich das Diagramm in der Hinrunde von rechts nach links und in der Rückrunde von links nach rechts?Oder grundsätzlich in jeder Runde von rechts nach links.
15.02.2022 - 15:38DROPS Design answered:
Liebe Kathrin, ja genau, bei den Rückrunden sollen Sie die Diagramme links nach rechts lesen - hier lesen Sie mehr. Viel Spaß beim häkeln!
15.02.2022 - 17:14Ik snap toer 3 niet als ik de tekening volg dan meerder ik per herhaling al 2 keer maar in de tekst staat dat ik maar 8 steken moet meerderen. Dat snap ik niet
09.01.2022 - 13:19DROPS Design answered:
Dag Marion,
Je haakt toer 3 verder in patroon, dus zoals uitgelegd in toer 2, waarbij er dus in totaal 8 stokjes worden gemeerderd omdat je A.2 4 keer haakt op de toer (daar tussen zit A.1)
10.01.2022 - 17:58Hej med jer. Jeg er ny indenfor hækleverden. Er lige begyndt på Drop design sweater winter sunshine str. XL... er nået til række 3... er gået i stå.. jeg forstår ikke hvad jeg skal gøre. Hvis jeg følger A2 diagrammet, får jeg alt for MANGE masker. Der skal være 148 masker... hvad menes der med (hækle mønster = 8 stangmasker taget ud i A2??? ) Hvordan skal jeg hækle rækken, så maskeantallet passer? På forhånd tak Lene Petri
27.10.2021 - 06:55DROPS Design answered:
Hej Lene, du har 104 masker og du kan se at udtagningerne er tegnet ind i diagram A.2, det vil sige at på første omgang tager 2 masker ud hver gang du hækler A.2 = 8m + 20m ifølge forklaringen i opskriften = 132 masker. På 2. og 3. omgang tager du kun ud ifølge A.2 = 8 + 8 masker = 148 masker. God fornøjelse!
28.10.2021 - 13:52Hi there! I am working on the M version of this sweater and running into trouble before I even get to the charts. I have chained 110 and ss together. However when I chain 3, dc in the next 4, and sk 1 dc 6 in the remaining stitches I end up with 95 dc rather than 96. What am I doing wrong here? I can’t seem to figure it out. Thank you in advance!
21.09.2021 - 23:43How do I determine which size garment (sweater, in this case) to make? I can't find any measurements on the pattern's page, and sizes can vary widely by studio.
24.07.2021 - 03:23DROPS Design answered:
Dear Jackie, you can find all the relevant measurements of the finished piece on the schematic drawing at the bottom of the pattern. We suggest you measure a sweater that fits you and compare. Happy Stitching!
24.07.2021 - 09:35Bonjour, je ne comprends pas bien le début du diagramme A4. Le carré noir indique pas de maille. Mais si je saute cette maille, j’ai 9 brides et le compte n’est pas bon... alors que si je fais 8 brides, je peux le répéter 21 fois pour la taille S comme indiqué. à quoi correspond ce carré noir, et que dois-je faire? Merci !
03.06.2021 - 17:47DROPS Design answered:
Bonjour Estelle, ce carré noir n'est pas une maille, autrement dit, A.4 se crochète sur 8 mailles jusqu'au rang 3 où vous augmentez en crochetant 2 brides dan sla même bride en chêne clair = 8ème symbole de la légende = vous avez désormais 9 brides dans A.4. Au tour suivant, vous augmentez de nouveau 1 bride (au début de A.4) = 10 brides. Bon crochet!
04.06.2021 - 07:00Jeg har prøvet at lave til omgang 4 et par gange, men kan ikke helt få det til at passe. Såvidt jeg kan se på opskriften, skal man hækle A1 oveni A1 og A2 oveni A2 fra forrige række, og hver række starter og slutter skiftevis med 16 og 18 stangmasker (A1). Men når jeg vender går det galt. Jeg laver en kædemaske i 3. luftmaske, vender og derefter 3 nye luftmasker (=stangmaske), men har nu stadig f.eks. yderligere 18 masker hen til (A2), så derfor i alt 19 stangmasker (inkl luftmasker)
07.04.2021 - 22:21DROPS Design answered:
Hei Annemette. Litt usikker på hvor det går feil hos deg. Hvilken str hekler du? Husk at de 3 luftmaskene du starter med erstatter 1 stav. Har du fått med deg alle økningne i diagrammene, både i A.1 og A.2? Prøv å sett hjelpemarkører mellom hver diagram, da har man lettere oversikt og kan sjekke etter hver rad at man har det maskeantallet som står i oppskriften. mvh DROPS design
26.04.2021 - 10:10