
Popular categories
Looking for a yarn?


|
||||||||||||||||||||||||||||||||||||||||
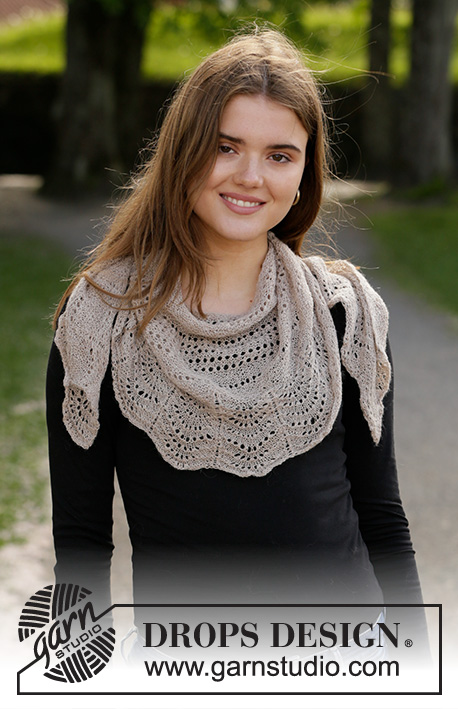
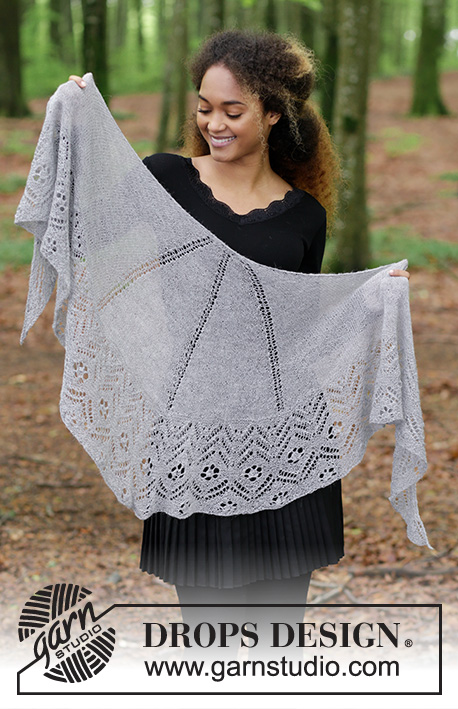
Wings of Love |
||||||||||||||||||||||||||||||||||||||||
 |
 |
|||||||||||||||||||||||||||||||||||||||
Knitted shawl with lace pattern in stockinette stitch and garter stitch. The piece is worked in DROPS Lace.
DROPS 181-4 |
||||||||||||||||||||||||||||||||||||||||
|
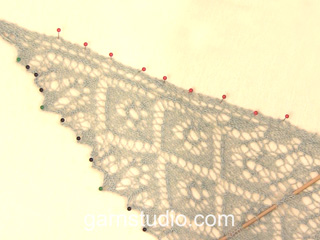
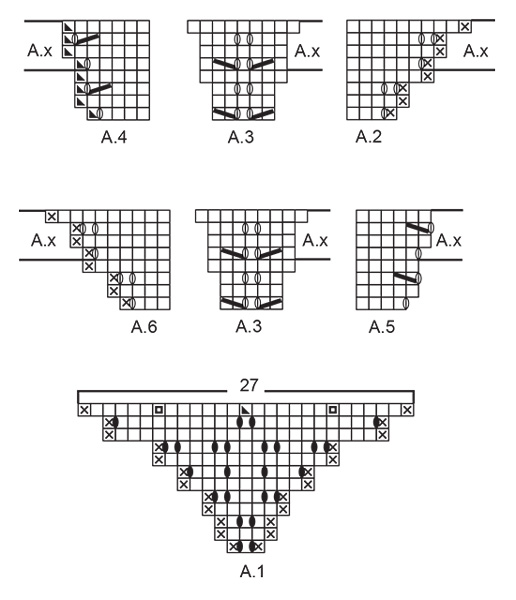
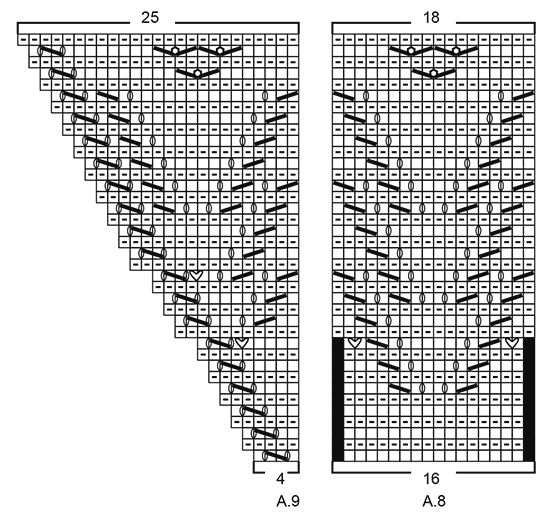
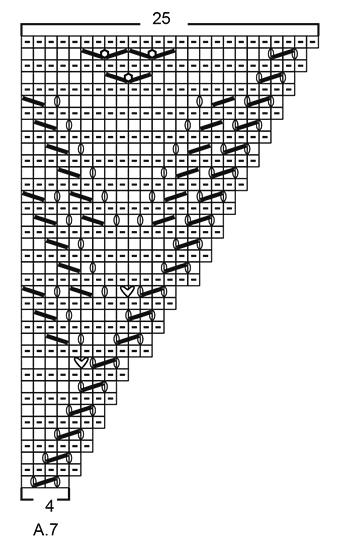
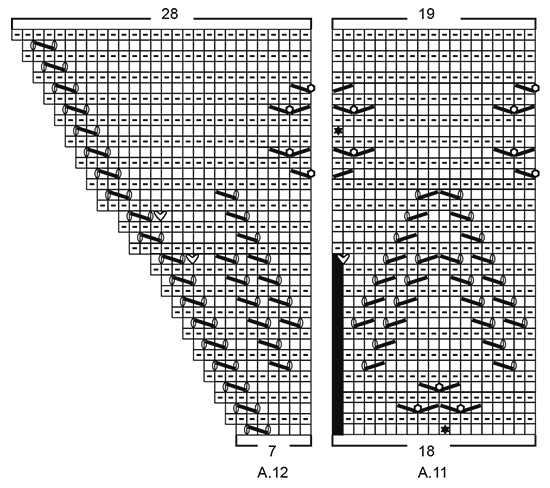
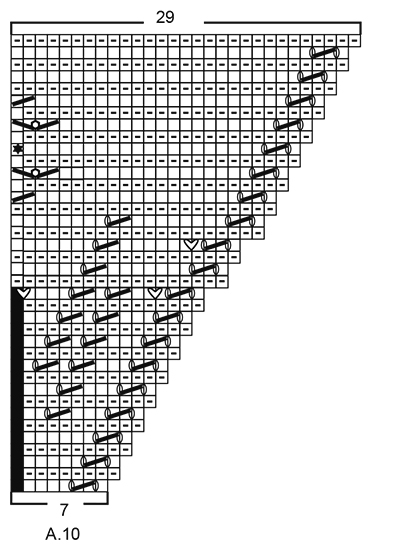
INFORMATION FOR THE PATTERN: RIDGE/GARTER STITCH (worked back and forth): 1 ridge = Knit 2 rows. PATTERN: See diagrams A.1 to A.12. The diagram shows all the rows in the pattern seen from the right side. Row 1 = right side. SHAPING: If you are using another yarn from yarn group A, you do not need to stretch the shawl to the right measurements, but dampen it and carefully lay it flat in the right shape. Allow it to dry. Repeat the process every time the shawl is washed. BINDING OFF TIP: To avoid the bind-off edge being tight, you can bind off with a needle a ½ size larger. ---------------------------------------------------------- SHAWL: The piece is worked back and forth with circular needle, top down. Work from the middle of the top edge with stockinette stitch and lace pattern and finish at the bottom with a border of lace pattern and garter stitch. Cast on 3 stitches with circular needle size 3 mm / US 2.5 and Lace - read KNITTING GAUGE above. Work according to diagram A.1 (= 3 stitches) - read PATTERN above. On the last row, insert 3 markers as shown in the diagram. When the whole of diagram A.1 has been completed in height, there are 27 stitches on the needle. WORK ACCORDING TO DIAGRAMS A.2 TO A.6 AS FOLLOWS FROM THE RIGHT SIDE: Work A.2 (= 4 stitches), A.3 (= 5 stitches – the first marker sits in the middle of A.3), A.4 (= 5 stitches – the second marker sits in the last stitch of A.4), A.5 (= 4 stitches), A.3 (= 5 stitches – the third marker sits in the middle of A.3) and A.6 (= 4 stitches). When the whole of diagrams A.2 to A.6 have been completed in height, there are 51 stitches on the needle. Repeat the increases as shown in A.x onwards – increase alternately 4 and 8 stitches on each row from the right side (i.e. 12 increased stitches for every repeat of A.x in height), the increased stitches are worked in stockinette stitch on each side of A.3. Repeat as shown in A.x 24 times in total in height = 339 stitches on the needle. The piece measures approx. 36 cm / 14¼". On the next row from the right side, work and increase 4 stitches as shown on the first row of A.x = 343 stitches. Purl 1 row from the wrong side (the edge stitch in each side is worked in GARTER STITCH – see description above, throughout the whole piece). Knit 1 row from the right side and increase 1 stitch inside the edge stitch in garter stitch in each side and increase 1 stitch only by the mid-stitch (= 3 stitches increased) = 346 stitches on the needle and purl 1 row from the wrong side. You do not need the 3 markers from here. WORK ACCORDING TO DIAGRAMS A.7 TO A.9 AS FOLLOWS FROM THE RIGHT SIDE: Work 1 edge stitch in garter stitch, A.7 over 4 stitches, repeat A.8 until there are 5 stitches left on the needle (= 21 repeats of 16 stitches), A.9 over 4 stitches and 1 edge stitch in garter stitch. NOTE! On the 11th row in the diagram, increase 2 stitches in each repeat of A.7, A.8 and A.9. On the 17th row increase 2 stitches in each of A.7 and A.9. When the whole of diagrams A.7 to A.9 have been completed in height, there are 430 stitches on the needle. WORK ACCORDING TO DIAGRAMS A.10 TO A.12 AS FOLLOWS FROM THE RIGHT SIDE: Work 1 edge stitch in garter stitch, A.10 over 7 stitches, repeat A.11 until there are 8 stitches left on the needle (= 23 repeats of 18 stitches), A.12 over 7 stitches and 1 edge stitch in garter stitch. NOTE! On the 17th row in the diagram increase 3 stitches in A.10, 1 stitch in A.11 and 2 stitches in A.12. On the 21st row increase 2 stitches in A.10 and in A.12. When the whole of diagrams A.10 to A.12 have been completed in height, there are 496 stitches on the needle – loosely bind off on the last row from the wrong side - read BINDING OFF TIP above. STRETCHING: Lay the shawl in lukewarm water until it is thoroughly wet. Carefully press the water out of the shawl – it must not be twisted, then roll the shawl in a towel and press again to remove more water – the shawl will now just be damp. If you are using another yarn from yarn group A - read SHAPING above. Lay the shawl on a floor rug or mattress – pull it carefully into shape and use pins to fasten it in place. Allow the shawl to dry. Repeat the process every time the shawl is washed. |
||||||||||||||||||||||||||||||||||||||||
Diagram explanations |
||||||||||||||||||||||||||||||||||||||||
|
||||||||||||||||||||||||||||||||||||||||
|
||||||||||||||||||||||||||||||||||||||||
|
||||||||||||||||||||||||||||||||||||||||
|
||||||||||||||||||||||||||||||||||||||||
|
||||||||||||||||||||||||||||||||||||||||
|
||||||||||||||||||||||||||||||||||||||||
|
Have you made this or any other of our designs? Tag your pictures in social media with #dropsdesign so we can see them! Do you need help with this pattern?You'll find tutorial videos, a Comments/Questions area and more by visiting the pattern on garnstudio.com. © 1982-2024 DROPS Design A/S. We reserve all rights. This document, including all its sub-sections, has copyrights. Read more about what you can do with our patterns at the bottom of each pattern on our site. |
||||||||||||||||||||||||||||||||||||||||


With over 40 years in knitting and crochet design, DROPS Design offers one of the most extensive collections of free patterns on the internet - translated to 17 languages. As of today we count 304 catalogs and 11422 patterns - 11417 of which are translated into English (US/in).
We work hard to bring you the best knitting and crochet have to offer, inspiration and advice as well as great quality yarns at incredible prices! Would you like to use our patterns for other than personal use? You can read what you are allowed to do in the Copyright text at the bottom of all our patterns. Happy crafting!
Comments / Questions (79)
Reichen da 100 g Lacegarn? Das Tuch ist ja ziemlich groß.
03.03.2019 - 12:57DROPS Design answered:
Liebe Sabine, 100 g DROPS Lace reichen - 1 Knäuel = 50 g / ca 400 m - siehe Farbkarte. Viel Spaß beim stricken!
05.03.2019 - 12:17Impossible d'imprimer les diagrammes corrigés. Pourquoi?
20.02.2019 - 23:18DROPS Design answered:
Bonjour Mme Bigras, si vous avez imprimé les diagrammes avant la date de la correction, imprimez de nouveau les explications pour avoir les bons diagrammes, sinon, vous pouvez simplement imprimer les explications et les diagrammes tels quels, ils sont justes maintenant; Bon tricot!
21.02.2019 - 10:52Årh for den da.... Havde jo lige glemt indtagningerne ! Så ja alt passer.
18.01.2019 - 01:55Når man skal i gang med AX står der, at der øges med skiftevis 4 og 8 ...... Jeg synes jo, der er 8 og 10 ekstra skiftevis i hver anden række. Altså 18 og ikke 12
17.01.2019 - 21:29DROPS Design answered:
Hei Jette. Så bra at du fant ut av det. God fornøyelse videre
21.01.2019 - 11:19Kan jeg bruge 1-tråds moskusgarn til denne opskrift? Og hvad vil garnforbruget da være. Jeg kender desværre ikke løbelængden på moskusgarn.
09.01.2019 - 18:21DROPS Design answered:
Hej Linda, Nej jeg tror altså du skal bruge DROPS Lace for at få det bedste resultat :)
05.04.2019 - 12:29Jag har fastnat nu när jag har stickat A1-A6 Jag har 51 maskor på stickan och första raden på A.x är 39maskor bred vad ska jag göra med resterande 12? och vad ska jag göra med resterande 12 maskor som ökas varje gång när jag har stickat diagrammet A.x?
07.12.2018 - 11:17DROPS Design answered:
Hei Lynn. Disse økte maskene strikkes i glattstrikk på hver side av A.3. Du begynner ikke på nytt igjen med A.X, men fortsetter å øke på samme måten som du har gjort i A.X. Altså du strikker annenhver pinne fra retten med øking, og annenhver pinne fra retten med øking og felling i endene av hvert diagram. Se for deg at diagrammet fortsetter på samme måte utover i en trekant, men for hver nye rapport i høyden er det 4 rettmasker fler enn på begynnelsen av forrige rapport. God fornøyelse
07.12.2018 - 12:05Katerina wrote:
Hi!! My mun asks if there is a video about diagram A1 or this spacific shawl maybe. Thank you.
30.10.2018 - 18:49DROPS Design answered:
Dear Katerina, you can find the turorial videos related to this pattern at the left side of teh page, just below the modell's picture. Happy Knitting!
25.11.2018 - 11:07Danke für das tolle Tuch und für die geduldigen Antworten auf meine Fragen. Ich orientiere mich jetzt am Diagramm A.3 , das für mich jetzt ein Fixpunkt im Muster ist. Die Maschen bei A.2 und A.4 stricke ich entsprechend der Anzahl wie sie dann auf meiner Nadel liegen. Die Anzahl der Maschen ist bei mir dieselbe wie im Diagramm auch wenn Sie anders verteilt ist. Darum bin ich zuversichtlich am Ende auch A.9 bis A.12 problemlos ansetzen zu können.
13.08.2018 - 17:25In A.3 werden in der 3. Reihe 2 Maschen zugenommen. Damit werden aus 5 Maschen 7 Maschen, die entsprechend nach A.2 und A.4 übertragen werden. In A.2 sind in dieser Reihe 2 Zunahmen und in A.4 0 Zunahmen. Damit müsste A.2 in der 4. Reihe 3 Maschen mehr haben und A.4 nur eine Masche mehr. Im Diagramm sind aber bei A.2 und A.4 je 2 Maschen mehr. Gleiche Zunahmen in A.2 und A.4 stimmen auch nicht mit dem Foto überein. A.2 ist da deutlich breiter als A.4.
13.08.2018 - 14:38DROPS Design answered:
Liebe Frau Roggensack, bei der letzte Reihe in A.2-A.4 haben Sie 10 M in A.2 und 11 M (= 10 + 1 mit Markierer) in A.4, im A.3 haben Sie immer nur 5 Maschen. Es werden abwechslungsweise 2 und 4 M zugenommen. Viel Spaß beim stricken!
13.08.2018 - 15:45Diagramme A.2 bis A.4: In der 3. Reihe sind 3 Zunahmen rechts der Mittelmasche von A.3 und 1 Zunahme links der Mittelmasche. In Reihe 4 sind nur 2 Zunahmen in A.2 eingetragen und 2 Zunahmen in A.4 . Damit würde sich die Mittelmasche in A.3 in jeder 4. Reihe 1 nach rechts über die Mittelmaschen der Vorreihen verschieben. Dasselbe auf der anderen Seite bei A.5 bis A.6 nur nach links. Frage: Ist dieser Versatz tatsächlich Absicht oder ein Fehler im Diagramm?
12.08.2018 - 12:10DROPS Design answered:
Liebe Frau Roggensack, Diagramme sind korrekt: die zugenommenen Maschen in A.3 werden glatt rechts gestrickt. A.3 muß Immer auf diesen Maschen gestrickt werden (= der Markierer muss immer in der Mitte in A.3 sein). Gleichzeitig nehmen sie in A.2/A.6 zu (1 M bei der 1. und 5. Reihe und 2 M bei der 2. und 7. Reihe) und in A.4/A.5 nehmen Sie 1 M oder (2 M re, 1 U). Viel Spaß beim stricken!
13.08.2018 - 10:01