DROPS Karisma
DROPS Karisma
100% Wool
from 2.50 € /50g
Get the yarn to make this pattern from 32.50€.

The yarn cost is calculated from the pattern’s smallest size and the yarn’s cheapest product type. Looking for an even better price? You might find it on the DROPS Deals!

DROPS SS24

Winter Berries

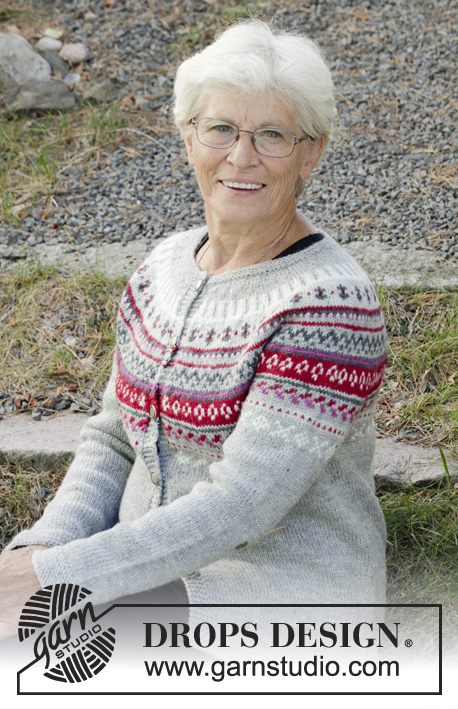
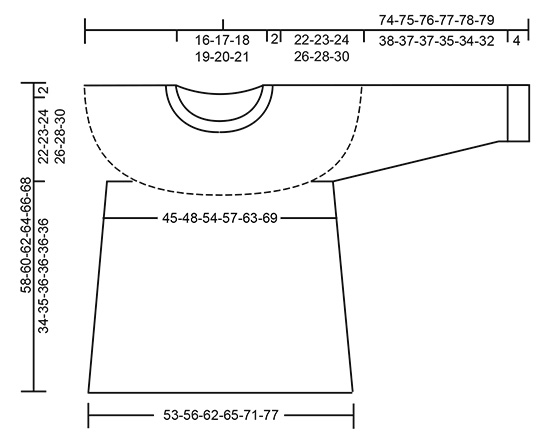
The set consists of: Knitted jumper with round yoke, multi-coloured Norwegian pattern and A-shape, worked top down. Sizes S - XXXL. Wrist warmers with multi-coloured Norwegian pattern. The set is worked in DROPS Karisma.

DROPS 181-16
DROPS Design: Pattern no u-823
Yarn group B
-----------------------------------------------------------
For the complete set, there will be enough yarn with approx.:
400-450-500-550-600-650 g colour 44, light grey
50-50-50-100-100-100 g colour 48, wine red
50-50-50-100-100-100 g colour 72, light pearl grey
50-50-50-50-50-100 g colour 16, dark grey
50-50-50-50-50-50 g colour 01, off white
50-50-50-50-50-50 g colour 13, cerise
-----------------------------------------------------------

JUMPER:
Sizes: S - M - L - XL - XXL - XXXL
Materials:
DROPS KARISMA from Garnstudio (belongs to yarn group B)
350-400-450-500-550-600 g colour 44 light grey
50 g in all sizes in the following colours:
colour 01, off white
colour 13, cerise
colour 16, dark grey
colour 48, wine red
colour 72, light pearl grey

The piece can also be knitted with yarn from:
"Alternative yarn (Yarn group B)" – see the link below.

DROPS DOUBLE POINTED NEEDLES AND CIRCULAR NEEDLE (40 + 80 cm) SIZE 4.5 MM – or the size needed to get 20 stitches and 26 rows stocking stitch on 10 cm in width and 10 cm in height.

DROPS CIRCULAR NEEDLE (80 cm) SIZE 4 MM – for garter stitch at bottom of body.

DROPS DOUBLE POINTED NEEDLES AND CIRCULAR NEEDLE (40 cm) SIZE 3.5 MM – for neckline and garter stitch at bottom of sleeves.
-----------------------------------------------------------

WRIST WARMERS:
Sizes: S/M - M/L
Circumference: approx. 18-20 cm. Length: approx. 23 cm in both sizes.
Materials:
DROPS KARISMA from Garnstudio (belongs to yarn group B)
50-100 g colour 44, light grey
50 g in both sizes of the following colours:
colour 01, off white
colour 13, cerise
colour 16, dark grey
colour 48, wine red
colour 72, light pearl grey

The piece can also be knitted with yarn from:
"Alternative yarn (Yarn group B)" – see the link below.

DROPS DOUBLE POINTED NEEDLES SIZE 3.5 MM – or the size needed to get 22 stitches and 30 rows stocking stitch on 10 cm in width and 10 cm in height.
DROPS DOUBLE POINTED NEEDLES SIZE 2.5 MM – for rib.
----------------------------------------------------------

-------------------------------------------------------

Alternative Yarn – See how to change yarns here
Yarn Groups A to F – Use the same pattern and change the yarn here
Yarn usage using an alternative yarn – Use our yarn converter here

-------------------------------------------------------

DROPS Karisma
DROPS Karisma
100% Wool
from 2.50 € /50g
Get the yarn to make this pattern from 32.50€.

The yarn cost is calculated from the pattern’s smallest size and the yarn’s cheapest product type. Looking for an even better price? You might find it on the DROPS Deals!

Pattern instructions

NOTE: This pattern is written in British English. All measurements in charts are in cm. For conversion from cm to inches - click here. There are different terms for crocheting in British and American English. If this pattern includes crochet, click for "crochet terms" here. For this pattern in American English, please click here.
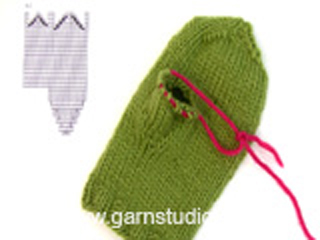
INFORMATION FOR THE PATTERN:

RIDGE/GARTER STITCH (worked in the round):
1 ridge = 2 rounds. Knit 1 round and purl 1 round.

ELEVATION:
Insert 1 marker at the beginning of the round = mid back. Start from the right side with light grey and knit until you have worked 11-12-13-14-15-16 stitches past the marker, turn, tighten the strand and purl 22-24-26-28-30-32 stitches. Turn, tighten the strand and knit 33-36-39-42-45-48 stitches, turn, tighten the strand and purl 44-48-52-56-60-64 stitches. Turn, tighten the strand and knit 55-60-65-70-75-80 stitches, turn, tighten the strand and purl 66-72-78-84-90-96 stitches. Turn, tighten the strand and knit to mid back.

INCREASE/DECREASE TIP:
To work out how to increase evenly, count the total number of stitches on the needle (e.g. 90 stitches) and divide by the number of increases/decreases to be made (e.g. 18) = 5.
In this example, increase after every 5th stitch by making 1 yarn over, on the next round knit the yarn overs twisted to prevent holes.
If you are decreasing, knit every 4th and 5th stitch together.

KNITTING TIP-1 (for multi-coloured pattern):
To prevent the knitting tension becoming tighter when working pattern, it is important that the strands do not tighten at the back of the piece. You can increase a needle size when working pattern if this is a problem.

PATTERN:
Jumper: See diagrams A.1 and A.2. Choose diagram for your size.
Wrist warmers: See diagram A.3.
The whole pattern is worked in stocking stitch.

INCREASE TIP-1 (for the sides in the body):
All increases are worked from the right side!
Start 2 stitches before the marker thread, make 1 yarn over, knit 4 stitches (the marker thread sits in the middle of these 4 stitches), make 1 yarn over (= 2 stitches increased). On the next row (wrong side) purl the yarn overs twisted to prevent holes.

DECREASE TIP (for mid under the sleeve):
Start 3 stitches before the marker thread, knit 2 together, knit 2 (the marker thread sits in the middle of these 2 stitches), slip 1 stitch as if to knit, knit 1, pass the slipped stitch over the knitted stitch (= 2 stitches decreased).


INCREASE TIP-2 (for the thumb gusset):
Work as far as the stitch with the marker thread, make 1 yarn over, knit 1, make 1 yarn over (= 2 stitches increased). On the next round, knit the yarn overs twisted to prevent holes.
The next time you increase, work as follows: Work until there are 2 stitches left before the stitch with the marker thread, make 1 yarn over, knit 3, make 1 yarn over (= 2 stitches increased). Continue the increases every 6th round, in this way, i.e. always increase on the outside of the increased stitches.
----------------------------------------------------------

JUMPER:
The piece is worked in the round with circular needle, top down. The sleeves are worked in the round with short circular needle, top down, change to double pointed needles when necessary.

NECKLINE:
Cast on 90-94-98-102-106-110 stitches with circular needle size 3.5 mm and light grey. Work 3 RIDGES – see description above. Knit 1 round where you increase 18-20-22-30-32-34 stitches evenly on round – read INCREASE/DECREASE TIP = 108-114-120-132-138-144 stitches on needle. Continue by working yoke as described below.

YOKE:
Read KNITTING TIP-1!
Change to circular needle size 4.5 mm and knit 1 round. For a better fit, you can now work an ELEVATION in the back of the neck – see description above. When the elevation has been completed, work A.1 in the round (= 36-38-40-44-46-48 repeats of 3 stitches). Continue the pattern in this way and, at the same time, increase on every round marked with an arrow in A.1 as described below – read INCREASE/DECREASE TIP and REMEMBER THE KNITTING TENSION!
On the round with arrow-1 increase 30-30-36-42-42-42 stitches evenly on round = 138-144-156-174-180-186 stitches.
On the round with arrow -2 increase 24-27-30-33-36-36 stitches evenly on round = 162-171-186-207-216-222 stitches.
On the round with arrow -3 increase 24-27-30-33-36-36 stitches evenly on round = 186-198-216-240-252-258 stitches.
On the round with arrow -4 increase 20-26-28-28-30-36 stitches evenly on round = 206-224-244-268-282-294 stitches.
On the round with arrow -5 increase 18-24-28-28-30-34 stitches evenly on round = 224-248-272-296-312-328 stitches.
On the round with arrow -6 increase 16-16-16-16-16-24 stitches evenly on round = 240-264-288-312-328-352 stitches.
On the round with arrow -7 increase 8-12-12-12-16-16 stitches evenly on round = 248-276-300-324-344-368 stitches.
On the round with arrow -8 increase 8-12-12-12-16-16 stitches evenly on round = 256-288-312-336-360-384 stitches.
On the round with arrow -9 increase 12-16-20-20-20-16 stitches evenly on round = 268-304-332-356-380-400 stitches.
After the last increase, the piece measures approx. 24-25-26-28-30-32 cm from the cast-on edge measured mid front.
When A.1 has been worked 1 time vertically continue as follows with light grey: knit 41-44-49-52-58-62 stitches (= ½ back piece), place the next 52-64-68-74-74-76 stitches on a thread for sleeve, cast on 8-8-10-10-10-14 new stitches on the needle (= in the side under the sleeve), knit 82-88-98-104-116-124 stitches (= front piece), place the next 52-64-68-74-74-76 stitches on a thread for sleeve, cast on 8-8-10-10-10-14 new stitches on the needle (= in the side under the sleeve) and knit the remaining 41-44-49-52-58-62 stitches (= ½ back piece). Cut the strand. Body and sleeves are now finished separately. THE PIECE IS NOW MEASURED FROM HERE!

BODY:
= 180-192-216-228-252-276 stitches. Insert 1 marker thread in the middle of the 8-8-10-10-10-14 stitches which were cast on under the sleeve in each side. Start the round by one of the marker threads and work A.2 in the round (= 15-16-18-19-21-23 repeats of 12 stitches). When A.2 has been completed continue working in stocking stitch with light grey.
When the piece measures 4 cm from the separation increase 2 stitches in each side – read INCREASE TIP-1 (= 4 stitches increased). Increase in this way every 4 cm a total of 8 times in each side = 212-224-248-260-284-308 stitches. Continue until the piece measures 32-33-34-34-34-34 cm from the separation. Change to circular needle size 4 mm and work 4 ridges. Cast off with knit, but to avoid the cast-off edge being tight, cast off with circular needle size 4.5 mm. The jumper measures approx. 58-60-62-64-66-68 cm from the shoulder down.

SLEEVE:
Place the 52-64-68-74-74-76 stitches from the thread on the one side of the piece on short circular needle size 4.5 mm and, in addition, knit up 1 stitch in each of the 8-8-10-10-10-14 stitches which were cast on under the sleeve, with light grey = 60-72-78-84-84-90 stitches on the needle. Insert 1 marker thread in the middle of the 8-8-10-10-10-14 stitches under the sleeve. Start the round here and knit 1 round. Then work A.2A in the round (= 5-6-6½-7-7-7½ repeats of 12 stitches). When A.2A has been completed, work stocking stitch with light grey. AT THE SAME TIME on the first round after A.2A decrease 2 stitches mid under the sleeve – read DECREASE TIP. Decrease in this way a total of 9-14-16-18-18-20 times; in S: Every 11th round, in M: Alternately every 6th and 7th round, in L: Alternately every 5th and 6th round, in XL and XXL: Alternately every 4th and 5th round and in XXXL: Alternately every 3rd and 4th round = 42-44-46-48-48-50 stitches. Continue working until the piece measures 38-37-37-35-34-32 cm from the separation. Change to double pointed needles size 3.5 mm and continue with GARTER STITCH in the round – see description above, for 4 cm. Cast off with knit, but to avoid the cast-off edge being tight, cast off with double pointed needles size 4.5 mm. The sleeve measures approx. 42-41-41-39-38-36 cm from the separation. Work the other sleeve in the same way.
----------------------------------------------------------

RIGHT WRIST WARMER:
The piece is worked in the round with double pointed needles.
Cast on 52-56 stitches with double pointed needles size 2.5 mm and light grey. Knit 1 round. Then work rib (= knit 2 /purl 2). When the rib measures 3 cm knit 1 round where you decrease 10-11 stitches evenly on round – read INCREASE/DECREASE TIP = 42-45 stitches. Change to double pointed needles size 3.5 mm and work A.3 in the round (= 14-15 repeats of 3 stitches). REMEMBER THE KNITTING TENSION! On the round marked with arrow-10 in the diagram, increase 0-3 stitches evenly on round = 42-48 stitches. Continue A.3. On the round marked with arrow-11 decrease 2-4 stitches evenly on round = 40-44 stitches. Continue A.3.
AT THE SAME TIME when the piece measures 11-12 cm increase 1 stitch on each side of the first stitch on the round – read INCREASE TIP-2. Increase in this way every 6th round a total of 4 times (i.e. you always increase on the outside of the increased stitches so that you get a gusset for the thumb) = 48-52 stitches. After the last increase the piece measures approx. 18-19 cm. Continue the pattern. AT THE SAME TIME on the first round after the last increase, place the 9 thumb-gusset stitches on a thread, in addition cast on 3 new stitches on the needle over the stitches on the thread = 42-46 stitches. Complete A.3. Change to double pointed needles size 2.5 mm and knit 1 round where you increase 2 stitches evenly on round = 44-48 stitches. Work rib (= knit 2 / purl 2) for 3 cm. Cast off with knit over knit and purl over purl, but to avoid the cast-off edge being tight you can cast off with double pointed needles size 3.5 mm. The whole wrist warmer measures approx. 23 cm in both sizes.

THUMB:
Place the 9 stitches from the thread on double pointed needles size 3.5 mm and knit up 7 new stitches at the back of the thumb with light grey (i.e. knit up 1 stitch in each of the 3 stitches which were cast on + 2 stitches on each side of these 3 stitches) = 16 stitches. Work 2 rounds stocking stitch (make sure the thumb is not worked too tightly). Then work rib (= knit 2 /purl 2) for 3-3½ cm. Cast off with knit over knit and purl over purl.

LEFT WRIST WARMER:
Work as for right wrist warmer, but reversed, i.e. the increases for the thumb gusset are on each side of the last stitch on the round, instead of on each side of the first stitch on the round.

This pattern has been corrected.

Updated online: 29.11.2018
Correction - YOKE: After the last increase, the piece measures approx. 24-25-26-28-30-32 cm from the cast-on edge measured mid front. When A.1 has been worked 1 time vertically continue as follows with light grey

Diagram

symbols = light grey
symbols = off white
symbols = light pearl grey
symbols = dark grey
symbols = wine red
symbols = cerise
symbols = increase—decrease round
symbols = start on this round in your size
diagram
diagram
diagram

Each of our patterns has specific tutorial videos to help you.

Do you have a question? See a list of frequently asked questions (FAQ)

Knitting tension is what determines the final measurements of your work, and is usually measured per 10 x 10 cm. It is provided like so: number of stitches in width x number of rows in height - eg: 19 stitches x 26 rows = 10 x 10 cm.

The knitting tension is very individual; some people knit/crochet loosely while others work tightly. You adjust the knitting tension with the needle size, which is why the suggested needle size is only meant as a guide! You need to adjust this (up or down) to ensure that YOUR knitting tension matches the knitting tension provided in the pattern. If you work with a different knitting tension than provided you will have a different yarn consumption, and your work will have different measurements than what the pattern suggests.

The knitting tension also determines which yarns can replace each other. As long as you achieve the same knitting tension you can replace one yarn with another.

See DROPS lesson: How to measure your tension/gauge

See DROPS video: How to make a gauge tension swatch

The required amount of yarn is provided in grams, eg: 450 g. To calculate how many balls you’ll need you first need to know how many grams are in 1 ball (25g, 50g or 100g). This information is available if you click on the individual yarn quality on our pages. Divide the amount required with the amount of each ball. For example, if each ball is 50g (the most common amount), the calculation will be as follows: 450 / 50 = 9 balls.

The important thing when changing from one yarn to another is that the knitting/crochet tension remains the same. This is so that the measurements of the finished piece will be the same as on the sketch provided. It is easier to achieve the same knitting tension using yarns from the same yarn group. It is also possible to work with multiple strands of a thinner yarn to achieve the knitting tension of a thicker one. Please try our yarn converter. We recommend you to always work a test swatch.

Please NOTE: when changing yarn the garment might have a different look and feel to the garment in the photo, due to individual properties and qualities of each yarn.

See DROPS lesson: Can I use a different yarn than the one mentioned in the pattern?

All our yarns are categorised into yarn groups (from A to F) according to thickness and knitting tension – group A contains the thinnest yarns and group F the thickest. This makes it easier for you to find alternative yarns to our patterns, should you wish to switch yarn. All yarns within the same group have a similar knitting tension and can easily replace each other. However, different yarn qualities have different structures and properties which will give the finished work a unique look and feel.

Click here for an overview of the yarns in each yarn group

At the top of all our patterns you’ll find a link to our yarn calculator, which is a helpful tool should you wish to use a different yarn than suggested. By filling in the yarn quality you wish to replace, the amount (in your size) and number of strands, the calculator will present good alternative yarns with the same knitting tension. Additionally it will tell you how much you’ll require in the new qualities and whether you’ll need to work with multiple strands. Most skeins are 50g (some are 25g or 100g).

If the pattern is worked with multiple colours, every colour will have to be calculated separately. Similarly, if the pattern is worked with several strands of different yarns (for example 1 strand Alpaca and 1 strand Kid-Silk) you will have to find alternatives for each, individually.

Click here to see our yarn calculator

Since different yarns have different qualities and textures we have chosen to keep the original yarn in our patterns. However, you can easily find options among our available qualities by using our yarn calculator, or simply pick a yarn from the same yarn group.

It is possible that some retailers still have discontinued yarns in stock, or that someone has a few skeins at home that they would like to find patterns for.

The yarn calculator will provide both alternative yarn as well as required amount in the new quality.

If you think it's hard to decide what size to make, it can be a good idea to measure a garment you own already and like the size of. Then you can pick the size by comparing those measures with the ones available in the pattern's size chart.

You'll find the size chart at the bottom of the pattern.

See DROPS lesson: How to read size chart

The needle size provided in the pattern serves only as a guide, the important thing is to follow the knitting tension. And since knitting tension is very individual, you will have to adjust the needle size to ensure that YOUR tension is the same as in the pattern – maybe you’ll have to adjust 1, or even 2 needle sizes, up or down to achieve the correct tension. For this, we recommend that you work test swatches.

Should you work with a different knitting tension than the one provided, the measurements of the finished garment might deviate from the measurement sketch.

See DROPS lesson: How to measure your tension/gauge

See DROPS video: How to make a tension/gauge swatch

Working a garment top-down provides more flexibility and room for personal adjustment. For example it is easier to try the garment on while working, as well as making adjustments to length of yoke and shoulder caps.

The instructions are carefully explaining every step, in the correct order. Diagrams are adjusted to the knitting direction and are worked as usual.

The diagram depicts all rows/rounds, and every stitch seen from the right side. It is read from bottom to top, from right to left. 1 square = 1 stitch.

When working back and forth, every other row is worked from the right side and every other row is worked from the wrong side. When working from the wrong side, the diagram will have to be worked reversed: from left to right, knit stitches are purled, purl stitches are knit etc.

When working in the round every round is worked from the right side and the diagram are worked from right to left on all rounds.

See DROPS lesson: How to read knitting diagrams

The diagram depicts all rows/rounds, and every stitch seen from the right side. It is worked from bottom to top, from right to left.

When working back and forth every other row is worked from the right side: from right to left and every other row is worked from the wrong side: from left to right.

When working in the round, every row in the diagram are worked from the right side, from right to left.

When working a circular diagram you start in the middle and work your way outwards, counter clockwise, row by row.

The rows usually start with a given number of chain stitches (equivalent to the height of the following stitch), this will either be depicted in the diagram or explained in the pattern.

See DROPS lesson: How to read crochet diagrams

Instructions for working several diagrams after each other on the same row/round, will often be written like so: “work A.1, A.2, A.3 a total of 0-0-2-3-4 times". This means you work A.1 once, then A.2 is worked once, and A.3 is repeated (in width) the number of times provided for your size – in this case like so: S = 0 times, M = 0 times, L=2 times, XL= 3 times and XXL = 4 times.

The diagrams are worked as usual: begin with the first row in A.1, then work the first row in A.2 etc.

See DROPS lesson: How to read knitting diagrams

See DROPS lesson: How to read crochet diagrams

The total width of the garment (from wrist-to-wrist) will be larger in the larger sizes, despite the actual sleeves being shorter. The larger sizes have longer sleeve caps and wider shoulders, so there will be a good fit in all sizes.

The measurement sketch/schematic drawing provides information regarding the full length of the garment. If it’s a jumper or a jacket the length is measured from the highest point on the shoulder closest to the neckline, and straight down to the bottom of the garment. It is NOT measured from the tip of shoulder. Similarly, the length of yoke is measured from the highest point on the shoulder and down to where yoke is split into body and sleeves.

On a jacket measures are never taken along bands, unless specifically stated. Always measure inside band stitches when measuring the length.

See DROPS lesson: How to read a schematic drawing

Diagrams are often repeated on the round or in height. 1 repeat is the diagram the way it appears in the pattern. If it says to work 5 repeats of A.1 in the round, then you work A.1 a total of 5 times after/next to each other in the round. If it says to work 2 repeats of A.1 vertically/in height you work the entire diagram once, then begin again at the start and work the entire diagram one more time.

Chain stitches are slightly narrower than other stitches and to avoid working the cast-on edge too tight, we simply chain more stitches to begin with. The stitch count will be adjusted on the following row to fit the pattern and measurement sketch.

The rib edge is more elastic and will contract slightly compared to, for example, stocking stitch. By increasing before the rib edge, you avoid a visible difference in width between the rib edge and the rest of the body.

It’s very easy to cast off too tightly, and by making yarn overs while casting off (and simultaneously casting these off) you avoid a too tight cast off edge.

See DROPS video: How to bind off with yarn overs (yo)

To achieve an even increase (or decrease) you can increase on, for example: every 3rd and 4th row alternately, like so: work 2 rows and increase on the 3rd row, work 3 rows and increase on the 4th. Repeat this until the increase is complete.

See DROPS lesson: Increase or decrease 1 st on every 3rd and 4th row alternately

Should you prefer to work in the round instead of back and forth, you may of course adjust the pattern. You’ll need to add steeks mid-front (usually 5 stitches), and follow the instructions. When you would normally turn and work from the wrong side, simply work across the steek and continue in the round. At the end you’ll cut the piece open, pick up stitches to work bands, and cover the cut edges.

See DROPS video: How to knit steeks and cut open

Should you prefer to work back and forth instead of in the round, you may of course adjust the pattern so you work the pieces separately and then assemble them at the end. Divide the stitches for the body in 2, add 1 edge stitch in each side (for sewing) and work the front and back pieces separately.

See DROPS lesson: Can I adapt a pattern for circular needles into straight needles?

Pattern repeats can vary slightly in the different sizes, in order to get the correct proportions. If you’re not working the exact same size as the garment in the photo, yours might deviate slightly. This has been carefully developed and adjusted so that the complete impression of the garment is the same in all sizes.

Make sure to follow instructions and diagrams for your size!

If you have found a pattern you like which is available in women’s size it’s not very difficult to convert it to men’s size. The biggest difference will be the length of sleeves and body. Start working on the women size that you think would fit across the chest. The additional length will be worked right before you cast off for the armhole/sleeve cap. If the pattern is worked top-down you can add the length right after the armhole or before the first decrease on sleeve.

Regarding additional yarn amount, this will depend on how much length you add, but it is better with a skein too many than too few.

All yarns will have excess fibres (from production) that might come off as lint or shedding. Brushed yarns (ie hairier yarns) have more of these loose, excess fibres, causing more shedding.

Shedding also depends on what is worn under or over the garment, and whether this pulls at the yarn fibres. It’s therefore not possible to guarantee that there will be no shedding

Below are some tips on how to get the best result when working with hairier yarns:

1. When the garment is finished (before you wash it) shake it vigorously so the looser hairs come off. NOTE: do NOT use a lint roller, brush or any method that pulls at the yarn.

2. Place the garment in a plastic bag and put it in your freezer - the temperature will cause the fibres to become less attached to each other, and excess fibres will come off easier.

3. Leave in the freezer for a few hours before taking it out and shaking it again.

4. Wash the garment according to the instructions on the yarn label.

Pilling is a natural process that happens to even the most exclusive of fibers. It's a natural sign of wear and tear that is hard to avoid, and that is most visible in high friction areas of your garment like a sweater's arms and cuffs.

You can make your garment look as new by removing the pilling, using a fabric comb or a pill/lint remover.

Still can't find the answer you need? Then scroll down and leave your question so one of our experts can try to help you. This will be done normally within 5 to 10 working days.
In the meantime, you can read the questions and answers that others have left to this pattern or join the DROPS Workshop on Facebook to get help from fellow knitters/crocheters!

You might also like...

Winter berries

Sandra, Spain

Winter berries

Robin, United States

Winter berries

Robin, United States

Post a comment to pattern DROPS 181-16

We would love to hear what you have to say about this pattern!

If you want to leave a question, please make sure you select the correct category in the form below, to speed up the answering process. Required fields are marked *.

Comments / Questions (21)

country flag M De Vries wrote:

Na het breien van patroon A.2A in de mouw moet ik gaan minderen. Er staat minder 2 steken. Moet ik dan 2 steken samen breien if 2x2 steken? Alvast bedankt.

08.10.2023 - 12:03

DROPS Design answered:

Dag M De Vries,

Je mindert verschillend aan elke kant van het midden, lees hiervoor 'TIP VOOR HET MINDEREN (voor midden onder de mouw)' bovenaan het patroon.

08.10.2023 - 16:57

country flag Marion wrote:

Is het de bedoeling dat het proeflapje op rondbreinaalden wordt gebreid? Of zijn gewone naalden ook goed? Alvast bedankt voor uw antwoord.

15.06.2023 - 21:23

DROPS Design answered:

Dag Marion,

Je kunt het beste het proeflapje breien op de naalden waar je het uiteindelijke werkstuk ook mee gaat breien. Het kan namelijk zijn dat je losser of juist strakker breit op de rondbreinaalden.

18.06.2023 - 11:57

country flag Gabi wrote:

Guten Tag Bei den Ärmeln habe ich 64 Maschen , muss ich dort 8 Maschen zusätzlich aufnehmen oder nur eine Masche. Herzlichen Dank

13.10.2022 - 08:23

DROPS Design answered:

Liebe Gabi, in M sollen Sie 1 Masche in je die 8 Maschen unter die Ärmel auffassen - diese Lektion zeigt beim Bild 18a, wie das bearbeitet wird. Viel Spaß beim stricken!

13.10.2022 - 09:35

country flag Tina Nyborg wrote:

Strikker pulsvarmerne - men kan ikke få mønster til at passe når jeg begynder at tage ud til tommelfingerkilen. Det synes jeg ikke der er taget højde for ?

19.12.2021 - 14:35

DROPS Design answered:

Hei Tina. For å hjelpe deg best mulig er det fint for oss å vite hvilken str. strikker du, hvor i diagrammet er du når du gjøre første økning? Er det hver gang du gjør en økning at du mener det ikke passer? mvh DROPS Design

21.12.2021 - 11:34

country flag Tuula Santala wrote:

Winter berries u-823. Yoke: after the elevation,: work 1A after 1 row of grey. In the picture though the are several rows before A1? Or has she worn it backside front?? Just wandering how to do?

01.08.2021 - 09:17

DROPS Design answered:

Dear Tuula, you should do the edge, and teh elevation befor the one knit row, and then start the pattern. Happy Stitching!

02.08.2021 - 01:08

country flag Alison Morris wrote:

The part of the pattern for the sleeves refers to chart A2.A. Is this different to chart A2? I can’t seem to find it. Thank you

07.06.2021 - 21:17

DROPS Design answered:

Dear Alison, A.2A refers to the cardigan version of this modell. Happy Knitting!

07.06.2021 - 23:37

country flag Sue Parsell wrote:

I’m struggling to understand how to read the diagram and would appreciate some help please! I’m knitting a Medium size so rows 1-3 knitted in light grey across the row (increasing on R3) then rows 4-12 do I knit 1 stitch in light grey then 2 sets in white and repeat across the row? Thank you

30.01.2021 - 14:56

DROPS Design answered:

Hi Sue, It is correct: in size M: rounds 1-3 are in light grey (do not forget to increase evenly 30 sts in round 3); rounds 4-12 work 1 st in light grey and 2 sts in off white and repeat it across the round. Happy knitting!

30.01.2021 - 17:59

country flag Lynn Flitney wrote:

What gauge is this pattern... needke sz and stitches

08.10.2020 - 18:56

DROPS Design answered:

Dear Mrs Flitney, you will find the gauge and needle size as well as yarn required under the header, jumper and wrist warmers do not use both same needle size/tension. Happy knitting!

09.10.2020 - 07:32

country flag Manja wrote:

Hallo, wie stricke ich den Übergang an der hinteren Mitte, damit man den Wechsel von der einen zur anderen Farbe nicht so sieht? VG Manja

03.11.2019 - 17:22

DROPS Design answered:

Liebe Manja, je nach den Reihen vom Muster können Sie diese Technick stricken. Viel Spaß beim stricken!

05.11.2019 - 07:51

country flag Deb wrote:

Hi im working on this sweather and im at the point where i need to cast on the 8 stitches under the sleeve, is there a video that shows this, Ive put the 64 stitches on the thread for the sleeve, but where do i take the 8 stiches from, this is a new technique for me, Thanks so much for your help

28.03.2019 - 03:28

DROPS Design answered:

Hi Deb, You cast on the 8 stitches from the last stitch on the body (before the stitches you have put on a thread for the sleeve) and then continue working the stitches on the other side of the sleeve. I hope this helps and happy knitting!

28.03.2019 - 07:07