DROPS Air
DROPS Air
65% Alpaca, 28% Polyamide, 7% Wool
from 4.80 £ /50g
DROPS Kid-Silk
DROPS Kid-Silk
75% Mohair, 25% Silk
from 4.60 £ /25g
Get the yarn to make this pattern from 51.80£.

The yarn cost is calculated from the pattern’s smallest size and the yarn’s cheapest product type. Looking for an even better price? You might find it on the DROPS Deals!

DROPS SS24

Winter Flirt

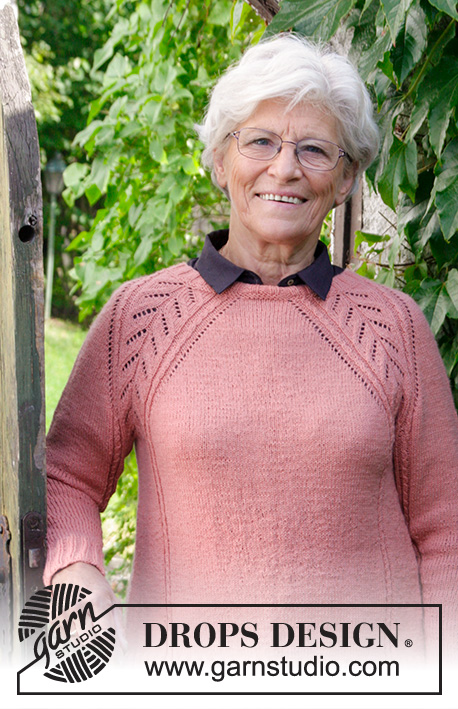
Knitted jumper with cables and lace pattern. Sizes S - XXXL. The jumper is worked in DROPS Air and DROPS Kid-Silk.

DROPS 179-26
DROPS Design: Pattern no ai-090
Yarn group C + A
-----------------------------------------------------------
Sizes: S - M - L - XL - XXL - XXXL
Materials:
DROPS AIR from Garnstudio (belongs to yarn group C)
300-350-350-400-450-450 g colour 03, pearl grey
and use:
DROPS KID-SILK (belongs to yarn group A)
125-125-150-150-175-175 g colour 01, off white

The piece can also be knitted with yarn from:
"Alternative yarn (Yarn group C)" – see the link below.
The piece can also be knitted with yarn from:
"Alternative yarn (Yarn group A)" – see the link below.

DROPS DOUBLE POINTED NEEDLES AND CIRCULAR NEEDLE (40 + 60 or 80 cm) SIZE 7 MM – or the size needed to get 14 stitches and 17 rows stocking stitch with 2 strands on 10 cm in width and 10 cm in height.
---------------------------------------------------------

-------------------------------------------------------

Alternative Yarn – See how to change yarns here
Yarn Groups A to F – Use the same pattern and change the yarn here
Yarn usage using an alternative yarn – Use our yarn converter here

-------------------------------------------------------

DROPS Air
DROPS Air
65% Alpaca, 28% Polyamide, 7% Wool
from 4.80 £ /50g
DROPS Kid-Silk
DROPS Kid-Silk
75% Mohair, 25% Silk
from 4.60 £ /25g
Get the yarn to make this pattern from 51.80£.

The yarn cost is calculated from the pattern’s smallest size and the yarn’s cheapest product type. Looking for an even better price? You might find it on the DROPS Deals!

Pattern instructions

NOTE: This pattern is written in British English. All measurements in charts are in cm. For conversion from cm to inches - click here. There are different terms for crocheting in British and American English. If this pattern includes crochet, click for "crochet terms" here. For this pattern in American English, please click here.
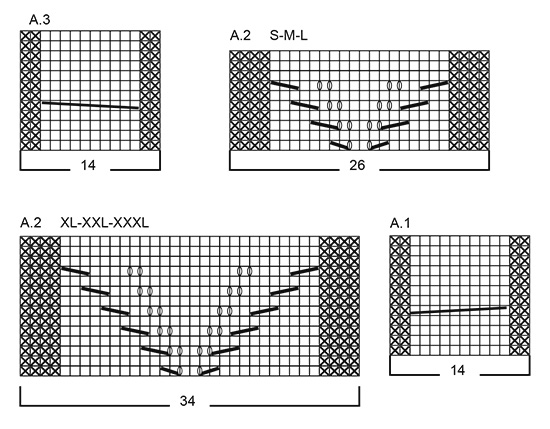
INFORMATION FOR THE PATTERN:

PATTERN: 
See diagrams A.1, A.2 and A.3. The diagrams show all the rows in the pattern seen from the right side. See diagram for your size when working according to A.2.

INCREASE TIP (for mid under the sleeve):
Start 1 stitch before the marker thread, make 1 yarn over, knit 2 (the marker thread sits in the middle of these 2 stitches), make 1 yarn over (= 2 stitches increased). On the next row, knit the yarn overs twisted to prevent holes.
----------------------------------------------------------

JUMPER:
The jumper is worked in the round with circular needle, up to the armholes, then the front and back pieces are worked back and forth with circular needle to finished length. The sleeves are worked in the round with double pointed needles/short circular needle.

BODY:
Cast on 152-160-176-184-208-216 stitches with circular needle size 7 mm and 1 strand Air and 1 strand Kid-Silk (= 2 strands). Knit 1 round. Then work rib in the round as follows:

SIZES S - XL - XXXL: Purl 1, * knit 2/ purl 2 *, repeat from *-* until there are 3 stitches left, finish with knit 2 and purl 1.
SIZES M - L - XXL: Knit 1, * purl 2/ knit 2 *, repeat from *-* until there are 3 stitches left, finish with purl 2 and knit 1.

When the rib measures 8 cm continue working as follows: * Knit 11-13-17-15-21-23 stitches, A.1 (= 14 stitches), A.2 (= 26-26-26-34-34-34 stitches), A.3 (= 14 stitches), knit 11-13-17-15-21-23 stitches *, work from *-* a total of 2 times. Continue this pattern upwards. REMEMBER THE KNITTING TENSION! When the piece measures 46-47-48-49-50-51 cm work as follows (adjust so that this is a row with pattern in A.2): Cast off the first 2 stitches, work the next 72-76-84-88-100-104 stitches as before, cast off the next 4 stitches, work the next 72-76-84-88-100-104 stitches as before and cast off the last 2 stitches. Continue working the front and back pieces separately to finished length.

BACK PIECE:
= 72-76-84-88-100-104 stitches. Start from the wrong side and continue pattern back and forth. When the piece measures 62-64-66-68-70-72 cm cast off the middle 26-26-26-30-30-30 stitches for the neck and each shoulder is finished separately. Decrease 1 stitch on the next row from the neck = 22-24-28-28-34-36 stitches left on the shoulder. Continue working until there is 1 row left before the piece measures 64-66-68-70-72-74 cm. Decrease 5 stitches over A.1/A.3 = 17-19-23-23-29-31 stitches on the shoulder. Cast off. Work the other shoulder in the same way.

FRONT PIECE:
= 72-76-84-88-100-104 stitches. Continue back and forth in the same way as for the back piece until the piece measures 56-58-60-62-64-66 cm (you can if necessary work stocking stitch over the middle 18-18-18-26-26-26 stitches in the last repeat of A.2 to prevent the neck-decreases disrupting the pattern. See photo). Now place the middle 20-20-20-24-24-24 stitches on 1 thread for the neck and each shoulder is finished separately. Continue by casting off for the neck at the beginning of each row from the neck as follows: 2 stitches 1 time and 1 stitch 2 times = 22-24-28-28-34-36 stitches left on the shoulder. Continue working until there is 1 row left before the piece measures 64-66-68-70-72-74 cm. Decrease 5 stitches over A.1/A.3 = 17-19-23-23-29-31 stitches on the shoulder. Cast off. Work the other shoulder in the same way.

SLEEVE:
The sleeve is worked in the round with double pointed needles, change to circular needle when you have increased enough stitches. Cast on 32-32-36-36-40-40 stitches with double pointed needles size 7 mm and 1 strand Air and 1 strand Kid-Silk (= 2 strands). Knit 1 round. Then work rib in the round as follows:
SIZES S - M - XXL - XXXL: Knit 1, * purl 2/ knit 2 *, repeat from *-* until there are 3 stitches left, finish with purl 2 and knit 1.
SIZES L - XL: Purl 1, * knit 2/ purl 2*, repeat from *-* until there are 3 stitches left, finish with knit 2 and purl 1.
Work rib until the piece measures 6 cm. Insert 1 marker thread at the beginning of the round (= mid under the sleeve). The next round is worked as follows: 9-9-11-11-13-13 stitches stocking stitch, A.1 (= 14 stitches), 9-9-11-11-13-13 stitches stocking stitch. Continue the pattern in this way. When the piece measures 8-7-8-8-8-7 cm increase 2 stitches mid under the sleeve – READ INCREASE TIP. Increase in this way every 3½-3½-3-2½-2½-2½ cm a total of 12-13-13-14-13-15 times = 56-58-62-64-66-70 stitches. Continue working until there is 1 row left before the piece measures 51-51-49-48-45-45 cm. Decrease 5 stitches over A.1 = 51-53-57-59-61-65 stitches. Cast off. Work one more sleeve in the same way, but now work A.3 instead of A.1.

ASSEMBLY:
Sew the shoulder seams Sew in the sleeves.

NECKLINE:
Knit up from the right side approx. 78-100 stitches around the neck (including the stitches on the thread at the front) with one strand of each quality (= 2 strands) and short circular needle size 7 mm. The number of stitches must be divisible by 4. Purl 1 round and knit 1 round, then work rib (= knit 2/ purl 2) for 14 cm. Then cast off LOOSELY with knit over knit and purl over purl.

Diagram

symbols = knit from the right side, purl from the wrong side
symbols = purl from the right side, knit from the wrong side
symbols = between 2 stitches make 1 yarn over
symbols = knit 2 stitches together
symbols = slip 1 stitch as if to knit, knit 1 stitch, pass the slipped stitch over the knitted stitch
symbols = knit 3 stitches together
symbols = slip 1 stitch as if to knit, knit 2 stitches together, pass the slipped stitch over the stitches knitted together
symbols = place 5 stitches on cable needle at the back of the piece, knit 5 stitches, knit 5 stitches from cable needle
symbols = place 5 stitches on cable needle at the front of the piece, knit 5 stitches, knit 5 stitches from cable needle
diagram
diagram

Each of our patterns has specific tutorial videos to help you.

Do you have a question? See a list of frequently asked questions (FAQ)

Knitting tension is what determines the final measurements of your work, and is usually measured per 10 x 10 cm. It is provided like so: number of stitches in width x number of rows in height - eg: 19 stitches x 26 rows = 10 x 10 cm.

The knitting tension is very individual; some people knit/crochet loosely while others work tightly. You adjust the knitting tension with the needle size, which is why the suggested needle size is only meant as a guide! You need to adjust this (up or down) to ensure that YOUR knitting tension matches the knitting tension provided in the pattern. If you work with a different knitting tension than provided you will have a different yarn consumption, and your work will have different measurements than what the pattern suggests.

The knitting tension also determines which yarns can replace each other. As long as you achieve the same knitting tension you can replace one yarn with another.

See DROPS lesson: How to measure your tension/gauge

See DROPS video: How to make a gauge tension swatch

The required amount of yarn is provided in grams, eg: 450 g. To calculate how many balls you’ll need you first need to know how many grams are in 1 ball (25g, 50g or 100g). This information is available if you click on the individual yarn quality on our pages. Divide the amount required with the amount of each ball. For example, if each ball is 50g (the most common amount), the calculation will be as follows: 450 / 50 = 9 balls.

The important thing when changing from one yarn to another is that the knitting/crochet tension remains the same. This is so that the measurements of the finished piece will be the same as on the sketch provided. It is easier to achieve the same knitting tension using yarns from the same yarn group. It is also possible to work with multiple strands of a thinner yarn to achieve the knitting tension of a thicker one. Please try our yarn converter. We recommend you to always work a test swatch.

Please NOTE: when changing yarn the garment might have a different look and feel to the garment in the photo, due to individual properties and qualities of each yarn.

See DROPS lesson: Can I use a different yarn than the one mentioned in the pattern?

All our yarns are categorised into yarn groups (from A to F) according to thickness and knitting tension – group A contains the thinnest yarns and group F the thickest. This makes it easier for you to find alternative yarns to our patterns, should you wish to switch yarn. All yarns within the same group have a similar knitting tension and can easily replace each other. However, different yarn qualities have different structures and properties which will give the finished work a unique look and feel.

Click here for an overview of the yarns in each yarn group

At the top of all our patterns you’ll find a link to our yarn calculator, which is a helpful tool should you wish to use a different yarn than suggested. By filling in the yarn quality you wish to replace, the amount (in your size) and number of strands, the calculator will present good alternative yarns with the same knitting tension. Additionally it will tell you how much you’ll require in the new qualities and whether you’ll need to work with multiple strands. Most skeins are 50g (some are 25g or 100g).

If the pattern is worked with multiple colours, every colour will have to be calculated separately. Similarly, if the pattern is worked with several strands of different yarns (for example 1 strand Alpaca and 1 strand Kid-Silk) you will have to find alternatives for each, individually.

Click here to see our yarn calculator

Since different yarns have different qualities and textures we have chosen to keep the original yarn in our patterns. However, you can easily find options among our available qualities by using our yarn calculator, or simply pick a yarn from the same yarn group.

It is possible that some retailers still have discontinued yarns in stock, or that someone has a few skeins at home that they would like to find patterns for.

The yarn calculator will provide both alternative yarn as well as required amount in the new quality.

If you think it's hard to decide what size to make, it can be a good idea to measure a garment you own already and like the size of. Then you can pick the size by comparing those measures with the ones available in the pattern's size chart.

You'll find the size chart at the bottom of the pattern.

See DROPS lesson: How to read size chart

The needle size provided in the pattern serves only as a guide, the important thing is to follow the knitting tension. And since knitting tension is very individual, you will have to adjust the needle size to ensure that YOUR tension is the same as in the pattern – maybe you’ll have to adjust 1, or even 2 needle sizes, up or down to achieve the correct tension. For this, we recommend that you work test swatches.

Should you work with a different knitting tension than the one provided, the measurements of the finished garment might deviate from the measurement sketch.

See DROPS lesson: How to measure your tension/gauge

See DROPS video: How to make a tension/gauge swatch

Working a garment top-down provides more flexibility and room for personal adjustment. For example it is easier to try the garment on while working, as well as making adjustments to length of yoke and shoulder caps.

The instructions are carefully explaining every step, in the correct order. Diagrams are adjusted to the knitting direction and are worked as usual.

The diagram depicts all rows/rounds, and every stitch seen from the right side. It is read from bottom to top, from right to left. 1 square = 1 stitch.

When working back and forth, every other row is worked from the right side and every other row is worked from the wrong side. When working from the wrong side, the diagram will have to be worked reversed: from left to right, knit stitches are purled, purl stitches are knit etc.

When working in the round every round is worked from the right side and the diagram are worked from right to left on all rounds.

See DROPS lesson: How to read knitting diagrams

The diagram depicts all rows/rounds, and every stitch seen from the right side. It is worked from bottom to top, from right to left.

When working back and forth every other row is worked from the right side: from right to left and every other row is worked from the wrong side: from left to right.

When working in the round, every row in the diagram are worked from the right side, from right to left.

When working a circular diagram you start in the middle and work your way outwards, counter clockwise, row by row.

The rows usually start with a given number of chain stitches (equivalent to the height of the following stitch), this will either be depicted in the diagram or explained in the pattern.

See DROPS lesson: How to read crochet diagrams

Instructions for working several diagrams after each other on the same row/round, will often be written like so: “work A.1, A.2, A.3 a total of 0-0-2-3-4 times". This means you work A.1 once, then A.2 is worked once, and A.3 is repeated (in width) the number of times provided for your size – in this case like so: S = 0 times, M = 0 times, L=2 times, XL= 3 times and XXL = 4 times.

The diagrams are worked as usual: begin with the first row in A.1, then work the first row in A.2 etc.

See DROPS lesson: How to read knitting diagrams

See DROPS lesson: How to read crochet diagrams

The total width of the garment (from wrist-to-wrist) will be larger in the larger sizes, despite the actual sleeves being shorter. The larger sizes have longer sleeve caps and wider shoulders, so there will be a good fit in all sizes.

The measurement sketch/schematic drawing provides information regarding the full length of the garment. If it’s a jumper or a jacket the length is measured from the highest point on the shoulder closest to the neckline, and straight down to the bottom of the garment. It is NOT measured from the tip of shoulder. Similarly, the length of yoke is measured from the highest point on the shoulder and down to where yoke is split into body and sleeves.

On a jacket measures are never taken along bands, unless specifically stated. Always measure inside band stitches when measuring the length.

See DROPS lesson: How to read a schematic drawing

Diagrams are often repeated on the round or in height. 1 repeat is the diagram the way it appears in the pattern. If it says to work 5 repeats of A.1 in the round, then you work A.1 a total of 5 times after/next to each other in the round. If it says to work 2 repeats of A.1 vertically/in height you work the entire diagram once, then begin again at the start and work the entire diagram one more time.

Chain stitches are slightly narrower than other stitches and to avoid working the cast-on edge too tight, we simply chain more stitches to begin with. The stitch count will be adjusted on the following row to fit the pattern and measurement sketch.

The rib edge is more elastic and will contract slightly compared to, for example, stocking stitch. By increasing before the rib edge, you avoid a visible difference in width between the rib edge and the rest of the body.

It’s very easy to cast off too tightly, and by making yarn overs while casting off (and simultaneously casting these off) you avoid a too tight cast off edge.

See DROPS video: How to bind off with yarn overs (yo)

To achieve an even increase (or decrease) you can increase on, for example: every 3rd and 4th row alternately, like so: work 2 rows and increase on the 3rd row, work 3 rows and increase on the 4th. Repeat this until the increase is complete.

See DROPS lesson: Increase or decrease 1 st on every 3rd and 4th row alternately

Should you prefer to work in the round instead of back and forth, you may of course adjust the pattern. You’ll need to add steeks mid-front (usually 5 stitches), and follow the instructions. When you would normally turn and work from the wrong side, simply work across the steek and continue in the round. At the end you’ll cut the piece open, pick up stitches to work bands, and cover the cut edges.

See DROPS video: How to knit steeks and cut open

Should you prefer to work back and forth instead of in the round, you may of course adjust the pattern so you work the pieces separately and then assemble them at the end. Divide the stitches for the body in 2, add 1 edge stitch in each side (for sewing) and work the front and back pieces separately.

See DROPS lesson: Can I adapt a pattern for circular needles into straight needles?

Pattern repeats can vary slightly in the different sizes, in order to get the correct proportions. If you’re not working the exact same size as the garment in the photo, yours might deviate slightly. This has been carefully developed and adjusted so that the complete impression of the garment is the same in all sizes.

Make sure to follow instructions and diagrams for your size!

If you have found a pattern you like which is available in women’s size it’s not very difficult to convert it to men’s size. The biggest difference will be the length of sleeves and body. Start working on the women size that you think would fit across the chest. The additional length will be worked right before you cast off for the armhole/sleeve cap. If the pattern is worked top-down you can add the length right after the armhole or before the first decrease on sleeve.

Regarding additional yarn amount, this will depend on how much length you add, but it is better with a skein too many than too few.

All yarns will have excess fibres (from production) that might come off as lint or shedding. Brushed yarns (ie hairier yarns) have more of these loose, excess fibres, causing more shedding.

Shedding also depends on what is worn under or over the garment, and whether this pulls at the yarn fibres. It’s therefore not possible to guarantee that there will be no shedding

Below are some tips on how to get the best result when working with hairier yarns:

1. When the garment is finished (before you wash it) shake it vigorously so the looser hairs come off. NOTE: do NOT use a lint roller, brush or any method that pulls at the yarn.

2. Place the garment in a plastic bag and put it in your freezer - the temperature will cause the fibres to become less attached to each other, and excess fibres will come off easier.

3. Leave in the freezer for a few hours before taking it out and shaking it again.

4. Wash the garment according to the instructions on the yarn label.

Pilling is a natural process that happens to even the most exclusive of fibers. It's a natural sign of wear and tear that is hard to avoid, and that is most visible in high friction areas of your garment like a sweater's arms and cuffs.

You can make your garment look as new by removing the pilling, using a fabric comb or a pill/lint remover.

Still can't find the answer you need? Then scroll down and leave your question so one of our experts can try to help you. This will be done normally within 5 to 10 working days.
In the meantime, you can read the questions and answers that others have left to this pattern or join the DROPS Workshop on Facebook to get help from fellow knitters/crocheters!

You might also like...

Winter Flirt

Souliina, Finland

Winter Flirt

Sif Andersen, Denmark

Winter Flirt

kjondal, Norway

Post a comment to pattern DROPS 179-26

We would love to hear what you have to say about this pattern!

If you want to leave a question, please make sure you select the correct category in the form below, to speed up the answering process. Required fields are marked *.

Comments / Questions (21)

country flag Kharmeana wrote:

Hoi, Ik neem aan dat de 17 st verkeerd geplaatst is bij L, denk dat dit 15 moet zijn. Bij...Als de boordsteek 8 cm meet brei dan verder als volgt: * 11-13-17-15-21-23 steken recht voor xl geldt en niet voor L klopt dit? de 17 staan nu voor de L. Groeten Mary

10.10.2017 - 12:58

country flag Marise wrote:

Quand l'ouvrage mesure 46 cm (petit), tricoter ainsi (ajuster pour que ce rang soit un rang impair dans A.2)... Le rang impair arrivera à un rang où il y aura des motifs dans A2 et je dois faire des diminutions et tricoter 72 m rendu à 46 cm, est-ce que je continue comme dans le motif avec les jetés et autres pour ces mailles ou serait-ce dans un rang pair en jersey? Je vous remercie à l'avance pour votre serviabilité et rapidité à répondre! Bonne et belle journée!

02.10.2017 - 14:54

DROPS Design answered:

Bonjour Marise, vous continuez les diagrammes comme avant (= rang suivant du diagramme avec le point ajouré/torsades) et sur ce rang, vous rabattez 4 m sur chacun des 2 côtés pour les emmanchures. Le rang suivant sera sur l'envers = vous tricotez les mailles sur l'envers comme indiqué dans les diagrammes (= rang pair). Bon tricot!

02.10.2017 - 15:10

country flag Mc wrote:

Merci pour la rapidité de votre réponse ! Comment savoir associer les couleurs dans 2 qualités différentes ?

25.09.2017 - 11:07

DROPS Design answered:

Bonjour Mc, pour le choix d'une qualité/couleur différente, demandez conseil à votre magasin DROPS, même par mail ou téléphone, on saura vous conseiller. Bon tricot!

25.09.2017 - 13:28

country flag Mc wrote:

Bonjour, merci de me préciser, avant que je ne fasse ma commande : ce modèle est tricoté avec 2 fils différents : Drops air et Drops kid silk ?

25.09.2017 - 10:24

DROPS Design answered:

Bonjour Mc, oui tout à fait, on tricote avec les 2 qualités Air et Kid-Silk en même temps (1 fil de chaque qualité). Bon tricot!

25.09.2017 - 10:55

country flag Victoria wrote:

If in the body of the pattern it said cast off the first 2 stitches then 4 stitches then 2 more stitches the math does not add up to 72. My math say 68. So please explain

31.08.2017 - 03:20

DROPS Design answered:

Dear Victoria, you had 152 sts and dec 8 sts (2+4+2) = 144 sts remain divided in 2 = 72 sts for front and back piece. Happy knitting!

31.08.2017 - 07:42

country flag Marianne Johansson wrote:

Snygg när den är nystickad men garnet blir fort "fult", så det är tråkigt 😟

04.08.2017 - 16:50

country flag Nadine Landry wrote:

Comme nom: nuage confort, comfort cloud. Il a vraiment l'air confortable j'ai hâte d'avoir le patron.

31.07.2017 - 23:30

country flag Helle Jacobsen wrote:

Min favorit

31.07.2017 - 16:59

country flag OLIVON wrote:

Super mélange de torsades et de jours. Je l'imagine dans un fil mohair. J'ai hâte d'avoir les explications pour me lancer dans cet ouvrage. Bravo

01.07.2017 - 16:36

country flag Marimar wrote:

J'adoore !

06.06.2017 - 13:59