DROPS Nepal
DROPS Nepal
65% Wool, 35% Alpaca
from 2.40 £ /50g
Get the yarn to make this pattern from 38.40£.

The yarn cost is calculated from the pattern’s smallest size and the yarn’s cheapest product type. Looking for an even better price? You might find it on the DROPS Deals!

DROPS SS24

On the Horizon

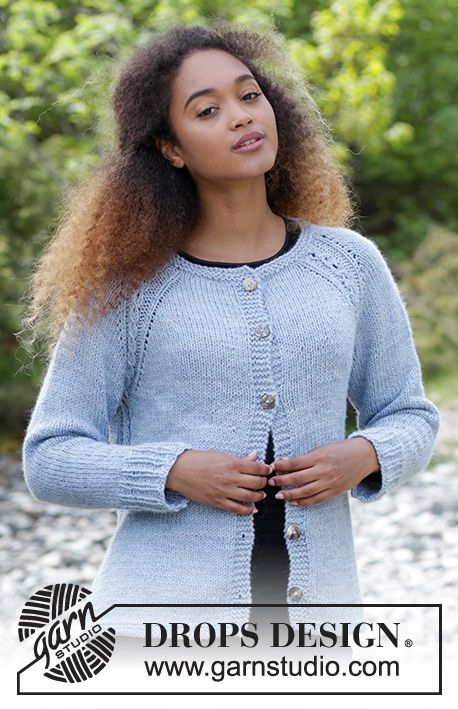
Knitted jumper with stripes. Size: S - XXXL Piece is knitted in DROPS Nepal.

DROPS 181-5
DROPS design: Pattern ne-260
Yarn group C or A + A
----------------------------------------------------------
Size: S - M - L - XL - XXL - XXXL
Materials:
DROPS NEPAL from Garnstudio (belongs to yarn group C)
550-600-650-700-750-850 g colour no 0501, grey
250-300-300-350-350-400 g colour no 8907, fog

Piece can also be knitted with yarn from:
“Alternative yarn (yarn group C)” - see link below.

DROPS DOUBLE POINTED NEEDLES AND CIRCULAR NEEDLE (80 cm) SIZE 5.5 mm – or size needed to get 16 stitches and 20 rows in stocking stitch = width 10 cm and 10 cm vertically.

DROPS DOUBLE POINTED NEEDLES AND CIRCULAR NEEDLE (40 and 80 cm) SIZE 4.5 mm for rib in moss stitch – or size needed to get 18 stitches and 23 rows in stocking stitch = width 10 cm and 10 cm vertically.
----------------------------------------------------------

-------------------------------------------------------

Alternative Yarn – See how to change yarns here
Yarn Groups A to F – Use the same pattern and change the yarn here
Yarn usage using an alternative yarn – Use our yarn converter here

-------------------------------------------------------

DROPS Nepal
DROPS Nepal
65% Wool, 35% Alpaca
from 2.40 £ /50g
Get the yarn to make this pattern from 38.40£.

The yarn cost is calculated from the pattern’s smallest size and the yarn’s cheapest product type. Looking for an even better price? You might find it on the DROPS Deals!

Pattern instructions

NOTE: This pattern is written in British English. All measurements in charts are in cm. For conversion from cm to inches - click here. There are different terms for crocheting in British and American English. If this pattern includes crochet, click for "crochet terms" here. For this pattern in American English, please click here.
INFORMATION FOR PATTERN:

GARTER STITCH (back and forth):
1 ridge = knit 2 rows.

MOSS STITCH:
ROUND/ROW 1: * Knit 1, purl 1 *, repeat from *-*.
ROUND/ROW 2: Knit over purl and purl over knit. Repeat 2nd round/row upwards.

STRIPES:
* Work 10 cm with fog, work 10 cm with grey *, repeat from *-* 1 more time, work 10 cm with fog, then work with grey until finished measurements.

INCREASE TIP (applies to mid under sleeve):
Work until 1 stitch remain before marker, make 1 yarn over, knit 2 (marker is between these 2 stitches), make 1 yarn over. On next round knit yarn overs twisted to avoid holes.
----------------------------------------------------------

JUMPER:
Work piece back and forth on circular needle. Work sleeves in the round on double pointed needles.

BACK PIECE:
Cast on 123-123-133-143-153-163 stitches on circular needle size 4.5 mm with grey. Purl 1 row. Work next row as follows from right side: 4 stitches in GARTER STITCH - see explanation above - * 5 stitches in stocking stitch, 5 stitches in MOSS STITCH - see explanation above *, repeat from *-* until 9 stitches remain, work 5 stitches in stocking stitch and 4 stitches in garter stitch. Continue like this until piece measures 9 cm and finish after a row from wrong side - REMEMBER KNITTING TENSION. Switch to circular needle size 5.5 mm and knit 1 row and decrease 11-5-9-11-13-15 stitches evenly (do not decrease over the 4 outermost stitches) = 112-118-124-132-140-148 stitches. Purl 1 row with 4 stitches in garter stitch in each side. Switch to fog and work STRIPES - see explanation above, and in stocking stitch with 4 stitches in garter stitch in each side. When piece measures 30 cm, insert 1 marker in each side (these marks vents). Cast on 1 edge stitch at the end of the next 2 rows = 114-120-126-134-142-150 stitches. Then work in stocking stitch with 1 edge stitch in garter stitch in each side. When piece measures 50-51-52-53-54-55 cm, insert 1 marker in each side (marks armholes). Continue to work until piece measures 66-68-70-72-74-76 cm. Now cast off for diagonal shoulder, AT THE SAME TIME cast off for neck when piece measures 68-70-72-74-76-78 cm, work as follows:
DIAGONAL SHOULDER:
Cast off on every other row on each side as follows: Cast off 8-9-9-10-10-11 stitches 4 times, cast off the remaining 10-9-11-11-14-14 stitches (= 42-45-47-51-54-58 stitches cast off in total for diagonal shoulder in each side).
NECK:
Cast off the middle 26-26-28-28-30-30 stitches for neck and finish each shoulder separately. Then cast off 1 stitch on next row from neck.

FRONT PIECE:
Work front piece the same way as back piece but begin neck decrease before beginning diagonal shoulder, work as follows:
Cast on and work as back piece. When piece measures 64-66-68-70-71-73 cm, cast off for neck, AT THE SAME TIME cast off for diagonal shoulder when piece measures 66-68-70-72-74-76 cm, work as follows:
NECK:
Cast off the middle 20-20-22-22-24-24 stitches for neck and finish each shoulder separately. Then cast off stitches from neck as follows: 2 stitches 1 time and 1 stitch 2 times.
DIAGONAL SHOULDER:
Cast off as on back piece.

SLEEVE:
Work sleeves in the round on double pointed needles.
Cast on 40-40-40-40-48-48 stitches on double pointed needles size 4.5 mm with grey. Knit 1 round. Work * 5-5-5-5-4-4 stiches in moss stitch, knit 5-5-5-5-4-4 *, repeat from *-* the entire round. Continue like this until piece measures 5 cm. Switch to double pointed needles size 5.5 mm and knit 1 round and decrease 6-4-4-2-8-6 stitches evenly = 34-36-36-38-40-42 stitches. Insert 1 marker at beginning of round (= mid under sleeve). Then work in stocking stitch. When piece measures 8-8-6-8-5-6 cm, increase 2 stitches mid under sleeve - READ INCREASE TIP. Increase like this every 3½-3½-3-2½-2½-2 cm 9-9-11-11-12-13 times in total = 52-54-58-60-64-68 stitches. When piece measures 40-39-38-37-35-34 cm (NOTE: Shorter measurements in the larger sizes because of wider shoulder), cast off - to avoid a tight cast-off edge, cast off with ½ needle size larger. Work another sleeve the same way.

ASSEMBLY:
Sew the shoulder seams. Sew side seams from markers at armholes and down to vent - sew inside 1 edge stitch in garter stitch. Sew in sleeves.

NECK EDGE:
Pick up approx. 70-80 stitches around the neck on a short circular needle size 4.5 mm with grey. Knit 1 round while adjusting number of stitches to 70-70-70-80-80-80. Work * knit 5, 5 stitches in moss stitch *, repeat from *-* the entire round. Continue like this until neck edge measures 6 cm. Cast off stitches with knit over knit and purl over purl.

Diagram

diagram measurements

Each of our patterns has specific tutorial videos to help you.

Do you have a question? See a list of frequently asked questions (FAQ)

Knitting tension is what determines the final measurements of your work, and is usually measured per 10 x 10 cm. It is provided like so: number of stitches in width x number of rows in height - eg: 19 stitches x 26 rows = 10 x 10 cm.

The knitting tension is very individual; some people knit/crochet loosely while others work tightly. You adjust the knitting tension with the needle size, which is why the suggested needle size is only meant as a guide! You need to adjust this (up or down) to ensure that YOUR knitting tension matches the knitting tension provided in the pattern. If you work with a different knitting tension than provided you will have a different yarn consumption, and your work will have different measurements than what the pattern suggests.

The knitting tension also determines which yarns can replace each other. As long as you achieve the same knitting tension you can replace one yarn with another.

See DROPS lesson: How to measure your tension/gauge

See DROPS video: How to make a gauge tension swatch

The required amount of yarn is provided in grams, eg: 450 g. To calculate how many balls you’ll need you first need to know how many grams are in 1 ball (25g, 50g or 100g). This information is available if you click on the individual yarn quality on our pages. Divide the amount required with the amount of each ball. For example, if each ball is 50g (the most common amount), the calculation will be as follows: 450 / 50 = 9 balls.

The important thing when changing from one yarn to another is that the knitting/crochet tension remains the same. This is so that the measurements of the finished piece will be the same as on the sketch provided. It is easier to achieve the same knitting tension using yarns from the same yarn group. It is also possible to work with multiple strands of a thinner yarn to achieve the knitting tension of a thicker one. Please try our yarn converter. We recommend you to always work a test swatch.

Please NOTE: when changing yarn the garment might have a different look and feel to the garment in the photo, due to individual properties and qualities of each yarn.

See DROPS lesson: Can I use a different yarn than the one mentioned in the pattern?

All our yarns are categorised into yarn groups (from A to F) according to thickness and knitting tension – group A contains the thinnest yarns and group F the thickest. This makes it easier for you to find alternative yarns to our patterns, should you wish to switch yarn. All yarns within the same group have a similar knitting tension and can easily replace each other. However, different yarn qualities have different structures and properties which will give the finished work a unique look and feel.

Click here for an overview of the yarns in each yarn group

At the top of all our patterns you’ll find a link to our yarn calculator, which is a helpful tool should you wish to use a different yarn than suggested. By filling in the yarn quality you wish to replace, the amount (in your size) and number of strands, the calculator will present good alternative yarns with the same knitting tension. Additionally it will tell you how much you’ll require in the new qualities and whether you’ll need to work with multiple strands. Most skeins are 50g (some are 25g or 100g).

If the pattern is worked with multiple colours, every colour will have to be calculated separately. Similarly, if the pattern is worked with several strands of different yarns (for example 1 strand Alpaca and 1 strand Kid-Silk) you will have to find alternatives for each, individually.

Click here to see our yarn calculator

Since different yarns have different qualities and textures we have chosen to keep the original yarn in our patterns. However, you can easily find options among our available qualities by using our yarn calculator, or simply pick a yarn from the same yarn group.

It is possible that some retailers still have discontinued yarns in stock, or that someone has a few skeins at home that they would like to find patterns for.

The yarn calculator will provide both alternative yarn as well as required amount in the new quality.

If you think it's hard to decide what size to make, it can be a good idea to measure a garment you own already and like the size of. Then you can pick the size by comparing those measures with the ones available in the pattern's size chart.

You'll find the size chart at the bottom of the pattern.

See DROPS lesson: How to read size chart

The needle size provided in the pattern serves only as a guide, the important thing is to follow the knitting tension. And since knitting tension is very individual, you will have to adjust the needle size to ensure that YOUR tension is the same as in the pattern – maybe you’ll have to adjust 1, or even 2 needle sizes, up or down to achieve the correct tension. For this, we recommend that you work test swatches.

Should you work with a different knitting tension than the one provided, the measurements of the finished garment might deviate from the measurement sketch.

See DROPS lesson: How to measure your tension/gauge

See DROPS video: How to make a tension/gauge swatch

Working a garment top-down provides more flexibility and room for personal adjustment. For example it is easier to try the garment on while working, as well as making adjustments to length of yoke and shoulder caps.

The instructions are carefully explaining every step, in the correct order. Diagrams are adjusted to the knitting direction and are worked as usual.

The diagram depicts all rows/rounds, and every stitch seen from the right side. It is read from bottom to top, from right to left. 1 square = 1 stitch.

When working back and forth, every other row is worked from the right side and every other row is worked from the wrong side. When working from the wrong side, the diagram will have to be worked reversed: from left to right, knit stitches are purled, purl stitches are knit etc.

When working in the round every round is worked from the right side and the diagram are worked from right to left on all rounds.

See DROPS lesson: How to read knitting diagrams

The diagram depicts all rows/rounds, and every stitch seen from the right side. It is worked from bottom to top, from right to left.

When working back and forth every other row is worked from the right side: from right to left and every other row is worked from the wrong side: from left to right.

When working in the round, every row in the diagram are worked from the right side, from right to left.

When working a circular diagram you start in the middle and work your way outwards, counter clockwise, row by row.

The rows usually start with a given number of chain stitches (equivalent to the height of the following stitch), this will either be depicted in the diagram or explained in the pattern.

See DROPS lesson: How to read crochet diagrams

Instructions for working several diagrams after each other on the same row/round, will often be written like so: “work A.1, A.2, A.3 a total of 0-0-2-3-4 times". This means you work A.1 once, then A.2 is worked once, and A.3 is repeated (in width) the number of times provided for your size – in this case like so: S = 0 times, M = 0 times, L=2 times, XL= 3 times and XXL = 4 times.

The diagrams are worked as usual: begin with the first row in A.1, then work the first row in A.2 etc.

See DROPS lesson: How to read knitting diagrams

See DROPS lesson: How to read crochet diagrams

The total width of the garment (from wrist-to-wrist) will be larger in the larger sizes, despite the actual sleeves being shorter. The larger sizes have longer sleeve caps and wider shoulders, so there will be a good fit in all sizes.

The measurement sketch/schematic drawing provides information regarding the full length of the garment. If it’s a jumper or a jacket the length is measured from the highest point on the shoulder closest to the neckline, and straight down to the bottom of the garment. It is NOT measured from the tip of shoulder. Similarly, the length of yoke is measured from the highest point on the shoulder and down to where yoke is split into body and sleeves.

On a jacket measures are never taken along bands, unless specifically stated. Always measure inside band stitches when measuring the length.

See DROPS lesson: How to read a schematic drawing

Diagrams are often repeated on the round or in height. 1 repeat is the diagram the way it appears in the pattern. If it says to work 5 repeats of A.1 in the round, then you work A.1 a total of 5 times after/next to each other in the round. If it says to work 2 repeats of A.1 vertically/in height you work the entire diagram once, then begin again at the start and work the entire diagram one more time.

Chain stitches are slightly narrower than other stitches and to avoid working the cast-on edge too tight, we simply chain more stitches to begin with. The stitch count will be adjusted on the following row to fit the pattern and measurement sketch.

The rib edge is more elastic and will contract slightly compared to, for example, stocking stitch. By increasing before the rib edge, you avoid a visible difference in width between the rib edge and the rest of the body.

It’s very easy to cast off too tightly, and by making yarn overs while casting off (and simultaneously casting these off) you avoid a too tight cast off edge.

See DROPS video: How to bind off with yarn overs (yo)

To achieve an even increase (or decrease) you can increase on, for example: every 3rd and 4th row alternately, like so: work 2 rows and increase on the 3rd row, work 3 rows and increase on the 4th. Repeat this until the increase is complete.

See DROPS lesson: Increase or decrease 1 st on every 3rd and 4th row alternately

Should you prefer to work in the round instead of back and forth, you may of course adjust the pattern. You’ll need to add steeks mid-front (usually 5 stitches), and follow the instructions. When you would normally turn and work from the wrong side, simply work across the steek and continue in the round. At the end you’ll cut the piece open, pick up stitches to work bands, and cover the cut edges.

See DROPS video: How to knit steeks and cut open

Should you prefer to work back and forth instead of in the round, you may of course adjust the pattern so you work the pieces separately and then assemble them at the end. Divide the stitches for the body in 2, add 1 edge stitch in each side (for sewing) and work the front and back pieces separately.

See DROPS lesson: Can I adapt a pattern for circular needles into straight needles?

Pattern repeats can vary slightly in the different sizes, in order to get the correct proportions. If you’re not working the exact same size as the garment in the photo, yours might deviate slightly. This has been carefully developed and adjusted so that the complete impression of the garment is the same in all sizes.

Make sure to follow instructions and diagrams for your size!

If you have found a pattern you like which is available in women’s size it’s not very difficult to convert it to men’s size. The biggest difference will be the length of sleeves and body. Start working on the women size that you think would fit across the chest. The additional length will be worked right before you cast off for the armhole/sleeve cap. If the pattern is worked top-down you can add the length right after the armhole or before the first decrease on sleeve.

Regarding additional yarn amount, this will depend on how much length you add, but it is better with a skein too many than too few.

All yarns will have excess fibres (from production) that might come off as lint or shedding. Brushed yarns (ie hairier yarns) have more of these loose, excess fibres, causing more shedding.

Shedding also depends on what is worn under or over the garment, and whether this pulls at the yarn fibres. It’s therefore not possible to guarantee that there will be no shedding

Below are some tips on how to get the best result when working with hairier yarns:

1. When the garment is finished (before you wash it) shake it vigorously so the looser hairs come off. NOTE: do NOT use a lint roller, brush or any method that pulls at the yarn.

2. Place the garment in a plastic bag and put it in your freezer - the temperature will cause the fibres to become less attached to each other, and excess fibres will come off easier.

3. Leave in the freezer for a few hours before taking it out and shaking it again.

4. Wash the garment according to the instructions on the yarn label.

Pilling is a natural process that happens to even the most exclusive of fibers. It's a natural sign of wear and tear that is hard to avoid, and that is most visible in high friction areas of your garment like a sweater's arms and cuffs.

You can make your garment look as new by removing the pilling, using a fabric comb or a pill/lint remover.

Still can't find the answer you need? Then scroll down and leave your question so one of our experts can try to help you. This will be done normally within 5 to 10 working days.
In the meantime, you can read the questions and answers that others have left to this pattern or join the DROPS Workshop on Facebook to get help from fellow knitters/crocheters!

You might also like...

Post a comment to pattern DROPS 181-5

We would love to hear what you have to say about this pattern!

If you want to leave a question, please make sure you select the correct category in the form below, to speed up the answering process. Required fields are marked *.

Comments / Questions (17)

country flag Ali wrote:

I want to knit this jumper (largest size) using 2 strands of Kid silk. Will that be possible? And if so how do I calculate the number of balls I will need? I am planning to do it in one colour , not stripes.

28.11.2023 - 15:45

DROPS Design answered:

Dear Ali, sure, use the yarn converter to get the new amount of yarn using 2 strands Kid-Silk instead of 1 strand Nepal. Juste note that the texture will be different as yarn are different. Happy knitting!

28.11.2023 - 16:33

country flag Giovanna wrote:

Nello schema alla fine della descrizione del collo c’è scritto: “ Poi intrecciare 1 maglia sul ferro successivo dal collo. ” Mi potete spiegare cosa vuol dire?

03.12.2022 - 09:46

DROPS Design answered:

Buonasera Giovanna, deve intrecciare 1 maglia dal lato del collo. Buon lavoro!

03.12.2022 - 16:16

country flag Eilen wrote:

Har i intet måleskema om hvilken størrelse er best; bruger normalt xl, men strikker lidt løst?

23.02.2021 - 00:29

DROPS Design answered:

Hej Eilen, Jo nederst i opskriften finder du en måleskitse som viser målene i alle størrelser :)

23.02.2021 - 09:05

country flag Fiona wrote:

Can you explain the shoulder decreases? I’m afraid I can’t make sense of them!

25.03.2020 - 16:03

DROPS Design answered:

Dear Fiona, you will cast off at the beginning of the RS and WS rows starting from Shoulder side (= from armhole towards neck) 8 to 11 sts a total of 4 times (= 32 to 44 sts cast off on each side + the remaining 8 to 14 sts). Do not forget to shape neck at the same time, so that each shoulder will then be worked separately but as before, casting off at the beg of row from shoulder/armhole towards neck the 8 to 11 first stitches. Hope this will help, happy knitting!

25.03.2020 - 17:21

country flag Jacqueline wrote:

Guten Tag So gerne möchte ich dieses Pullover stricken. Ich trage Kleidergrösse 32. Ist dann die Weite nicht doch etwas zu viel, auch wenn ich gerne obersized trage? - Und welche leichte Ersatzqualtiät mit Baumwolle und/oder Viskose können Sie mir empfehlen? Danke für Ihre Antwort im voraus recht herzlich. MfG Jacqueline

14.07.2019 - 09:42

DROPS Design answered:

Liebe Jacqueline, leider können wir nicht jeder unserer Anleitungen nach jeder individuellen Anfrage anpassen, nehmen Sie bitte Kontakt mit Ihrem DROPS Laden auf - auch telefonisch oder per Mail, dort hilft man Ihnen gerne weiter. Viel Spaß beim stricken!

15.07.2019 - 10:12

country flag Camilla wrote:

Hvor mange pakker garn skal man bruge? Og passer den fra str. S-xxxl?

08.02.2019 - 20:05

country flag Lena Gørges wrote:

Hej - jeg vil helst helt undgå slidserne, så hvordan gør jeg så? Altså så den er lukket hele vejen ned i siderne. Mvh Lena

05.01.2019 - 04:41

DROPS Design answered:

Hei Lena. Om du ikke ønsker splitten i sidene kan du legge til 1 kantmaske i rille i hver side fra starten av - i steden for å legge de til når arbeidet måler 30 cm. Etter vrangborden kan de 4 maskene med rillestrikk i hver side strikkes glattstrikk slik som resten av arbeidet. Det opp til deg om du vil beholde disse 4 rillemaskene i hver side når du strikker vrangborden, eller om du ønsker å justere dette slik at alle maskene strikkes i glattstrikk og perlestrikk. Hvordan du løser dette blir opp til deg. God fornøyelse

07.01.2019 - 08:44

country flag Mw. Steffens wrote:

Kleinste maat, diagonale schouder achterpand: 114 - (2 x 42) = 30. Dan de middelste 26 st. afkanten en nogmaals 1 x 1. Ik houd daarna toch echt 2 st. over. Hetzelfde geldt voor het voorpand, dus ik vermoed dat ik een denkfout maak. Kunt u mij verder helpen?

27.02.2018 - 14:03

DROPS Design answered:

Hallo Mw. Steffens, Inderdaad je hebt gelijk, er blijven 2 steken over. Waarschijnlijk zijn de kantsteken niet meegerekend. Ik zal het doorgeven aan designafdeling. In dit geval zou je de overgebleven 11 steken af kunnen kanten, zodat je verder kunt.

07.03.2018 - 20:30

country flag Maartje De Boer wrote:

Ik heb een vraag over het achterpand, na 30 cm moet ik 1 kantsteek opzetten aan het einde van de volgende 2 naalden, en hiermee 2 steken meerderen. Nou snap ik hoe ik van een bestaande steek een kantsteek moet maken, maar hoe maak ik er een kantsteek bij zodat ik meteen een steek meerder? Bij voorbaat dank!

05.01.2018 - 15:43

DROPS Design answered:

Hoi Maartje, Je meerdert niet aan het eind van de naald, maar je zet extra steken op. Dit kun je eenvoudig doen door a.h.w. lussen op te zetten aan het eind van de naald. In deze video is dat uitgelegd

12.01.2018 - 19:05

country flag Federica wrote:

Non capisco l'intreccio per le spalle e il collo, è possibile una spiegazione più dettagliata per principianti? Grazie

08.11.2017 - 11:58

DROPS Design answered:

Buongiorno Federica. P.es per la taglia S, intreccia all’inizio del ferro sul diritto del lavoro le prime 8 maglie per la spalla, poi intreccia le 26 m centrali per lo scollo e lavora fino alla fine del ferro. Lavora ora le spalle separatamente. Gira, e sul rovescio del lavoro, intreccia le prime 8 m, lavora le altre m della spalla, gira e sul diritto del lavoro intreccia 1 m per lo scollo e prosegue sulle maglie della spalla. Su questa spalla intreccia poi all’inizio del ferro sul rovescio del lavoro 8 m altre 3 volte e poi intreccia le 10 m rimaste. Analogamente per l’altra spalla, intrecciando le 8 m all’inizio del ferro sul diritto del lavoro. Buon lavoro!

08.11.2017 - 12:46