DROPS Lima
DROPS Lima
65% Wool, 35% Alpaca
from 3.30 $ /50g
Get the yarn to make this pattern from 49.50$.

The yarn cost is calculated from the pattern’s smallest size and the yarn’s cheapest product type. Looking for an even better price? You might find it on the DROPS Deals!

DROPS SS24

Lofoten

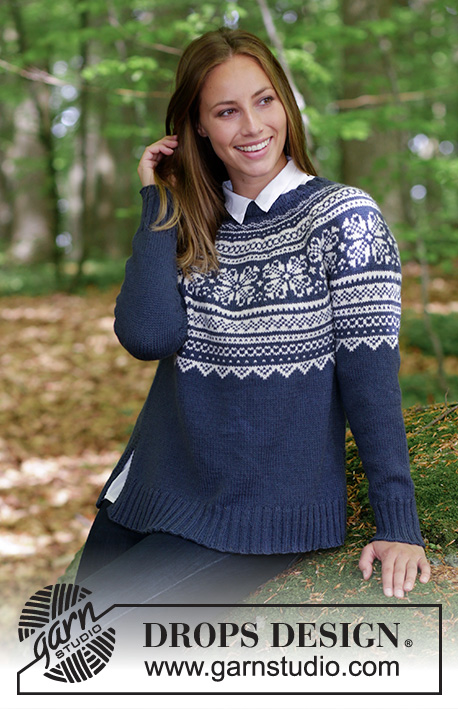
Knitted jumper with round yoke, multi-colored Norwegian pattern and A-shape, worked top down. Sizes S - XXXL. The piece is worked in DROPS Lima.

DROPS 181-9
DROPS Design: Pattern no li-087
Yarn group B
-----------------------------------------------------------
Sizes: S - M - L - XL - XXL - XXXL
Materials:
DROPS LIMA from Garnstudio (belongs to yarn group B)
600-700-750-800-900-1000 g color 4305, dark blue
150-150-150-200-200-200 g color 0100, off white

The piece can also be knitted with yarn from:
"Alternative yarn (Yarn group B)" – see the link below.

DROPS DOUBLE POINTED NEEDLES AND CIRCULAR NEEDLE (40 + 80 cm / 16" + 32") SIZE 4 mm/US 6 – or the size needed to get 21 stitches and 28 rows stockinette stitch on 10 cm / 4" in width and 10 cm / 4" in height.

DROPS DOUBLE POINTED NEEDLES AND CIRCULAR NEEDLE (40 + 80 cm / 16" + 32") SIZE 3 mm/US 2.5 for rib – or the size needed to get 23 stitches and 32 rows stockinette stitch on 10 cm / 4" in width and 10 cm / 4" in height.

-------------------------------------
You can replace the DROPS Lima colors used in this pattern with many other color combinations. Check the pattern pictures for inspiration and the Comments section to find out the exact color numbers in the samples.
-------------------------------------

-------------------------------------------------------

Alternative Yarn – See how to change yarns here
Yarn Groups A to F – Use the same pattern and change the yarn here
Yarn usage using an alternative yarn – Use our yarn converter here

-------------------------------------------------------

DROPS Lima
DROPS Lima
65% Wool, 35% Alpaca
from 3.30 $ /50g
Get the yarn to make this pattern from 49.50$.

The yarn cost is calculated from the pattern’s smallest size and the yarn’s cheapest product type. Looking for an even better price? You might find it on the DROPS Deals!

Pattern instructions

NOTE: This pattern is written in American English. All measurements in charts are in cm. For conversion from inches to cm - click here. There are different terms for crocheting in American and British English. If this pattern includes crochet, click for "crochet terms" here. For this pattern in British English, please click here.
INFORMATION FOR THE PATTERN:

RIDGE/GARTER STITCH (worked back and forth):
1 ridge = Knit 2 rows.

DECREASE/INCREASE TIP:
To work out how to decrease/increase evenly, count the total number of stitches on the needle (e.g. 104 stitches) and divide by the number of decreases/increases to be made (e.g. 12) = 8.6.
In this example, knit together alternately every 7th and 8th stitch and every 8th and 9th stitch when decreasing.
If you are increasing make 1 yarn over after alternately every 8th and 9th stitch; on the next round, knit the yarn overs twisted to prevent holes.

ELEVATION:
Insert 1 marker in the middle stitch on the needle (= mid back). Start from the right side with dark blue and knit until you have worked 11-11-12-13-13-14 stitches past the marker, turn, tighten the strand and purl 22-22-24-26-26-28 stitches. Turn, tighten the strand and knit 33-33-36-39-39-42 stitches, turn, tighten the strand and purl 44-44-48-52-52-56 stitches. Turn, tighten the strand and knit 55-55-60-65-65-70 stitches, turn, tighten the strand and purl 66-66-72-78-78-84 stitches. Turn, tighten the strand and knit to mid back.

KNITTING TIP-1:
To prevent the knitting gauge becoming tighter when working pattern, it is important that the strands do not tighten at the back of the piece. You can increase a needle size when working pattern if this is a problem.

PATTERN:
See diagrams A.1 to A.6. Choose diagram for your size. The whole of the pattern is worked in stockinette stitch.

INCREASE TIP (for the sides of body):
Start 2 stitches before the marker thread, make 1 yarn over, knit 4 (the marker thread sits in the middle of these 4 stitches), make 1 yarn over (= 2 stitches increased). On the next round, knit the yarn overs twisted to prevent holes.

DECREASE TIP (for mid under sleeve):
Start 2 stitches before the marker thread, knit 2 together, marker thread, slip 1 stitch as if to knit, knit 1, pass the slipped stitch over the knitted stitch (= 2 stitches decreased).
----------------------------------------------------------

JUMPER:
The piece is worked in the round with circular needle, top down. It is divided for the split at the bottom of the body, front and back pieces are finished separately. The sleeves are worked in the round with short circular needle, top down. Change to double pointed needles when necessary.

NECKLINE:
Cast on 104-108-116-124-128-136 stitches with circular needle size 3 mm / US 2.5 and dark blue. Knit 1 round. Then work rib (= knit 2 / purl 2). When the rib measures 2-2-2-3-3-3 cm / ¾"-¾"-¾"-1⅛"-1⅛"-1⅛" knit 1 round where you decrease 12-12-16-16-16-16 stitches evenly on round – read DECREASE/INCREASE TIP = 92-96-100-108-112-120 stitches.
Continue by working yoke as described below.

YOKE:
Change to circular needle size 4 mm / US 6. Knit 1 round. For a better fit, you can now work an ELEVATION in the back of the neck – see description above.
When the elevation has been completed, work A.1 in the round (= 23-24-25-27-28-30 repeats of 4 stitches). Continue the pattern and increase as shown in the diagram. Read KNITTING TIP-1 and REMEMBER THE GAUGE!
When A.1 has been completed, there are 161-168-175-189-196-210 stitches on the needle.
Continue by working A.2 – AT THE SAME TIME on the first round, increase 31-36-47-51-56-60 stitches evenly on round (marked with arrow-1 in A.2) = 192-204-222-240-252-270 stitches on the needle. Continue the pattern. On the round marked with arrow-2 in A.2 increase 28-36-38-40-48-50 stitches evenly on round = 220-240-260-280-300-320 stitches.
When A.2 has been completed, work A.3 in the round (= 11-12-13-14-15-16 repeats of 20 stitches). Continue the pattern and increase as shown in the diagram. After the last increase in A.3 there are 275-300-325-350-375-400 stitches on the needle. On the round marked with arrow-3 in A.3 increase 1-8-11-10-9-8 stitches evenly on the round = 276-308-336-360-384-408 stitches.
When A.3 has been completed, work A.4 in the round (choose diagram for your size = 69-77-84-90-96-102 repeats of 4 stitches). On the round marked with arrow-4 in A.4 increase 10-8-14-8-12-16 stitches evenly on round = 286-316-350-368-396-424 stitches.
When A.4 has been completed, the piece measures approx. 25-25-26-27-29-31 cm / 9¾"-9¾"-10¼"-10½"-11½"-12¼" from the cast on edge mid front.
The next round is worked as follows with dark blue: Knit 43-47-51-55-60-65 stitches (= ½ back piece), place the next 58-64-74-74-78-82 stitches on a thread for sleeve, cast on 8-8-10-10-12-14 stitches (= in the side under the sleeve), knit 85-94-101-110-120-130 stitches (= front piece), place the next 58-64-74-74-78-82 stitches on a thread for sleeve, cast on 8-8-10-10-12-14 new stitches on the needle (= in the side under the sleeve) and knit the remaining 42-47-50-55-60-65 stitches (= ½ back piece). Cut the strand.
Body and sleeves are finished separately. THE PIECE IS NOW MEASURED FROM HERE!

BODY:
= 186-204-222-240-264-288 stitches. Insert 1 marker thread in the middle of the 8-8-10-10-12-14 stitches which were cast on under the sleeve in each side and start the round by one of the marker threads.
SIZES S, M, L, XL and XXL:
Work A.5 in the round (= 31-34-37-40-44-48 repeats of 6 stitches). On the round marked with arrow-5 in A.5 increase 6-4-2-0-0 stitches evenly on round (for S, M and L, make sure you have the same number of stitches on the front and back pieces) = 192-208-224-240-264 stitches on the needle (96-104-112-120-132 stitches on front and back pieces).
When A.5 has been completed, work A.6 in the round (= 24-26-28-30-33 repeats of 8 stitches). Continue the pattern until A.6 has been completed. Continue working as described below in ALL SIZES.
SIZE XXXL = 288 stitches. Work A.6 in the round (= 36 repeats of 8 stitches – NOTE: in this size, you do not work A.5 because the repeat has been worked in A.4). Continue until A.6 has been completed.

ALL SIZES:
= 192-208-224-240-264-288 stitches on the needle and the piece measures approx. 8-8-6-6-4-3 cm / 3"-3"-2¼"-2¼"-1½"-1" from the separation by the armholes. Continue by working stockinette stitch with dark blue.
AT THE SAME TIME on the first round after A.6 increase 1 stitch on each side of both marker threads – read INCREASE TIP (= 4 stitches increased). Increase in this way every 8-6-8-6-6-6 cm / 3"-2¼"-3"-2¼"-2¼"-2¼" a total of 2-3-3-3-4-4 times in each side = 200-220-236-252-280-304 stitches. When the piece measures 20-22-23-24-24-24 cm / 8"-8¾"-9"-9½"-9½"-9½" from the separation, work 6 stitches in GARTER STITCH – see description above, in each side (3 stitches in garter stitch on each side of both marker threads – the remaining stitches are continued in stockinette stitch). When you have worked 3 ridges in height, divide the piece by the marker threads for the split and the front and back pieces are continued separately.

FRONT PIECE:
= 100-110-118-126-140-152 stitches. Continue with stockinette stitch with 3 stitches garter stitch in each side. When the piece measures 51-53-55-57-59-61 cm / 20"-21"-21⅝"-22½"-23¼"-24" from the shoulder (approx. 5 cm / 2" from the separation for split) knit 1 row from the right side where you increase 24-26-30-30-32-36 stitches evenly on row (do not increase over the 3 stitches in garter stitch in each side) = 124-136-148-156-172-188 stitches. Purl 1 row from the wrong side with knit 3 edge stitches in each side (the yarn overs are purled twisted to prevent holes). Change to circular needle size 3 mm / US 2.5 and work the next row from the right side as follows: 3 edge stitches in garter stitch, * knit 2, purl 2 *, repeat from *-* until there are 5 stitches left on the needle, knit 2 and finish with 3 stitches in garter stitch. Continue rib in this way, but after 2 cm / ¾" increase all purl 2 (seen from the right side) to purl 3 by making 1 yarn over in the transition from knit 2 to purl 2 = 153-168-183-193-213-233 stitches. On the next row work the yarn overs twisted to prevent holes.
Continue working until the rib measures 8 cm / 3⅛". Change to circular needle size 4 mm / US 6 and bind off with garter stitch over garter stitch, knit over knit and purl over purl. The whole jumper measures approx. 60-62-64-66-68-70 cm / 23⅝"-24⅜"-25¼"-26"-26¾"-27½" from the shoulder down.

BACK PIECE:
= 100-110-118-126-140-152 stitches. Work in the same way as described under FRONT PIECE.

SLEEVE:
Place the 58-64-74-74-78-82 stitches from the thread in the one side of the piece on short circular needle size 4 mm / US 6 and, in addition, knit up 1 stitch in each of the 8-8-10-10-12-14 stitches cast on under the sleeve = 66-72-84-84-90-96 stitches. Insert 1 marker thread in the middle of these 8-8-10-10-12-14 stitches and start the round by the marker thread (= mid under the sleeve).
READ THE REST OF SLEEVE BEFORE CONTINUING!
SIZES S, M, L, XL and XXL:
Work A.5A in the round (= 11-12-14-14-15 repeats of 6 stitches). When A.5A has been completed, work A.6A in the round, but be aware that A.6A does not fit mid under sleeve in all sizes. When starting A.6A you have decreased 1-1-2-2-0 stitches mid under the sleeve as described below in ALL SIZES = 64-70-80-80-90 stitches on the needle. In other words, in S, L and XL start A.6A with the first stitch in the diagram and you work 8-10-10 repeats of 8 stitches. In size M, start A.6A with the 2nd stitch in the diagram and in XXL start A.6A with the 8th stitch in the diagram.
SIZE XXXL: Work A.6A in the round (= 12 repeats of 8 stitches – NOTE: in this size, you do not work A.5A because this repeat has been worked in A.4A).

ALL SIZES:
When A.5A and A.6A have been completed, work stockinette stitch onwards with dark blue. AT THE SAME TIME when the piece measures 2-2-2-2-3-3 cm / ¾"-¾"-¾"-¾"-1"-1" from the separation under the sleeve, decrease 2 stitches mid under the sleeve – read DECREASE TIP. Decrease in this way every 2½-2-1½-1½-1-1 cm / ⅞"-¾"-½"-½"-⅜"-⅜" a total of 11-13-18-18-19-21 times = 44-46-48-48-52-54 stitches.
Continue working until the sleeve measures 32-32-32-32-31-29 cm / 12½"-12½"-12½"-12½"-12¼"-11½" from the separation (shorter measurements in the larger sizes because of longer yoke). Knit 1 round where you increase 12-10-12-12-12-14 stitches evenly on round = 56-56-60-60-64-68 stitches. Change to double pointed needles size 3 mm / US 2.5 and work rib (= knit 2 / purl 2) for 8 cm / 3⅛". Bind off with knit over knit and purl over purl, but to avoid the bind-off edge being tight, make 1 yarn over after every 8th stitch at the same time as you bind off (the yarn overs are bind off as normal stitches). The sleeve measures approx. 40-40-40-40-39-37 cm / 15¾"-15¾"-15¾"-15¾"-15¼"-14½" from the separation. Work the other sleeve in the same way.

This pattern has been corrected.

Updated online: 09.10.2017
FRONT PIECE: = 100-110-118-126-140-152 stitches. Continue with stockinette with 3 stitches garter stitch in each side. When the piece measures 51-53-55-57-59-61 cm from the shoulder (approx. 5 cm/2 inches from the separation for split)...

Diagram

All measurements in charts are in cm.

symbols = dark blue
symbols = off white
symbols = between 2 stitches make 1 yarn over with the background colour in the pattern stripe, on the next row work the yarn overs twisted to prevent holes
symbols = increase row
diagram
diagram
diagram

Each of our patterns has specific tutorial videos to help you.

Do you have a question? See a list of frequently asked questions (FAQ)

Knitting tension is what determines the final measurements of your work, and is usually measured per 10 x 10 cm. It is provided like so: number of stitches in width x number of rows in height - eg: 19 stitches x 26 rows = 10 x 10 cm.

The knitting tension is very individual; some people knit/crochet loosely while others work tightly. You adjust the knitting tension with the needle size, which is why the suggested needle size only serve as a guide! You need to adjust this (up or down) to ensure that YOUR knitting tension matches the knitting tension provided in the pattern. If you work with a different knitting tension than provided you will have a different yarn consumption, and your work will have different measurements than what the pattern suggests.

The knitting tension also determines which yarns can replace each other. As long as you achieve the same knitting tension you can replace one yarn with another.

See DROPS lesson: How to measure your tension/gauge

See DROPS video: How to make a gauge tension swatch

The required amount of yarn is provided in grams, eg: 450 g. To calculate how many balls you’ll need you first need to know how many grams are in 1 ball (25g, 50g or 100g). This information is available if you click on the individual yarn quality on our pages. Divide the amount required with the amount of each ball. For example, if each ball is 50g (the most common amount), the calculation will be as follows: 450 / 50 = 9 balls.

The important thing when changing from one yarn to another is that the knitting/crochet tension remains the same. This is so that the measurements of the finished piece will be the same as on the sketch provided. It is easier to achieve the same knitting tension using yarns from the same yarn group. It is also possible to work with multiple strands of a thinner yarn to achieve the knitting tension of a thicker one. Please try our yarn converter. We recommend you to always work a test swatch.

Please NOTE: when changing yarn the garment might have a different look and feel to the garment in the photo, due to individual properties and qualities of each yarn.

See DROPS lesson: Can I use a different yarn than the one mentioned in the pattern?

All our yarns are categorised into yarn groups (from A to F) according to thickness and knitting tension – group A contains the thinnest yarns and group F the thickest. This makes it easier for you to find alternative yarns to our patterns, should you wish to switch yarn. All yarns within the same group have a similar knitting tension and can easily replace each other. However, different yarn qualities have different structures and properties which will give the finished work a unique look and feel.

Click here for an overview of the yarns in each yarn group

At the top of all our patterns you’ll find a link to our yarn converter, which is a helpful tool should you wish to use a different yarn than suggested. By filling in the yarn quality you wish to replace, the amount (in your size) and number of strands, the converter will present good alternative yarns with the same knitting tension. Additionally it will tell you how much you’ll require in the new qualities and whether you’ll need to work with multiple strands. Most skeins are 50g (some are 25g or 100g).

If the pattern is worked with multiple colours, every colour will have to be converted separately. Similarly, if the pattern is worked with several strands of different yarns (for example 1 strand Alpaca and 1 strand Kid-Silk) you will have to find alternatives for each, individually.

Click here to see our yarn converter

Since different yarns have different qualities and textures we have chosen to keep the original yarn in our patterns. However, you can easily find options among our available qualities by using our yarn converter, or simply pick a yarn from the same yarn group.

It is possible that some retailers still have discontinued yarns in stock, or that someone has a few skeins at home that they would like to find patterns for.

The yarn converter will provide both alternative yarn as well as required amount in the new quality.

If you think it's hard to decide what size to make, it can be a good idea to measure a garment you own already and like the size of. Then you can pick the size by comparing those measures with the ones available in the pattern's size chart.

You'll find the size chart at the bottom of the pattern.

See DROPS lesson: How to read size chart

The needle size provided in the pattern serves only as a guide, the important thing is to follow the knitting tension. And since knitting tension is very individual, you will have to adjust the needle size to ensure that YOUR tension is the same as in the pattern – maybe you’ll have to adjust 1, or even 2 needle sizes, up or down to achieve the correct tension. For this, we recommend that you work test swatches.

Should you work with a different knitting tension than the one provided, the measurements of the finished garment might deviate from the measurement sketch.

See DROPS lesson: How to measure your tension/gauge

See DROPS video: How to make a gauge tension swatch

Working a garment top-down provides more flexibility and room for personal adjustment. For example it is easier to try the garment on while working, as well as making adjustments to length of yoke and shoulder caps.

The instructions are carefully explaining every step, in the correct order. Diagrams are adjusted to the knitting direction and are worked as usual.

The diagram depicts all rows/rounds, and every stitch seen from the right side. It is read from bottom to top, from right to left. 1 square = 1 stitch.

When working back and forth, every other row is worked from the right side and every other row is worked from the wrong side. When working from the wrong side, the diagram will have to be worked reversed: from left to right, knit stitches are purled, purl stitches are knit etc.

When working in the round every round is worked from the right side and the diagram are worked from right to left on all rounds.

See DROPS lesson: How to read knitting diagrams

The diagram depicts all rows/rounds, and every stitch seen from the right side. It is worked from bottom to top, from right to left.

When working back and forth every other row is worked from the right side: from right to left and every other row is worked from the wrong side: from left to right.

When working in the round, every row in the diagram are worked from the right side, from right to left.

When working a circular diagram you start in the middle and work your way outwards, counter clockwise, row by row.

The rows usually start with a given number of chain stitches (equivalent to the height of the following stitch), this will either be depicted in the diagram or explained in the pattern.

See DROPS lesson: How to read crochet diagrams

Instructions for working several diagrams after each other on the same row/round, will often be written like so: “work A.1, A.2, A.3 a total of 0-0-2-3-4 times". This means you work A.1 once, then A.2 is worked once, and A.3 is repeated (in width) the number of times provided for your size – in this case like so: S = 0 times, M = 0 times, L=2 times, XL= 3 times and XXL = 4 times.

The diagrams are worked as usual: begin with the first row in A.1, then work the first row in A.2 etc.

See DROPS lesson: How to read knitting diagrams

See DROPS lesson: How to read crochet diagrams

The total width of the garment (from wrist-to-wrist) will be larger in the larger sizes, despite the actual sleeves being shorter. The larger sizes have longer sleeve caps and wider shoulders, so there will be a good fit in all sizes.

The measurement sketch/schematic drawing provides information regarding the full length of the garment. If it’s a jumper or a jacket the length is measured from the highest point on the shoulder (usually closest to the neckline), and straight down to the bottom of the garment. It is NOT measured from the tip of shoulder. Similarly, the length of yoke is measured from the highest point on the shoulder and down to where yoke is split into body and sleeves.

See DROPS lesson: How to read a schematic drawing

Diagrams are often repeated on the round or in height. 1 repeat is the diagram the way it appears in the pattern. If it says to work 5 repeats of A.1 in the round, then you work A.1 a total of 5 times after/next to each other in the round. If it says to work 2 repeats of A.1 vertically/in height you work the entire diagram once, then begin again at the start and work the entire diagram one more time.

Chain stitches are slightly narrower than other stitches and to avoid working the cast-on edge too tight, we simply chain more stitches to begin with. The stitch count will be adjusted on the following row to fit the pattern and measurement sketch.

The rib edge is more elastic and will contract slightly compared to, for example, stocking stitch. By increasing before the rib edge, you avoid a visible difference in width between the rib edge and the rest of the body.

It’s very easy to cast off too tightly, and by making yarn overs while casting off (and simultaneously casting these off) you avoid a too tight cast off edge.

See DROPS video: How to bind off with yarn overs (yo)

To achieve an even increase (or decrease) you can increase on, for example: every 3rd and 4th row alternately, like so: work 2 rows and increase on the 3rd row, work 3 rows and increase on the 4th. Repeat this until the increase is complete.

See DROPS lesson: Increase or decrease 1 st on every 3rd and 4th row alternately

Should you prefer to work in the round instead of back and forth, you may of course adjust the pattern. You’ll need to add steeks mid-front (usually 5 stitches), and follow the instructions. When you would normally turn and work from the wrong side, simply work across the steek and continue in the round. At the end you’ll cut the piece open, pick up stitches to work bands, and cover the cut edges.

See DROPS video: How to knit steeks and cut open

Should you prefer to work back and forth instead of in the round, you may of course adjust the pattern so you work the pieces separately and then assemble them at the end. Divide the stitches for the body in 2, add 1 edge stitch in each side (for sewing) and work the front and back pieces separately.

See DROPS lesson: Can I adapt a pattern for circular needles into straight needles?

Pattern repeats can vary slightly in the different sizes, in order to get the correct proportions. If you’re not working the exact same size as the garment in the photo, yours might deviate slightly. This has been carefully developed and adjusted so that the complete impression of the garment is the same in all sizes.

Make sure to follow instructions and diagrams for your size!

If you have found a pattern you like which is available in women’s size it’s not very difficult to convert it to men’s size. The biggest difference will be the length of sleeves and body. Start working on the women size that you think would fit across the chest. The additional length will be worked right before you cast off for the armhole/sleeve cap. If the pattern is worked top-down you can add the length right after the armhole or before the first decrease on sleeve.

Regarding additional yarn amount, this will depend on how much length you add, but it is better with a skein too many than too few.

All yarns will have excess fibres (from production) that might come off as lint or shedding. Brushed yarns (ie hairier yarns) have more of these loose, excess fibres, causing more shedding.

Shedding also depends on what is worn under or over the garment, and whether this pulls at the yarn fibres. It’s therefore not possible to guarantee that there will be no shedding

Below are some tips on how to get the best result when working with hairier yarns:

1. When the garment is finished (before you wash it) shake it vigorously so the looser hairs come off. NOTE: do NOT use a lint roller, brush or any method that pulls at the yarn.

2. Place the garment in a plastic bag and put it in your freezer - the temperature will cause the fibres to become less attached to each other, and excess fibres will come off easier.

3. Leave in the freezer for a few hours before taking it out and shaking it again.

4. Wash the garment according to the instructions on the yarn label.

Pilling is a natural process that happens to even the most exclusive of fibers. It's a natural sign of wear and tear that is hard to avoid, and that is most visible in high friction areas of your garment like a sweater's arms and cuffs.

You can make your garment look as new by removing the pilling, using a fabric comb or a pill/lint remover.

Still can't find the answer you need? Then scroll down and leave your question so one of our experts can try to help you. This will be done normally within 5 to 10 working days.
In the meantime, you can read the questions and answers that others have left to this pattern or join the DROPS Workshop on Facebook to get help from fellow knitters/crocheters!

You might also like...

Lofoten

Merike Rahkema, Estonia

Lofoten

Anne-Mette, Denmark

Lofoten

Anita, Sweden

Lofoten

Ada, Croatia

Lofoten Sweater

Daniela, Slovakia

Post a comment to pattern DROPS 181-9

We would love to hear what you have to say about this pattern!

If you want to leave a question, please make sure you select the correct category in the form below, to speed up the answering process. Required fields are marked *.

Comments / Questions (38)

country flag Bente Kristin Ims wrote:

Jeg ønsker å strikke denne i hvit og blå som på bildet i str S . Hvor mange nøster trenger jeg av hver farge? Og hvilke pinner trenger jeg?

04.03.2018 - 18:49

DROPS Design answered:

Hej Bente, det står øverst i opskriften. Du skal bruge DROPS Lima 600gr 4305 og 150gr 0100 samt pinde 3 og 4, men se i opskriften så du får de rigtige. God fornøjelse!

06.03.2018 - 17:01

country flag Silke Nowitzky wrote:

Hallo zusammen. Für den Pulli in Größe M habe ich noch 6 Knäuel von der Hauptfarbe übrig. Habe nur ich diese Abweichungen? Liebe Grüße Silke Nowitzky

28.02.2018 - 21:16

country flag Bente Kristin Ims wrote:

Jeg ønsker å strikke denne i hvit og blå som på bildet i str S . Hvor mange nøster trenger jeg av hver farge? Og hvilke pinner trenger jeg?

26.02.2018 - 20:12

country flag Elin Carlsson wrote:

Hei. Strikket denne i småløp. Passer fint men har mer enn 150 gram garn til overs etter oppskriften . 🤔

16.02.2018 - 18:32

country flag Wendy Fowler wrote:

I’m onto the sleeves and it is asking to use A.5A and A.6A am I right to assume that these are the same as A5 and A6 but without any increase rows. Also when you knit the medium size and it says start with the second stitch does this just mean you miss the first stitch of each round ?

03.02.2018 - 17:01

DROPS Design answered:

Dear Mrs Fowler, when you start A.6A you have already started to decrease, ie 1 st has been dec on each side of marker mid under sleeve. In size M, start A.6A with 2nd st in diagram then work to the end of diagram and repeat A.6A entirely in width to the end of round (and remember to continue the dec mid under arm). Happy knitting!

05.02.2018 - 08:55

country flag BROUX wrote:

Oups! pour la taille XXXL

30.10.2017 - 12:14

country flag BROUX wrote:

Bonjour je ne vois pas la grille A5 pour la taille XXL

30.10.2017 - 12:13

DROPS Design answered:

Bonjour Mme Broux, en taille XXXL on ne tricote pas A.5 car ce motif correspond à celui tricoté à la fin de A.4. Bon tricot!

30.10.2017 - 12:43

country flag Helle Gosch wrote:

Dejlig trøje, men jeg ønsker at skifte garnet ud med Puna. Og min fornemmelse siger mig, st jeg så skal bruge færre nøgler, men jeg ved ikke hvordan jeg regner ud, hvor mange nøgler jeg skal bruge. Håber at I kan hjælpe. På forhånd tak, venlig hilsen Helle

21.10.2017 - 19:21

DROPS Design answered:

Hej Helle, Her ser du hvordan man regner garnforbruget ud!

31.10.2017 - 13:57

country flag DROPS Design wrote:

Colour combinations shown are: A) DROPS Lima 4088, 0100 B) DROPS Lima 9020, 0519

28.09.2017 - 12:40

country flag Claudia wrote:

Es scheint ein Fehler in der Anleitung zu sein. Beim Vorderteil soll man stricken bis zu einer Länge von 51-...61 cm ab Teilung. Es müssten aber nur ca. 25-35 cm sein, die genauen Maße hätte ich gerne.

23.09.2017 - 21:31

DROPS Design answered:

Liebe Claudia, Anleitung wird korrigiert und eine neue Skizze wurde hochgeladen, es muss von dem Shulter gemessen werden. Viel Spaß beim stricken

09.10.2017 - 15:14