
Popular categories
Looking for a yarn?


|
||||||||||||||||||||||||||||||||||||||||||||||
Margarita |
||||||||||||||||||||||||||||||||||||||||||||||
 |
 |
|||||||||||||||||||||||||||||||||||||||||||||
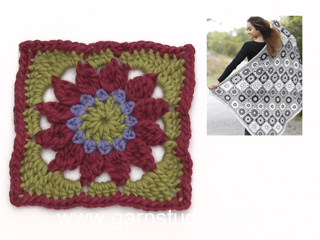
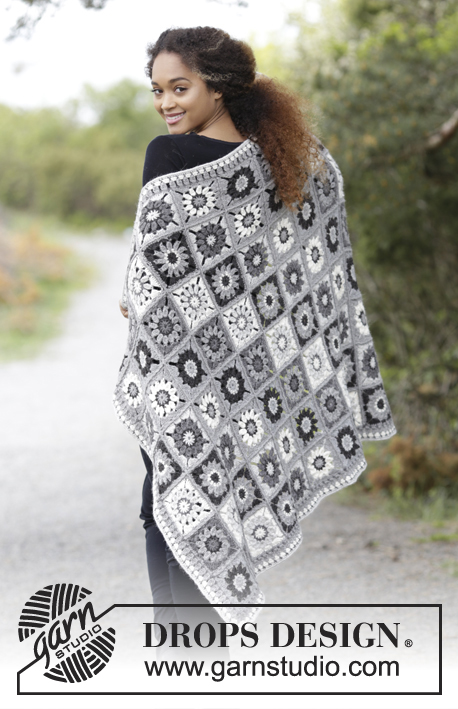
Blanket with crochet squares. Piece is crocheted in DROPS Puna.
DROPS 179-5 |
||||||||||||||||||||||||||||||||||||||||||||||
|
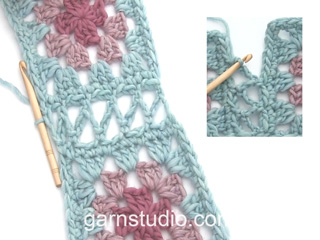
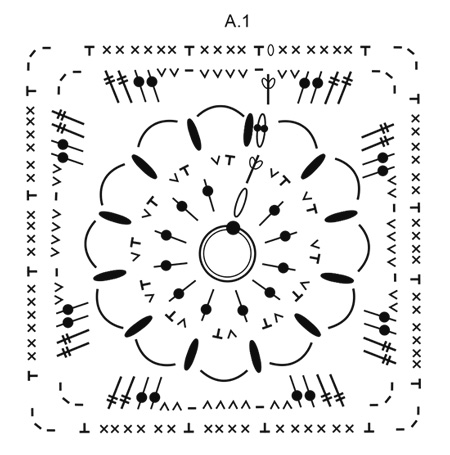
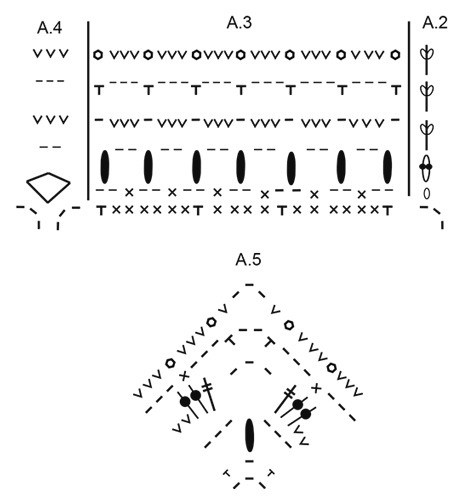
INFORMATION FOR PATTERN: PATTERN: See diagrams A.1 to A.5. COLORS (applies to crochet squares): Square 1: Cast on + ROUND 1: black ROUND 2: off white ROUND 3: gray ROUND 4: black ROUND 5: gray Square 2: Cast on + 1 ROUND: light gray ROUND 2: black ROUND 3: dark gray ROUND 4: light gray ROUND 5: gray Square 3: Cast on + ROUND 1: off white ROUND 2: dark gray ROUND 3: light gray ROUND 4: off white ROUND 5: gray Square 4: Cast on + 1 ROUND: dark gray ROUND 2: black ROUND 3: gray ROUND 4: dark gray ROUND 5: gray Square 5: Cast on + 1 ROUND: gray ROUND 2: black ROUND 3: off white ROUND 4: gray ROUND 5: gray Square 6: Cast on + 1 ROUND: gray ROUND 2: light gray ROUND 3: black ROUND 4: gray ROUND 5: gray STRIPES (applies to edge): ROUND 1: dark gray ROUND 2: gray ROUND 3: off white ROUND 4: dark gray ROUND 5: light gray ---------------------------------------------------------- BLANKET: Work first 16 squares in every color combination. Then assemble the crochet squares by working them together. Work an edge around the entire blanket. CROCHET SQUARES: Begin with hook size 4.5 mm/US 7 and Puna and work PATTERN according to diagram A.1 - work 16 squares of each COLOR – see explanation above = 96 squares. REMEMBER THE CROCHET GAUGE! 1 square measures approx. 11 x 11 cm / 4½"x 4½". Fasten yarn while working and on the backside of piece. ASSEMBLY: Place squares with correct square number as shown in illustration/chart (8 squares in width and 12 squares in length). Square number on illustration/chart refers to crochet squares with same number explained below COLORS. Work squares together first alongside the entire blanket and then across. Work them together as follows: Place 2 squares together wrong side against wrong side. Work through both layers with gray: 1 single crochet around corner, * 2 chain stitches, skip 2 single crochets, work 1 single crochet in next single crochet *. Work from *-* until and with corner (= 7 chain spaces) and work 3 chain stitches (= transition to the next 2 squares). Repeat the same on the next two squares that are next to them. Continue the same to other end of blanket until all squares on these two rows have been worked together. Cut the yarn. Now work this double row together with next row the same way. When all rows have been worked together alongside, the squares hang together. Now work the same way across. EDGE: Work an edge around the entire blanket in STRIPES - see explanation above. Begin on 2nd round in diagram (first round shows last round worked on crochet squares). Begin in one corner on blanket. Work pattern according to diagram A.2 (shows how round begins and ends). * Work A.3 along the side of crochet square, A.4 in transition between 2 crochet squares *, work from *-* until 1 crochet square remains before next corner, work A.3 along the side on this crochet square, work A.5 around chain space in corner. Work the same way along the next 3 sides and corner on blanket. Fasten off. |
||||||||||||||||||||||||||||||||||||||||||||||
Diagram explanations |
||||||||||||||||||||||||||||||||||||||||||||||
|
||||||||||||||||||||||||||||||||||||||||||||||
|
||||||||||||||||||||||||||||||||||||||||||||||
|
||||||||||||||||||||||||||||||||||||||||||||||

|
||||||||||||||||||||||||||||||||||||||||||||||
|
Have you made this or any other of our designs? Tag your pictures in social media with #dropsdesign so we can see them! Do you need help with this pattern?You'll find tutorial videos, a Comments/Questions area and more by visiting the pattern on garnstudio.com. © 1982-2024 DROPS Design A/S. We reserve all rights. This document, including all its sub-sections, has copyrights. Read more about what you can do with our patterns at the bottom of each pattern on our site. |
||||||||||||||||||||||||||||||||||||||||||||||


With over 40 years in knitting and crochet design, DROPS Design offers one of the most extensive collections of free patterns on the internet - translated to 17 languages. As of today we count 304 catalogs and 11422 patterns - 11417 of which are translated into English (US/in).
We work hard to bring you the best knitting and crochet have to offer, inspiration and advice as well as great quality yarns at incredible prices! Would you like to use our patterns for other than personal use? You can read what you are allowed to do in the Copyright text at the bottom of all our patterns. Happy crafting!
Comments / Questions (17)
Creo que en el esquema está mal detallado el símbolo de punto doble. Dice punto bajo en lugar de punto doble
01.10.2022 - 22:21Það eru villur í uppskriftinni. 1. Í uppgefnu magni stendur 50 gr af lit nr. 06 í Puna en á að vera 550 gr. 2. Í litasamsetningu nr. 3 vantar 2 síðustu umferðirnar.
30.09.2022 - 19:37DROPS Design answered:
Blessuð Rósa. Takk fyrir ábendinguna þetta hefur verið lagfært.
06.10.2022 - 11:34I love this pattern and am interested in a different colour combination in Drops Sky. Have you this pattern in a different colour combination? Thank you.
10.09.2021 - 23:50DROPS Design answered:
Dear Anne, please feel free to contact your DROPS store, even per mail or telephone, they will help you to choose the best colours matching your wishes. Happy crocheting!
13.09.2021 - 08:20Ik heb een vraag over het haken van de rand. Klopt het dat je over 1 zijkant van de deken patroon a2, a3, A4 heen en weer haakt, voordat je a5 de hoek om gaat? Ik snap het namelijk niet helemaal. Alvast bedankt voor het antwoord.
20.11.2020 - 09:09DROPS Design answered:
Dag Claartje,
Nee, je haakt het telpatroon volledig rondom de deken. A.4 wordt steeds tussen 2 vierkanten gehaakt, A.3 wordt over een vierkant gehaakt (dit herhaal je dus steeds op de korte en lange zijde), A.5 op alle 4 hoeken en A.2 laat zien hoe de toer begint en eindigt.
21.11.2020 - 14:42Hej Jeg kunne godt tænke mig at hækle dette kludetæppe til min datter men hun bryder sig ikke om uld/alpacka garn. Jeg ville hækle det i akryl garn. Kan I hjælpe mig med et garnmærke, hvor jeg kan få alle 3 nuancer af grå? Venlig hilsen Eva
12.07.2020 - 20:45DROPS Design answered:
Hei Eva. Dette teppet er heklet i DROPS Puna som tilhører garngruppe B. Om du går til GARN - Garngruppe A-F og så ser på de garnkvalitetene vi har under garngruppe B, kan du velge bomullskvalitet, blandingskvalitet eller ullkvalitet. Se også under hver enkel kvalitet om hvilken gråfarger de har og hva du selv ønsker. Når du har funent hvilken kvalitet og farger du ønsker, kan du bruke vår garnkalkulator til å finne ut av hvor mye garn du trenger av de ulike fargene. God Fornøyelse!
13.07.2020 - 14:32Muy bien explicado
25.06.2020 - 13:38This person is selling your pattern on ebay , i tried to post link but it wouldnt allow me
24.02.2019 - 10:54DROPS Design answered:
Dear Mrs Harvey, thanks for the information, please report on Ebay, as we do. Happy crocheting!
25.02.2019 - 12:29Wol geeft dikwijls een prikkerig onaangenaam gevoel. Is dit ook zo met dit soort garen? Zo ja, heb je dan een anders soort garen om eem deken mee te haken? Dank bij voorbaat.
28.12.2018 - 13:43DROPS Design answered:
Dag Vanrenterghem Lutgart,
De garens in dit patroon zijn van alpaca en dat kan inderdaad kriebelen als je daar gevoelig voor bent. Een goed alternatief is DROPS Karisma, die kriebelt niet, maar als je helemaal niet tegen wol kan (allergie) kun je beter DROPS Merino Extra Fine gebruiken. Beide garens vallen in dezelfde categorie, dus met ongeveer dezelfde stekenverhouding.
01.01.2019 - 19:51Bonjour, Ma question concerne l'assemblage : vous dites : "continuer jusqu'à l'autre extrémité de la couverture jusqu'à ce que tous les carrés de ces 2 rangs aient été crochetés ensemble" jusque là ça va, mais après Crochetez maintenant ce double rang avec le rang suivant de la même façon. Faut-il refaire un rang d'arceaux ? Merci d'avance pour votre réponse. Chantal
23.05.2018 - 11:51DROPS Design answered:
Bonjour Mme Bonneton, quand vous avez fait une bande en assemblant les carrés 2 par 2, vous obtenez une bande de 2 carrés en largeur, assemblez maintenant cette bande avec la rangée suivante de carrés comme vous avez fait auparavant en suivant l'ordre des carrés du schéma. Les carrés seront ensuite assemblés dans l'autre sens (= en largeur). Bon assemblage!
23.05.2018 - 14:34Dit is zo een mooi patroon dat ik er gelijk 2 heb gemaakt. Ze worden dagelijks gebruikt.
25.02.2018 - 17:04