DROPS Nepal
DROPS Nepal
65% Wool, 35% Alpaca
from 2.40 £ /50g
Get the yarn to make this pattern from 24.00£.

The yarn cost is calculated from the pattern’s smallest size and the yarn’s cheapest product type. Looking for an even better price? You might find it on the DROPS Deals!

DROPS SS24

Solfest

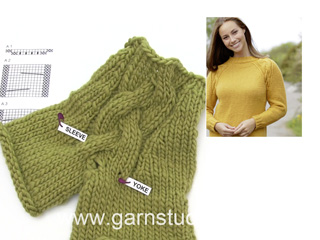
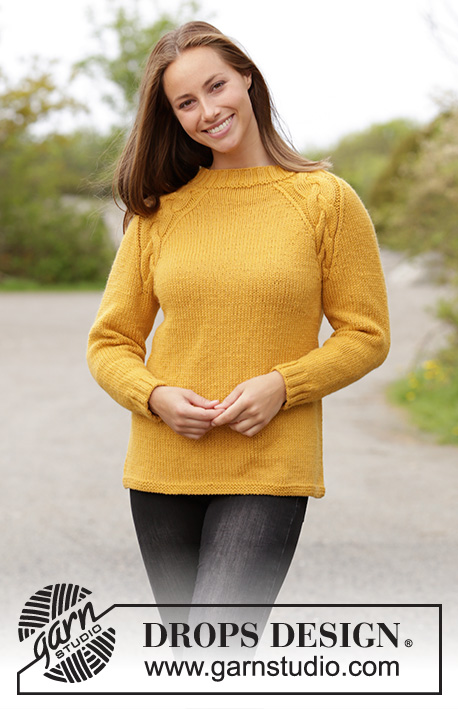
Knitted jumper with cables and raglan. Sizes S - XXXL. The piece is worked in DROPS Nepal.

DROPS 180-16
DROPS Design: Pattern no ne-245
Yarn group C or A + A
-----------------------------------------------------------
Sizes: S - M - L - XL - XXL - XXXL
Materials:
DROPS NEPAL from Garnstudio (belongs to yarn group C)
500-550-650-700-750-800 g colour 2923, golden rod

The piece can also be knitted with yarn from:
"Alternative yarn (Yarn group C)" – see the link below.

DROPS DOUBLE POINTED NEEDLES AND CIRCULAR NEEDLE (60 or 80 cm) SIZE 5.5 MM – or the size needed to get 16 stitches and 20 rows stocking stitch on 10 cm in width and 10 cm in height.

DROPS DOUBLE POINTED NEEDLES AND CIRCULAR NEEDLE (40 and 60 or 80 cm) SIZE 4.5 MM for rib/garter stitch edge – or the size needed to get 18 stitches and 23 rows stocking stitch on 10 cm in width and 10 cm in height.

DROPS CABLE NEEDLE – for cables.
----------------------------------------------------------

-------------------------------------------------------

Alternative Yarn – See how to change yarns here
Yarn Groups A to F – Use the same pattern and change the yarn here
Yarn usage using an alternative yarn – Use our yarn converter here

-------------------------------------------------------

DROPS Nepal
DROPS Nepal
65% Wool, 35% Alpaca
from 2.40 £ /50g
Get the yarn to make this pattern from 24.00£.

The yarn cost is calculated from the pattern’s smallest size and the yarn’s cheapest product type. Looking for an even better price? You might find it on the DROPS Deals!

Pattern instructions

NOTE: This pattern is written in British English. All measurements in charts are in cm. For conversion from cm to inches - click here. There are different terms for crocheting in British and American English. If this pattern includes crochet, click for "crochet terms" here. For this pattern in American English, please click here.
INFORMATION FOR THE PATTERN:

RIDGE/GARTER STITCH (worked in the round):
1 ridge = 2 rounds. Knit 1 round and purl 1 round.

DECREASE TIP (for body):
Decrease as follows by both marker threads: Work until there are 3 stitches left before the marker thread: Knit 2 together, knit 2 (the marker thread sits in the middle of these stitches), slip 1 stitch as if to knit, knit 1, pass the slipped stitch over the knitted stitch.

INCREASE TIP (for sleeves):
Increase as follows mid under the sleeve – start 1 stitch before the marker thread: Make 1 yarn over, knit 2 stitches (the marker thread sits in the middle of these 2 stitches), make 1 yarn over (= 2 stitches increased). On the next round, knit the yarn overs twisted to prevent holes.

RAGLAN:
Decrease 2 stitches in each transition between body and sleeves. Start 2 stitches before A.2/A.3, knit 2 together, work A.2/A.3, slip 1 stitch as if to knit, knit 1, pass the slipped stitch over the knitted stitch.

ELEVATION (for back of neck):
Cut the strand. Continue working as follows – starting after 11-13-16-18-19-20 stitches on the back piece (= mid back): Work stocking stitch, A.2 and A.3 as before.
Insert 1 marker in the next stitch on the row (= mid back). Start from the right side and work 36-37-39-41-43-45 stitches past the marker, turn, tighten the strand and work 73-75-79-83-87-91 stitches. Turn, tighten the strand and work 67-69-73-77-81-85 stitches, turn, tighten the strand and work 61-63-67-71-75-79 stitches. Turn, tighten the strand and work to mid back. Cut the strand. The round now starts at the same place as before, i.e. 16-17-19-21-23-25 stitches towards the right (seen from the right side) at the marker mid back.

PATTERN:
See diagrams A.1 to A.3.
----------------------------------------------------------

JUMPER:
The piece is worked bottom up. The body is worked in the round with circular needle and the sleeves are worked in the round with double pointed needles before they are worked together and you work the yoke in the round with circular needle.

BODY:
Cast on 166-178-194-210-226-246 stitches with circular needle size 4.5 mm and Nepal. Work 3 RIDGES – see description above. Change to circular needle size 5.5 mm and work stocking stitch. Insert 1 marker thread at the beginning of the round and 1 marker thread after 83-89-97-105-113-123 stitches (the marker threads mark the sides of the garment). REMEMBER THE KNITTING TENSION! When the piece measures 11 cm decrease 1 stitch on each side of each marker thread (= 4 stitches decreased) – read DECREASE TIP. Decrease in this way every 4 cm a total of 7 times = 138-150-166-182-198-218 stitches. When the piece measures 37-37-38-38-38-38 cm cast off 4-4-5-5-6-7 stitches on each side of each marker thread (= 8-8-10-10-12-14 stitches in each side) = 61-67-73-81-87-95 stitches on the front/back piece. Lay the piece to one side and work the sleeves.

SLEEVES:
The piece is worked in the round with double pointed needles. Cast on 44-44-48-48-52-52 stitches with double pointed needles size 4.5 mm and Nepal. Knit 1 round, then work rib (= knit 2/ purl 2). When the piece measures 6 cm change to double pointed needles size 5.5 mm. Knit 1 round and decrease 8-8-8-6-8-8 stitches evenly on round = 36-36-40-42-44-44 stitches. Work stocking stitch. Insert 1 marker thread at the beginning of the round (= mid under the sleeve). When the piece measures 8 cm increase 1 stitch on each side of the marker thread – read INCREASE TIP. Increase in this way every 4-3-2½-2-2-1½ cm a total of 8-11-12-13-13-15 times = 52-58-64-68-70-74 stitches. When the piece measures 40-39-38-37-36-34 cm (shorter measurements in larger sizes because of longer yoke) cast off the middle 8-8-10-10-12-14 stitches under the sleeve (= 4-4-5-5-6-7 stitches on each side of the marker thread) = 44-50-54-58-58-60 stitches. Lay the piece to one side and work 1 more sleeve.

YOKE:
Place the sleeves on the same circular needle size 5.5 mm as the body where you have cast off stitches for the armholes = 210-234-254-278-290-310 stitches.
Continue working as follows – start the round after 5-4-3-3-4-5 stitches on the back piece: Work * 51-59-67-75-79-85 stitches stocking stitch, A.1 (= 12 stitches), 30-34-36-40-42-46 stitches stocking stitch, A.1 over the next 12 stitches *, work from *-* a total of 2 times. When A.1 has been completed in height 1 time, there are 226-250-270-294-306-326 stitches on the needle.
Now continue working as follows: Work * 51-59-67-75-79-85 stitches stocking stitch, A.2 (= 16 stitches), 30-34-36-40-42-46 stitches stocking stitch, A.3 (= 16 stitches) *, work from *-* a total of 2 times. Continue with pattern and decrease to RAGLAN – see description above.
Decrease every 4th round 6-6-6-6-7-7 times, then every 2nd round 8-10-11-13-13-15 times (= a total of 14-16-17-19-20-22 times).
After all the decreases, there are 114-122-134-142-146-150 stitches on the round. For a better fit, you can now work an ELEVATION in the back of the neck – see description above.
On the next round, decrease 4 stitches over each of A.2 and A.3 = 98-106-118-126-130-134 stitches.
The next round is worked as follows: Work * 33-35-39-43-47-51 stitches stocking stitch and decrease 3-4-7-9-10-11 stitches evenly on round, knit the next 16-18-20-20-18-16 stitches together 2 and 2, *, work from *-* a total of 2 times = 76-80-84-88-92-96 stitches. Purl 1 round. The yoke measures approx. 21-23-24-26-28-30 cm.

NECK:
Knit 1 round and increase 8 stitches evenly on round = 84-88-92-96-100-104 stitches. Change to short circular needle size 4.5 mm. Work rib (= knit 2 / purl 2) for 4 cm, then cast off with knit over knit and purl over purl.

This pattern has been corrected.

Updated online: 25.06.2019
Correction - ELEVATION: Continue working as follows – starting after 11-13-16-18-19-20 stitches on the back piece (= mid back)
Updated online: 31.10.2019
SLEEVES:...Insert 1 marker thread at the beginning of the round (= mid under the sleeve). When the piece measures 8 cm increase 1 stitch on each side of the marker thread – read INCREASE TIP....

Diagram

symbols = knit
symbols = purl
symbols = between 2 stitches make 1 yarn over, on the next round knit the yarn over twisted to prevent holes
symbols = place 4 stitches on cable needle in front of the piece, knit 4 stitches, knit 4 stitches from cable needle
symbols = place 4 stitches on cable needle behind the piece, knit 4 stitches, knit 4 stitches from cable needle
diagram
diagram

Each of our patterns has specific tutorial videos to help you.

Do you have a question? See a list of frequently asked questions (FAQ)

Knitting tension is what determines the final measurements of your work, and is usually measured per 10 x 10 cm. It is provided like so: number of stitches in width x number of rows in height - eg: 19 stitches x 26 rows = 10 x 10 cm.

The knitting tension is very individual; some people knit/crochet loosely while others work tightly. You adjust the knitting tension with the needle size, which is why the suggested needle size is only meant as a guide! You need to adjust this (up or down) to ensure that YOUR knitting tension matches the knitting tension provided in the pattern. If you work with a different knitting tension than provided you will have a different yarn consumption, and your work will have different measurements than what the pattern suggests.

The knitting tension also determines which yarns can replace each other. As long as you achieve the same knitting tension you can replace one yarn with another.

See DROPS lesson: How to measure your tension/gauge

See DROPS video: How to make a gauge tension swatch

The required amount of yarn is provided in grams, eg: 450 g. To calculate how many balls you’ll need you first need to know how many grams are in 1 ball (25g, 50g or 100g). This information is available if you click on the individual yarn quality on our pages. Divide the amount required with the amount of each ball. For example, if each ball is 50g (the most common amount), the calculation will be as follows: 450 / 50 = 9 balls.

The important thing when changing from one yarn to another is that the knitting/crochet tension remains the same. This is so that the measurements of the finished piece will be the same as on the sketch provided. It is easier to achieve the same knitting tension using yarns from the same yarn group. It is also possible to work with multiple strands of a thinner yarn to achieve the knitting tension of a thicker one. Please try our yarn converter. We recommend you to always work a test swatch.

Please NOTE: when changing yarn the garment might have a different look and feel to the garment in the photo, due to individual properties and qualities of each yarn.

See DROPS lesson: Can I use a different yarn than the one mentioned in the pattern?

All our yarns are categorised into yarn groups (from A to F) according to thickness and knitting tension – group A contains the thinnest yarns and group F the thickest. This makes it easier for you to find alternative yarns to our patterns, should you wish to switch yarn. All yarns within the same group have a similar knitting tension and can easily replace each other. However, different yarn qualities have different structures and properties which will give the finished work a unique look and feel.

Click here for an overview of the yarns in each yarn group

At the top of all our patterns you’ll find a link to our yarn calculator, which is a helpful tool should you wish to use a different yarn than suggested. By filling in the yarn quality you wish to replace, the amount (in your size) and number of strands, the calculator will present good alternative yarns with the same knitting tension. Additionally it will tell you how much you’ll require in the new qualities and whether you’ll need to work with multiple strands. Most skeins are 50g (some are 25g or 100g).

If the pattern is worked with multiple colours, every colour will have to be calculated separately. Similarly, if the pattern is worked with several strands of different yarns (for example 1 strand Alpaca and 1 strand Kid-Silk) you will have to find alternatives for each, individually.

Click here to see our yarn calculator

Since different yarns have different qualities and textures we have chosen to keep the original yarn in our patterns. However, you can easily find options among our available qualities by using our yarn calculator, or simply pick a yarn from the same yarn group.

It is possible that some retailers still have discontinued yarns in stock, or that someone has a few skeins at home that they would like to find patterns for.

The yarn calculator will provide both alternative yarn as well as required amount in the new quality.

If you think it's hard to decide what size to make, it can be a good idea to measure a garment you own already and like the size of. Then you can pick the size by comparing those measures with the ones available in the pattern's size chart.

You'll find the size chart at the bottom of the pattern.

See DROPS lesson: How to read size chart

The needle size provided in the pattern serves only as a guide, the important thing is to follow the knitting tension. And since knitting tension is very individual, you will have to adjust the needle size to ensure that YOUR tension is the same as in the pattern – maybe you’ll have to adjust 1, or even 2 needle sizes, up or down to achieve the correct tension. For this, we recommend that you work test swatches.

Should you work with a different knitting tension than the one provided, the measurements of the finished garment might deviate from the measurement sketch.

See DROPS lesson: How to measure your tension/gauge

See DROPS video: How to make a tension/gauge swatch

Working a garment top-down provides more flexibility and room for personal adjustment. For example it is easier to try the garment on while working, as well as making adjustments to length of yoke and shoulder caps.

The instructions are carefully explaining every step, in the correct order. Diagrams are adjusted to the knitting direction and are worked as usual.

The diagram depicts all rows/rounds, and every stitch seen from the right side. It is read from bottom to top, from right to left. 1 square = 1 stitch.

When working back and forth, every other row is worked from the right side and every other row is worked from the wrong side. When working from the wrong side, the diagram will have to be worked reversed: from left to right, knit stitches are purled, purl stitches are knit etc.

When working in the round every round is worked from the right side and the diagram are worked from right to left on all rounds.

See DROPS lesson: How to read knitting diagrams

The diagram depicts all rows/rounds, and every stitch seen from the right side. It is worked from bottom to top, from right to left.

When working back and forth every other row is worked from the right side: from right to left and every other row is worked from the wrong side: from left to right.

When working in the round, every row in the diagram are worked from the right side, from right to left.

When working a circular diagram you start in the middle and work your way outwards, counter clockwise, row by row.

The rows usually start with a given number of chain stitches (equivalent to the height of the following stitch), this will either be depicted in the diagram or explained in the pattern.

See DROPS lesson: How to read crochet diagrams

Instructions for working several diagrams after each other on the same row/round, will often be written like so: “work A.1, A.2, A.3 a total of 0-0-2-3-4 times". This means you work A.1 once, then A.2 is worked once, and A.3 is repeated (in width) the number of times provided for your size – in this case like so: S = 0 times, M = 0 times, L=2 times, XL= 3 times and XXL = 4 times.

The diagrams are worked as usual: begin with the first row in A.1, then work the first row in A.2 etc.

See DROPS lesson: How to read knitting diagrams

See DROPS lesson: How to read crochet diagrams

The total width of the garment (from wrist-to-wrist) will be larger in the larger sizes, despite the actual sleeves being shorter. The larger sizes have longer sleeve caps and wider shoulders, so there will be a good fit in all sizes.

The measurement sketch/schematic drawing provides information regarding the full length of the garment. If it’s a jumper or a jacket the length is measured from the highest point on the shoulder closest to the neckline, and straight down to the bottom of the garment. It is NOT measured from the tip of shoulder. Similarly, the length of yoke is measured from the highest point on the shoulder and down to where yoke is split into body and sleeves.

On a jacket measures are never taken along bands, unless specifically stated. Always measure inside band stitches when measuring the length.

See DROPS lesson: How to read a schematic drawing

Diagrams are often repeated on the round or in height. 1 repeat is the diagram the way it appears in the pattern. If it says to work 5 repeats of A.1 in the round, then you work A.1 a total of 5 times after/next to each other in the round. If it says to work 2 repeats of A.1 vertically/in height you work the entire diagram once, then begin again at the start and work the entire diagram one more time.

Chain stitches are slightly narrower than other stitches and to avoid working the cast-on edge too tight, we simply chain more stitches to begin with. The stitch count will be adjusted on the following row to fit the pattern and measurement sketch.

The rib edge is more elastic and will contract slightly compared to, for example, stocking stitch. By increasing before the rib edge, you avoid a visible difference in width between the rib edge and the rest of the body.

It’s very easy to cast off too tightly, and by making yarn overs while casting off (and simultaneously casting these off) you avoid a too tight cast off edge.

See DROPS video: How to bind off with yarn overs (yo)

To achieve an even increase (or decrease) you can increase on, for example: every 3rd and 4th row alternately, like so: work 2 rows and increase on the 3rd row, work 3 rows and increase on the 4th. Repeat this until the increase is complete.

See DROPS lesson: Increase or decrease 1 st on every 3rd and 4th row alternately

Should you prefer to work in the round instead of back and forth, you may of course adjust the pattern. You’ll need to add steeks mid-front (usually 5 stitches), and follow the instructions. When you would normally turn and work from the wrong side, simply work across the steek and continue in the round. At the end you’ll cut the piece open, pick up stitches to work bands, and cover the cut edges.

See DROPS video: How to knit steeks and cut open

Should you prefer to work back and forth instead of in the round, you may of course adjust the pattern so you work the pieces separately and then assemble them at the end. Divide the stitches for the body in 2, add 1 edge stitch in each side (for sewing) and work the front and back pieces separately.

See DROPS lesson: Can I adapt a pattern for circular needles into straight needles?

Pattern repeats can vary slightly in the different sizes, in order to get the correct proportions. If you’re not working the exact same size as the garment in the photo, yours might deviate slightly. This has been carefully developed and adjusted so that the complete impression of the garment is the same in all sizes.

Make sure to follow instructions and diagrams for your size!

If you have found a pattern you like which is available in women’s size it’s not very difficult to convert it to men’s size. The biggest difference will be the length of sleeves and body. Start working on the women size that you think would fit across the chest. The additional length will be worked right before you cast off for the armhole/sleeve cap. If the pattern is worked top-down you can add the length right after the armhole or before the first decrease on sleeve.

Regarding additional yarn amount, this will depend on how much length you add, but it is better with a skein too many than too few.

All yarns will have excess fibres (from production) that might come off as lint or shedding. Brushed yarns (ie hairier yarns) have more of these loose, excess fibres, causing more shedding.

Shedding also depends on what is worn under or over the garment, and whether this pulls at the yarn fibres. It’s therefore not possible to guarantee that there will be no shedding

Below are some tips on how to get the best result when working with hairier yarns:

1. When the garment is finished (before you wash it) shake it vigorously so the looser hairs come off. NOTE: do NOT use a lint roller, brush or any method that pulls at the yarn.

2. Place the garment in a plastic bag and put it in your freezer - the temperature will cause the fibres to become less attached to each other, and excess fibres will come off easier.

3. Leave in the freezer for a few hours before taking it out and shaking it again.

4. Wash the garment according to the instructions on the yarn label.

Pilling is a natural process that happens to even the most exclusive of fibers. It's a natural sign of wear and tear that is hard to avoid, and that is most visible in high friction areas of your garment like a sweater's arms and cuffs.

You can make your garment look as new by removing the pilling, using a fabric comb or a pill/lint remover.

Still can't find the answer you need? Then scroll down and leave your question so one of our experts can try to help you. This will be done normally within 5 to 10 working days.
In the meantime, you can read the questions and answers that others have left to this pattern or join the DROPS Workshop on Facebook to get help from fellow knitters/crocheters!

You might also like...

Post a comment to pattern DROPS 180-16

We would love to hear what you have to say about this pattern!

If you want to leave a question, please make sure you select the correct category in the form below, to speed up the answering process. Required fields are marked *.

Comments / Questions (32)

country flag Coraline wrote:

Bonjour pour l’étape : rabattre 4-4-5-5-6-7 mailles de chaque côté de chaque fil marqueur (= 8mailles de chaque côté) = 61 mailles pour le devant/le dos., Ou est positionnée la dernière maille tricotée ? Exemple je commence mon rang normal pour le devant ,au fil marqueur je rabat 8 mailles je continue pour le dos , au fil marqueur je rabat 4 maille et là je recommence un nouveau rang en rabattants 4 maille et le fil est à ce moment là en attente ?

13.06.2019 - 21:08

DROPS Design answered:

Bonjour Coraline, vous commencez les tours au 1er marqueur: rabattez 4 m au début du tour, tricotez le devant (= 61-67 m), rabattez les 4 m avant le marqueur et les 4 m après le marqueur (= 8 m au total), tricotez les mailles du dos (= 61-67 m) et rabattez les 4 dernières m du tour (soit 8 m pour chaque emmanchure), coupez le fil et passez-le dans la dernière maille, mettez l'ouvrage en attente et tricotez les manches, vous reprendrez ensuite tout ensemble (cf vidéo). Bon tricot!

14.06.2019 - 07:15

country flag Coraline wrote:

Un grand merci !

29.04.2019 - 20:04

country flag Coraline wrote:

Bonjour , pour l’étape Diminuer ainsi 7 fois au total tous les 4 cm: est ce qu’on fait DIMINUTION / 1 rang normal / 7 fois de suite ? Ou on fait 7 rang de suite DIMINUTION sans rang normal intermédiaire ?

25.04.2019 - 16:38

DROPS Design answered:

Bonjour Coraline, on espace les rangs de diminutions de 4 cm jusqu'à ce qu'il y ait 7 diminutions au total: *1 tour de diminutions, puis on continue sans diminuer jusqu'à 4 cm depuis les diminutions*, on répète 6 fois de *-* et on termine par 1 rang de diminutions = on a diminué 7 fois tous les 4 cm. Bon tricot!

26.04.2019 - 08:39

country flag Pia wrote:

Ich bin bei den raglan Abnahmen nicht sicher. Muss ich in jeder Reihe abnehmen oder nur jede 4. Reihe und dann jede 2. Reihe? Wie oft muss ich das Zopfmuster wiederholen?

20.11.2018 - 21:13

DROPS Design answered:

Liebe Pia, die Raglanabnahmen entstehen zuerst in jede 4. Reihe, dann in jede 2. Reihe - dh es sind insgesamt 14-16-17-19-20-22 Mal. Das Zopfmuster wird in der Höhe wiederholt bis alle Abnahmen und Erhöhung fertig sind. Viel Spaß beim stricken!

21.11.2018 - 08:32

country flag Dufour wrote:

Bonjour, c\\\\\\\'est la première fois que je fais un de vos modèle, les diminutions se font presque sur le raglan ?\\\\r\\\\nCar il me reste des diminution et il me reste que 4 mailles avant le raglan et j\\\\\\\'ai encore 4 diminutions à faire se qui fait 8 m, 4 m de chaque côté.\\\\r\\\\nMerci de votre réponse.

05.11.2018 - 08:12

DROPS Design answered:

Bonjour Mme Dufour, je ne suis pas bien sûre de bien comprendre votre question. Vous diminuez pour le raglan (= 8 mailles au total, soit 1 m avant A.2/A.3 et 1 m après A.2/A.3): 6-6-6-6-7-7 fois tous les 4 tours, puis 8-10-11-13-13-15 fois tous les 2 tours (= 14-16-17-19-20-22 fois au total) = 114-122-134-142-146-150 mailles quand toutes les diminutions du raglan sont faites. Bon tricot!

05.11.2018 - 10:11

country flag Helle Jørgensen wrote:

Hej...jeg kan ikke få det til at passe med masker hvis der skal være 5 på bærestykket og 7 på ærmer...kan få til at passe med 4 på bærestykke og 8 på ærmer. Hvordan kan jeg få det til at passe...hvis jeg forstår opskrift rigtigt skal omgangen startes efter 4 masker, derefter strikkes 59 masker, tilbage på min pind er nu 4 masker?.. Håber i kan afhjælpe mit problem så jeg kan komme videre ...

26.07.2018 - 19:50

DROPS Design answered:

Hei Helle. I følge oppskriften skal første omgang av mønster A.1 gå over 4 masker på for-og bakstykket, og 8 masker på ermene, i størrelse M og XXL, så det stemmer. God fornøyelse

14.08.2018 - 10:50

country flag Claudia wrote:

Hallo Komme nicht so richtig weiter.Habe die zwei Ärmel fertig und mit der Passe nicht so.Können Sie mir dabei helfen.Komme bei der Passe nicht weiter.Danke an Sie

27.05.2018 - 09:27

DROPS Design answered:

Liebe Claudia, die beide Ärmel mit dem Rumpfteil auf eine Nadel nehmen, und dann wie beschrieben Zopf und Raglanabnahmen stricken. Viel Spaß beim stricken!

28.05.2018 - 09:26

country flag Claudia Wächtler wrote:

Hallo Wie nimmt man die Maschen nach 37 cm ab? Ist dann die Masche die ja der Makierungsfaden auch abgekettet?Danke für die Hilfe Claudia

08.04.2018 - 09:07

DROPS Design answered:

Liebe Frau Wächtler, die 8 Maschen auf beiden Seiten (= 4 M vor der Markierungsfaden + 4 M nach der Markierungsfaden) werden abgekettet = es sind jetzt 61-67 M je für Rücken- und Vorderteil. Viel Spaß beim stricken!

09.04.2018 - 10:16

country flag Agnete Årikstad Eidet wrote:

Hei, når jeg skal strikke sammen arm og bol, skal det være seks masker fra arm og seks masker fra bol som skal bli de tolv maskene med mønster i overgangen? Jeg får ikke det til å gå opp... da blir det for mange masker på ermene og for få på bolen mellom mønster.

03.04.2018 - 22:49

DROPS Design answered:

Hei Agnete. Mønsteret er ikke helt på midten av overgangen mellom bol og erme. De 12 maskene i A.1 er fordelt slik: Det er 5 masker fra bolen og 7 masker fra ermet. Om du ser nøye på bildet av gensern, kan du se at mønsteret er litt lenger ut på ermet. God fornøyelse

18.04.2018 - 13:50

country flag Yvonne wrote:

Beste mensen, dit is mijn eerste trui die ik brei (na sjaals en mutsen) Kan je de mouwen ook op een rondbreinaald breien ipv naalden zonder knop? En als dat kan, is 40 cm dan een handige lengte? Daarbij vroeg ik me dan af of je een 40 cm rondbreinaald ook kan gebruiken voor de hals of beter andere lengtes voor mouwen en hals? Alvast bedankt voor uw antwoord. MVG, Yvonne

10.11.2017 - 12:32

DROPS Design answered:

Hoi Yvonne, Jazeker, de mouwen kun je prima op een rondbreinaald breien, en 40 cm is daar wel geschikt voor. Mocht de draad iets te lang zijn voor het aantal steken, dan kun je de 'magic loop' techniek toepassen. Bekijk deze video.

15.11.2017 - 10:31