
Popular categories
Looking for a yarn?


|
|||||||||||||||||||
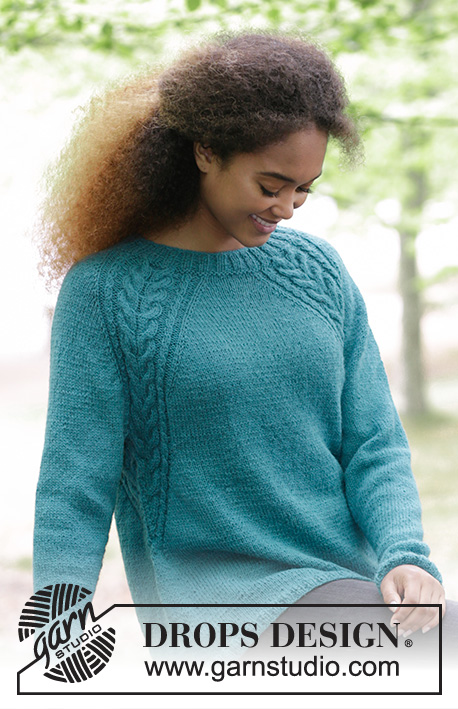
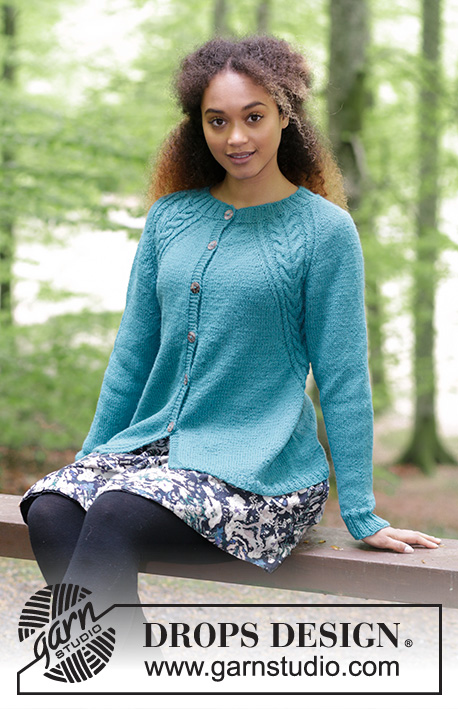
Arendal Cardigan |
|||||||||||||||||||
 |
 |
||||||||||||||||||
Knitted jacket with cables and raglan, worked top down. Sizes S - XXXL. The piece is worked in DROPS Puna.
DROPS 181-25 |
|||||||||||||||||||
|
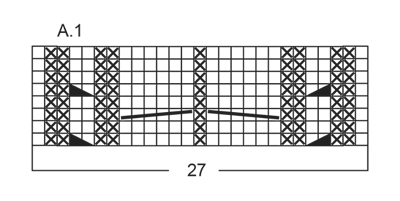
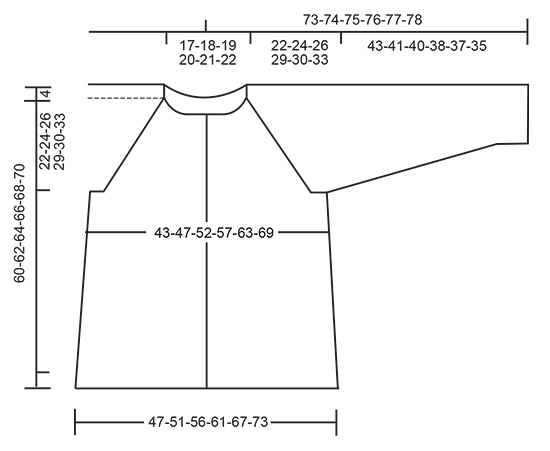
INFORMATION FOR THE PATTERN: RIDGE/GARTER STITCH (worked back and forth): 1 ridge = Knit 2 rows. PATTERN: See diagram A.1. The diagram shows all the rows in the pattern seen from the right side. RAGLAN: Increase to raglan on each side of A.1. Increase 1 stitch on each side of A.1 as follows (= 8 new stitches each time you increase). Work to A.1, 1 yarn over, work A.1, 1 yarn over. On the next round, purl the yarn overs twisted to prevent holes. INCREASE TIP (for the sides): Work until there are 2 stitches left before the marker thread in the side. Make 1 yarn over, knit 2 stitches (the marker thread sits between these) and make 1 yarn over. On the next round, purl the yarn overs twisted to prevent holes. DECREASE TIP (for sleeves): Decrease 1 stitch on each side of the marker thread as follows: Work until there are 3 stitches left before the marker thread, slip 1 stitch as if to knit, knit 1, pass the slipped stitch over, knit 2 stitches (the marker thread sits between these stitches), knit the next 2 stitches together. BUTTONHOLE: The first buttonhole is worked when the rib in the neck measures 3 cm / 1", then work the 5-5-5-6-6-6 next buttonholes with approx. 8 cm / 3⅛" between them. Decrease for buttonhole on the right band as follows: Work until there are 3 stitches left on the needle (seen from the right side), make 1 yarn over, knit 2 together and knit 1. On the next row, knit the yarn over, so that there is a hole. ---------------------------------------------------------- The jacket is worked back and forth with circular needle, from mid front and top down. JACKET: Cast on 120-128-132-136-144-144 stitches (including 5 band stitches in each side towards mid front) with circular needle size 4 mm / US 6 and Puna. Purl 1 row from the wrong side, then work as follows – from the right side: 5 stitches garter stitch, * knit 2/ purl 2 *, repeat from *-* until there are 7 stitches left, knit 2 stitches and 5 stitches garter stitch. REMEMBER BUTTONHOLE! Continue with rib in this way for 4 cm / 1½". The last row is from the wrong side. Change to circular needle size 4.5 mm / US 7. Work 1 RIDGE – see description above, on the first row, decrease 2 stitches evenly on row = 118-126-130-134-142-142 stitches. Continue as follows – from the right side: Work 5 stitches garter stitch, knit 11-12-13-15-16-18, *1 yarn over, knit 1 *, repeat from *-* a total of 3 times, knit 1, * 1 yarn over, knit 1 *, repeat from *-* a total of 3 times (= these 7 stitches become 13 stitches), knit 18-20-20-18-20-16, *1 yarn over, knit 1 *, repeat from *-* a total of 3 times, knit 1, * 1 yarn over, knit 1 *, repeat from *-* a total of 3 times, knit 22-24-26-30-32-36, * 1 yarn over, knit 1 *, repeat from *-* a total of 3 times, knit 1, * 1 yarn over, knit 1 *, repeat from *-* a total of 3 times, knit 18-20-20-18-20-16, *1 yarn over, knit 1 *, repeat from *-* a total of 3 times, knit 1, * 1 yarn over, knit 1 *, repeat from *-* a total of 3 times, knit 11-12-13-15-16-18 and 5 stitches garter stitch = 142-150-154-158-166-166 stitches. Purl 1 row from the wrong side; the yarn overs are purled twisted to prevent holes and the bands are knitted. Continue as follows from the right side: Work 5 stitches garter stitch (= band stitches), 4-5-6-8-9-11 stitches stockinette stitch (= left front piece), A.1 (= 27 stitches), 4-6-6-4-6-2 stitches stockinette stitch (= sleeve), A.1, 8-10-12-16-18-22 stitches stockinette stitch (= back piece), A1, 4-6-6-4-6-2 stitches stockinette stitch (= sleeve), A.1, 4-5-6-8-9-11 stitches stockinette stitch (= right front piece and finish with 5 stitches garter stitch (= band stitches). READ THE WHOLE OF THE NEXT SECTION BEFORE CONTINUING! Continue this pattern, at the same time increase on each side of A.1 to RAGLAN – see description above. Increase every 2nd row (= each row from the right side) 21-24-27-30-32-35 times. REMEMBER THE GAUGE! After all the increases, there are 310-342-370-398-422-446 stitches on the needle. Continue the pattern as before (without increases) until the piece measures 22-24-26-29-30-33 cm / 8¾"-9½"-10¼"-11½"-11¾"-13" from the cast-on edge mid front. The next row is worked as follows from the wrong side: Work 50-54-58-63-68-73 stitches (= right front piece), place the next 60-68-74-78-80-82 stitches on 1 thread (= sleeve), cast on 8-8-10-10-12-14 new stitches on the needle (= under the sleeve), work 90-98-106-116-126-136 stitches (= back piece), place the next 60-68-74-78-80-82 stitches on 1 thread (= sleeve), cast on 8-8-10-10-12-14 new stitches on the needle (= under the sleeve) and work the remaining 50-54-58-63-68-73 stitches (= left front piece). BODY: = 206-222-242-262-286-310 stitches. THE PIECE IS NOW MEASURED FROM HERE! Insert a marker thread in each side, in the middle of the new stitches cast on. Continue back and forth with stockinette stitch and 5 stitches garter stitch in each side of the piece. REMEMBER BUTTONHOLE. Continue A.1 over the 20-20-20-20-22-22 stitches in the pattern which remain on the front and back pieces, but on every 2nd row (= each row from the right side) make 1 yarn over on the outside of each A.1 (= towards mid front and mid back) and knit 2 stitches together on each side of the marker thread in the sides. The yarn overs are purled twisted on the next row to prevent holes. The number of stitches remains the same, but the stitches in A.1 will gradually decrease towards the sides of the jacket and there will be more and more stitches in stockinette stitch. When there are not enough stitches in A.1 to work 6-stitch cable, work these stitches in stockinette stitch, AT THE SAME TIME as you decrease 3 stitches evenly over the cable, do not decrease over the cable with 2 stitches (remember to make the increase on the outside of A.1 and decrease on each side of the marker threads). When all of A.1 has been decreased there are 182-198-218-238-262-286 stitches on the row. Continue with stockinette stitch and garter stitch over the band stitches. There is 48-52-57-62-68-74 stitches on each front piece and 86-94-104-114-126-138 stitches on back piece. When the piece measures 15-15-15-15-15-15 cm / 6" all sizes increase 1 stitch on each side of the marker threads (= 4 stitches increased) – READ INCREASE TIP! Increase every 5 cm / 2" a total of 4 times = 198-214-234-254-278-302 stitches. When the piece measures 32-32-32-31-32-31 cm / 12½"-12½"-12½"-12¼"-12½"-12¼", purl 1 row from the wrong side where you increase 42-46-50-54-58-62 stitches evenly on row (the bands are continued in garter stitch, do not increase over these stitches) = 240-260-284-308-336-364 stitches. Change to circular needle size 4 mm / US 6. On the next row from the right side, work as follows: 5 stitches garter stitch, * knit 2, purl 2 *, repeat from *-* until there are 7 stitches left, knit 2 stitches and 5 stitches garter stitch. Work rib for 2 cm / ¾", bind off loosely, with knit over knit and purl over purl. The jacket measures approx. 60-62-64-66-68-70 cm / 23⅝"-24⅜"-25¼"-26"-26¾"-27½" from the shoulder. SLEEVE: The piece is worked in the round with circular needle/double pointed needles. Place the 60-68-74-78-80-82 stitches from the thread in the one side of the piece on a short circular needle size 4.5 mm / US 7. In addition, cast on 8-8-10-10-12-14 new stitches mid under the sleeve = 68-76-84-88-92-96 stitches on the needle. Insert a marker thread in the middle of these new stitches – The piece is now measured from here! Work stockinette stitch in the round. When the piece measures 2-2-2-2-2-4 cm / ¾"-¾"-¾"-¾"-¾"-1½" decrease 2 stitches mid under the sleeve – READ DECREASE TIP. Decrease every 3-2-1½ -1½-1½-1 cm / 1"-¾"-½"-½"-½"-⅜" a total of 12-15-18-19-20-21 times = 44-46-48-50-52-54 stitches. When the sleeve measures 38-36-35-33-32-30 cm / 15"-14¼"-13¾"-13-"12½"-11¾"' increase 4-6-8-6-8-10 stitches evenly on round = 48-52-56-56-60-64 stitches. Change to double pointed needles size 4 mm / US 6 and work rib, knit 2/ purl 2 over all stitches. Bind off with knit over knit and purl over purl when the sleeve measures 43-41-40-38-37-35 cm / 17"-16"-15¾"-15"-14¼"-13¾". Work the other sleeve in the same way. ASSEMBLY: Sew the openings under the sleeves. Sew the buttons onto the left band. |
|||||||||||||||||||
Diagram explanations |
|||||||||||||||||||
|
|||||||||||||||||||
|
|||||||||||||||||||
|
|||||||||||||||||||
|
Have you made this or any other of our designs? Tag your pictures in social media with #dropsdesign so we can see them! Do you need help with this pattern?You'll find tutorial videos, a Comments/Questions area and more by visiting the pattern on garnstudio.com. © 1982-2024 DROPS Design A/S. We reserve all rights. This document, including all its sub-sections, has copyrights. Read more about what you can do with our patterns at the bottom of each pattern on our site. |
|||||||||||||||||||


With over 40 years in knitting and crochet design, DROPS Design offers one of the most extensive collections of free patterns on the internet - translated to 17 languages. As of today we count 304 catalogs and 11422 patterns - 11417 of which are translated into English (US/in).
We work hard to bring you the best knitting and crochet have to offer, inspiration and advice as well as great quality yarns at incredible prices! Would you like to use our patterns for other than personal use? You can read what you are allowed to do in the Copyright text at the bottom of all our patterns. Happy crafting!
Comments / Questions (45)
Bonjour, Au moment du placement des deux fils marqueurs pour les côtés du dos et des devants, je ne comprends pas comment le nombre de mailles peut rester le même si j'augmente d'une maille de part et d'autre des quatre A1, soit huit mailles de plus en tout, et que je ne diminue que d'une maille de chaque côté des deux marqueurs, soit 4 mailles en moins. Merci de votre aide !!
13.11.2017 - 23:14DROPS Design answered:
Bonjour Camille, on va augmenter 4 m et diminuer 4 m sur le même rang, ainsi le nombre de mailles va rester le même. Bon tricot!
14.11.2017 - 09:24Nu har jeg prøvet en del forskellige måder, og dette er den bedste efter min mening. Afpas de 3 indtagninger på snoningen med en snogningsomgang. Put de 3 m på hjælpepind, strik derefter 1 m fra hjælpepind + 1m fra pind ret sammen. Gentag i alt 3 gange. Det giver en flot snoning og indtagning der ser meget naturlig ud.
27.10.2017 - 21:17Hej. Jeg forstår ikke hvad jeg skal. Jeg har taget ind på hver side af mærketråden i siden og nu er snoningerne på hver side af mærketråden. Hvis jeg tager 3 m ind vil jeg skulle strikke alle 6 m 2 ret sammen. Men der står jeg samtidig skal tage ind på hver side af mærketråden. Hvordan skal det kunne lade sig at gøre?
26.10.2017 - 10:39DROPS Design answered:
Hej, Jo men det stemmer, maskerne i A.1 vil forsvinde efterhånden som du tager ind i siden, men for at maskeantallet ikke skal blive mindre så tager du samtidig ud på ydersiden af A.1. God fornøjelse!
15.11.2017 - 13:52Hej. Jeg forstår ikke hvad jeg skal. Jeg har taget ind på hver side af mærketråden i siden og nu er snoningerne på hver side af mærketråden. Hvis jeg tager 3 m ind vil jeg skulle strikke alle 6 m 2 ret sammen. Men der står jeg samtidig skal tage ind på hver side af mærketråden. Hvordan skal det kunne lade sig at gøre?
25.10.2017 - 22:09Bardzo proszę o wyjaśnienie fragmentu "Gdy jest wystarczająca liczba oczek w schemacie A.1, aby przerobić warkocze z 6 oczek, przerabiać te oczka dżersejem, W TYM SAMYM CZASIE zamykając 3 oczka ponad każdym warkoczem, nie zamykać oczek ponad warkoczami z 2 oczek"
20.10.2017 - 19:46DROPS Design answered:
Witak Agnieszko, wkradł się błąd. Oto przeformułowany fragment: "Gdy nie ma dostatecznej liczby oczek w schemacie A.1, aby wykonać warkocze z 6 oczek, przerabiać te oczka dżersejem, a W TYM SAMYM CZASIE zamknąć 3 oczka ponad każdym warkoczem, nie zamykać oczek ponad warkoczami z 2 oczek (pamiętać, aby dodawać oczka z każdej strony schematu A.1 i zamykać oczka z każdej strony nitek markerów)". Miłej pracy!
21.10.2017 - 09:55Bonjour, A votre avis, puis-je tricoter ce pull avec les 2 laines suivantes ensemble : Alpaga et Flora (elles sont chacune du groupe A) ? J'ai des pelotes de ces 2 catégories dont les couleurs s'associent très bien, mais je me demande si ça ne va pas faire trop épais pour du 4,5. Merci pour vos conseils.
12.08.2017 - 22:24DROPS Design answered:
Bonjour, Puna est du groupe de fils B, tandis que Alpaca et Flora ensemble sont du grupe C (2 fils A = 1 fil C). Pour voir comment utiliser un fil différent de celui mentionné dans le modele consultez notre lecon ICI. Bon tricot!
18.08.2017 - 13:53Wann kommt die Anleitung fuer den Pullover, passend zu Arendal? Ich finde das Modell einfach toll und mein Beutel "Puna" wartet schon sehnsuechtig darauf, als pu-018 verstrickt zu werden! Ich habe schon viele Drops Garne verstrickt und finde sie ganz toll. Wuerde mir aber gern einige mehr Multi-Color Garne wuenschen, vor allem in Baumwolle und Alpaca. Liebe Gruesse.
30.07.2017 - 19:15DROPS Design answered:
Liebe Frau Bieber, alle Modellen der letzten Kollektion sind noch nicht online, die werden Tag für Tag online gestellt, bleiben Sie daran, dieses Modell kommt sicher gleich!
31.07.2017 - 10:37Ich stricke die Jacke gerade aus Cotton-light,fb. Glockenblume.Die Farbe ist sehr schön und die Wolle lsst sich gut verarbeiten. Gabriele
27.07.2017 - 11:39Liebes drops-team, in der Anleitung für das Knopfloch steht, den Umschlag in der Rückreihe verschränkt stricken. Ich glaube,dass ist so nicht richtig-der Umschlag muss normal gestrickt werden damit ein Loch entsteht. Mit lieben Grüßen, Gabriele
27.07.2017 - 09:45DROPS Design answered:
Liebe Gabriele, genau, Umschlag beim Knopfloch muss normal gestrickt werden, die Anleitung wird korrigiert. Danke für den Hinweis. Viel Spaß beim stricken!
27.07.2017 - 11:35Guten Morgen, ich möchte diese Jacke in Gr. S mit doppeltem Faden aus Drops Fabel mit Stricknadel Nr. 4,5 stricken. Wieviel Garn brauche ich dafür? Liebe Grüße, Lydia
17.07.2017 - 10:12DROPS Design answered:
Liebe Lydia, dieses Modell wird aus DROPS Puna, dh Garngruppe B gestrickt - 2 Fäden Fabel = Garngruppe C - lesen Sie mehr hier, dann sollen Sie lieber ein Modell aus der Garngruppe C aussuchen. Viel Spaß beim stricken!
17.07.2017 - 10:35