
Popular categories
Looking for a yarn?


|
|||||||||||||||||||
Arendal Cardigan |
|||||||||||||||||||
 |
 |
||||||||||||||||||
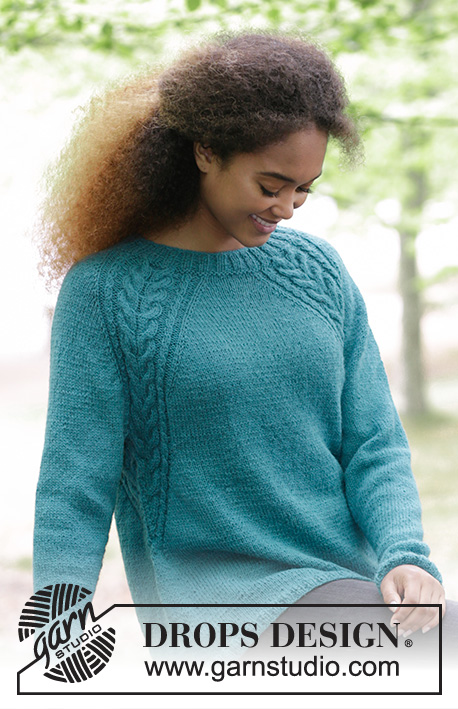
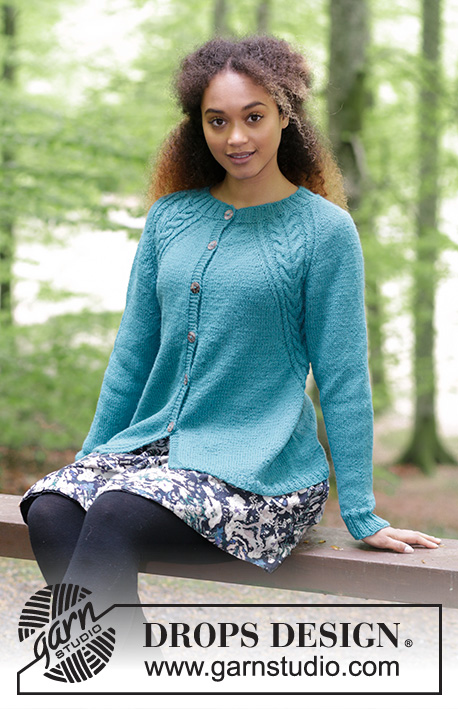
Knitted jacket with cables and raglan, worked top down. Sizes S - XXXL. The piece is worked in DROPS Puna.
DROPS 181-25 |
|||||||||||||||||||
|
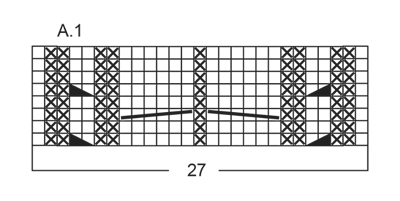
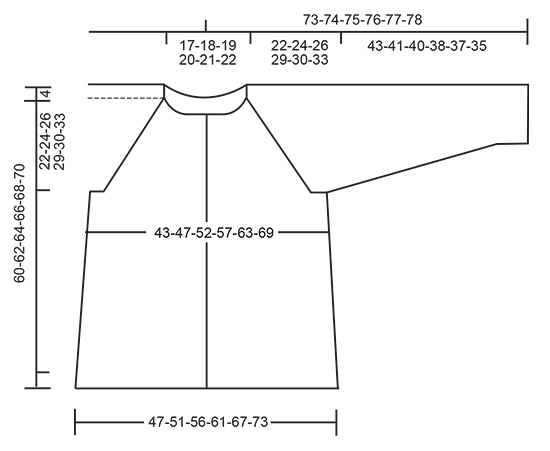
INFORMATION FOR THE PATTERN: RIDGE/GARTER STITCH (worked back and forth): 1 ridge = Knit 2 rows. PATTERN: See diagram A.1. The diagram shows all the rows in the pattern seen from the right side. RAGLAN: Increase to raglan on each side of A.1. Increase 1 stitch on each side of A.1 as follows (= 8 new stitches each time you increase). Work to A.1, 1 yarn over, work A.1, 1 yarn over. On the next round, purl the yarn overs twisted to prevent holes. INCREASE TIP (for the sides): Work until there are 2 stitches left before the marker thread in the side. Make 1 yarn over, knit 2 stitches (the marker thread sits between these) and make 1 yarn over. On the next round, purl the yarn overs twisted to prevent holes. DECREASE TIP (for sleeves): Decrease 1 stitch on each side of the marker thread as follows: Work until there are 3 stitches left before the marker thread, slip 1 stitch as if to knit, knit 1, pass the slipped stitch over, knit 2 stitches (the marker thread sits between these stitches), knit the next 2 stitches together. BUTTONHOLE: The first buttonhole is worked when the rib in the neck measures 3 cm / 1", then work the 5-5-5-6-6-6 next buttonholes with approx. 8 cm / 3⅛" between them. Decrease for buttonhole on the right band as follows: Work until there are 3 stitches left on the needle (seen from the right side), make 1 yarn over, knit 2 together and knit 1. On the next row, knit the yarn over, so that there is a hole. ---------------------------------------------------------- The jacket is worked back and forth with circular needle, from mid front and top down. JACKET: Cast on 120-128-132-136-144-144 stitches (including 5 band stitches in each side towards mid front) with circular needle size 4 mm / US 6 and Puna. Purl 1 row from the wrong side, then work as follows – from the right side: 5 stitches garter stitch, * knit 2/ purl 2 *, repeat from *-* until there are 7 stitches left, knit 2 stitches and 5 stitches garter stitch. REMEMBER BUTTONHOLE! Continue with rib in this way for 4 cm / 1½". The last row is from the wrong side. Change to circular needle size 4.5 mm / US 7. Work 1 RIDGE – see description above, on the first row, decrease 2 stitches evenly on row = 118-126-130-134-142-142 stitches. Continue as follows – from the right side: Work 5 stitches garter stitch, knit 11-12-13-15-16-18, *1 yarn over, knit 1 *, repeat from *-* a total of 3 times, knit 1, * 1 yarn over, knit 1 *, repeat from *-* a total of 3 times (= these 7 stitches become 13 stitches), knit 18-20-20-18-20-16, *1 yarn over, knit 1 *, repeat from *-* a total of 3 times, knit 1, * 1 yarn over, knit 1 *, repeat from *-* a total of 3 times, knit 22-24-26-30-32-36, * 1 yarn over, knit 1 *, repeat from *-* a total of 3 times, knit 1, * 1 yarn over, knit 1 *, repeat from *-* a total of 3 times, knit 18-20-20-18-20-16, *1 yarn over, knit 1 *, repeat from *-* a total of 3 times, knit 1, * 1 yarn over, knit 1 *, repeat from *-* a total of 3 times, knit 11-12-13-15-16-18 and 5 stitches garter stitch = 142-150-154-158-166-166 stitches. Purl 1 row from the wrong side; the yarn overs are purled twisted to prevent holes and the bands are knitted. Continue as follows from the right side: Work 5 stitches garter stitch (= band stitches), 4-5-6-8-9-11 stitches stockinette stitch (= left front piece), A.1 (= 27 stitches), 4-6-6-4-6-2 stitches stockinette stitch (= sleeve), A.1, 8-10-12-16-18-22 stitches stockinette stitch (= back piece), A1, 4-6-6-4-6-2 stitches stockinette stitch (= sleeve), A.1, 4-5-6-8-9-11 stitches stockinette stitch (= right front piece and finish with 5 stitches garter stitch (= band stitches). READ THE WHOLE OF THE NEXT SECTION BEFORE CONTINUING! Continue this pattern, at the same time increase on each side of A.1 to RAGLAN – see description above. Increase every 2nd row (= each row from the right side) 21-24-27-30-32-35 times. REMEMBER THE GAUGE! After all the increases, there are 310-342-370-398-422-446 stitches on the needle. Continue the pattern as before (without increases) until the piece measures 22-24-26-29-30-33 cm / 8¾"-9½"-10¼"-11½"-11¾"-13" from the cast-on edge mid front. The next row is worked as follows from the wrong side: Work 50-54-58-63-68-73 stitches (= right front piece), place the next 60-68-74-78-80-82 stitches on 1 thread (= sleeve), cast on 8-8-10-10-12-14 new stitches on the needle (= under the sleeve), work 90-98-106-116-126-136 stitches (= back piece), place the next 60-68-74-78-80-82 stitches on 1 thread (= sleeve), cast on 8-8-10-10-12-14 new stitches on the needle (= under the sleeve) and work the remaining 50-54-58-63-68-73 stitches (= left front piece). BODY: = 206-222-242-262-286-310 stitches. THE PIECE IS NOW MEASURED FROM HERE! Insert a marker thread in each side, in the middle of the new stitches cast on. Continue back and forth with stockinette stitch and 5 stitches garter stitch in each side of the piece. REMEMBER BUTTONHOLE. Continue A.1 over the 20-20-20-20-22-22 stitches in the pattern which remain on the front and back pieces, but on every 2nd row (= each row from the right side) make 1 yarn over on the outside of each A.1 (= towards mid front and mid back) and knit 2 stitches together on each side of the marker thread in the sides. The yarn overs are purled twisted on the next row to prevent holes. The number of stitches remains the same, but the stitches in A.1 will gradually decrease towards the sides of the jacket and there will be more and more stitches in stockinette stitch. When there are not enough stitches in A.1 to work 6-stitch cable, work these stitches in stockinette stitch, AT THE SAME TIME as you decrease 3 stitches evenly over the cable, do not decrease over the cable with 2 stitches (remember to make the increase on the outside of A.1 and decrease on each side of the marker threads). When all of A.1 has been decreased there are 182-198-218-238-262-286 stitches on the row. Continue with stockinette stitch and garter stitch over the band stitches. There is 48-52-57-62-68-74 stitches on each front piece and 86-94-104-114-126-138 stitches on back piece. When the piece measures 15-15-15-15-15-15 cm / 6" all sizes increase 1 stitch on each side of the marker threads (= 4 stitches increased) – READ INCREASE TIP! Increase every 5 cm / 2" a total of 4 times = 198-214-234-254-278-302 stitches. When the piece measures 32-32-32-31-32-31 cm / 12½"-12½"-12½"-12¼"-12½"-12¼", purl 1 row from the wrong side where you increase 42-46-50-54-58-62 stitches evenly on row (the bands are continued in garter stitch, do not increase over these stitches) = 240-260-284-308-336-364 stitches. Change to circular needle size 4 mm / US 6. On the next row from the right side, work as follows: 5 stitches garter stitch, * knit 2, purl 2 *, repeat from *-* until there are 7 stitches left, knit 2 stitches and 5 stitches garter stitch. Work rib for 2 cm / ¾", bind off loosely, with knit over knit and purl over purl. The jacket measures approx. 60-62-64-66-68-70 cm / 23⅝"-24⅜"-25¼"-26"-26¾"-27½" from the shoulder. SLEEVE: The piece is worked in the round with circular needle/double pointed needles. Place the 60-68-74-78-80-82 stitches from the thread in the one side of the piece on a short circular needle size 4.5 mm / US 7. In addition, cast on 8-8-10-10-12-14 new stitches mid under the sleeve = 68-76-84-88-92-96 stitches on the needle. Insert a marker thread in the middle of these new stitches – The piece is now measured from here! Work stockinette stitch in the round. When the piece measures 2-2-2-2-2-4 cm / ¾"-¾"-¾"-¾"-¾"-1½" decrease 2 stitches mid under the sleeve – READ DECREASE TIP. Decrease every 3-2-1½ -1½-1½-1 cm / 1"-¾"-½"-½"-½"-⅜" a total of 12-15-18-19-20-21 times = 44-46-48-50-52-54 stitches. When the sleeve measures 38-36-35-33-32-30 cm / 15"-14¼"-13¾"-13-"12½"-11¾"' increase 4-6-8-6-8-10 stitches evenly on round = 48-52-56-56-60-64 stitches. Change to double pointed needles size 4 mm / US 6 and work rib, knit 2/ purl 2 over all stitches. Bind off with knit over knit and purl over purl when the sleeve measures 43-41-40-38-37-35 cm / 17"-16"-15¾"-15"-14¼"-13¾". Work the other sleeve in the same way. ASSEMBLY: Sew the openings under the sleeves. Sew the buttons onto the left band. |
|||||||||||||||||||
Diagram explanations |
|||||||||||||||||||
|
|||||||||||||||||||
|
|||||||||||||||||||
|
|||||||||||||||||||
|
Have you made this or any other of our designs? Tag your pictures in social media with #dropsdesign so we can see them! Do you need help with this pattern?You'll find tutorial videos, a Comments/Questions area and more by visiting the pattern on garnstudio.com. © 1982-2024 DROPS Design A/S. We reserve all rights. This document, including all its sub-sections, has copyrights. Read more about what you can do with our patterns at the bottom of each pattern on our site. |
|||||||||||||||||||


With over 40 years in knitting and crochet design, DROPS Design offers one of the most extensive collections of free patterns on the internet - translated to 17 languages. As of today we count 304 catalogs and 11422 patterns - 11417 of which are translated into English (US/in).
We work hard to bring you the best knitting and crochet have to offer, inspiration and advice as well as great quality yarns at incredible prices! Would you like to use our patterns for other than personal use? You can read what you are allowed to do in the Copyright text at the bottom of all our patterns. Happy crafting!
Comments / Questions (45)
Hi I am confused about the decrease on the six stitch cable. Will it be a decrease of 24 stitches altogether on one row? Or 12?
12.01.2019 - 16:21DROPS Design answered:
Dear Flo, you will decrease alltogether 24 sts on row - remember to continue dec/inc as before - but since cables are tighten work, you need to dec to keep correct width. Happy knitting!
14.01.2019 - 10:15Teil 2: Das würde auch heissen, dass ich in eben diesem Umgang den allerletzten 6er Zopf mache, da dann nach weiteren 3x Abnehmen vor dem Markierungsfaden auch für den ersten 6er Zopf in A1 nicht mehr genügend Maschen vorhanden wären. Das heisst ich hätte dann nur 9 mal die 6er Zöpfe gestrickt (Grösse M, stricke eher fest, Maschenanzahl stimmt 222), doch auf dem Foto, welches S oder M sein soll, sieht es eher nach mind. 12 6er Zöpfen aus. Stimmt ewas nicht? Bin froh um jeden Tipp. Danke!
07.10.2018 - 10:31DROPS Design answered:
Liebe Kim, wieviele A.1 in der Höhe stricken werden hängt auch von Ihrer Maschenprobe in der Höhe. Die Hauptsache ist, daß beide A.1 unter jedem Ärmel wie eine 3-Eck endet (= mit Zu- und Abnahmen). Viel Spaß beim stricken!
08.10.2018 - 08:56Teil 1: Guten Tag. Komme ich zu dem Umgang in welchem für den zweiten 6er Zopf in A1 zu wenige Maschen vorhanden sind, so sieht das Muster wie folgt aus: 1 re, 2li, 2re, 2li, 6er Zopf, 1li (Mittelmasche), 6 re, Marierungsfaden. Nun soll ich also in diesem Umgang aus diesen 6 M vor der Markierung sowohl die zwei letzten Maschen vor dem Markierungsfaden zusammenstricken und zusätzlich 3 Maschen abnhemen. Das heisst im müsste aus den 6re Maschen vor der Markierung 2 machen?
07.10.2018 - 10:20DROPS Design answered:
Liebe Kim, die Abnahmen entstehen in den 6er Zopf, die Sie nicht mehr als Zopf stricken können (so wird dieses Teil nicht breiter sein) - auf beiden Seiten wiederholen. Die anderen Maschen wie zuvor stricken. Sie werden dann bei dieser Reihe Maschen abnehmen, dann wie zuvor weiter stricken (mit Zu- und Abnahme bis keine Maschen in A.1 gestrickt werden). Viel Spaß beim stricken!
08.10.2018 - 08:53How do I print the photo of pattern pu-019?
04.07.2018 - 06:30DROPS Design answered:
Dear Diane, click on "Picture" between "Print pattern" and "Add to favorites", just above where you can read "Pattern instructions". Happy knitting!
04.07.2018 - 07:20Bonjour, est-ce que les aug./dim. se font dès le 1er rg endroit après avoir mis en attente les m. des manches ? Egalement, pouvez-vous m'expliquer comment faire les dim. de 3 m. au-dessus de la torsade de 6 m. qui ne peut plus se faire ? Quand j'arrive à ce stade, je fais 1 torsade de 6 m., 1 m. env. et il me reste 6 m. avant le fil marqueur : dois-je tricoter 3 fois 2 m. ens. ? J'ai l'impression d\'avoir fait une erreur. Merci d\'avance pour votre aide!
20.04.2018 - 09:05DROPS Design answered:
Bonjour Christelle, on augmente sur le devant et sur le dos (= 2 m par côté/4 m au total) avant les torsades devant/dos et après ces torsades. On diminue en même temps 1 m de chaque côté du fil marqueur (= 2 dim par côté/4 dim au total). Quand vous arrivez aux diminutions sur les torsades, tricotez ces 6 m 2 par 2 ens à l'end (= 3 diminutions) mais continuez bien à augmenter/diminuer comme avant. Ces diminutions dans les torsades permettent de bien conserver la bonne largeur. Bon tricot!
20.04.2018 - 09:31Bonjou, je bute sur les augmentations à faire sur A1, on est bien d\\\'accord qu\'il y a dans l\'ouvrage 4 A1? Donc, un jeté de chaque côté fait 8 augmentations en tout! Alors que les diminutions sur les nouvelles mailles montées (2 fois 8-8-10-10-12-14) se font de chaque côté, donc 4 augmentations. Il manque 4 mailles! Faut-il faire des diminutions au milieu de ces nouvelles mailles? Merci beaucoup!
18.03.2018 - 18:15DROPS Design answered:
Bonjour Evelyne, il y a bien 4 fois A.1 répartis ainsi: A1, 8-10-12-14 m, A.1 de chaque côté. On va augmenter et diminuer ainsi: 1 augmentation, A.1, jersey jusqu'à 2 m avant le marqueur, 2 m ens à l'end, marqueur, 2 m ens à l'end, A.1, 1 augmentation = on augmente 2 m et on diminue 2 m au milieu sous la manche et on répète ça sur l'autre côté, on augmente 4 m et on diminue 4 m au total sur le rang. Bon tricot!
19.03.2018 - 15:00Talli wrote:
Thank you for the super-fast reply! I still require some clarification though:instruction is to dec 3 evenly over cable, and there are 4 cables. That makes a total of 12s decreased. But i start with 222s ans suppose to end with 198, which makes a total if 4dec. What i am having difficulty with is this math... what am i missing??? 😅 thanks again!
16.03.2018 - 16:03Talli answered:
Sorry for bothering you, just figured my mistake!
16.03.2018 - 17:04Talli wrote:
Hello, i have a question concerning the body section descreases. I am asked to end up with 4s less than i stated with, matching 4 repetitions of A1. My problem us that i am asked to decrease 3s evenly over the cable while only increasing 1, and that makes 8 in total and not 4. Could you please assist me? Thank you very much for all the wonderful patterns!!!
16.03.2018 - 15:11DROPS Design answered:
Dear Talli, continue the dec (4 sts) and the inc (4 sts) as before to displace the pattern on the side (until it disappear), but when you don't have enough sts to work the 6 sts cable, decrease 3 sts over each of these cable to keep the correct width (cables are tighening pieces, if you don't dec over the cables when you cannot work them anymore, piece will be wider). Happy knitting!
16.03.2018 - 15:31Hallo eine Frage: ich stricke gerade die Jacke und es heisst beim Rumpf: Beim Zopf gleichzeitig je 3 Maschen abnehmen. Das verstehe ich nicht. Wo soll ich bitte diese Maschen abnehmen? Ist das egal und wie oft ? Vielen Dank im voraus
28.01.2018 - 15:17DROPS Design answered:
Liebe Frau Brandt, wenn es nicht genügend Maschen für die Zöpfe gibt (dh wegen Abnehmen mitte under den Arm), dann nehmen Sie 3 M auf jedem Zopf, damit die Breite mit/ohne Zopf immer stimmt. Viel Spaß beim stricken!
29.01.2018 - 10:40Bonjour. Lorsqu'il n'y a plus assez de mailles pour tricoter les torsades de A1 en entier, il est écrit qu'il faut diminuer de 3 mailles au dessus de chaque torsade. Cela fait donc 24 mailles sur le même rang. Cela me semble énorme. Pouvez-vous me confirmer ? Merci
04.01.2018 - 22:11DROPS Design answered:
Bonjour Mme Petit, on va diminuer seulement les mailles des torsades de 6 m qui ne peuvent plus être croisées, donc 1 des torsades dans chaque A.1, et pas dans tout A.1 en même temps. On diminue dans les torsades pour bien conserver la bonne largeur (les torsades resserrent davantage que le jersey). Bon tricot!
05.01.2018 - 09:12