-------------------------------------------------------
Alternative Yarn – See how to change yarns here
Yarn Groups A to F – Use the same pattern and change the yarn here
Yarn usage using an alternative yarn – Use our yarn converter here
-------------------------------------------------------
= 1 chain stitch | |
= 1 double crochet between 2 treble crochets | |
= 1 double crochet around the chain stitch | |
= 1 half treble crochet between 2 treble crochets | |
= 1 treble crochet around the chain-stitch ring/chain-space | |
= Crocheted-together double treble crochet: Work 3 double treble crochets together in double crochet/around chain-space as follows: Work 1 double treble crochet, but wait with the last pull through (= 2 loops on the hook), work 1 more double treble crochet, but wait with the last pull through (= 3 loops on the hook), work 1 more double treble crochet, at the last pull through, pull the strand through all 4 loops on the hook | |
= The round starts with 3 chain stitches and finishes with 1 slip stitch in the 3rd chain stitch at the beginning of the round | |
= The round starts with 2 chain stitches and finishes with 1 slip stitch in the 2nd chain stitch at the beginning of the round, work slip stitches to the middle of the next chain-space (at the end of round 2 in A.1, finish only with 1 slip stitch in the 2nd chain stitch at the beginning of the round). | |
= The round starts with 3 chain stitches and finishes with 1 slip stitch in the first crocheted-together double treble crochet | |
= Work 4 chain stitches and form them to a ring with 1 slip stitch in the first chain stitch | |
= this round has been worked |
Each of our patterns has specific tutorial videos to help you.
These step-by-step tutorials might also help you:
Why is the knitting/crochet tension so important?
Knitting tension is what determines the final measurements of your work, and is usually measured per 10 x 10 cm. It is provided like so: number of stitches in width x number of rows in height - eg: 19 stitches x 26 rows = 10 x 10 cm.
The knitting tension is very individual; some people knit/crochet loosely while others work tightly. You adjust the knitting tension with the needle size, which is why the suggested needle size is only meant as a guide! You need to adjust this (up or down) to ensure that YOUR knitting tension matches the knitting tension provided in the pattern. If you work with a different knitting tension than provided you will have a different yarn consumption, and your work will have different measurements than what the pattern suggests.
The knitting tension also determines which yarns can replace each other. As long as you achieve the same knitting tension you can replace one yarn with another.
See DROPS lesson: How to measure your tension/gauge
See DROPS video: How to make a gauge tension swatch
How do I know how many balls of yarn I need?
The required amount of yarn is provided in grams, eg: 450 g. To calculate how many balls you’ll need you first need to know how many grams are in 1 ball (25g, 50g or 100g). This information is available if you click on the individual yarn quality on our pages. Divide the amount required with the amount of each ball. For example, if each ball is 50g (the most common amount), the calculation will be as follows: 450 / 50 = 9 balls.
Can I use a different yarn than what the pattern suggests?
The important thing when changing from one yarn to another is that the knitting/crochet tension remains the same. This is so that the measurements of the finished piece will be the same as on the sketch provided. It is easier to achieve the same knitting tension using yarns from the same yarn group. It is also possible to work with multiple strands of a thinner yarn to achieve the knitting tension of a thicker one. Please try our yarn converter. We recommend you to always work a test swatch.
Please NOTE: when changing yarn the garment might have a different look and feel to the garment in the photo, due to individual properties and qualities of each yarn.
See DROPS lesson: Can I use a different yarn than the one mentioned in the pattern?
What are the yarn groups?
All our yarns are categorised into yarn groups (from A to F) according to thickness and knitting tension – group A contains the thinnest yarns and group F the thickest. This makes it easier for you to find alternative yarns to our patterns, should you wish to switch yarn. All yarns within the same group have a similar knitting tension and can easily replace each other. However, different yarn qualities have different structures and properties which will give the finished work a unique look and feel.
How do I use the yarn calculator?
At the top of all our patterns you’ll find a link to our yarn calculator, which is a helpful tool should you wish to use a different yarn than suggested. By filling in the yarn quality you wish to replace, the amount (in your size) and number of strands, the calculator will present good alternative yarns with the same knitting tension. Additionally it will tell you how much you’ll require in the new qualities and whether you’ll need to work with multiple strands. Most skeins are 50g (some are 25g or 100g).
If the pattern is worked with multiple colours, every colour will have to be calculated separately. Similarly, if the pattern is worked with several strands of different yarns (for example 1 strand Alpaca and 1 strand Kid-Silk) you will have to find alternatives for each, individually.
Why do you show discontinued yarns in the patterns?
Since different yarns have different qualities and textures we have chosen to keep the original yarn in our patterns. However, you can easily find options among our available qualities by using our yarn calculator, or simply pick a yarn from the same yarn group.
It is possible that some retailers still have discontinued yarns in stock, or that someone has a few skeins at home that they would like to find patterns for.
The yarn calculator will provide both alternative yarn as well as required amount in the new quality.
What size should I knit?
If you think it's hard to decide what size to make, it can be a good idea to measure a garment you own already and like the size of. Then you can pick the size by comparing those measures with the ones available in the pattern's size chart.
You'll find the size chart at the bottom of the pattern.
See DROPS lesson: How to read size chart
Why do I get the wrong knitting tension with the suggested needle size?
The needle size provided in the pattern serves only as a guide, the important thing is to follow the knitting tension. And since knitting tension is very individual, you will have to adjust the needle size to ensure that YOUR tension is the same as in the pattern – maybe you’ll have to adjust 1, or even 2 needle sizes, up or down to achieve the correct tension. For this, we recommend that you work test swatches.
Should you work with a different knitting tension than the one provided, the measurements of the finished garment might deviate from the measurement sketch.
See DROPS lesson: How to measure your tension/gauge
See DROPS video: How to make a tension/gauge swatch
Why is the pattern worked top-down?
Working a garment top-down provides more flexibility and room for personal adjustment. For example it is easier to try the garment on while working, as well as making adjustments to length of yoke and shoulder caps.
The instructions are carefully explaining every step, in the correct order. Diagrams are adjusted to the knitting direction and are worked as usual.
How do I work according to a knitting diagram?
The diagram depicts all rows/rounds, and every stitch seen from the right side. It is read from bottom to top, from right to left. 1 square = 1 stitch.
When working back and forth, every other row is worked from the right side and every other row is worked from the wrong side. When working from the wrong side, the diagram will have to be worked reversed: from left to right, knit stitches are purled, purl stitches are knit etc.
When working in the round every round is worked from the right side and the diagram are worked from right to left on all rounds.
See DROPS lesson: How to read knitting diagrams
How do I work according to a crochet diagram?
The diagram depicts all rows/rounds, and every stitch seen from the right side. It is worked from bottom to top, from right to left.
When working back and forth every other row is worked from the right side: from right to left and every other row is worked from the wrong side: from left to right.
When working in the round, every row in the diagram are worked from the right side, from right to left.
When working a circular diagram you start in the middle and work your way outwards, counter clockwise, row by row.
The rows usually start with a given number of chain stitches (equivalent to the height of the following stitch), this will either be depicted in the diagram or explained in the pattern.
See DROPS lesson: How to read crochet diagrams
How do I work several diagrams simultaneously on the same row/round?
Instructions for working several diagrams after each other on the same row/round, will often be written like so: “work A.1, A.2, A.3 a total of 0-0-2-3-4 times". This means you work A.1 once, then A.2 is worked once, and A.3 is repeated (in width) the number of times provided for your size – in this case like so: S = 0 times, M = 0 times, L=2 times, XL= 3 times and XXL = 4 times.
The diagrams are worked as usual: begin with the first row in A.1, then work the first row in A.2 etc.
See DROPS lesson: How to read knitting diagrams
See DROPS lesson: How to read crochet diagrams
Why are the sleeves shorter in larger sizes?
The total width of the garment (from wrist-to-wrist) will be larger in the larger sizes, despite the actual sleeves being shorter. The larger sizes have longer sleeve caps and wider shoulders, so there will be a good fit in all sizes.
Where on the garment is the length measured?
The measurement sketch/schematic drawing provides information regarding the full length of the garment. If it’s a jumper or a jacket the length is measured from the highest point on the shoulder closest to the neckline, and straight down to the bottom of the garment. It is NOT measured from the tip of shoulder. Similarly, the length of yoke is measured from the highest point on the shoulder and down to where yoke is split into body and sleeves.
On a jacket measures are never taken along bands, unless specifically stated. Always measure inside band stitches when measuring the length.
See DROPS lesson: How to read a schematic drawing
What is a repeat?
Diagrams are often repeated on the round or in height. 1 repeat is the diagram the way it appears in the pattern. If it says to work 5 repeats of A.1 in the round, then you work A.1 a total of 5 times after/next to each other in the round. If it says to work 2 repeats of A.1 vertically/in height you work the entire diagram once, then begin again at the start and work the entire diagram one more time.
Why does the piece start with more chain stitches than it’s worked with?
Chain stitches are slightly narrower than other stitches and to avoid working the cast-on edge too tight, we simply chain more stitches to begin with. The stitch count will be adjusted on the following row to fit the pattern and measurement sketch.
Why increase before the rib edge when the piece is worked top-down?
The rib edge is more elastic and will contract slightly compared to, for example, stocking stitch. By increasing before the rib edge, you avoid a visible difference in width between the rib edge and the rest of the body.
Why increase in the cast-off edge?
It’s very easy to cast off too tightly, and by making yarn overs while casting off (and simultaneously casting these off) you avoid a too tight cast off edge.
See DROPS video: How to bind off with yarn overs (yo)
How do I increase/decrease on every 3rd and 4th row/round alternately?
To achieve an even increase (or decrease) you can increase on, for example: every 3rd and 4th row alternately, like so: work 2 rows and increase on the 3rd row, work 3 rows and increase on the 4th. Repeat this until the increase is complete.
See DROPS lesson: Increase or decrease 1 st on every 3rd and 4th row alternately
How can I work a jacket in the round instead of back and forth?
Should you prefer to work in the round instead of back and forth, you may of course adjust the pattern. You’ll need to add steeks mid-front (usually 5 stitches), and follow the instructions. When you would normally turn and work from the wrong side, simply work across the steek and continue in the round. At the end you’ll cut the piece open, pick up stitches to work bands, and cover the cut edges.
See DROPS video: How to knit steeks and cut open
Can I work a jumper back and forth instead of in the round?
Should you prefer to work back and forth instead of in the round, you may of course adjust the pattern so you work the pieces separately and then assemble them at the end. Divide the stitches for the body in 2, add 1 edge stitch in each side (for sewing) and work the front and back pieces separately.
See DROPS lesson: Can I adapt a pattern for circular needles into straight needles?
Why is the pattern slightly different than what I see in the photo?
Pattern repeats can vary slightly in the different sizes, in order to get the correct proportions. If you’re not working the exact same size as the garment in the photo, yours might deviate slightly. This has been carefully developed and adjusted so that the complete impression of the garment is the same in all sizes.
Make sure to follow instructions and diagrams for your size!
How do I make a women’s size garment into a men’s size one?
If you have found a pattern you like which is available in women’s size it’s not very difficult to convert it to men’s size. The biggest difference will be the length of sleeves and body. Start working on the women size that you think would fit across the chest. The additional length will be worked right before you cast off for the armhole/sleeve cap. If the pattern is worked top-down you can add the length right after the armhole or before the first decrease on sleeve.
Regarding additional yarn amount, this will depend on how much length you add, but it is better with a skein too many than too few.
How do I prevent a hairy garment from shedding?
All yarns will have excess fibres (from production) that might come off as lint or shedding. Brushed yarns (ie hairier yarns) have more of these loose, excess fibres, causing more shedding.
Shedding also depends on what is worn under or over the garment, and whether this pulls at the yarn fibres. It’s therefore not possible to guarantee that there will be no shedding
Below are some tips on how to get the best result when working with hairier yarns:
1. When the garment is finished (before you wash it) shake it vigorously so the looser hairs come off. NOTE: do NOT use a lint roller, brush or any method that pulls at the yarn.
2. Place the garment in a plastic bag and put it in your freezer - the temperature will cause the fibres to become less attached to each other, and excess fibres will come off easier.
3. Leave in the freezer for a few hours before taking it out and shaking it again.
4. Wash the garment according to the instructions on the yarn label.
Why does my garment pill?
Pilling is a natural process that happens to even the most exclusive of fibers. It's a natural sign of wear and tear that is hard to avoid, and that is most visible in high friction areas of your garment like a sweater's arms and cuffs.
You can make your garment look as new by removing the pilling, using a fabric comb or a pill/lint remover.
Forest Cycle |
||||||||||||||||||||||||||||||||||
|
|
|||||||||||||||||||||||||||||||||
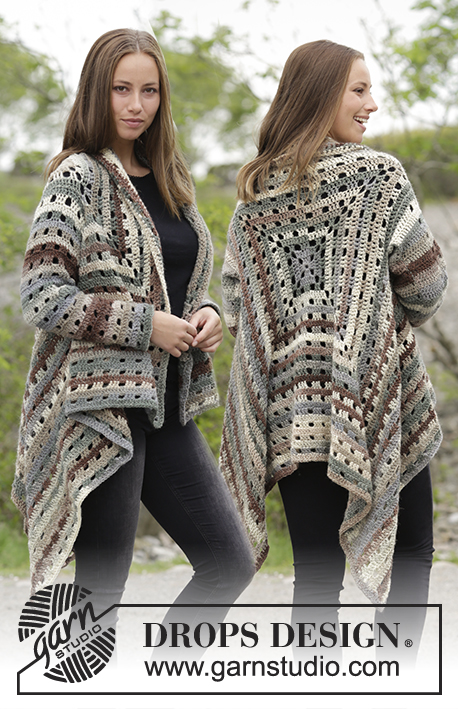
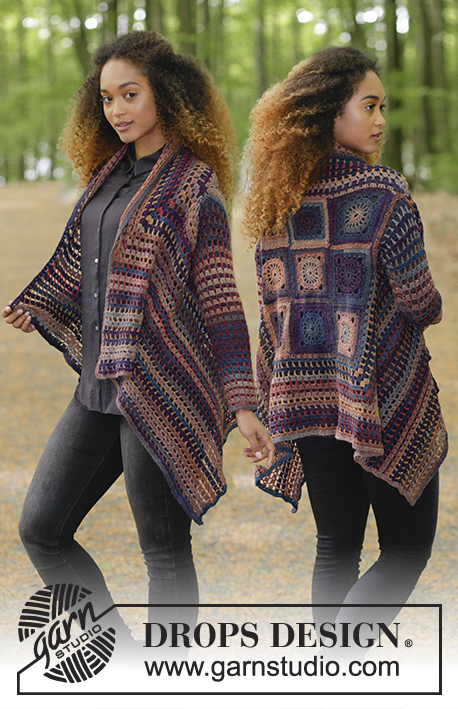
Crochet circle jacket with stripes. Sizes S - XXXL. The piece is worked in DROPS Air and DROPS Big Delight.
DROPS 180-12 |
||||||||||||||||||||||||||||||||||
INFORMATION FOR THE PATTERN: PATTERN: See diagrams A.1 to A.6. Diagrams A.1, A.3 and A.5 show how the rounds start and finish, diagrams A.2, A.4 and A.6 are repeated on the round. COLOURS: The jacket is crocheted in stripes as follows: ROUND 1: Air ROUND 2: Big Delight ROUND 3: Air ROUND 4: Air ROUND 5: Air ROUND 6: Big Delight. Work as for rounds 3-6, two more times. ROUND 15: Air ROUND 16: Air ROUND 17: Big Delight Work as for rounds 15-17, one more time ROUND 21: Air ROUND 22: Air ROUND 23: Air. ROUND 24: Big Delight. Work as for rounds 21-24 to finished length. COLOUR CHANGE: The stitches in A.1, A.3 and A.5 are always crocheted with one strand of each quality, so that the strand you are not using will follow your work upwards until you need to use it. INCREASE TIP: Increase 1 chain-space by working 3 chain stitches + 1 double crochet around the chain stitch in the middle of the treble crochet group from the previous round. DECREASE TIP: Decrease 1 chain-space by skipping 2 chain stitches instead of 1 chain stitch 2 times evenly spaced on the round = 1 chain-space decreased. MEASUREMENT TIP: The jacket will be quite stretchy. It is advisable to try the jacket on before the sleeves are finished, to get the right length. ---------------------------------------------------------- CIRCLE JACKET: The piece is worked in the round from mid back. READ THE WHOLE PATTERN BEFORE STARTING! Work 4 chain stitches with hook size 6 mm and Air and form them to a ring with 1 slip stitch in the first chain stitch. READ COLOURS and COLOUR CHANGE! Work A.1, then work A.2 a total of 4 times on the round. REMEMBER THE CROCHET TENSION! Work A.1 and A.2 1 time in height = 32 treble crochet groups/chain-spaces (the stitches in A.1 are not counted in the total number of stitches). SIZE S/M: Work round 1. in A.3 and A.4, then work round 2 in A.3 and A.4, AT THE SAME TIME as you increase 16 chain-spaces evenly on round – READ INCREASE TIP = 48 chain-spaces. Continue by working armholes – see description below. SIZE L/XL: Work A.3 and A.4 1 time in height, AT THE SAME TIME on round 2 in A.4 increase 16 chain spaces evenly on round = 48 treble crochet groups/chain-spaces. Continue with round 1 in A.3 and A.4, then work round 2 in A.3 and A.4, AT THE SAME TIME as you increase 16 chain-spaces evenly on round = 64 chain-spaces. Continue by working armholes – see description below. SIZE XXL/XXXL: Work A.3 and A.4 2 times in height, increase 16 chain-spaces evenly on round every time you work round 2 in A.4 = 64 treble crochet groups/chain-spaces. Continue by working round 1 in A.3 and A.4, then work round 2 in A.3 and A.4, AT THE SAME TIME as you increase 12 chain spaces evenly on round = 76 chain-spaces. Continue by working armholes – see description below. ARMHOLES – ALL SIZES: Now work the last round in A.4 and work the armhole as follows: Work 3 double treble crochets together + 4 chain stitches in each of the first 6-7-8 chain-spaces, work 3 double treble crochets together in the next chain-space, work 22-26-30 chain stitches and skip 5-6-7 chain-spaces, work 3 double treble crochets together + 4 chain stitches in each of the next 23-35-43 chain-spaces, work 3 double treble crochets together in the next chain-space, work 22-26-30 chain stitches and skip 5-6-7 chain-spaces, work 3 double treble crochets together + 4 chain stitches in each of the last 7-8-9 chain-spaces. Continue with the first round in A.3 and A.4, around the chain-spaces for the armhole, work 6-7-8 treble crochet groups = 48-64-76 treble crochet groups. Continue with A.3 and A.4, repeat the 3 rounds in height and increase 12 chain-spaces evenly on the round every time you work round 2 in A.4. NOTE! In size S/M increase 16 chain-spaces the first time, then increase 12 chain-spaces. Continue until the piece measures approx. 110-120-130 cm in diameter– READ MEASUREMENT TIP! Cut and fasten the strand. SLEEVE: The sleeve is worked with Air. Start in the bottom corner of the armhole, work 1 double crochet, * 4 chain stitches, 1 double crochet around the next chain-space *, repeat from *-* as far as the other corner of the armhole = 6-7-8 chain-spaces, work 6-7-8 chain-spaces on the other side of the armhole in the same way = 12-14-16 chain-spaces. Continue with A.5 and A.6 and decrease 1 chain-space on round 2 – READ DECREASE TIP! = 11-13-15 chain-spaces. Repeat the 3 rounds in height. Continue to decrease every time round 2 is worked until there are 7-8-9 chain-spaces left on the round. When the sleeve measures 50 cm in all sizes – REMEMBER MEASUREMENT TIP, work 2 rounds with Big Delight, cut and fasten the strand. Work the other sleeve in the same way. |
||||||||||||||||||||||||||||||||||
Diagram explanations |
||||||||||||||||||||||||||||||||||
|
||||||||||||||||||||||||||||||||||
Have you made this or any other of our designs? Tag your pictures in social media with #dropsdesign so we can see them! Do you need help with this pattern?You'll find tutorial videos, a Comments/Questions area and more by visiting the pattern on garnstudio.com. © 1982-2024 DROPS Design A/S. We reserve all rights. This document, including all its sub-sections, has copyrights. Read more about what you can do with our patterns at the bottom of each pattern on our site. |
With over 40 years in knitting and crochet design, DROPS Design offers one of the most extensive collections of free patterns on the internet - translated to 17 languages. As of today we count 304 catalogues and 11422 patterns - 11422 of which are translated into English (UK/cm).
We work hard to bring you the best knitting and crochet have to offer, inspiration and advice as well as great quality yarns at incredible prices! Would you like to use our patterns for other than personal use? You can read what you are allowed to do in the Copyright text at the bottom of all our patterns. Happy crafting!
Comments / Questions (18)
Sofia E wrote:
I absolutely love this but must agree very difficult to read pattern.
05.11.2023 - 20:53Isabelita Rodriguez wrote:
Hola, es primera vez que utilizo esta aplicación. Tengo sificultades para entender el patrón, el abrigo a realizar, es para una clienta y quiere ese diseño esclusivamente. Necesito ayuda, por favor
31.07.2021 - 06:30DROPS Design answered:
Hola Isabelita, tienes bajo el patrón vídeos y lecciones que pueden ayudarte a realizar la labor. Sin una duda concreta es díficil ofrecerte ayuda más específica. Te recomendamos acudir a la tienda DROPS más cercana para que te ayuden de forma más personalizada.
31.07.2021 - 17:47Eliana wrote:
Bonjour. Pourriez vous faire une video pour ce magnifique modèle ? Merci
27.12.2020 - 00:54DROPS Design answered:
Bonjour Eliana;, nous ne pouvons malheureusement pas faire de vidéo pour chacun de nos modèles, pour vous aider à réaliser cette veste, vous pourrez trouver ici comment lire un diagramme crochet, si vous avez une question, n'hésitez pas à la poser ici, ou à contacter votre magasin pour toute assistance individuelle complémentaire. Bon crochet!
04.01.2021 - 09:23José Hagen Weustink Hendrikjesweg 29 Hattem wrote:
Hoe minder ik de lossenlus in dit patroon bij de mouwen. Ik snap de beschrijving niet in het patroon.
18.11.2020 - 20:15DROPS Design answered:
Dag José,
Dit staat bij de 'TIP VOOR HET MINDEREN'; je mindert door 2 lossen over te slaan in plaats van 1 losse, 2 keer verdeeld op de toer.<.p>
19.11.2020 - 10:23Nelly Hilton wrote:
Could you please tell me what ply you use, as that is on the label here. Names of wool used does not tell me anything
03.12.2019 - 00:24DROPS Design answered:
Dear Mrs Hilton, you will find all relevant informations on the shadecards to DROPS Air and DROPS Big Delight - for any further individual information you can contact your DROPS store per email. Happy crocheting!
03.12.2019 - 11:06Linda Collier wrote:
I have been certain crocheting for 40 years and am close to the expert level but can’t make head or tail of this pattern. Why don’t you write down what to do (the stitches to use and stitch count in each row) in words the way every other pattern in the world does instead of having six different graphs? I’ve actually made circle sweaters from regular patterns, but your looks so complicated that I won’t be attempting it when there are conventional patterns that are much more user friendly.
15.08.2019 - 15:39DROPS Design answered:
Dear Mrs Collier, The DROPS patterns are knitted and crocheted by thousands and thousands of people around the world. We understand however that in certain countries, with different knitting/crochet traditions than Scandinavia, our patterns might be written in a way that differs from what some are used to. But of course we want everyone to understand our patterns, so that’s why we have created an extensive library of tutorial videos as well as step by step lessons that explain how to follow the techniques we use and how to read the diagrams in our patterns. Give them a try!
15.08.2019 - 16:29Nina wrote:
Where can we buy these yarns in the US?
04.03.2019 - 18:36DROPS Design answered:
Dear Nina, please find here DROPS stores shipping to US. Happy crocheting!
05.03.2019 - 09:43Nina wrote:
Is this really the same as the fall festival 171-21?
04.03.2019 - 17:40DROPS Design answered:
Hi Nina! It looks like the Fall Festival but it is not the same. Please see the diagrams. Happy crocheting!
04.03.2019 - 18:26Antonina wrote:
Buongiorno,sono interessata a questo modello e lo vorrei riprodurre,gentilmente mi dice quanta lana in totale devo comprare sia della air che della big delight? grazie mille in anticipo
29.08.2018 - 14:39DROPS Design answered:
Buongiorno Antonina. Trova l’indicazione della quantità del filato occorrente all’inizio delle spiegazioni. A seconda della taglia che deve lavorare il quantitativo sarà il seguente (le taglie previste sono nell’ordine: S/M – L/XL – XXL/XXXL): del filato AIR 300-350-400 g e del filato Big DELIGHT 100-100-100 g. Buon lavoro!
29.08.2018 - 15:15Online Marketing Total Front Page wrote:
By moving a portion of one's money offshore, you are able to allow a sudden escape valve. You should get the place of your respective land right and also this requires some homework however the opportunity is offered to all. "I had one indisputable fact that never changed i believe - that you need to make use of wealth to help individuals," Feeney said.
12.07.2017 - 18:40