Clicking the ORDER button will redirect you to Wool Warehouse Direct Ltd website
The yarn cost is calculated from the pattern’s smallest size and the yarn’s cheapest product type. Looking for an even better price? You might find it on the DROPS Deals!
-------------------------------------------------------
Alternative Yarn – See how to change yarns here
Yarn Groups A to F – Use the same pattern and change the yarn here
Yarn usage using an alternative yarn – Use our yarn converter here
-------------------------------------------------------
Clicking the ORDER button will redirect you to Wool Warehouse Direct Ltd website
The yarn cost is calculated from the pattern’s smallest size and the yarn’s cheapest product type. Looking for an even better price? You might find it on the DROPS Deals!
This pattern has been corrected. Click here to see the correction/s.
= knit from the right side, purl from the wrong side | |
= purl from the right side, knit from the wrong side | |
= between 2 stitches make 1 yarn over | |
= knit 2 together | |
= slip 1 stitch knitwise, knit 1, pass slipped stitch over stitch worked | |
= slip 1 stitch on cable needle in front of piece, knit 1, knit 1 from cable needle | |
= slip 1 stitch on cable needle behind piece, knit 1, knit 1 from cable needle |
Each of our patterns has specific tutorial videos to help you.
These step-by-step tutorials might also help you:
Why is the knitting/crochet tension so important?
Knitting tension is what determines the final measurements of your work, and is usually measured per 10 x 10 cm. It is provided like so: number of stitches in width x number of rows in height - eg: 19 stitches x 26 rows = 10 x 10 cm.
The knitting tension is very individual; some people knit/crochet loosely while others work tightly. You adjust the knitting tension with the needle size, which is why the suggested needle size is only meant as a guide! You need to adjust this (up or down) to ensure that YOUR knitting tension matches the knitting tension provided in the pattern. If you work with a different knitting tension than provided you will have a different yarn consumption, and your work will have different measurements than what the pattern suggests.
The knitting tension also determines which yarns can replace each other. As long as you achieve the same knitting tension you can replace one yarn with another.
See DROPS lesson: How to measure your tension/gauge
See DROPS video: How to make a gauge tension swatch
How do I know how many balls of yarn I need?
The required amount of yarn is provided in grams, eg: 450 g. To calculate how many balls you’ll need you first need to know how many grams are in 1 ball (25g, 50g or 100g). This information is available if you click on the individual yarn quality on our pages. Divide the amount required with the amount of each ball. For example, if each ball is 50g (the most common amount), the calculation will be as follows: 450 / 50 = 9 balls.
Can I use a different yarn than what the pattern suggests?
The important thing when changing from one yarn to another is that the knitting/crochet tension remains the same. This is so that the measurements of the finished piece will be the same as on the sketch provided. It is easier to achieve the same knitting tension using yarns from the same yarn group. It is also possible to work with multiple strands of a thinner yarn to achieve the knitting tension of a thicker one. Please try our yarn converter. We recommend you to always work a test swatch.
Please NOTE: when changing yarn the garment might have a different look and feel to the garment in the photo, due to individual properties and qualities of each yarn.
See DROPS lesson: Can I use a different yarn than the one mentioned in the pattern?
What are the yarn groups?
All our yarns are categorised into yarn groups (from A to F) according to thickness and knitting tension – group A contains the thinnest yarns and group F the thickest. This makes it easier for you to find alternative yarns to our patterns, should you wish to switch yarn. All yarns within the same group have a similar knitting tension and can easily replace each other. However, different yarn qualities have different structures and properties which will give the finished work a unique look and feel.
How do I use the yarn calculator?
At the top of all our patterns you’ll find a link to our yarn calculator, which is a helpful tool should you wish to use a different yarn than suggested. By filling in the yarn quality you wish to replace, the amount (in your size) and number of strands, the calculator will present good alternative yarns with the same knitting tension. Additionally it will tell you how much you’ll require in the new qualities and whether you’ll need to work with multiple strands. Most skeins are 50g (some are 25g or 100g).
If the pattern is worked with multiple colours, every colour will have to be calculated separately. Similarly, if the pattern is worked with several strands of different yarns (for example 1 strand Alpaca and 1 strand Kid-Silk) you will have to find alternatives for each, individually.
Why do you show discontinued yarns in the patterns?
Since different yarns have different qualities and textures we have chosen to keep the original yarn in our patterns. However, you can easily find options among our available qualities by using our yarn calculator, or simply pick a yarn from the same yarn group.
It is possible that some retailers still have discontinued yarns in stock, or that someone has a few skeins at home that they would like to find patterns for.
The yarn calculator will provide both alternative yarn as well as required amount in the new quality.
What size should I knit?
If you think it's hard to decide what size to make, it can be a good idea to measure a garment you own already and like the size of. Then you can pick the size by comparing those measures with the ones available in the pattern's size chart.
You'll find the size chart at the bottom of the pattern.
See DROPS lesson: How to read size chart
Why do I get the wrong knitting tension with the suggested needle size?
The needle size provided in the pattern serves only as a guide, the important thing is to follow the knitting tension. And since knitting tension is very individual, you will have to adjust the needle size to ensure that YOUR tension is the same as in the pattern – maybe you’ll have to adjust 1, or even 2 needle sizes, up or down to achieve the correct tension. For this, we recommend that you work test swatches.
Should you work with a different knitting tension than the one provided, the measurements of the finished garment might deviate from the measurement sketch.
See DROPS lesson: How to measure your tension/gauge
See DROPS video: How to make a tension/gauge swatch
Why is the pattern worked top-down?
Working a garment top-down provides more flexibility and room for personal adjustment. For example it is easier to try the garment on while working, as well as making adjustments to length of yoke and shoulder caps.
The instructions are carefully explaining every step, in the correct order. Diagrams are adjusted to the knitting direction and are worked as usual.
How do I work according to a knitting diagram?
The diagram depicts all rows/rounds, and every stitch seen from the right side. It is read from bottom to top, from right to left. 1 square = 1 stitch.
When working back and forth, every other row is worked from the right side and every other row is worked from the wrong side. When working from the wrong side, the diagram will have to be worked reversed: from left to right, knit stitches are purled, purl stitches are knit etc.
When working in the round every round is worked from the right side and the diagram are worked from right to left on all rounds.
See DROPS lesson: How to read knitting diagrams
How do I work according to a crochet diagram?
The diagram depicts all rows/rounds, and every stitch seen from the right side. It is worked from bottom to top, from right to left.
When working back and forth every other row is worked from the right side: from right to left and every other row is worked from the wrong side: from left to right.
When working in the round, every row in the diagram are worked from the right side, from right to left.
When working a circular diagram you start in the middle and work your way outwards, counter clockwise, row by row.
The rows usually start with a given number of chain stitches (equivalent to the height of the following stitch), this will either be depicted in the diagram or explained in the pattern.
See DROPS lesson: How to read crochet diagrams
How do I work several diagrams simultaneously on the same row/round?
Instructions for working several diagrams after each other on the same row/round, will often be written like so: “work A.1, A.2, A.3 a total of 0-0-2-3-4 times". This means you work A.1 once, then A.2 is worked once, and A.3 is repeated (in width) the number of times provided for your size – in this case like so: S = 0 times, M = 0 times, L=2 times, XL= 3 times and XXL = 4 times.
The diagrams are worked as usual: begin with the first row in A.1, then work the first row in A.2 etc.
See DROPS lesson: How to read knitting diagrams
See DROPS lesson: How to read crochet diagrams
Why are the sleeves shorter in larger sizes?
The total width of the garment (from wrist-to-wrist) will be larger in the larger sizes, despite the actual sleeves being shorter. The larger sizes have longer sleeve caps and wider shoulders, so there will be a good fit in all sizes.
Where on the garment is the length measured?
The measurement sketch/schematic drawing provides information regarding the full length of the garment. If it’s a jumper or a jacket the length is measured from the highest point on the shoulder closest to the neckline, and straight down to the bottom of the garment. It is NOT measured from the tip of shoulder. Similarly, the length of yoke is measured from the highest point on the shoulder and down to where yoke is split into body and sleeves.
On a jacket measures are never taken along bands, unless specifically stated. Always measure inside band stitches when measuring the length.
See DROPS lesson: How to read a schematic drawing
What is a repeat?
Diagrams are often repeated on the round or in height. 1 repeat is the diagram the way it appears in the pattern. If it says to work 5 repeats of A.1 in the round, then you work A.1 a total of 5 times after/next to each other in the round. If it says to work 2 repeats of A.1 vertically/in height you work the entire diagram once, then begin again at the start and work the entire diagram one more time.
Why does the piece start with more chain stitches than it’s worked with?
Chain stitches are slightly narrower than other stitches and to avoid working the cast-on edge too tight, we simply chain more stitches to begin with. The stitch count will be adjusted on the following row to fit the pattern and measurement sketch.
Why increase before the rib edge when the piece is worked top-down?
The rib edge is more elastic and will contract slightly compared to, for example, stocking stitch. By increasing before the rib edge, you avoid a visible difference in width between the rib edge and the rest of the body.
Why increase in the cast-off edge?
It’s very easy to cast off too tightly, and by making yarn overs while casting off (and simultaneously casting these off) you avoid a too tight cast off edge.
See DROPS video: How to bind off with yarn overs (yo)
How do I increase/decrease on every 3rd and 4th row/round alternately?
To achieve an even increase (or decrease) you can increase on, for example: every 3rd and 4th row alternately, like so: work 2 rows and increase on the 3rd row, work 3 rows and increase on the 4th. Repeat this until the increase is complete.
See DROPS lesson: Increase or decrease 1 st on every 3rd and 4th row alternately
How can I work a jacket in the round instead of back and forth?
Should you prefer to work in the round instead of back and forth, you may of course adjust the pattern. You’ll need to add steeks mid-front (usually 5 stitches), and follow the instructions. When you would normally turn and work from the wrong side, simply work across the steek and continue in the round. At the end you’ll cut the piece open, pick up stitches to work bands, and cover the cut edges.
See DROPS video: How to knit steeks and cut open
Can I work a jumper back and forth instead of in the round?
Should you prefer to work back and forth instead of in the round, you may of course adjust the pattern so you work the pieces separately and then assemble them at the end. Divide the stitches for the body in 2, add 1 edge stitch in each side (for sewing) and work the front and back pieces separately.
See DROPS lesson: Can I adapt a pattern for circular needles into straight needles?
Why is the pattern slightly different than what I see in the photo?
Pattern repeats can vary slightly in the different sizes, in order to get the correct proportions. If you’re not working the exact same size as the garment in the photo, yours might deviate slightly. This has been carefully developed and adjusted so that the complete impression of the garment is the same in all sizes.
Make sure to follow instructions and diagrams for your size!
How do I make a women’s size garment into a men’s size one?
If you have found a pattern you like which is available in women’s size it’s not very difficult to convert it to men’s size. The biggest difference will be the length of sleeves and body. Start working on the women size that you think would fit across the chest. The additional length will be worked right before you cast off for the armhole/sleeve cap. If the pattern is worked top-down you can add the length right after the armhole or before the first decrease on sleeve.
Regarding additional yarn amount, this will depend on how much length you add, but it is better with a skein too many than too few.
How do I prevent a hairy garment from shedding?
All yarns will have excess fibres (from production) that might come off as lint or shedding. Brushed yarns (ie hairier yarns) have more of these loose, excess fibres, causing more shedding.
Shedding also depends on what is worn under or over the garment, and whether this pulls at the yarn fibres. It’s therefore not possible to guarantee that there will be no shedding
Below are some tips on how to get the best result when working with hairier yarns:
1. When the garment is finished (before you wash it) shake it vigorously so the looser hairs come off. NOTE: do NOT use a lint roller, brush or any method that pulls at the yarn.
2. Place the garment in a plastic bag and put it in your freezer - the temperature will cause the fibres to become less attached to each other, and excess fibres will come off easier.
3. Leave in the freezer for a few hours before taking it out and shaking it again.
4. Wash the garment according to the instructions on the yarn label.
Why does my garment pill?
Pilling is a natural process that happens to even the most exclusive of fibers. It's a natural sign of wear and tear that is hard to avoid, and that is most visible in high friction areas of your garment like a sweater's arms and cuffs.
You can make your garment look as new by removing the pilling, using a fabric comb or a pill/lint remover.
Für Elise |
||||||||||||||||||||||
|
|
|||||||||||||||||||||
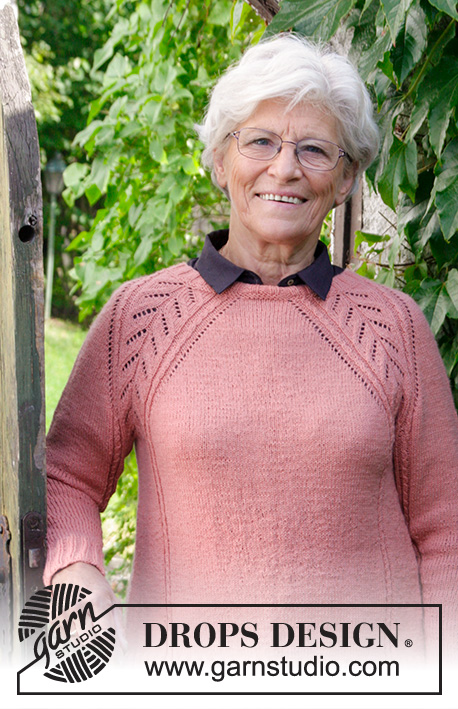
Knitted jumper with raglan, lace pattern, cables, and A-shape, knitted top down. Size: S - XXXL Piece is knitted in DROPS Flora.
DROPS 179-23 |
||||||||||||||||||||||
INFORMATION FOR PATTERN: GARTER STITCH (back and forth): 1 ridge = knit 2 rows. INCREASE TIP (evenly): To calculate how to increase evenly, use the number of stitches increases are done over (e.g. 28 stitches) and divide this number by number of increases to be done (e.g. 3) = 9.3. I.e. in this example increase by making a yarn over after approx. every 9th stitch. On next round knit the yarn over twisted to avoid hole. PATTERN: See diagrams A.1 to A.3. Diagrams show all rows in pattern seen from the right side. RAGLAN: Increase for raglan on each side of every repetition A.1 (= 8 increases on round) Increase 1 stitch by making 1 yarn over on each side of A.1. On next round knit the yarn overs to make holes. INCREASE TIP (applies to sides of body): Work until 5 stitches remain before marker, make 1 yarn over, knit 10 (marker thread is in the middle of these 10 stitches), make 1 yarn over (= 2 stitches increased). On next round knit yarn overs twisted to avoid holes. ---------------------------------------------------------- JUMPER: Worked in the round on circular needle. Work top down. Beginning of round is mid back. Work sleeves in the round on double pointed needles. YOKE: Cast on 125-125-130-130-140-145 stitches on a short circular needle size 2.5 mm with Flora. Knit 1 round. Then work rib = knit 2/purl 3 until piece measures 3 cm. Knit 1 round while increasing stitches as follows: Knit 28-28-28-28-30-30 while AT THE SAME TIME increasing 1-3-3-3-3-4 stitches evenly over these stitches – read INCREASE TIP (evenly), * 1 yarn over, knit 1 *, work *-* 6-6-9-9-10-12 times in total, knit 57-57-56-56-60-61 while AT THE SAME TIME increasing 3-3-4-4-4-5 stitches evenly over these stitches, * 1 yarn over, knit 1 *, work from *-* 6-6-9-9-10-12 times in total, knit 28-28-28-28-30-30 while AT THE SAME TIME increasing 1-3-3-3-3-4 stitches evenly over these stitches = 142-146-158-158-170-182 stitches. Knit 1 round where all the yarn overs are knitted twisted (to avoid holes). Purl 1 round, knit 1 round and purl 1 round. Switch to circular needle size 3 mm. REMEMBER THE KNITTING TENSION! Now work pattern as follows: Knit 5-6-9-9-12-15 (= half back piece), A.1 (= 28 stitches), knit 5 (= sleeve), A.1, knit 10-12-18-18-24-30 stitches (= front piece), A.1, knit 5 (= sleeve), A.1, knit 5-6-9-9-12-15 (= half back piece). Continue pattern like this AT THE SAME TIME on next round begin increase for RAGLAN – see explanation above. Increase like this every other round 23-27-29-33-36-38 times in total = 326-362-390-422-458-486 stitches. Work without increase until piece measures 22-25-26-28-30-31 cm from cast-on edge mid back and down! Now divide piece for body and sleeves. NOTE: Middle of A.1 is not transition between body and sleeves! Continue with A.2 (= 6 stitches) over the first 6 stitches in A.1 and work A.3 (= 6 stitches) over the last 6 stitches in A.1, knit over the middle 16 stitches of A.1. Work next row as follows: Work 46-50-54-60-66-72 stitches (= half back piece), slip the next 71-81-87-91-97-99 stitches on a stitch holder (= sleeve), cast on 8-10-12-12-14-16 new stitches under sleeve, work the next 92-100-108-120-132-144 stitches (= front piece), slip the next 71-81-87-91-97-99 stitches on a stitch holder (= sleeve), cast on 8-10-12-12-14-16 new stitches under sleeve, work the remaining 46-50-54-60-66-72 stitches (= half back piece). NOW MEASURE PIECE FROM HERE! BODY: = 200-220-240-264-292-320 stitches. Insert 1 marker thread in the middle of the new stitches cast-on under each sleeve in each side (= 4-5-6-6-7-8 new stitches on each side of marker thread) and 100-110-120-132-146-160 stitches between marker threads. Continue in the round in stocking stitch, A.2 and A.3 as before. When piece measures 4 cm, increase 1 stitch on each side of marker thread in the side - read INCREASE TIP (= 4 stitches increased). Increase like this every 6th round 10 times in total in all sizes = 240-260-280-304-332-360 stitches. When piece measures 23-22-23-23-23-24 cm, divide the piece for front and back piece as follows: Work the first 28-33-38-42-48-53 stitches and increase at the same time 9-12-14-18-19-22 stitches evenly, work A.2, work 25-25-25-27-28-30 stitches and increase at the same time 7-7-7-10-9-12 stitches evenly, cast off the next 2 stitches (= vent), work 25-25-25-27-28-30 stitches and increase at the same time 7-7-7-10-9-12 stitches evenly, work A.3, work 56-66-76-84-96-106 stitches and increase 18-23-28-35-38-43 stitches evenly, work A.2, work 25-25-25-27-28-30 stitches and increase at the same time 7-7-7-10-9-12 stitches evenly, cast off the next 2 stitches (= vent), work 25-25-25-27-28-30 stitches and increase at the same time 7-7-7-10-9-12 stitches evenly, work A.3, work the remaining 28-33-38-42-48-53 stitches and increase at the same time 9-11-14-17-19-21 stitches evenly. Cut the yarn. Slip the stitches for back piece on a stitch holder. RIB FRONT PIECE: = 150-165-180-205-220-245 stitches. Work rib back and forth. Switch to circular needle size 2.5 mm. Work from right side as follows: 4 stitches in garter stitch, knit 2, * purl 3, knit 2 *, work from *-* until 4 stitches remain on row BUT continue with A.2 and A.3 over cables as before, and finish with 4 stitches in garter stitch. Continue like this back and forth until rib measures 7 cm. Cast off stitches with knit over knit and purl over purl. To avoid a tight cast-off edge cast off with a needle in a larger size. RIB BACK PIECE: = 150-165-180-205-220-245 stitches. Work as on rib on front piece. SLEEVE: Slip the 71-81-87-91-97-99 stitches from stitch holder in one side of piece on double pointed needles size 3 mm and pick in addition up 1 stitch in each of the 8-10-12-12-14-16 new stitches cast on under sleeve = 79-91-99-103-111-115 stitches. Insert a marker thread in the middle of the new stitches cast-on under sleeve (= 4-5-6-6-7-8 new stitches on each side of marker thread). Beginning of round is mid under sleeve. Work in stocking stitch in the round but continue with A.2/A.3 over the 2 small cables from raglan line. When sleeve measures 4 cm from division, decrease as follows: First decrease mid under sleeve: Work until 5 stitches remain before marker and knit 2 together, knit 6 (marker is between these stitches), slip 1 stitch knitwise, knit 1, pass slipped stitch over stitch worked (= 2 stitches decreased). Decrease like this every 8th-5th-4th-4th-3rd-3rd round 3-5-7-5-6-6 times in total = 73-81-85-93-99-103 stitches. Then decrease on the opposite side of A.2/A.3 (= on top side of sleeve), i.e. decrease as follows: Knit 5, work A.3, knit 1, knit 2 together, knit until 3 stitches remain before A.2, slip 1 stitch knitwise, knit 1, pass slipped stitch over (= 2 stitches decreased). Decrease like this every 8th-5th-4th-4th-3rd-3rd round 10-14-15-18-20-21 times in total = 53-53-55-57-59-61 stitches. Continue with stocking stitch and A.2/A.3 until sleeve measures 38-35-35-33-31-31 cm from division (NOTE: Shorter measurements in the larger sizes because of longer yoke). Work next round as follows: Work 5 stitches while increasing 2 stitches evenly, work A.3, work 31-31-33-35-37-39 stitches while increasing 8-8-11-9-7-10 stitches evenly, work A.2, work 5 stitches while increasing 2 stitches evenly = 65-65-70-70-70-75 stitches. Switch to double pointed needles size 2.5 mm. Now work rib as follows: Knit 1, purl 3, knit 2, purl 1, A.3, purl 1, * knit 2, purl 3 *, work from *-* 7-7-8-8-8-9 times, knit 2, purl 1, A.2, purl 1, knit 2, purl 3, knit 1. Continue rib in the round like this until rib measures 5 cm. Cast off stitches with knit over knit and purl over purl. To avoid a tight cast-off edge cast off with a needle in a larger size. Sleeve measures approx. 43-40-40-38-36-36 cm from division. Work the other sleeve the same way. |
||||||||||||||||||||||
Diagram explanations |
||||||||||||||||||||||
|
||||||||||||||||||||||
Have you made this or any other of our designs? Tag your pictures in social media with #dropsdesign so we can see them! Do you need help with this pattern?You'll find tutorial videos, a Comments/Questions area and more by visiting the pattern on garnstudio.com. © 1982-2024 DROPS Design A/S. We reserve all rights. This document, including all its sub-sections, has copyrights. Read more about what you can do with our patterns at the bottom of each pattern on our site. |
With over 40 years in knitting and crochet design, DROPS Design offers one of the most extensive collections of free patterns on the internet - translated to 17 languages. As of today we count 304 catalogues and 11422 patterns - 11422 of which are translated into English (UK/cm).
We work hard to bring you the best knitting and crochet have to offer, inspiration and advice as well as great quality yarns at incredible prices! Would you like to use our patterns for other than personal use? You can read what you are allowed to do in the Copyright text at the bottom of all our patterns. Happy crafting!
Comments / Questions (26)
Maryse wrote:
J'ai tricoté le col en côtes, je suis rendue aux augmentations et je ne comprends pas du tout! Dans ce premier rang d'augmentation : J'augmente de 28 m (soit aux 4 m) et en même temps 1 m à intervalle régulier (soit 28 m), puis 1 jeté, 1 m, 6 fois. Ces jetés doivent-elles être aux 28 m? 6 fois? Est-ce pour 6 rangs ou 6 fois dans le rang? Merci à l'avance de m'éclairer pour ce joli patron.
21.12.2018 - 04:40DROPS Design answered:
Bonjour Maryse, tricotez vos 125 m ainsi: 28 m end en augmentant 1-3 m (= 29-31 m end), puis vous tricotez 6 fois (1 jeté, 1 m end) (= vous avez ainsi 12 m), tricotez ensuite 57 m en augmentant 3 m (= vous avez 60 m), puis 6 fois (1 jeté, 1 m end) (= vous avez 12 m), et terminez par les 28 dernières m en augm. 1-3 m (= 29-31 m) soit: 29-31+12+60+12+29-31= 142 m en taille S et 146 m en taille M. Bon tricot!
21.12.2018 - 08:04Maria wrote:
Grazie ma ho ancora difficoltà. Quindi, se capisco bene, ricomincio il motivo centrale come all'inizio sulle righe 11 e 12. E poi? Ricomincio di nuovo da capo? Forse mi sfugge qualcosa. Grazie ancora
07.09.2018 - 08:54DROPS Design answered:
Buongiorno Maria. All'11° ferro riprende il primo ferro del motivo sulle maglie centrali e lo continua in modo che prosegua correttamente. Lavora le prime e ultime 6 maglie come indicato alle righe 11 e 12. Alla riga successiva, su queste maglie, ricomincia dall'inizio . Quindi la riga 13 diventa: prima riga del diagramma per le prime e ultime 6 maglie; terza riga per le maglie centrali. E' come se fossero due diagrammi separati. Buon lavoro.
07.09.2018 - 09:15Maria wrote:
Buongiorno. Non capisco come devo lavorare le righe 11 e 12, Cosa significano gli spazi bianchi dopo i primi 6 punti e prima degli ultimi 6? Grazie per il vostro aiuto. Maria
07.09.2018 - 08:28DROPS Design answered:
Buongiorno Maria. Alla riga 11, lavora le prime e le ultime sei maglie come indicato alla riga 11, le maglie centrali le lavora come la prima riga del diagramma A.1. Buon lavoro!
07.09.2018 - 08:34Marianne Steen wrote:
Det undrer mig da hele længden skal være 62 cm, at bærestykket er 28 cm, ryg og fortykke 23 cm og rib 7 cm. Det giver 58 cm. Hvor er så de sidste 4 cm. mvh Marianne Steen
11.02.2018 - 18:03DROPS Design answered:
Hej Marianne, det er de sidste 4 cm du får i selv raglanudskäringen. God fornöjelse !
12.02.2018 - 16:36Susanne Schweighofer wrote:
Hallo, ich habe folgende Frage: Es wird ja Diagramm A mehrmals wiederholt. Wie werden Reihe 11 und 12 gestrickt, es sind ja nur die ersten und letzten 6 Reihen gezeichnet? Wenn ich nach Reihe 10 wieder bei Reihe 1 beginne, stimmt mir das Zopfmuster nicht. Bitte um Info. Danke, lg, Susi
10.02.2018 - 15:57DROPS Design answered:
Liebe Frau Schweighofer, nach den 9. Reihen wiederholen Sie das mittlere Muster von Reihe 1 gleichzeitig die 6 ersten und letzten Maschen in A.1 wie im Diagram stricken, nach der 12. Reihe diese 2 x 6 M von der Reihe 1 wiederholen. Viel Spaß beim stricken!
12.02.2018 - 08:46Margret Schaloske wrote:
Hallo, wie komme ich zu Beginn der Passe von 130 M(bei L) auf 158M Es werden doch nur 2x3(bei je 28M) und 1x4 bei 56 M zugenommen,sind 10M wieso 9xZunahme?? Bitte um Aufklärung!? Danke und freundlichen Gruß Margret schaloske
09.01.2018 - 17:23DROPS Design answered:
Liebe Frau Schaloske, in der Größe L stricken Sie: 28 Maschen rechts stricken und gleichzeitig 3 Maschen gleichmäßig verteilt zunehmen (28+3=31) – * 1 Umschlag, 1 Masche rechts *, von *-* insgesamt 9 x arbeiten (= 2x9=18) , 56 Maschen rechts stricken und 4 Maschen gleichmäßig verteilt zunehmen (56+4=60), * 1 Umschlag, 1 Masche rechts *, von *-* insgesamt 9 x arbeiten (2x9=18), 28 Maschen rechts und 3 Maschen gleichmäßig verteilt zunehmen (28+3) = 31+18+60+18+31= 158 M. Viel Spaß beim stricken!
10.01.2018 - 08:50Elin Stensholm wrote:
Hvordan strikkes rad 11 og 12 på A1? Der det er blankt i midten
12.12.2017 - 11:32DROPS Design answered:
Hei Elin. Da begynner du på rad 1 igjen, mens flettene (der diagrammet går høyeste) i siden strikkes etter diagrammet (2 omganger til før du starter på omgang 1 igjen). Dette er fordi flettene i siden ikke går opp med mønstret i midten i høyden av A.1. God Fornøyelse!
12.12.2017 - 14:33Helle wrote:
Hei. Det er to blanke ruter i tegnforklaringen, hvor den ene sier 2 r sm, og rett på retten og vrang på vrangen. Regner med at 2 r sm skal ha motsatt strek av løft en strikk en løft første over. :)
09.11.2017 - 07:48Marie wrote:
Bonjour, et merci pour ce joli modèle. On doit faire des augmentations pour le raglan entre une maille endroit et une maille envers d'un coté et une maille envers et une maille endroit de l'autre. Quels types de jetés doit-on faire pour avoir des jours de la même dimension des deux côtés du raglan ?
30.10.2017 - 07:48DROPS Design answered:
Bonjour Marie, faites le même type de jeté, et essayez de les faire et de les tricoter de la même façon pour qu'ils aient la même taille - après le lavage/blocage, ils devraient ensuite s'égaliser, n'hésitez pas à vérifier sur un échantillon au préalable si besoin. Bon tricot!
30.10.2017 - 10:31Loredana wrote:
Buongiorno, sono arrivata alla divisione delle maglie tra dietro,davanti e maniche. Le istruzioni dicono di continuare con gli schemi A2 e A3 e a dritto le maglie intermedie (16 ).... le maglie aumentate sotto le maniche vanno lavorate a dritto? Grazie Loredana
20.10.2017 - 13:28DROPS Design answered:
Buongiorno Loredana. Le maglie aumentate sotto le maniche vanno lavorate a diritto. Buon lavoro!
20.10.2017 - 13:55